In this article, I will show you how you can create a custom post type in WordPress without a Plugin. Usually, if I need a custom post type in my site I use a plugin called Custom Post Type UI. Now there are 2 ways you can create a custom post type in WordPress without a plugin, and I will show you both. Let’s see the 1st way, that is by using functions.php.
Step 1: Make sure you have a child theme
Now, this is obvious if you want to make any changes to your theme. That is in case you have a theme downloaded from the WordPress repository. That’s because, if the parent theme is officially updated, and if you have not made a child theme, and done the customizing directly on the parent theme, your entire hard work will be lost.
So, it’s better to make a child theme. If you don’t know how to make a child theme, here’s a step by step guide on How to Create a WordPress Child Theme.
Step 2: Creating Custom Post Type
Assuming that you now have a child theme, let’s create our custom post type. In order to create a custom post type in our child theme, we need to open the functions.php file.
Inside that, We will create a function called:
function create_post_type() {
    // Your code here
}
Step 3: Register Post Type
Next, inside that, we need to register the custom post type, for now we will call our custom post type as “books”, Now that we created it.
In order to register the custom post type, you need to add the following code: register_post_type( 'books');
Now, your code should look something like this:
/**
 * Create Custom Post Type
 */
function create_post_type() {
    // Your code here
    register_post_type( 'books');
}
Step 4: Set up labels, public, and has archive
Now that we have registered our custom post type, we need to add in an array, which takes in some parameters like labels, public, and has archive.
To add those update your code to the following, and you code should look like this:
/**
 * Create Custom Post Type
 */
function create_post_type() {
    // Your code here
    register_post_type( 'books',
        array(
            'labels' => array(
                'name' => __( 'Books' ),
                'singular_name' => __( 'Book' )
            ),
            'public' => true,
            'has_archive' => true,
        )
    );
}
Step 5: Call the function with add_action
Now that we have created our custom post type, we need to call that with the function. To do that, add the code: add_action( 'init', 'create_post_type' );
So, your code should look like this:
/**
 * Create Custom Post Type
 */
function create_post_type() {
    // Your code here
    register_post_type( 'books',
        array(
            'labels' => array(
                'name' => __( 'Books' ),
                'singular_name' => __( 'Book' )
            ),
            'public' => true,
            'has_archive' => true,
        )
    );
}


add_action( 'init', 'create_post_type' );
Step 6: Access Custom Post Type in Dashboard
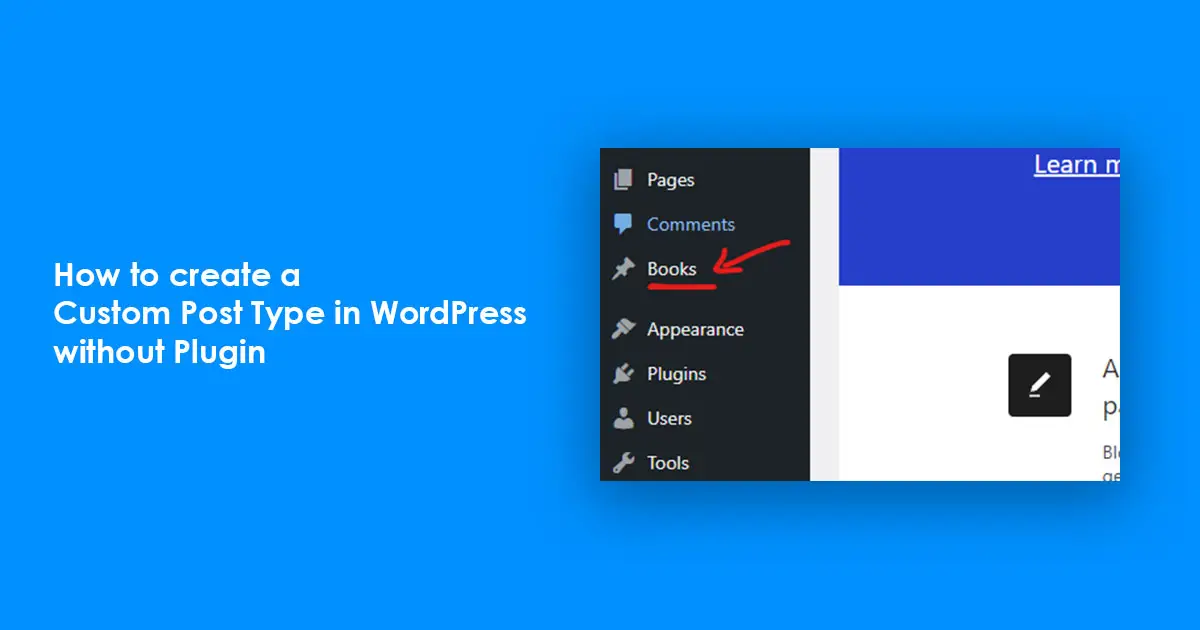
Since we have already added the code in our functions.php file, we can now go to the dashboard and access our Custom post type called books. Here’s the screenshot of the dashboard.
You can now click on that, and create custom posts for your website. Congratulations, you have successfully created a custom post type in WordPress without plugin.
Master Building Advanced Custom WordPress Themes with Our WordPress Theme Development Course!
8.5 Hrs of course contents, 12 Modules, and 81+ lessons. Learn from industry experts. Perfect for Beginners.
Source link