AMP stands for Accelerated Mobile Pages and is a way to make your website load faster on mobile devices. Fast-loading websites offer a better user experience and can improve traffic.
In this article, we will show you how to set up Google AMP in WordPress.
What is Google AMP?
Google’s Accelerated Mobile Pages is an open-source initiative that relies on bare minimal HTML and limited Javascript. AMP content is hosted in Google’s AMP cache, which is then served to your visitors instantly when they click on your result in search engines.
The AMP initiative is supported by both Google and Twitter, and the goal of the project is to make web content load faster for mobile users. Accelerated Mobile Pages work properly on every application, browser, and web viewer.
Google AMP Benefits :
- Firstly, AMP improves the loading time of your WordPress website on mobile devices. And everyone (including Google) loves faster websites.
- Google’s latest DoubleClick study shows that 53% of user bounce from websites that take longer than 3 seconds to load. That means more than half of the audience never sees your content if your site takes more than 3 seconds to load. AMP (Accelerated Mobile Pages) aims to fix this by loading web pages instantly.
- AMP Open Source JavaScript Library is highly cashable. Which ensures the snappy fast performance of your AMP pages.
- Having AMP on your site will reduce the load on your hosting servers, which will help improve website performance.
- although Google AMP enables you to achieve lightning-fast loading times, this can come at the expense of branding elements. AMP will remove particularly high-definition graphics, elaborate animations, and other flashy elements that use CSS and JavaScript.
- Google AMP’s high speeds can be partially attributed to the fact that it enables Google to display cached versions of your web pages. For this reason, your users may not always have access to the latest version of your content.
Who Should Implement AMP?
The straight answer is everyone who wants snappy fast web pages on mobile. If you are still not sure whether you should set up AMP or you should not. See the next points and make up your mind.
- If most of your site’s content is static (like a news site or a blog may be), then you should.
- As AMP does not support user-authored JavaScript. Therefore, sites with necessary dynamic content (like payment gateway for online payments) may hold back the implementation of AMP. Rather webmasters of such sites can explore AMP as Progressive Web App (PWA) or can embed AMP inside PWA.
How Does AMP Works?
In order to load a webpage instantly on mobile, the AMP ecosystem manages HTML, rendering of resources, caching, and optimization of the webpage.
AMP filters all that large HTML, uses inline & size-bound CSS, and loads the resources asynchronously. And at the same time, it retains the all-important content of the webpage. This is how AMP helps to render mobile-optimized content which loads instantly.
AMP is an ecosystem that creates and delivers mobile-optimized web pages called AMP Pages in general. These 3 key components of the AMP pages:
AMP HTML: A markup language like HTML but with custom AMP properties and some limitations for optimum performance. In other words, it is a subset of HTML. That is why, the one who knows HTML can easily adapt AMP HTML.
AMP JavaScript: AMP JS library is an environment for AMP pages. It helps fast rendering of AMP HTML pages. AMP JS library follows best performance practices like loading all JavaScripts asynchronously, sandboxing iframes, and pre-calculation of layout for all elements of the page before page resources are loaded.
AMP Cache: AMP Cache is a proxy-based Content Delivery Network that caches AMP pages, optimizes them and delivers them when it is required.
How to Enable Accelerated Mobile Pages in WordPress?
Accelerated Mobile Pages or AMP can be enabled by adding an amp link meta tag in the HTML tag <html> of your webpage. Search engines recognize amp meta tags and serve such webpages in AMP format. For example
<html amp>
  <body>
    Hello
  </body>
</html>
Because it is not an easy task to manually add an amp tag on all the pages of our website. Therefore, it’s a good idea to use readily available WordPress plugins to set up Accelerated Mobile Pages in WordPress.
How to Setup AMP on WordPress – A Step-By-Step Guide
The procedure described below will make your WordPress posts AMP Friendly but not the pages or homepage.
Step 1: Install the AMP Plugin
Automattic (that’s the company behind WordPress) has released a plugin for adding AMP support to WordPress websites. Although it is still in its early stages, it can successfully and easily add AMP support to your WordPress posts.
Install and Activate the AMP plugin by following this link
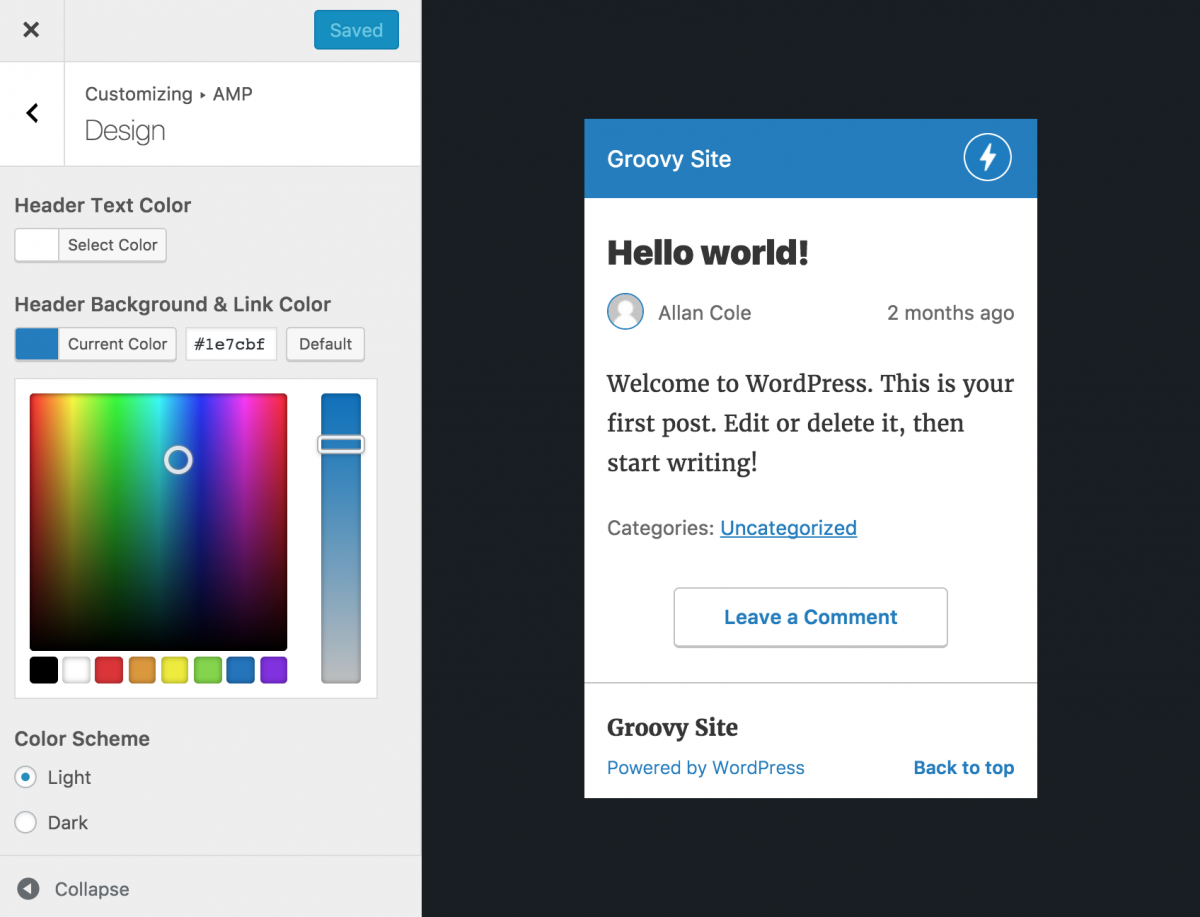
Step 2: Customization
You can go to Appearance → Customize → AMP → Design to alter the appearance of the AMP version of your posts. Because the AMP spec requires a minimal page design, you’ll see options to change the Header Text Color, Header Background, Link Color, and background color scheme.
Working with AMP :
To use the AMP plugin after installing and activating it, click on AMP in your dashboard.
Settings
In the AMP Settings, you will see three template modes:

Standard: In this mode, the plugin enables sites to have AMP as the only version of the content for both desktop and mobile. The entire site will be served as valid AMP pages (referred to as AMP-first).
In this mode there is no ? amp query added to any URLs.
Transitional: If available in your theme, AMP will rely on a theme’s template and styles when showing both AMP and non-AMP content. This means that your AMP and non-AMP content will have a similar look and feel.
In this mode the? amp query is added to URLs for AMP content.
In this case AMP, pages will usually only be seen on mobile from certain sources, such as Google searches and Twitter, or by manually adding the? amp query.
Reader: AMP content will be served in basic templates (with that blue bar at the top) which are separate from the templates in your active theme. Reader mode is less likely to interfere with functionality provided by a third-party theme or plugin.
In this mode, the URLs for AMP posts normally end in /amp/ whereas for pages they end in? amp.
Step 3: Add support for Analytics
To access AMP Analytics, you must have Google Analytics set up with your website. Please see how to set up Google Analytics here.
- In your Google Analytics account, click Admin → Property Settings and obtain the Property ID, which would look like UA-XXXXX-Y.
- Amend the following script, replacing the UA-XXXXX-Y with your property ID.
{
    "vars": {
        "account": "UA-XXXXX-Y"
    },
    "triggers": {
        "trackPageview": {
            "on": "visible",
            "request": "pageview"
        }
    }
}
3. Copy the script and in your site go to AMP → Analytics. In the type field, enter googleanalytics. Paste the code into the JSON Configuration field.

4. Click Save.
Step 4: Check your AMP implementation
There are a number of checks to make to ensure that your AMP pages look good but also comply with AMP guidelines. This is important because if there are errors in your implementation, Google will not take them into account.
1St Check -> Open a new browser window and navigate to one of your posts. Edit the URL and append /AMP at the end. For example, if this is your normal URL:
{domain}/
It will become:
{domain}/amp
This is how your AMP pages look like, of course, don’t forget that AMP pages are for MOBILE ONLY so to get an accurate picture of how they look, you need to repeat the same test on MOBILE.
2nd Check – > Install the AMP Validator Chrome Extension and then navigate to a page that has AMP support. Click the small AMP icon to see if you have any errors. If everything is ok, you will notice that the icon ![]() will become green.
will become green.
Conclusion
You work hard to create useful and informational content. And you definitely want your content to be seen by a large number of people. Also, you work on your site’s SEO to make sure that your content reaches a larger audience. Consequently a result of hard work, your site starts showing up higher in SERPs (Search Engine Result Pages).
But all of your efforts go in vain if the user jumps off your site because it took too long to load. This scenario is true for mobile and desktop users. And there a are lot of things that you can do to fix this. As it enables you to load your site instantly on mobile devices. Hence Accelerated Mobile Pages make the user experience better. Which is awesome for your audience as well as your site ranking.
Because of all these reasons, you must consider enabling Accelerated Mobile Pages on the WordPress website.
I hope this guide helps you to Enable Accelerated Mobile Pages in WordPress.

Source link