I recently moved to a new home, where I found that the light in my entryway was basically useless.
A mostly useless light
There are two switches for the light: one at the bottom of the stairs and one at the top. One would assume that flipping either switch would turn the light on or off, just like a typical 3-way switch. Instead, while the bottom switch functions as you’d think, the top switch can only turn the light off. When I come home, I want the light to automatically come on and stay on until I walk up the stairs; I don’t want to be playing the lightswitch puzzle game.
I wanted to find a way to automate the light without the hassle of installing new switches, or worse, running more wires. So I started investigating the thousands of smart bulb options. I didn’t need the light to change colors or react to the movie I’m watching; I just wanted a light that would reliably turn on when I opened my door.
I found a cheap 2-pack of smart bulbs that sounded perfect; however, when I went to purchase them, I realized that they didn’t support HomeKit, Apple’s home automation application. So, I started digging a little bit deeper and discovered Homebridge.
Are you an iPhone user? Are you a fan of home automation? Are you somewhat frustrated by the lack of adoption of Apple’s HomeKit? If so, it turns out you are not alone.
HomeKit is Apple’s home app for smart IoT (Internet of Things) device integration (you can learn more about it here). In typical Apple fashion, HomeKit requires more stringent security standards than competitive smart home apps.
Because of the more expensive hardware required to produce some of these devices, larger companies like Nest and Ring have opted out of HomeKit support. They may also be reluctant to support HomeKit because they are owned by some of Apple’s biggest competitors and want to entice users away from Apple’s sticky ecosystem. Whatever the reason, the fact remains that many of the more popular IoT devices aren’t available for HomeKit synchronization.
Enter Homebridge.
According to zdnet, “Homebridge is a NodeJS server that emulates the iOS HomeKit API to natively connect any unsupported smart devices to HomeKit.” In layman’s terms, Homebridge will be the middle man that allows your smart devices to work with HomeKit.
If you have a computer that you can leave running all the time (or maybe a less energy-intensive device like a Raspberry Pi), you can run a local node server that connects to your local wireless network, and pair it to HomeKit as if it was any other supported IoT device. Once Homebridge is connected, you can install plugins for the specific devices that you want to use in the HomeKit app that aren’t supported natively.
Agreed. But I wanted to try it out to see if it could be a reasonable solution for my lightbulb situation. So, I pulled out the Raspberry Pi 400 that’s been collecting dust in my closet for over a year and I started down the path of adding my Nest thermostats to my HomeKit using Homebridge.
Note: This is not intended to be a complete tutorial; you can find full tutorials for Raspberry Pi, Linux, Mac, Windows, and Docker on the Homebridge.io website. I only attempted to install Homebridge on a Raspberry Pi. I did not review installation steps on other platforms, so it is possible some are easier than others.
Once I was on the Homebridge website, I clicked the link for the platform I would be using Homebridge on: my Raspberry Pi. If you are hoping that the next steps are downloading a zip file, unpacking it, and hitting “finish,” this installation may not be for you.
Once I had Homebridge downloaded, I needed to open a terminal on my Raspberry Pi, add keys and repositories, and install packages. Four copy-pasted and lightly vetted terminal commands later, I had a local node server running with a decent user interface (UI) that I could view in a web browser. I didn’t need my terminal again after this step.
I then scanned the QR code on my screen and paired it with my HomeKit, but nothing really happened. Why? Because Homebridge with no plugins is really not doing anything.
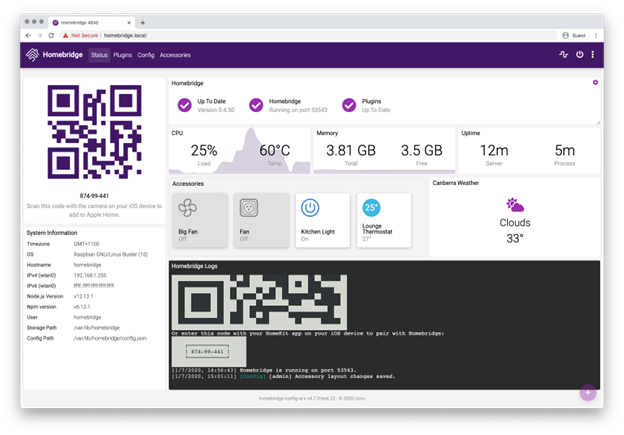
Sample Homebridge UI running on a local server
I found the Plugins button at the top of the screen and discovered that it was super easy to search npm for the plugins I needed. If you’re a software developer, you’re probably very familiar with npm and GitHub; otherwise, this is likely going to be a bit intimidating.
I searched for Nest, and found the homebridge-nest plugin. I reviewed it on GitHub and npm and noticed it gets hundreds of downloads per week, didn’t see any issues that really scared me, and decided it was safe enough for me to use.
Installing the plugin was not super easy. Because of the way Homebridge needs to authenticate with Google, I found myself inspecting network traffic and scraping cookies via the Chrome development tools. If this doesn’t sound fun, or you don’t know what this means, Homebridge is probably not for you.I have a firm grasp of the security risks and the directions were explicit enough, so I felt fine with this installation. Having said that, I would not expect most people in my life who don’t work in tech to figure this out.
After copy-pasting cookies into the app, I was able to pair my Nest thermostats to the HomeKit app with a couple of mouse clicks and by scanning another QR code. From my HomeKit, I’m now able to view the current temperature of the various zones in my home, turn the zones on or off, and set the temperature. Success.
HOOBS, HomeKit out of the Box, is supposed to be a simpler implementation than Homebridge, but it came with mixed reviews online. It’s still running the same software, but it has wrapped the software in a nice package that does some of the more annoying stuff for you. While the software is free to download, you’re still going to need to run it on something. The most convenient option is buying a box from HOOBS with the software already installed, but the $270 cost seems steep for a starter kit. Especially considering that you can get a Raspberry Pi for $70 (or, if they come back in stock, an older model that can run Homebridge for approximately $35).
However, the most simple option is to just buy things that already work with HomeKit. This is a reasonable option, but it forces you to be brand limited. It also doesn’t allow you to integrate anything incompatible that you already know and love.
Lastly, you can opt not to use HomeKit. I was managing my Nest thermostats just fine with the Google Home/Nest apps. What I was unable to do was use the Apple Home app to set the automation. Things like “when I unlock my front door, turn on the entryway light and the heat” are much simpler when they are all encompassed within the same app.
Do you care about being able to automate the smart devices in your house? Do you care about being able to control all of your smart devices from a single app? If not, then this probably isn’t necessary. For me, my garage door, some smart bulbs, a door lock, cameras, and thermostats all have mixed levels of support for HomeKit. Until I discovered Homebridge, I was mostly content with using all the different apps to control them since that’s just life post-2008. However, with Homebridge, I have the capability of running them all through the same app. All of these items have plugins available on Homebridge, so I’ll likely continue to play around with this some more. In the meantime, I just ordered the cheap smart bulbs We’ll see how it goes🤞.
Source link