In this series of articles, we consider the pros and cons of different ways to manage an M5Stack controller to build a machine learning application connected to the AWS IoT cloud. The series comprises 6 manuals with different languages, tools, and techniques.
Introduction to the M5Stack controller
M5Stack Core2 ESP32 IoT Development Kit for AWS IoT EduKit is a small controller based on ESP32 dual core ESP32-D0WDQ6-V3 processors with 8MB PSRAM and 16MB flash on board, dedicated to the AWS IoT EduKit program. It’s small, not-so-powerful, but it has a small touchscreen, card reader, microphone, speaker, vibration engine, accelerometer, gyroscope, 2.4Ghz Wi-Fi, and some colorful LEDs, so it’s perfect to be used as an IoT device for education.
Unfortunately, due to ESP32 architecture, it also has several significant limitations. The controller can’t be used as an IoT edge device for AWS Greengrass because there is no AWS Greengrass Core library for ESP32 so far. Besides that, it also can’t handle TinyML out of the box – all well-known learning libraries (like Tensorflow Lite or scikit-learn) require at least ARM processors to operate. The best you can do is to use Tensorflow Lite for Microcontrollers in C/C++ code or write your own ML logic in Micropython. If you want to use M5Stack to build a “learn on IoT edge” flow, you need to have at least an ARM-based Raspberry Pi (or similar) in your IoT network and use M5Stack to collect and pre-process data only.
How to work with M5Stack? The device is absolutely open, and you can flash the internal memory with everything you want. Of course, you need to cross-compile your software for ESP32, and it’s wise to add some M5Stack-related modules to handle at least the screen or some LED to know if it works. According to the documentation, there are a few recommended ways to manage your M5Stack device, so let’s discuss those possibilities and find the pros and cons.
UiFlow
The easy way first. UiFlow is a browser-based tool with a user-friendly block editor that uses OTA updates to deliver Micropython code to the device. There is also a desktop tool if you prefer to use USB cable more than OTA updates, but it’s already deprecated.
Preparation
To use UiFlow, you need to install proper firmware to M5Stack first. You need to install a CP210x_VCP driver dedicated to your OS on your computer (Windows, MacOS, and Linux versions are available) and then download and start a burning tool (small, portable app). You can find all of those on the official page https://docs.m5stack.com/en/quick_start/core2_for_aws/uiflow.
Now you can connect M5Stack controller to a USB port and verify the connection. To do that, open the burning tool and open the “COM Monitor” from the menu in the top right corner. If the device is connected, you should see the COM port attached to it by your OS. In my case, it’s COM3. The same port should be chosen by default in the drop-down menu in the top left corner.

If something is wrong, verify the driver installation, check your antivirus rules, and make sure the device is turned on. Sometimes, when you’ve made some mistake, the device looks like a bricked one (no LED, no screen), and it’s hard to recognize whether it is actually enabled or not.
Using the tool, you should install software prepared for Core2 only. It’s a good moment to play around and try to download and install, e.g., Core2_Tools (to test sensors) or some good old game prepared by the community. Be aware that most of the firmwares available in the burning tool are written for a basic M5Stack single-core controller, so you’ll be able to burn it to the device, but it won’t start at all. Don’t worry; in such a case, you can always burn another one. The official documentation suggests reducing the bitrate in case of burning errors, but I never had to do that.
Please note the debugging messages during burning. The tool uses esptool.py to burn firmware to the device, so in general, you can do the same from your console if you want.
Using UiFlow
Now, let’s burn UIFlow_Core2 firmware.
All you need to do is to pick the correct firmware, download it and burn. The burning tool will ask you for your Wi-Fi credentials. Remember, the device doesn’t support 5Ghz frequency, so you need to have a 2,4Ghz or 2,4/5Ghz mixed network to move on.
Now, it’s time to configure the firmware. Under the “configuration” button in the burning tool, you can pick one of three modes: App, USB, or Internet. In the App mode, you can start some application from the internal memory or configure USB or Internet mode directly using the controller’s screen. In the USB mode, you can upload and start an application from your computer (check Micropython and FreeRTOS sections). Internet mode is the way to use the web-based UiFlow.
After starting the controller in the Internet mode, you should see three important pieces of information.
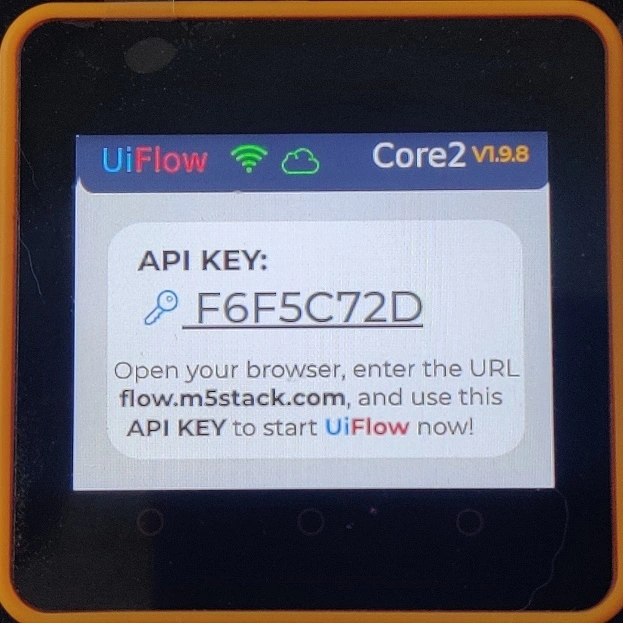
At the top bar, you can see the Wi-Fi icon and cloud synchronization icon. Both should be green. If the first one is red, you need to check your Wi-Fi configuration and make sure that you use a 2,4Ghz network and that the password is correct. In some rare cases, the device may be incompatible with your local router. It shouldn’t happen but well… It happened to me once, and I had to use another router to continue. If the cloud icon is red, maybe your local network isn’t connected to the Internet, or UiFlow servers are temporarily down.
In the center part of the screen, you can see the API KEY. You can use this identifier in your browser to update the device over-the-air. If you need to rotate your API KEY because e.g., you have compromised the key by posting a photo of your device with it in the blog article, and now everyone can update your device OTA, you can use the “Erase” button in the burning tool and burn the UiFlow_Core2 image again.
Now, you can open https://flow.m5stack.com in a browser and start coding. During the first start, the application should ask you to provide the API KEY and pick your M5Stack model.
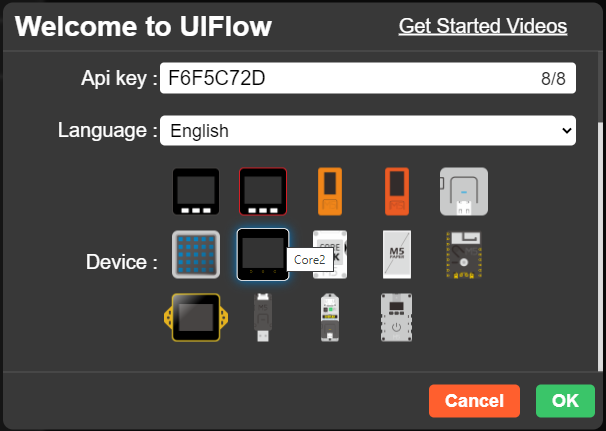
You can adjust those settings later using a small button in the bottom left corner.
The web tool is quite powerful.

At the center of the top bar, you can choose whether you want to use the block editor or if you prefer to write the Micropython code on your own. In the block mode, using the left bar, you can manage additional modules if you have some. In the code Python mode, you can also upload some small files to the device. You can run your code at the bottom right corner or open a Python console (using a COM port, not the Internet connection).
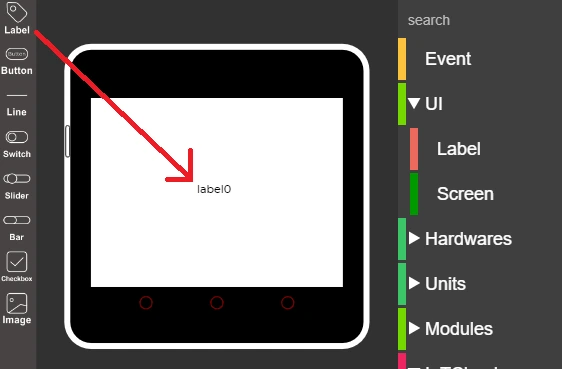
The top left section is the WYSIWYG editor – you can drag&drop UI components to your device’s screen.
Example
Let’s use UiFlow to implement some application. The aim is to connect the controller to the AWS IoT Core. The application will work in both ways – it will show on the device’s screen texts sent from the cloud via MQTT and send back the device position (from the built-in gyroscope). It’s just an example of both-way communication you can use for more complex tasks.
Let’s start from the AWS side. You can use a free tier account for this application if you don’t have a proper account yet.
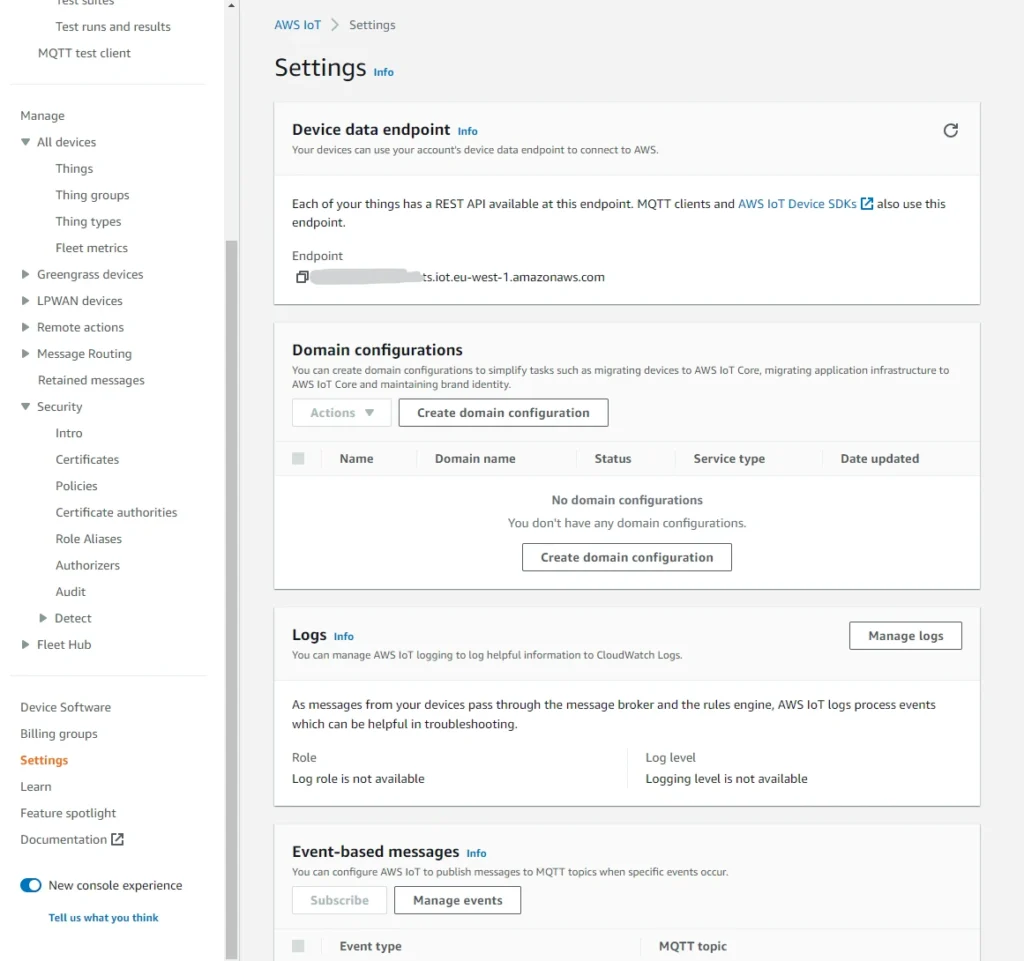
Open the AWS console and then the IoT Core service. From the left menu, pick Manage -> All devices -> Things.
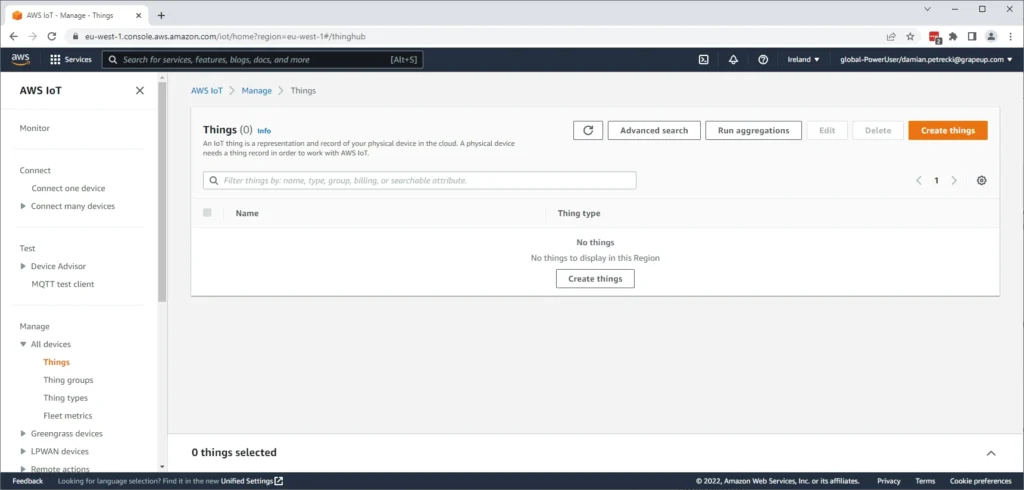
Create a new, single Thing (it’s enough for our use case so far). My Thing name is “UiFlow_test”. You can use whatever you want – we’re going to use the name at a later point. You can leave the rest of the Thing configuration with the default settings (no shadow, generate certificate, etc.). On the policies screen, create a new policy and copy-paste the following policy JSON definition:
{
  "Version": "2012-10-17",
  "Statement": [
    {
      "Effect": "Allow",
      "Action": "iot:*",
      "Resource": "*"
    }
  ]
}
Using allow-all policy is redundant for our use-case, so you can try to narrow your permissions if needed. You need to download certificates during the Thing creation wizard, because it won’t be possible later.

After downloading, rename the certificate and private key files to something shorter, because UiFlow doesn’t like long file names. You may download the Root CA certificates too. Those will be useful at a later stage.
OK, let’s create some code.
You’ll need all blocks from “IoTCloud -> AWS” section from the Blockly left menu, and also:
- “Event -> Loop”,
- “Timer -> Wait (s)”,
- “JSON -> dumps”,
- “Map -> create map”,
- 3x “Text -> empty”
- “Hardwares -> IMU -> Get X Gyr”,
- “Hardwares -> IMU -> Get Y Gyr”,
- “Hardwares -> IMU -> Get Z Gyr”,
- “UI -> Label -> Label show”.
The last one will appear in the menu after drag&drop’ing a label component from the very left menu to the controller preview screen.
Now, let’s do the puzzle and fill in the necessary data: Thing name, host URL, and topic names. I’ve user topic names: IoT_to_AWS and AWS_to_IoT. The endpoint URL is visible on the setting page in the AWS IoT console.
Please note you need to use the small “+” button in the AWS initialization block to upload the private key and certificate files before you can pick them for the “keyFile” and “certFile” fields, and you can add message fragments by clicking a bigger “+” button in the “create map” component. Your block editor should look like that:
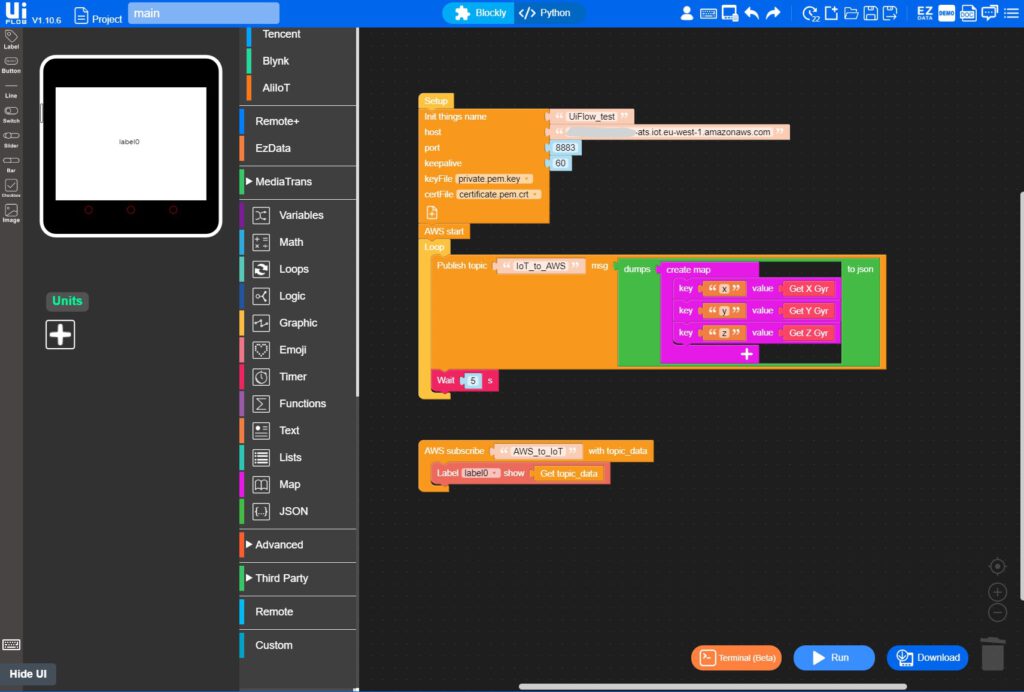
The generated code is as follows:
from m5stack import *
from m5stack_ui import *
from uiflow import *
from IoTcloud.AWS import AWS
import json

import time
import imu

screen = M5Screen()
screen.clean_screen()
screen.set_screen_bg_color(0xFFFFFF)

imu0 = imu.IMU()

label0 = M5Label('label0', x=134, y=109, color=0x000, font=FONT_MONT_14, parent=None)

def fun_AWS_to_IoT_(topic_data):
  # global params
  label0.set_text(str(topic_data))
  pass

aws = AWS(things_name="UiFlow_test", host=XXX-ats.iot.eu-west-1.amazonaws.com, port=8883, keepalive=60, cert_file_path="/flash/res/certificate.pem.crt", private_key_path="/flash/res/private.pem.key")
aws.subscribe(str('AWS_to_IoT'), fun_AWS_to_IoT_)
aws.start()
while True:
  aws.publish(str('IoT_to_AWS'),str((json.dumps(({'x':(imu0.gyro[0]),'y':(imu0.gyro[1]),'z':(imu0.gyro[2])})))))
  wait(5)
  wait_ms(2)
OK, let’s run the application and see what happens. If the controller doesn’t reset after your browser’s “resetting” message, you need to restart it manually and try again.
If you see the “label0” message on the controller’s screen, it’s time to open the AWS console and check the communication.
Go to the MQTT test client in the left menu of the AWS IoT service. Now you can subscribe to the IoT_to_AWS topic to collect the gyroscope data from the device, and you can publish something to the AWS_to_IoT topic to change the label on the device’s screen.
It’s all about your imagination; what do you want to do with the IoT device connected to the AWS cloud?
Micropython
We’ve learned the first steps with our M5Stack controller in the previous manual. This time, let’s leave the UI and use the good old IDE and console only.
To use this approach you need to burn the UIFlow_Core2 firmware in the same way as when configuring UiFlow. Wait a second… We already used this firmware and even wrote a Micropython code, so why does it deserve another section? This time we’re not going to use a fancy, block, web-based OTA tool but a good old Visual Studio Code.
Let’s start with the controller. All you need to do is to burn the UIFlow_Core2 and configure it in USB mode.
Now, let’s install VSCode and connect the controller. You can install the IDE directly from the official page https://code.visualstudio.com/. If you’re working on a Windows machine with WSL, the IDE will be available in both (Windows and Linux) environments. As we may need some extra libraries, easier to manage in Linux, let’s use VSCode from WSL. Let’s open WSL and run ‘code’. The newest IDE will be downloaded (if your version is obsolete) and run.
So far, so good, but there is an important obstacle when using WSL. First, you need WSL2, so please follow the official manual to upgrade: https://learn.microsoft.com/en-us/windows/wsl/install.
The second issue is USB forwarding. By default, USB ports are not available in the WSL environment. To change it, you need to use usbip. This tool will redirect all USB traffic via IP protocol to your Linux environment.
In WSL, you need to install two packages and set the default path for usbip.
sudo apt install linux-tools-5.15.0-47-generic hwdata
sudo update-alternatives --install /usr/local/bin/usbip usbip /usr/lib/linux-tools/5.15.0-47-generic/usbip 20
Now, please restart your WSL – close the terminal, call wsl –shutdown from the Windows command line and open the WSL terminal again. Please note, that the newest kernel version for me is 5.15.0-47 but you can have another one installed on your machine. Moreover, you need to install linux-tools-xxx-generic. You’ll see newest packages for not-generic usage available, but it’s not you’re looking for.
Now, using PowerShell console you need to install usbip and attach the correct port. It’s kind of strange, but you can install the tool and redirect the port using standard user privileges, but to detach the already attached port, you need to open PowerShell as Administrator. Therefore, it’s easier to start the PowerShell console as Administrator and call the following commands.
winget install usbipd
usbipd list
The output should look like that:
PS C:WINDOWSsystem32> usbipd list
Connected:
BUSID  VID:PID    DEVICE                                                        STATE
1-1    10c4:ea60  Silicon Labs CP210x USB to UART Bridge (COM3)                 Not shared
1-2    046d:c52b  Logitech USB Input Device, USB Input Device                   Not shared
1-10   0a5c:5834  Dell ControlVault w/ Fingerprint Touch Sensor, Microsoft...   Not shared
1-11   0c45:6717  Integrated Webcam                                             Not shared
1-14   8087:0aaa  Intel(R) Wireless Bluetooth(R)                                Not shared

Persisted:
GUID                                  DEVICE

usbipd: warning: Unknown USB filter 'edevmon' may be incompatible with this software; 'bind --force' may be required.
The warning in the last line is typical and there is nothing to be worried about. What we need is the busid of the CP210x device. In my case, the id is 1-1.
To attach and detach the controller to and from WSL environment, use following commands in the PowerShell console.
usbipd wsl attach –busid 1-1
usbipd unbind -b 1-1
If the device is attached, open your WSL console and run ‘lsusb’ for verification. The output should contains something similar to:
Bus 001 Device 002: ID 10c4:ea60 Silicon Labs CP210x UART BridgeThe device is connected, but so far, it’s available for root only.
You need to call ‘sudo chmod 666 /dev/ttyUSB0’ in your WSL to allow all users (and the IDE) to use it. If it doesn’t work, call ‘ls /dev/ttyUSB*’ to check the proper name of your USB connector.
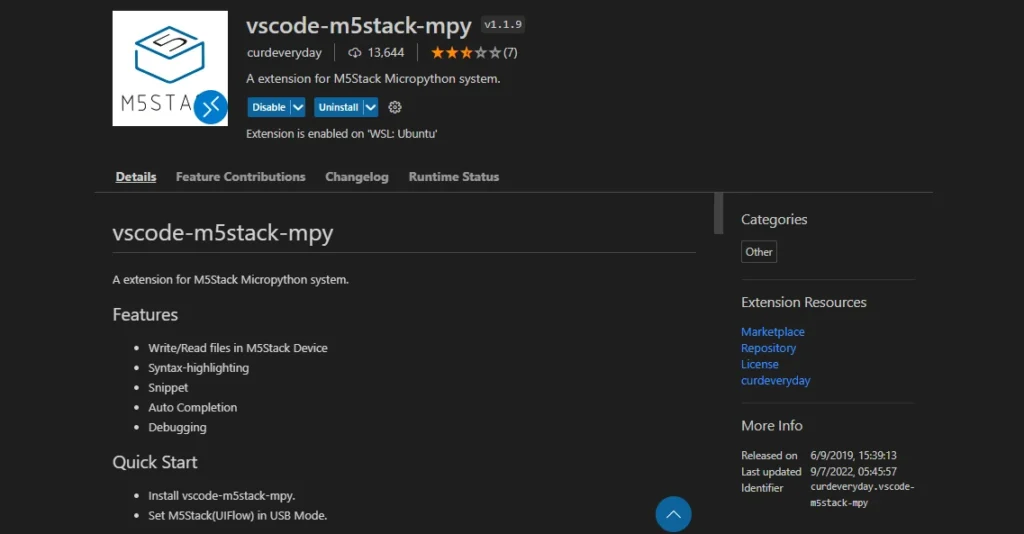
Now you can open VSCode (with ‘code’ command in WSL) and install the official vscode-m5stack-mpy plugin. Make sure, you have also the ‘WSL’ extension installed (it should be there by default).
When your IDE is set up, you should see a new button “Add M5Stack” in the bottom menu.
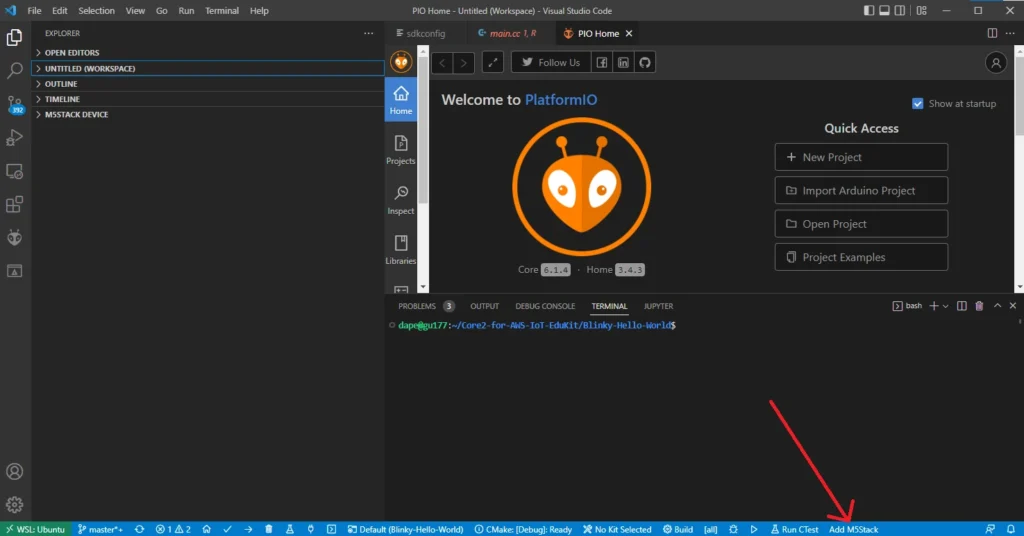
Hit it and pick the correct /dev/ttyUSB* device from the list. Now, in the Explorer view in the IDE, there is a new section called “M5Stack device”. Here you can directly manage the device memory using the Micropython language.
You can use the code from the UiFlow description for testing purposes. Just paste it to the main.py file on the controller and put the certificate and the private key files in the proper directory (according to the path in your code).
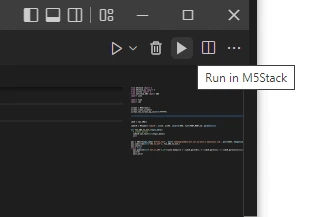
To run the code, click “Run in M5Stack” button in the top right corner.
Summary
UiFlow is a user-friendly web-based IDE with a block editor, WYSIWYG screen designer, and simple code management. It is powerful; however, it’s also limited to advanced usage. You can also use VS Code as a proper, popular IDE to create your application. You can play around with it, blink some LED on your controller or collect some extra data from external modules (if you have some). You need to be aware that Micropython is not the full Python but still preserves a developer-friendly syntax and some common libraries. However, on the other hand, there is no way to install any extra library to your code, so we can’t use TensorFlow with Micropython this way. We’ll try to address this issue in the next chapter of this article.
Source link