Disclaimer: Before trying to overclock a monitor be wary that not all models support overclocking. Even if this applies mostly to older devices, it is important to know what you are going for. Keep in mind that overclocking can void your manufacturer’s warranty, so do the research before you get started.
INTRODUCTION
Overclocking, in general, refers to increasing the speed at which a microprocessor can execute an instruction in a specific cycle. This includes monitors, CPUs (central processing unit) or GPUs (graphics processing unit). In more technical terms it is a practice of increasing the clock rate of a PC’s hardware to exceed the number certified by the manufacturer. The clock rate is measured in clock cycles per second or its equivalent, Hertz (Hz). Note, nowadays CPUs use gigahertz (GHz) to advertise their power levels, but in the context of our article, specifically monitors, we’ll keep stick with Hz. This is a useful metric for comparing hardware within the same family. Manufacturers select a benchmark unit and then place the price points higher or lower depending on the performance of different models.
When talking about overclocking a monitor, it specifically means changing and usually increasing its refresh rate from the base 60Hz. Refresh rate refers to the number of times per second a screen updates with an image(s) displaying on the monitor. Increasing the refresh rate results in getting a higher number of frames per second (FPS). Better refresh rates mean smoother graphics, as long as your system can handle the changes, specifically the GPU and CPU. For example, overclocking a monitor with a factory refresh rate of 60 Hz to 120 Hz means the monitor will refresh the image from 60 times every second to 120 times, twice as fast.
Most monitors today are marketed today as “Overclock” friendly, but overclocking is context-dependent and of a bit of a risk (one could say insignificant). Especially gamers play around with it since in terms of risk-reward the overall experience is worth it.
The list below covers the basics on how to overclock a monitor using Nvidia, AMD or Intel Custom Resolution Features. It is a straight forward task as any, just have your drivers up to date. Also in the last section of the article, you can find additional details on more complex software overclocking methods.
Overclocking using AMD
Overclocking is similar for all graphic cards and kicking off the list is the AMD Radeon:
- Right-click with your mouse button on the desktop and select AMD Radeon Settings.
- Click the “Display” tab in the bottom right corner.
- Find the Custom Resolutions and click “Create”.
- There use presets or change the refresh rate manually.
- Save and restart your PC.
Overclocking using NVIDIA
If Nvidia is your go-to GPU hardware then simply follow these easy steps.
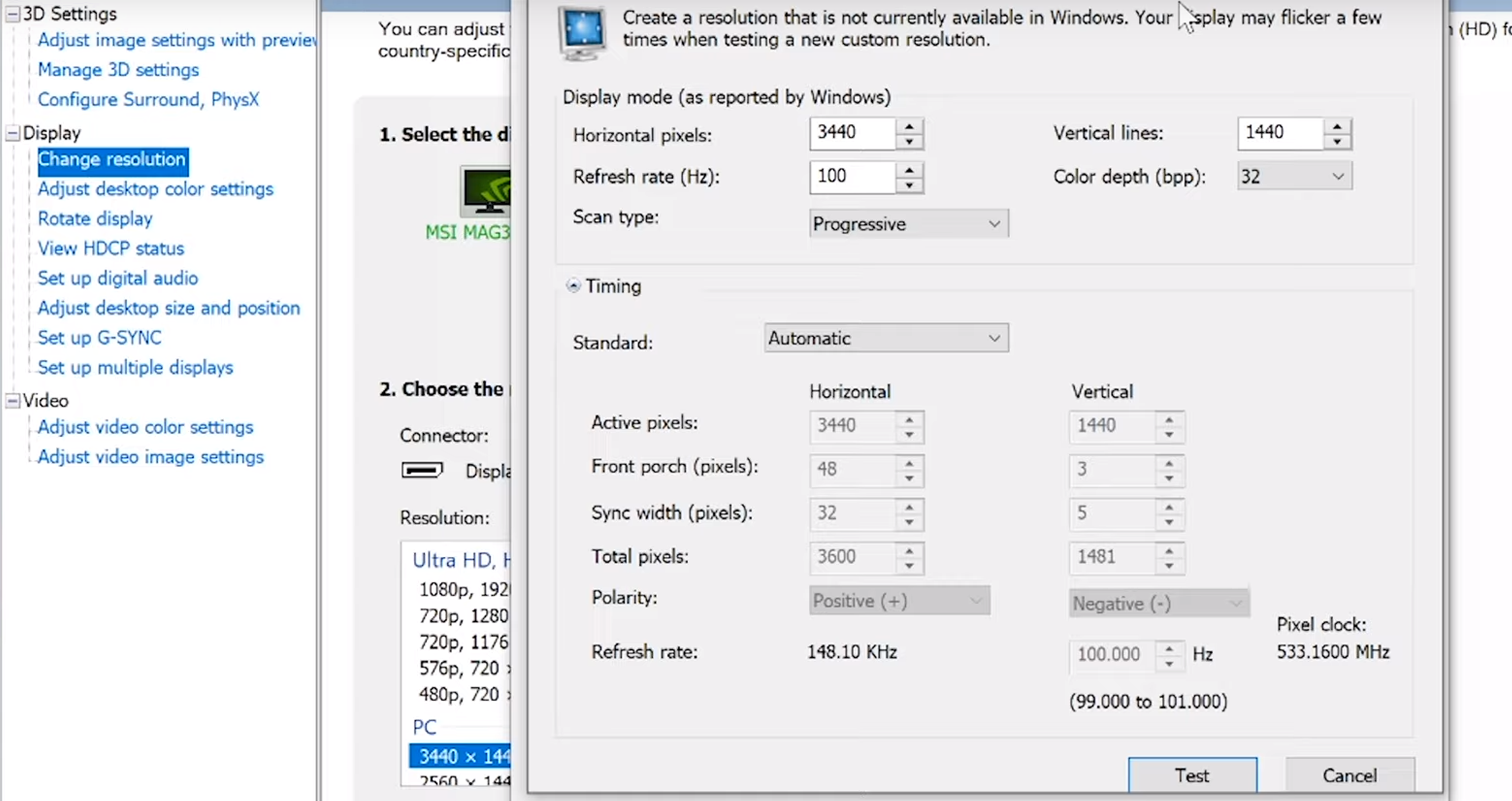
- Right-click on the desktop and select the NVIDIA Control Panel.
- Find the “Display” menu on the left-hand side.
- Click “Change resolution” and create a custom one.
- Press “test” to see if all goes well and apply.
- Restart your PC.
Overclocking using Intel Graphics
Just like with the others above, Intel’s own graphics control panel will also let you create custom resolutions and refresh rates fairly easily.
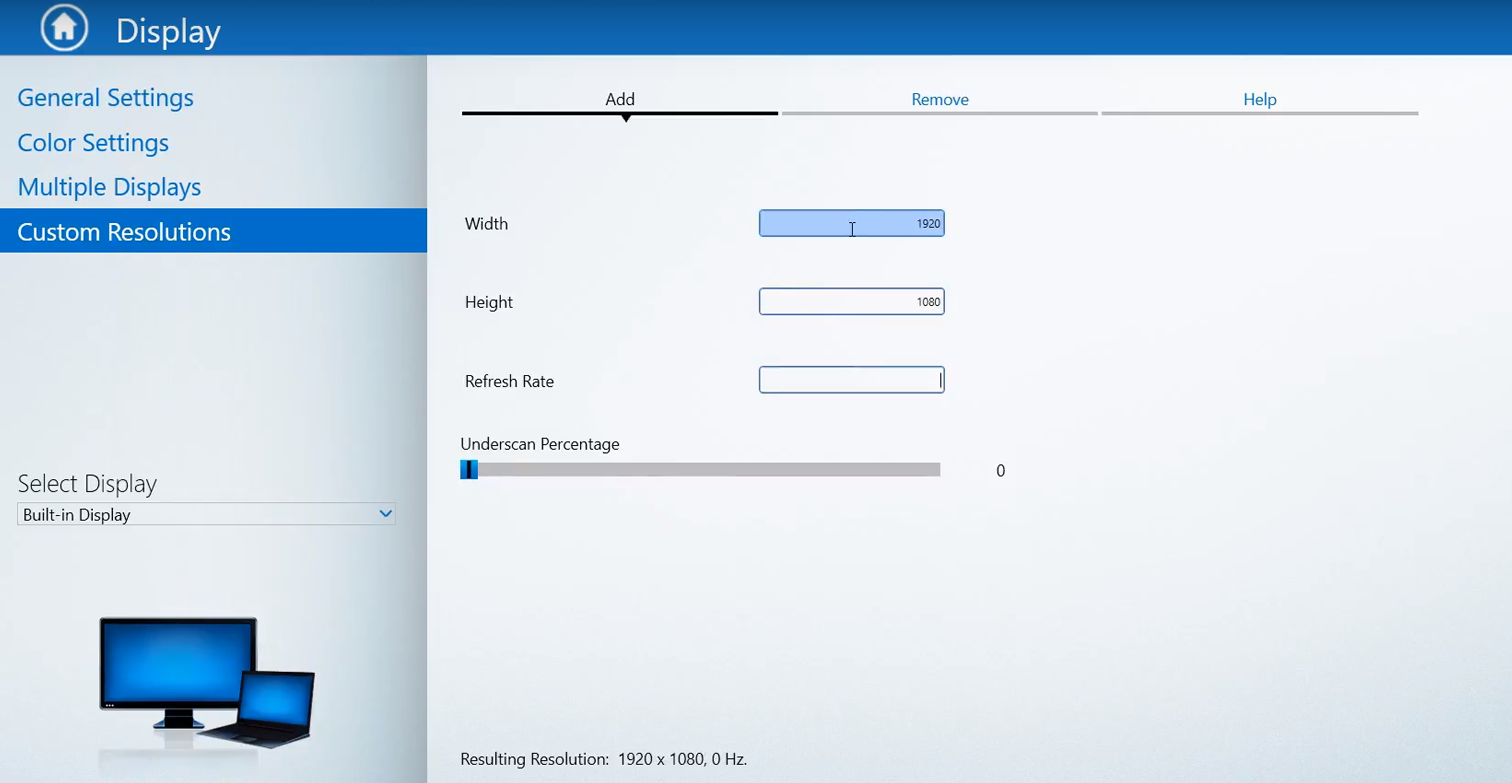
- Right-click on the desktop and select the Intel HD Graphics Control Panel.
- Select “Display”.
- On the left-hand side find Custom Resolutions”.
- Add the width, height and refresh rate.
- Click “Add”.
- Reboot your PC.
Overclocking using CRU (Custom Resolution Utility)
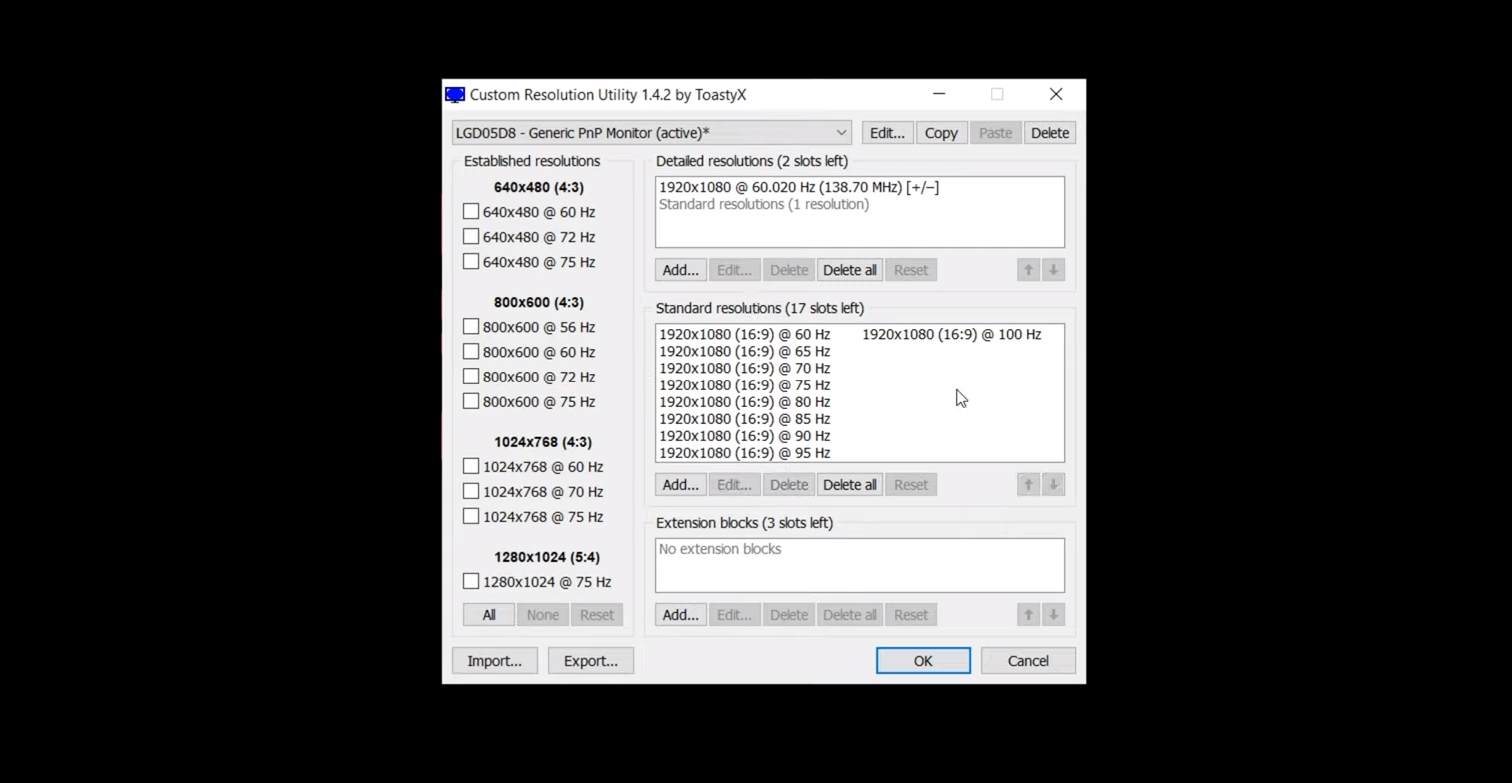
Since there are protection features in all the above-mentioned providers, there is a limit to how much you’ll be able to overclock your monitor by using them. Here is where the CRU comes in. It gives you the tools to add custom resolutions, remove unwanted resolutions, edit FreeSync ranges and more. This list only attributes to changing the refresh rates.
- Open CRU
- You’ll see two boxes, one for detailed resolutions and standard resolutions.
- Under standard resolutions, click add.
- Find the resolution of your screen and select it.
- Windows will open where you’ll be able to change the refresh rate (from the default 60 HZ) with increments of 5Hz.
- When that’s done restart your PC. When Windows restarts:
- Right-click on the desktop and select Display Settings.
- Click on Advanced display settings.
- Press “Display adapter properties for “.
- Find and click the “Monitor” tab.
- In the “Screen refresh rate” drop-down list select the refresh rate that you added via CRU.
- Press Apply and OK.
Simply put, CRU allows you to add those extra Refresh Rates. To utilize the more complex features of CRU we suggest reading through the forum topics before doing the deed. ToastyX is an expert on the matter and has a lasting community of monitor overclockers, ready to answer all your questions, providing regular updates and relevant data via testing on all monitor overclocking topics.
You may be surprised, but cables connecting the monitor and GPU also come into play, if you want to improve your experience. DisplayPort or dual-link DVI connectors used with your overclocked monitor can offer higher bandwidth than current HDMI cables allow for that equal better refresh rates and FPS.
When overclocking, it is an inventor’s journey so experiment (carefully) with different connectors, settings, and software. For example, the AMD/ATI Pixel Clock Patcher (or Nvidia Pixel clock patcher) allows for higher resolutions and refresh rates on your monitor by removing the pixel clock limit for a variety of cables like the single-link DVI, HDMI, dual-link DVI, VGA.
Once you reached the desired results, you can also double-check if the overclocking procedure went well, go to the Testufo website and doing the Frame Skipping test.
Use this knowledge wisely and be mindful of your gear. Do the research, don’t jump on internet hype trains. Each monitor manufacturer (Dell, MSI, Samsung, Phillips, etc.) has its own specs and quirks for their monitors so it is advisable to do the work before going over the (over)clock. For everything else regarding trends in tech and gaming keep Techfiddling.
Source link