In programming, a guard is a common pattern of controlling program flow. It involves performing a conditional check to determine whether the code execution should continue or exit. The use of guards can improve the readability and maintainability of your code.
Guards in NestJS work in a similar way as in general programming, but its implementation is tightly integrated with the NestJS framework. The responsibility of Guards is to allow or deny access to the NestJS endpoints. For instance, we can create a guard to protect a route that updates a user’s profile, to only be accessible by an administrator.
Jump ahead:
Before we dive into the specifics, let’s first look at where guards fit into the NestJS framework’s lifecycle.
Guards in the NestJS lifecycle
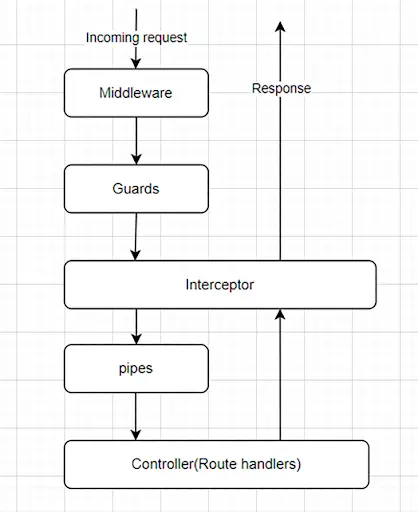
In NestJS, the request lifecycle refers to the sequence of events handling an incoming request and outgoing response.
As depicted in the below diagram, an incoming request flows through various components, such as middleware, guards, interceptors, and pipes before it reaches the endpoint and generates a response. Each of these components plays a part in handling the request and its response. Guards are executed after any defined middleware and before the interceptor is invoked.
Guards can be applied to three different levels:
- Global
- Controller
- Route (method) scope
The sequence of guard execution follows the hierarchy as shown below, starting with global guards, followed by controller guards, and ending with route guards.
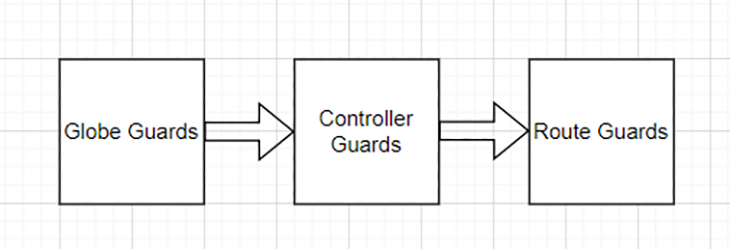
Understanding the sequence of execution allows developers to take advantage of various lifecycle events. For example, we can create a global guard to ensure only users with a valid profile can access the app. Additionally, by creating a role guard, we can configure the user controller to only allow the admin user to access it.
In other words, global guards provide general protection, while controller and route guards give us more specific access control.
Now, let’s create a guard.
Creating an AuthGuard
In the official documentation, a guard is defined as:
A class annotated with the
@Injectable()decorator, which implements theCanActivateinterface.
To create a guard, we must implement the CanActivate interface. This interface requires a canActivate method that is called every time a request is made to a route decorated with the guard. The canActivate method takes an ExecutionContext argument and should return a boolean value that indicates whether the route can be accessed.
ExecutionContext refers to the current application execution context when a request is being handled. It includes information such as:
- The current request
- Its response
- The next function handler
Using guards to protect individual routes
Below is an example of a simple guard that allows access to a route only if the request includes a valid Authorization header:
// auth.guard.ts
@Injectable()
export class AuthGuard implements CanActivate {
 constructor(private reflector: Reflector) {}
 canActivate(context: ExecutionContext): boolean {
 const request = context.switchToHttp().getRequest();
 // we use a hardcoded string to validate the user for sake of simplicity
 return request.headers?.authorization === 'valid_token';
 }
}
The above example utilizes the switchToHttp method to obtain an HttpArgumentsHost object suitable for the HTTP application context. The request object is then extracted from the HttpArgumentsHost object and the request headers are examined to confirm the presence of a valid token.
Since this is a contrived example, we use a hardcoded string to validate the user for simplicity. In a real-world scenario, you should use information from a JWT token or validate it against a database.
To apply the guard, use the @UseGuards decorator from NestJS and pass the guard in as an argument. Below is an example of applying AuthGuard to a specific endpoint:
import { Controller, Get, UseGuards } from '@nestjs/common';
import { AuthGuard } from './auth.guard';

@Controller()
export class AppController {
  @Get()
  @UseGuards(AuthGuard)
  getHello(): string {
    // This route will only be accessible if the request includes a valid header
    return this.appService.getHello();
  }
}
Using guards to protect controllers
We can also use guards to protect controllers, rather than just individual routes.
import { Controller, UseGuards } from '@nestjs/common';
import { AuthGuard } from './auth.guard';
@Controller('users')
@UseGuards(AuthGuard)
export class AppController { ... }
To apply a guard at the application level, we can use the useGlobalGuards method of the NestJS application instance:
const app = await NestFactory.create(AppModule);
app.useGlobalGuards(new RolesGuard());
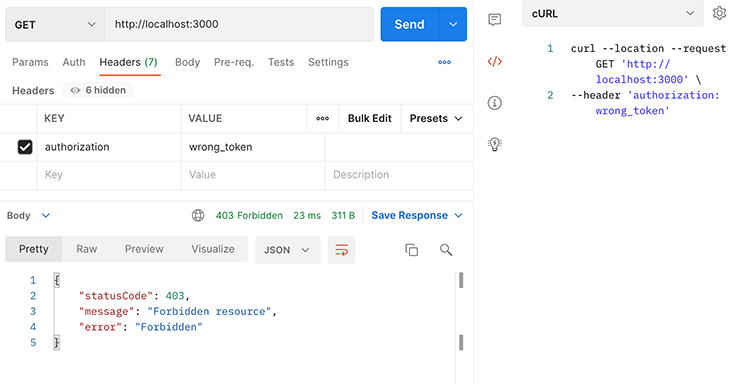
To test the new AuthGuard, run the following command to start the NestJS server.
npm run start
If we send a request with an incorrect authorization header as below, the response will be HTTP status code 403:
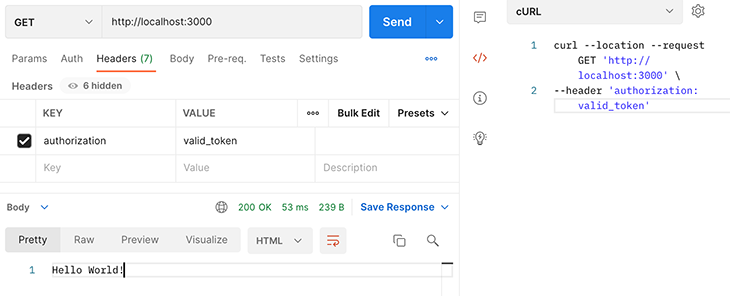
With a correct header, the request is successful:
Role-based access control (RBAC) is a commonly used access-control mechanism defined around roles. Let’s walk through how to implement basic RBAC in NestJS using guards.
Firstly, we need to define the role enum representing the roles in this example:
// role.enum.ts
export enum Role {
    Admin = 'Admin',
    Reader="Reader",
    Writer="Writer"
}
Next, create a Roles decorator to set the roles allowed for a controller or a method:
// roles.ts
import {SetMetadata} from '@nestjs/common';
import { Role } from './clients/entities/role.enum';

export const Roles = (...roles: Role[]) => SetMetadata('roles', roles);
In NestJS, the @SetMetadata decorator is provided to attach metadata to a class or method. It stores the metadata as a key-value pair. In the above code, the key is roles, and the value is passed from the roles argument. The saved metadata can be used by the role guard later.
Now, we can create the RoleGuard:
// role.guard.ts
@Injectable()
export class RolesGuard implements CanActivate {
  constructor(private reflector: Reflector) {}
  canActivate(context: ExecutionContext): boolean {
    // get the roles required
    const roles = this.reflector.getAllAndOverride<string[]>('roles', [context.getHandler(), context.getClass()]);
    if (!roles) {
      return false;
    }
    const request = context.switchToHttp().getRequest();
    const userRoles = request.headers?.role?.split(',');
    return this.validateRoles(roles, userRoles);
  }

  validateRoles(roles: string[], userRoles: string[]) {
    return roles.some(role => userRoles.includes(role));
  }
}
In the role guard, the getAllAndOverride method is used to retrieve the roles. The method takes two arguments:
Key: The metadata keyTargets: the set of decorated objects from which the metadata is retrieved
The above code gets the metadata for the roles key from the context of the decorated class and the decorated route handler. If different roles are associated with the class and handler, the handler metadata overrides the class metadata in the returned result.
In a nutshell, the method retrieves the userRoles from the request headers and calls validateRoles to compare the user’s role with the required roles. If the user’s role is present, the method returns true to grant the user access to the resource.
Using role guards with the Roles decorator
The role guard should be used in conjunction with the Roles decorator. In this example, we assign the Writer role to the createClient endpoint, and the Reader role to the getClients endpoint.
// client.controller.ts
 @Post()
  @Roles(Role.Writer)
  @UseGuards(RolesGuard)
  create(@Body() createClientDto: CreateClientDto) {
    return this.clientsService.create(createClientDto);
  }

  @Get()
  @Roles(Role.Reader)
  @UseGuards(AuthGuard, RolesGuard)
  getClients() {
    return this.clientsService.findAll();
  }
Let’s test the role guard using Postman.

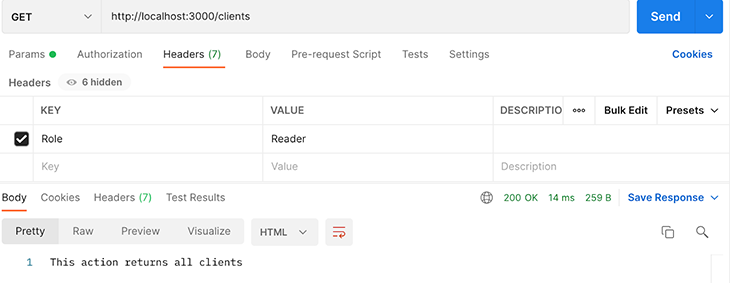
We sent a POST request and a GET request to the clients endpoint. In both requests, we set the request header with the Reader role. The GET request returns with HTTP status code 200, and the POST request is rejected with status code 401. This shows the role guard works correctly.
Skipping the authorization guard with SkipAuthCheck
Sometimes, we may want to skip the authorization guard. For example, we may apply an AuthGuard to a controller, but one of the endpoints within the controller is intended to be public. This can be achieved by adding specific metadata to the endpoint.
To begin, let’s create an AuthMetaData decorator, which can be used to set the metadata with the key 'auth' for a specific endpoint:
import { SetMetadata } from "@nestjs/common";

export const AuthMetaData = (...metadata: string[]) => SetMetadata('auth', metadata);
Later, this metadata can be read by a guard. Then, we can use it to add 'skipAuthCheck' metadata to an endpoint:
  @Get('hello')
  @AuthMetaData('skipAuthCheck')
  getPublicHello(): string { …}
In the AuthGuard, we add this code block to check for the skipAuthCheck metadata:
    const authMetaData = this.reflector.getAllAndOverride<string[]>('auth', [
      context.getHandler(),
      context.getClass(),
    ]);
    if (authMetaData?.includes('skipAuthCheck')) {
      return true;
    }
The addition of the above code block will allow the auth guard to skip the check if the 'skipAuthCheck' is contained in the metadata with the key of 'auth'.
The SkipAuthCheck guard adds flexibility when managing access to specific endpoints.
Using multiple guards
NestJS allows for multiple guards to be applied to a single target at either the controller or route level.
We can use the @UseGuards decorator to apply multiple guards, and the guards will be executed in the order in which they are bound. If any of the guards returns false, the request will be denied.
In the example below, we use the @UseGuards decorator to combine both AuthGuard and RoleGuard to the ClientsController:
@Controller('clients')
@UseGuards(AuthGuard, RolesGuard)
export class ClientsController {
  // This controller will be protected by both the AuthGuard and the RoleGuard
}
In this scenario, access to the controller is granted only if both AuthGuard and RolesGuard return true.
Summary
Guards are a powerful feature in NestJS that can be used to control access to routes based on certain conditions. They can be used in different scopes, and can also be applied in combination to build fine-grained access control. Understanding how to use guards can help you build more secure and well-organized NestJS applications.
The source code of the example in this article can be found here.
The post Understanding guards in NestJS appeared first on LogRocket Blog.
from LogRocket Blog https://ift.tt/VMyrtXJ
Gain $200 in a week
via Read more
Source link