In this hands-on lab session we demonstrate how to build an end-to-end big data solution with Cloudera Data Platform (CDP) Public Cloud, using the infrastructure we have deployed and configured over the course of the series.
This is the final article in a series of six:
Our objective is to provide a self-service data analytics solution that enables end-users to analyze stock data. On a high level, this encompasses the following steps:
- Configure automatic data ingestion from a public API to our S3 data lake.
- Provide an ELT solution to move data from our Data Lake to the Data Warehouse.
- Create a dashboard to visualize the data stored in the warehouse.
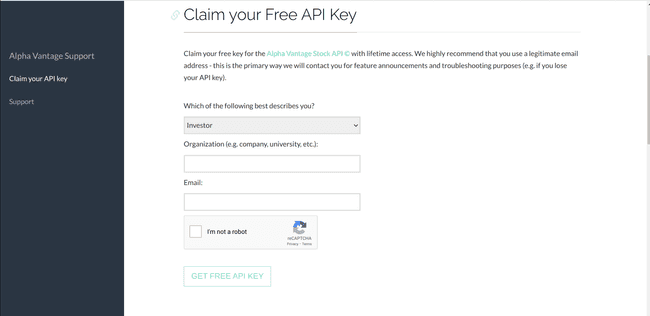
Preparation: Get Alpha Vantage API Key
Before we begin with our data ingestion, we need to get access to an API. For our purposes, we are going to use a free stock market API by Alpha Vantage:
-
Navigate to Alpha Vantage
-
Click on: Get Your Free Api Key Today
-
Fill the information to claim the key:
StudentSchool/organizationname- Valid email address
-
Click on
GET FREE API KEY
-
Take note of your key (
<api_alpha_key>) as you will need it later.
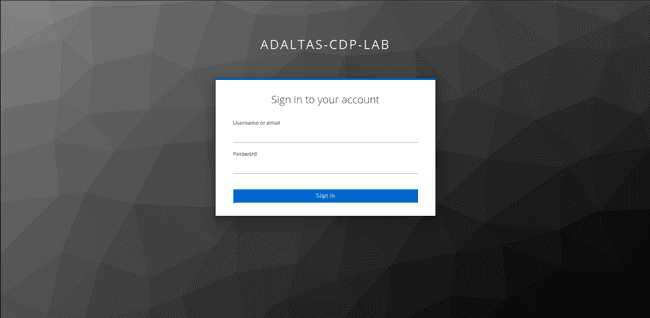
Access your CDP Public Cloud Portal
To get started, you need to have prepared a user account on your CDP infrastructure as described in our previous articles CDP part 4: user management on CDP Public Cloud with Keycloak and CDP part 5: user permission management on CDP Public Cloud.
-
Please login via your custom login page with a user you created for this exercise.
-
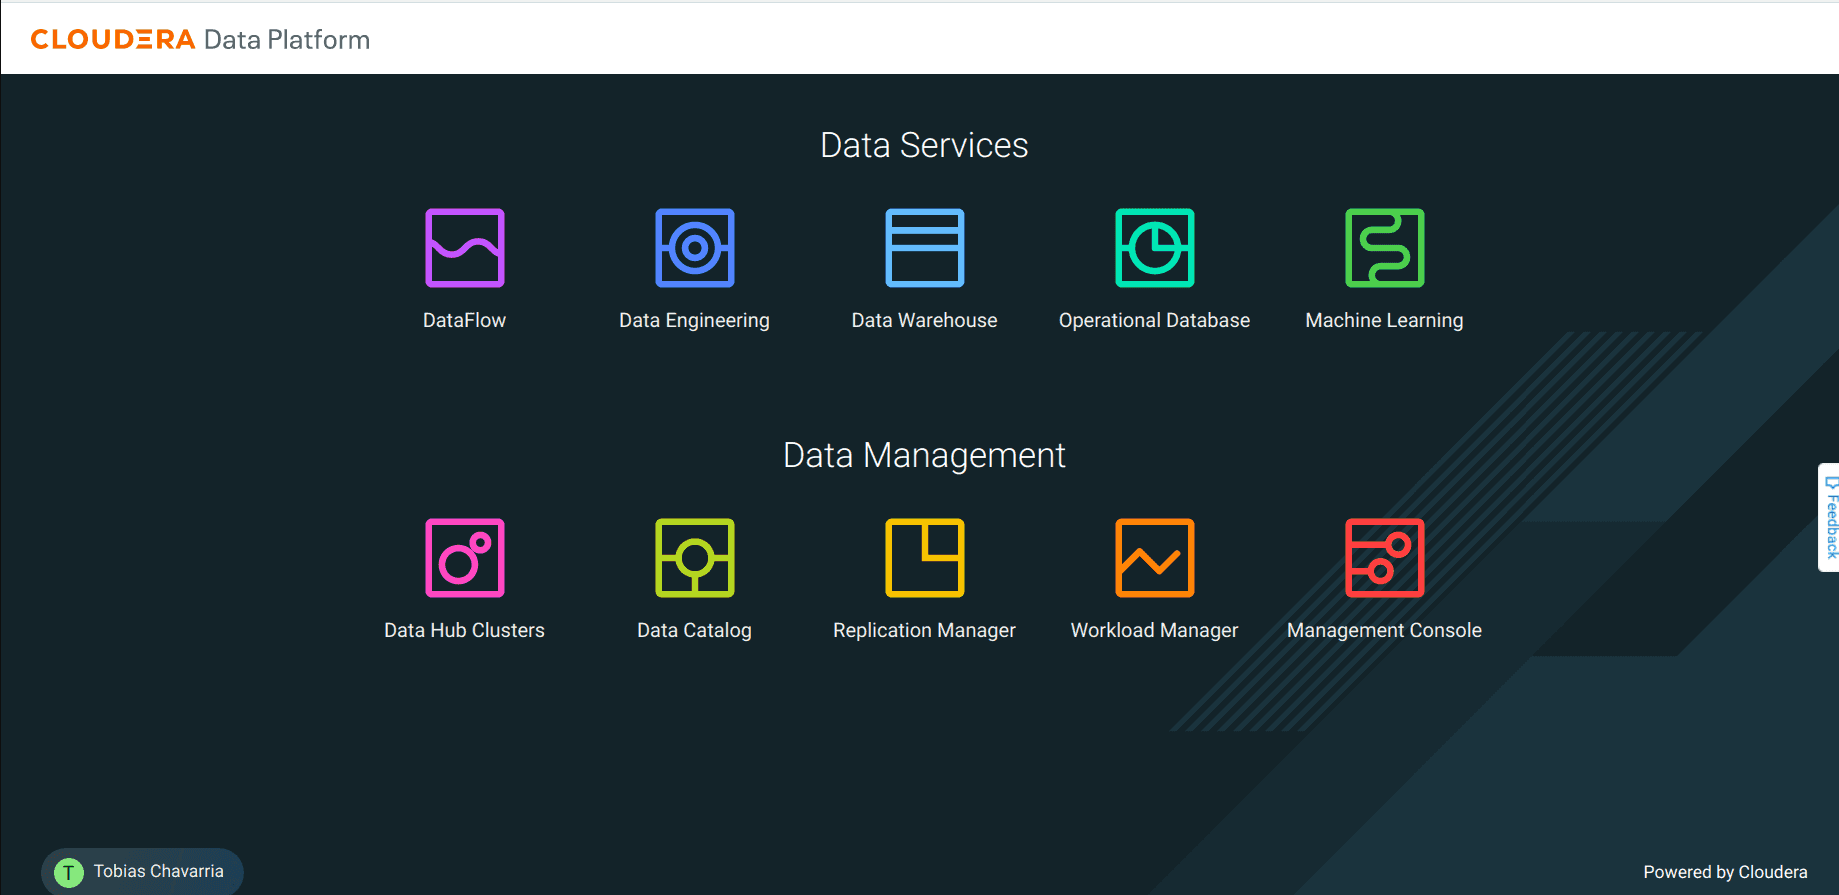
After login, you are redirected to the CDP console.


Note that if you did not configure your Keycloak instance to use SSL/TLS, you may see a non-secure site warning at this step.
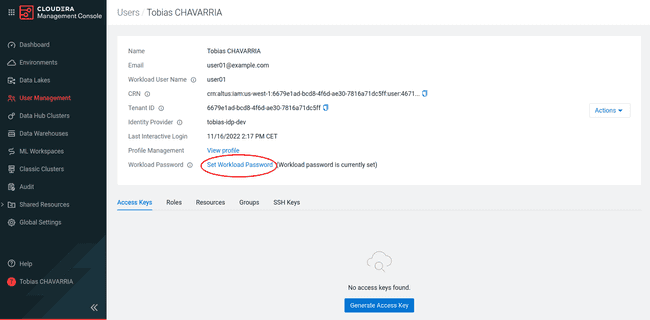
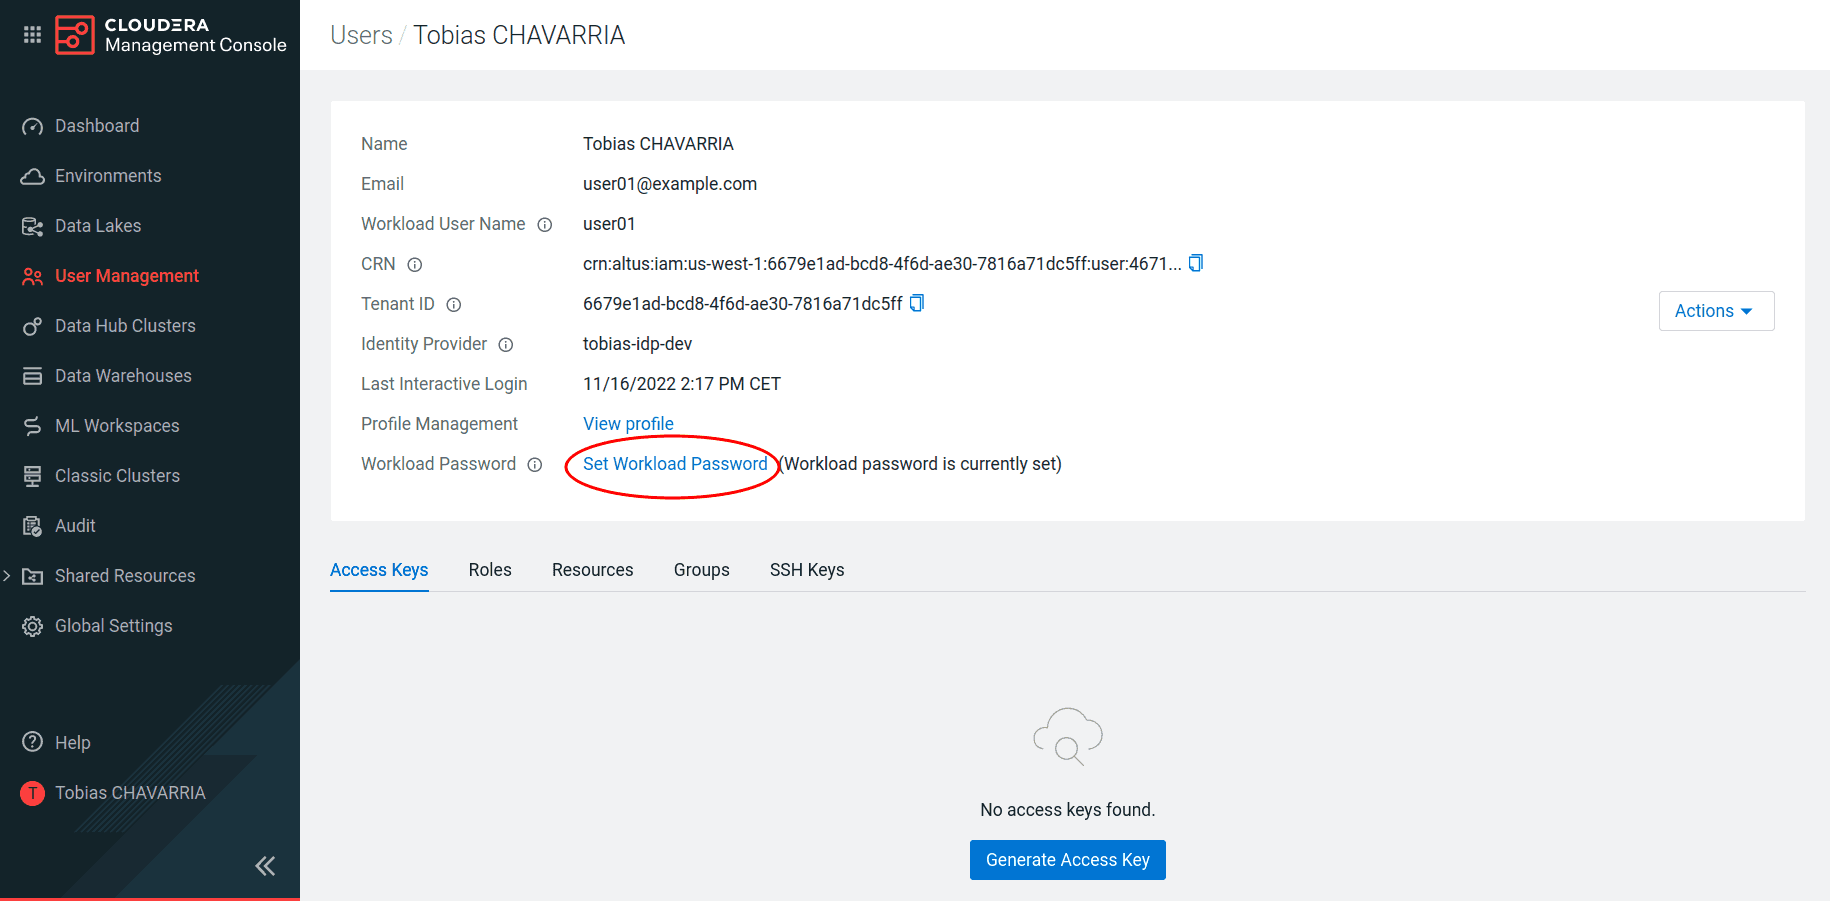
Set your Workload Password
After the first login with your CDP user, you are required to set a workload password. This enables you to perform tasks using CDP services.
-
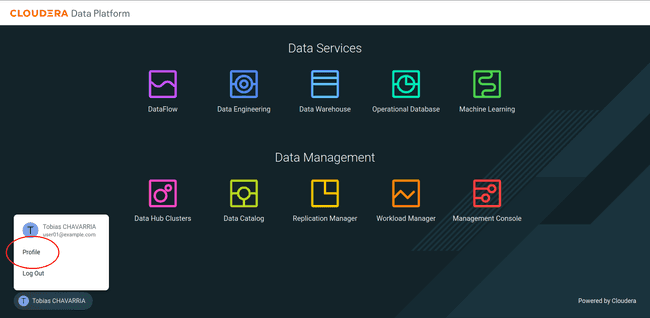
Click on your name on the button left corner and click on Profile
-
Click on Set Workload Password
-
If you successfully set your password, you see the message
( Workload password is currently set )on your profile.

Note: You may reset your password later in case you lose it.
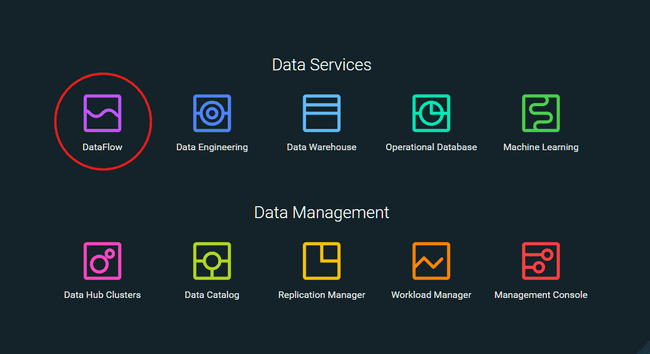
Data Ingestion: Set up a DataFlow
We are using CDP’s DataFlow service to ingest data from our API to our Data Lake. Remember that DataFlow is powered by Apache NiFi.
Import a Flow definition
-
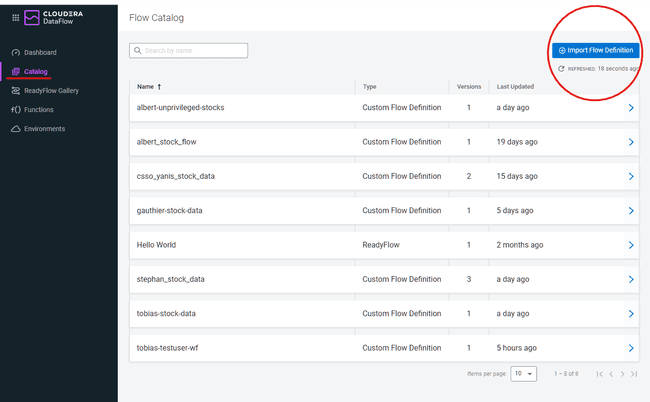
Navigate to the CDP portal and select the DataFlow icon
-
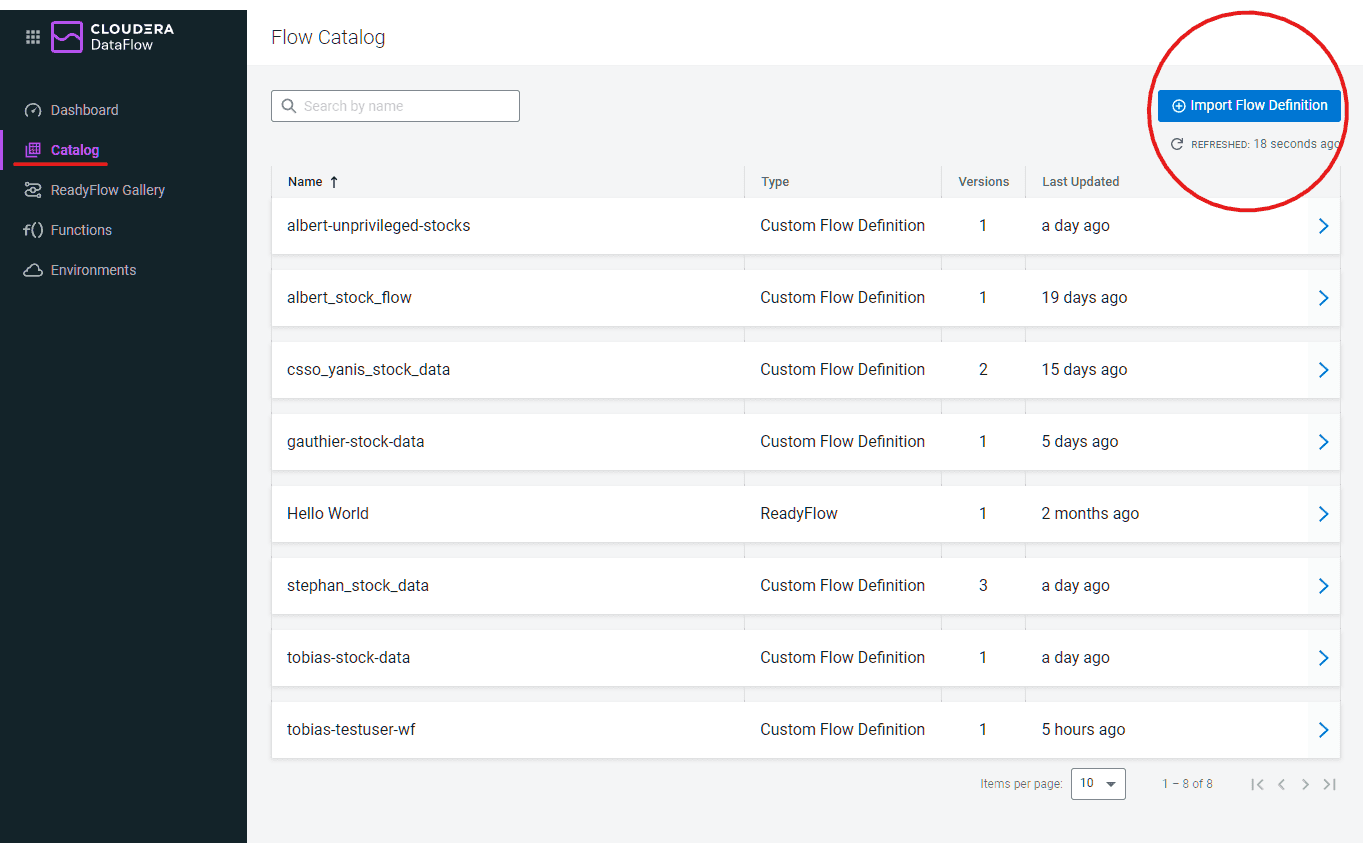
On the left menu click on Catalog and then on Import Flow Definition
-
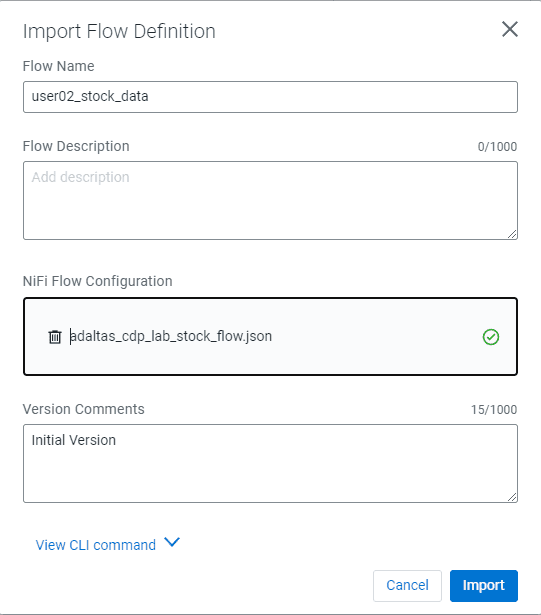
Import the NiFi Flow and fill up the parameters as follow:
- Flow name:
<username>_stock_data - Flow description:
- Import: NiFi Flow
- Click on Import
- Flow name:
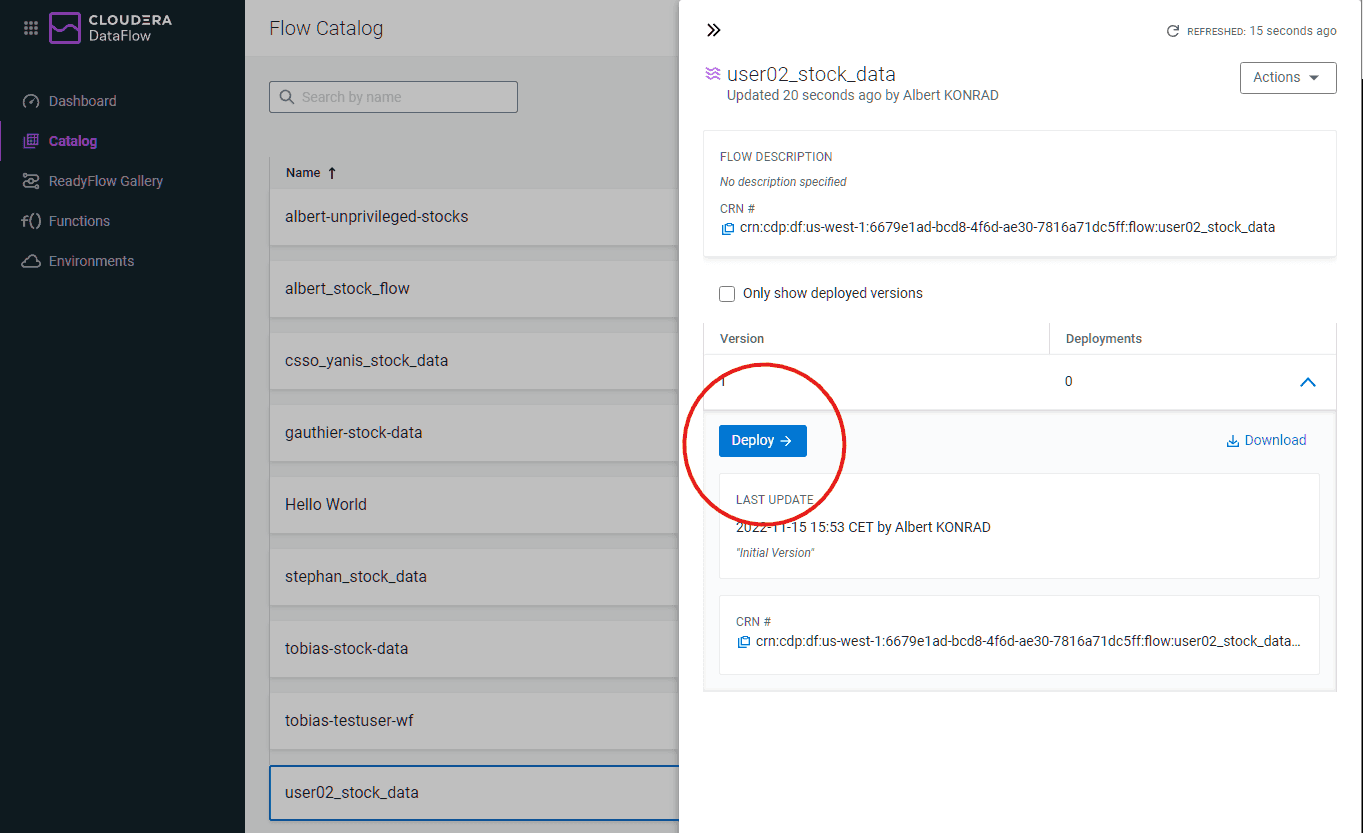
Deploy a Nifi Flow
-
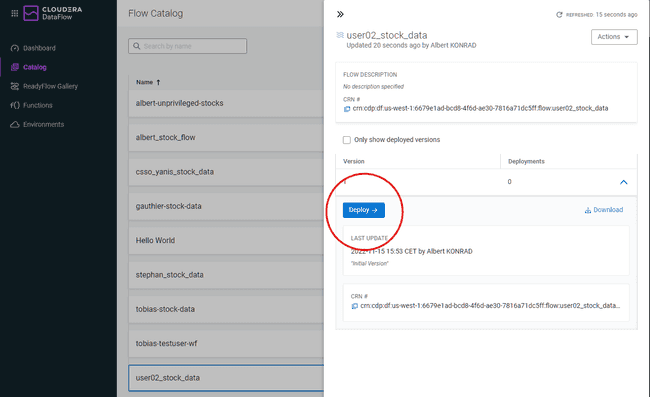
Click on the flow definition created in the previous step
-
Click on Deploy
-
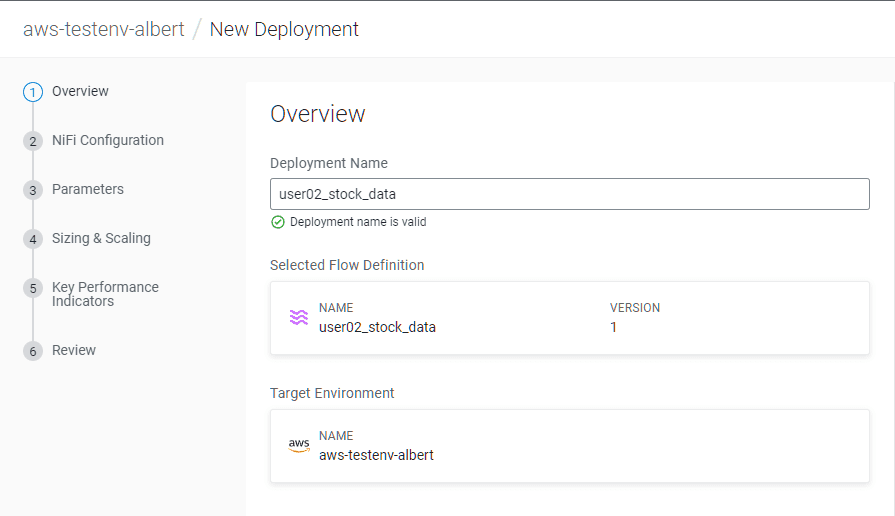
Select your existing CDP Public Cloud environment as Target Environment
-
Click on Continue

-
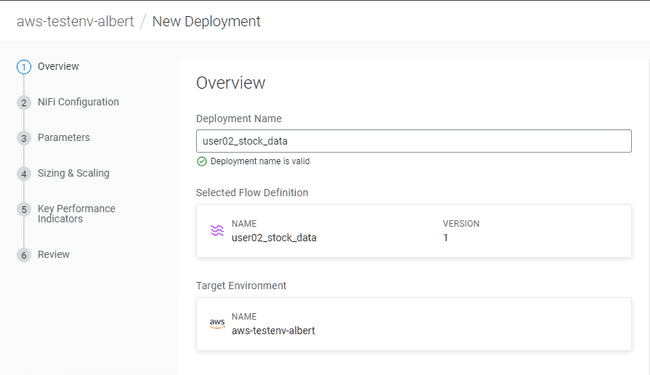
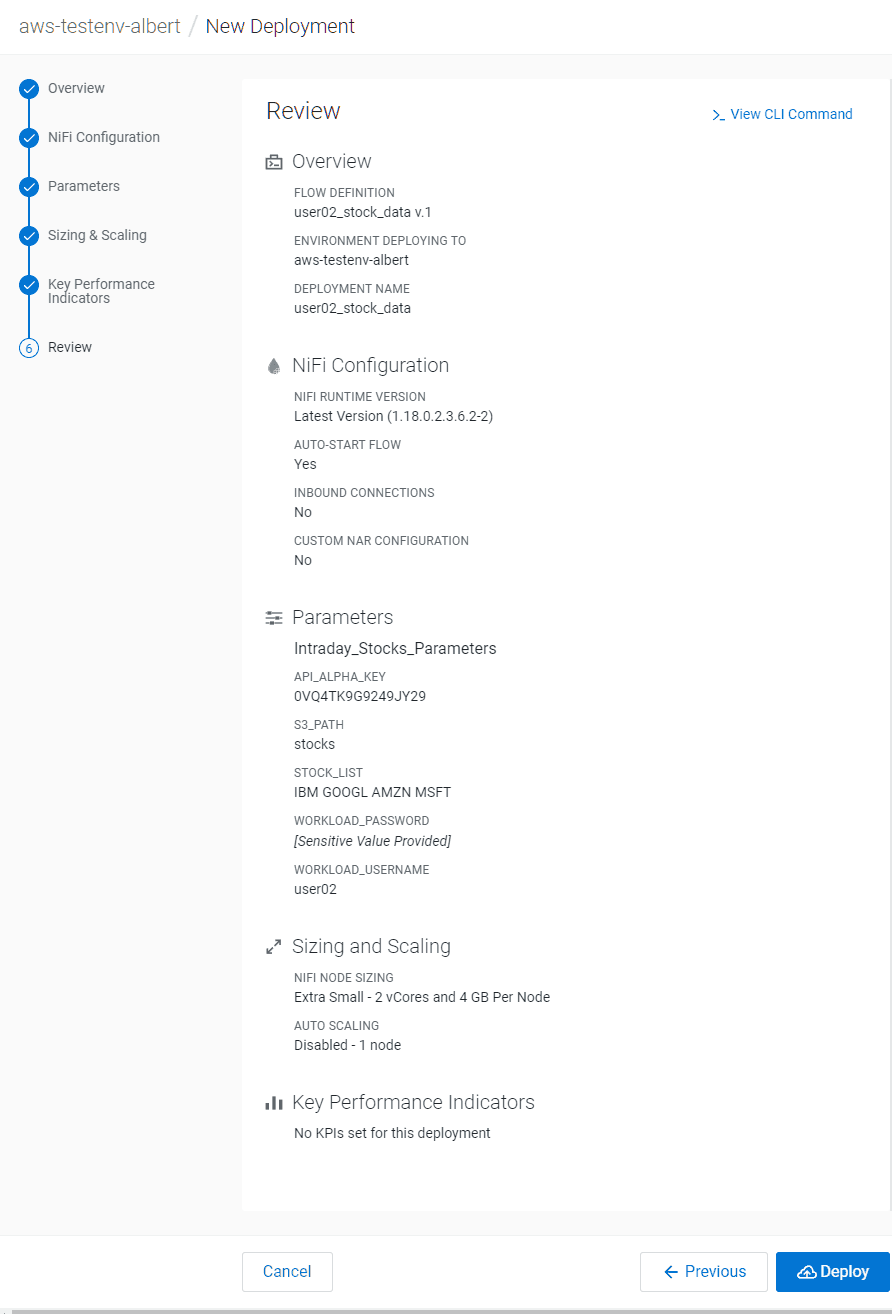
Set the Deployment Name:
<username>_stock_data
-
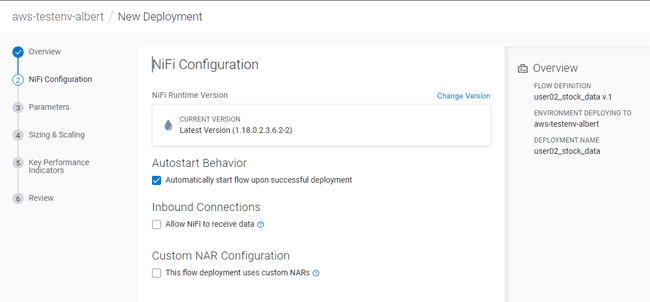
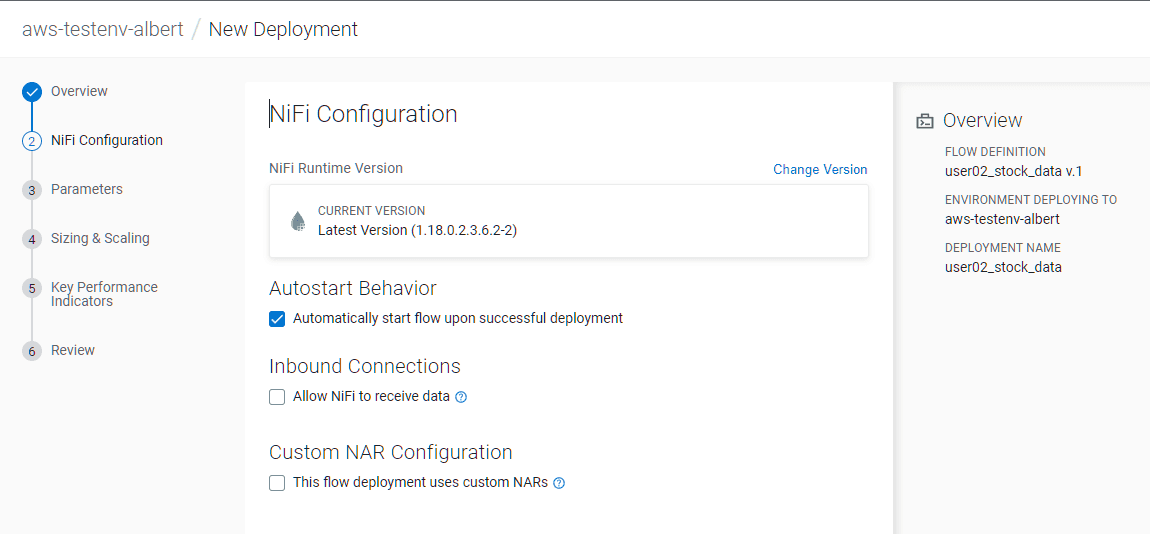
Do not modify the NiFi Configuration tab, click on Next
-
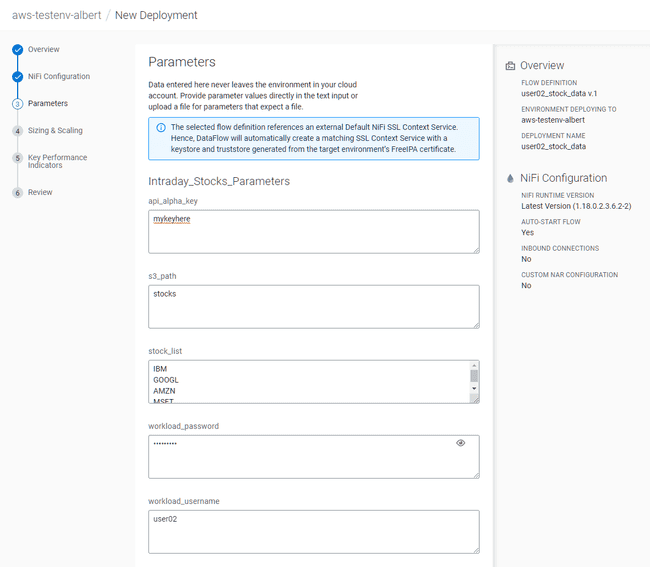
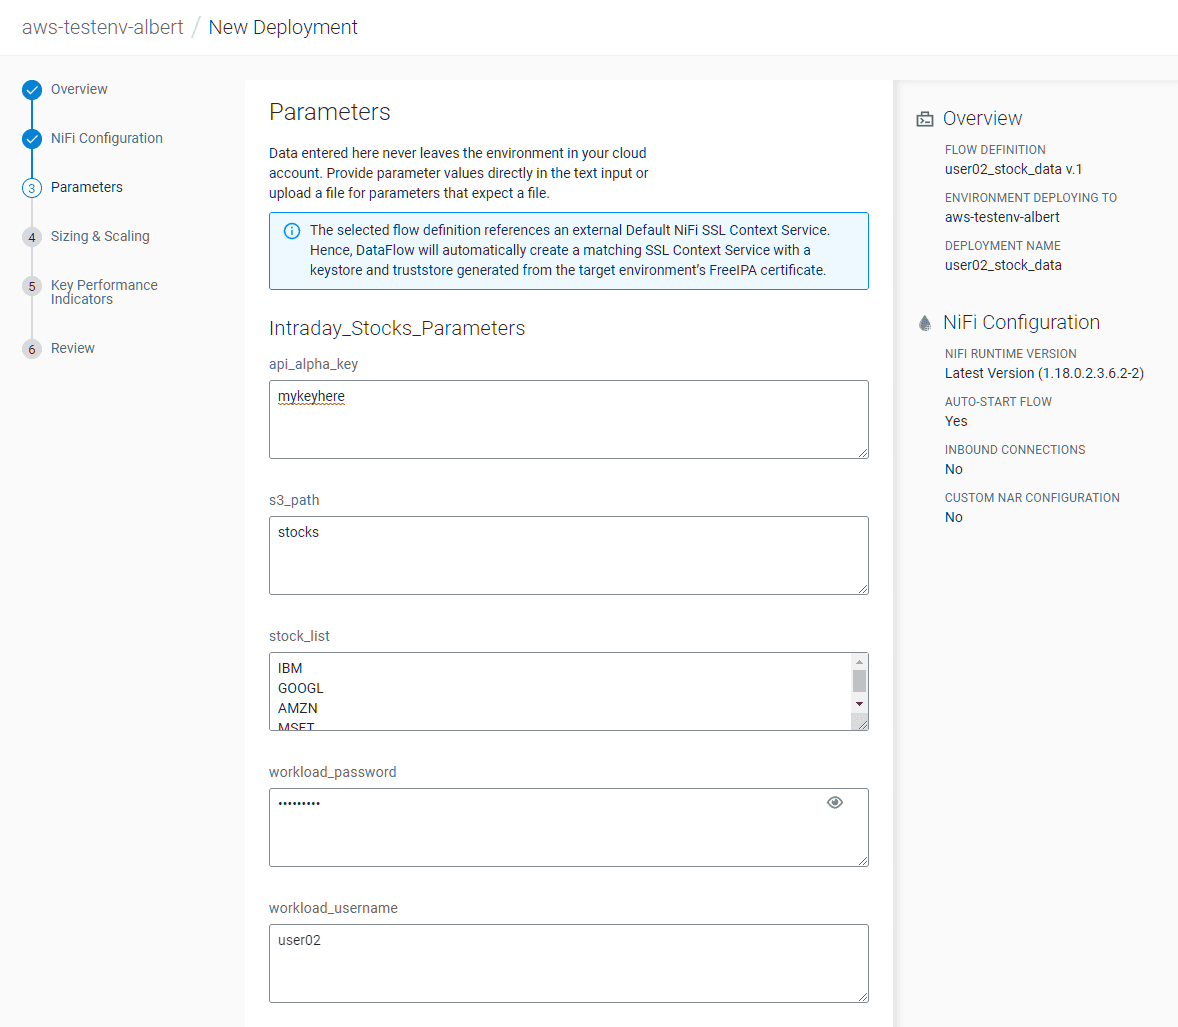
In the Parameters tab, set:
- api_alpha_key:
<Your Alpha Vantage API key> - s3_path:
stocks - stock_list:
default - workload_password:
<Your workload password> - workload_username:
<Your user name>
- api_alpha_key:
-
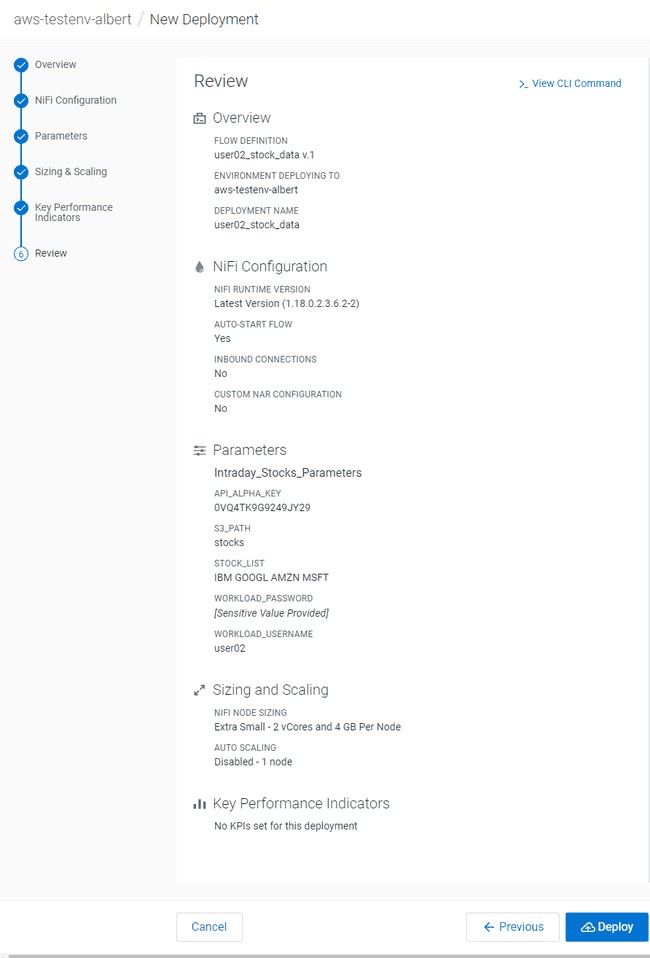
In the Sizing & Scaling tab, set:
- NiFi Node Sizing:
Extra Small - Auto Scaling:
Disabled - Nodes:
1

- NiFi Node Sizing:
-
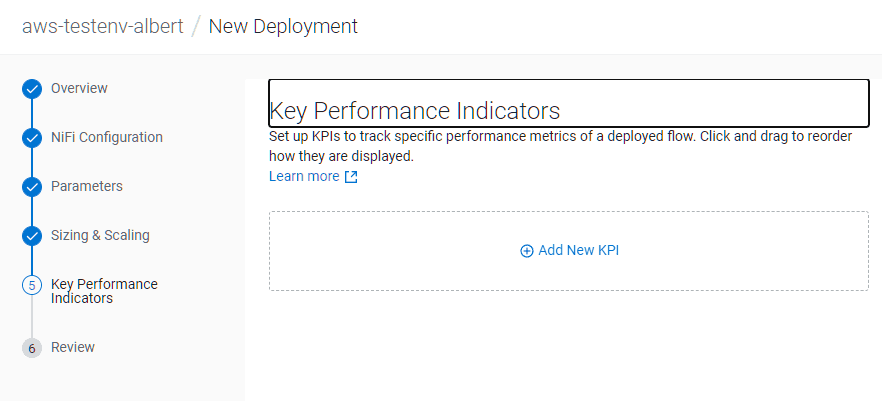
In the Key Performance Indicators, make no modifications and click on next

-
Review your configuration, then click on Deploy

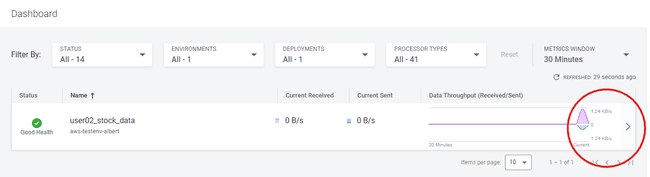
This last step launches the NiFi flow. It should take a few minutes until the flow is up and running. You may check the progress on the Dashboard tab in the CDF page.
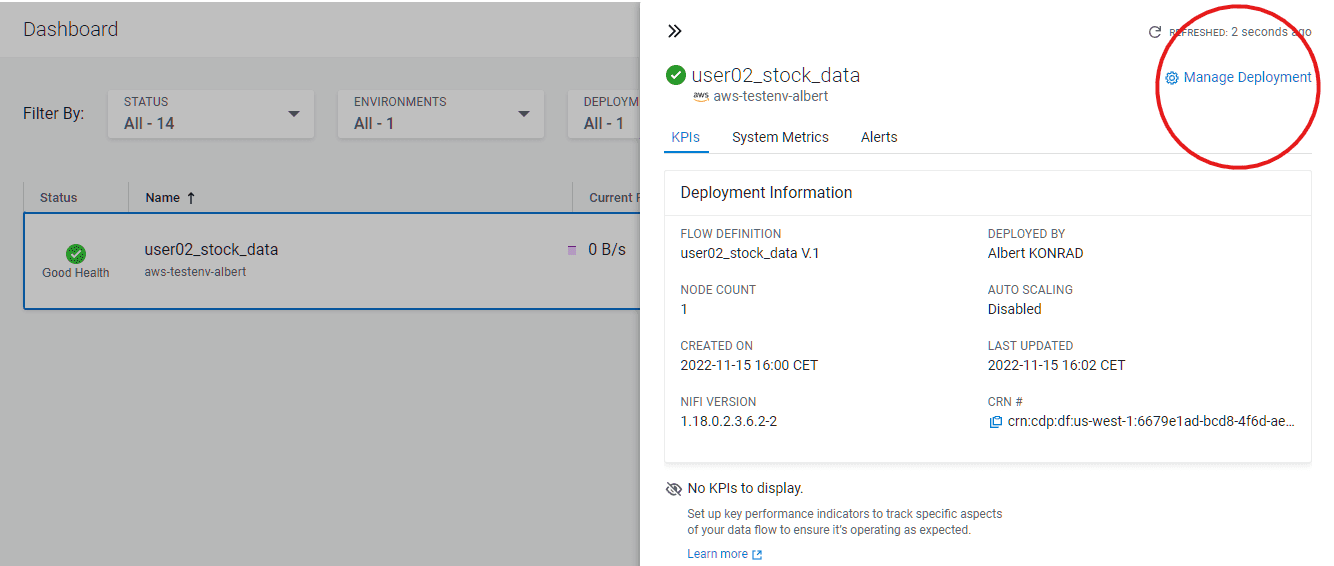
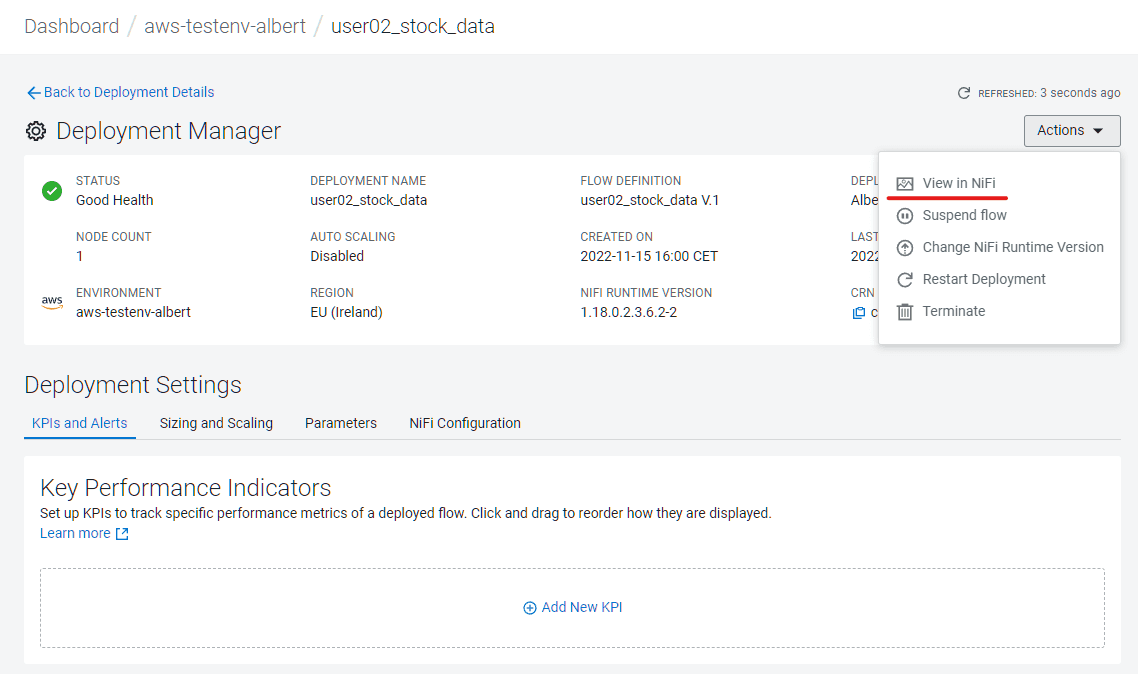
View your NiFi flow
It is possible to check and review the flow in the web interface once it is up and running:
-
Click on the blue arrow on the right of your deployed flow
-
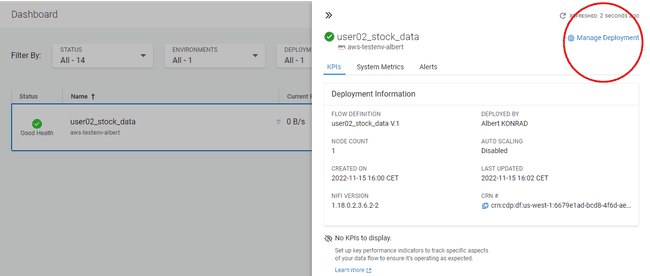
Click on Manage Deployment top right corner
-
In the Deployment Manager, click on Actions and then on View in NiFi
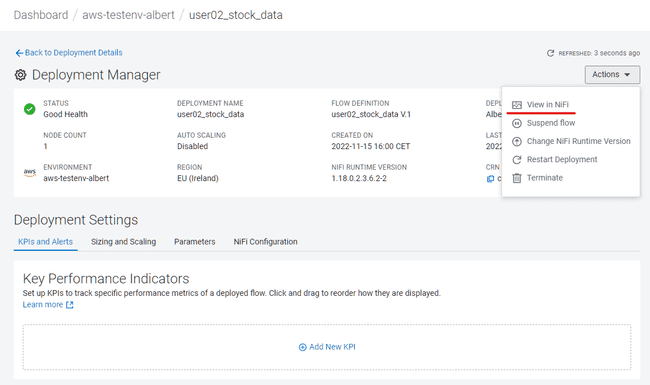
-
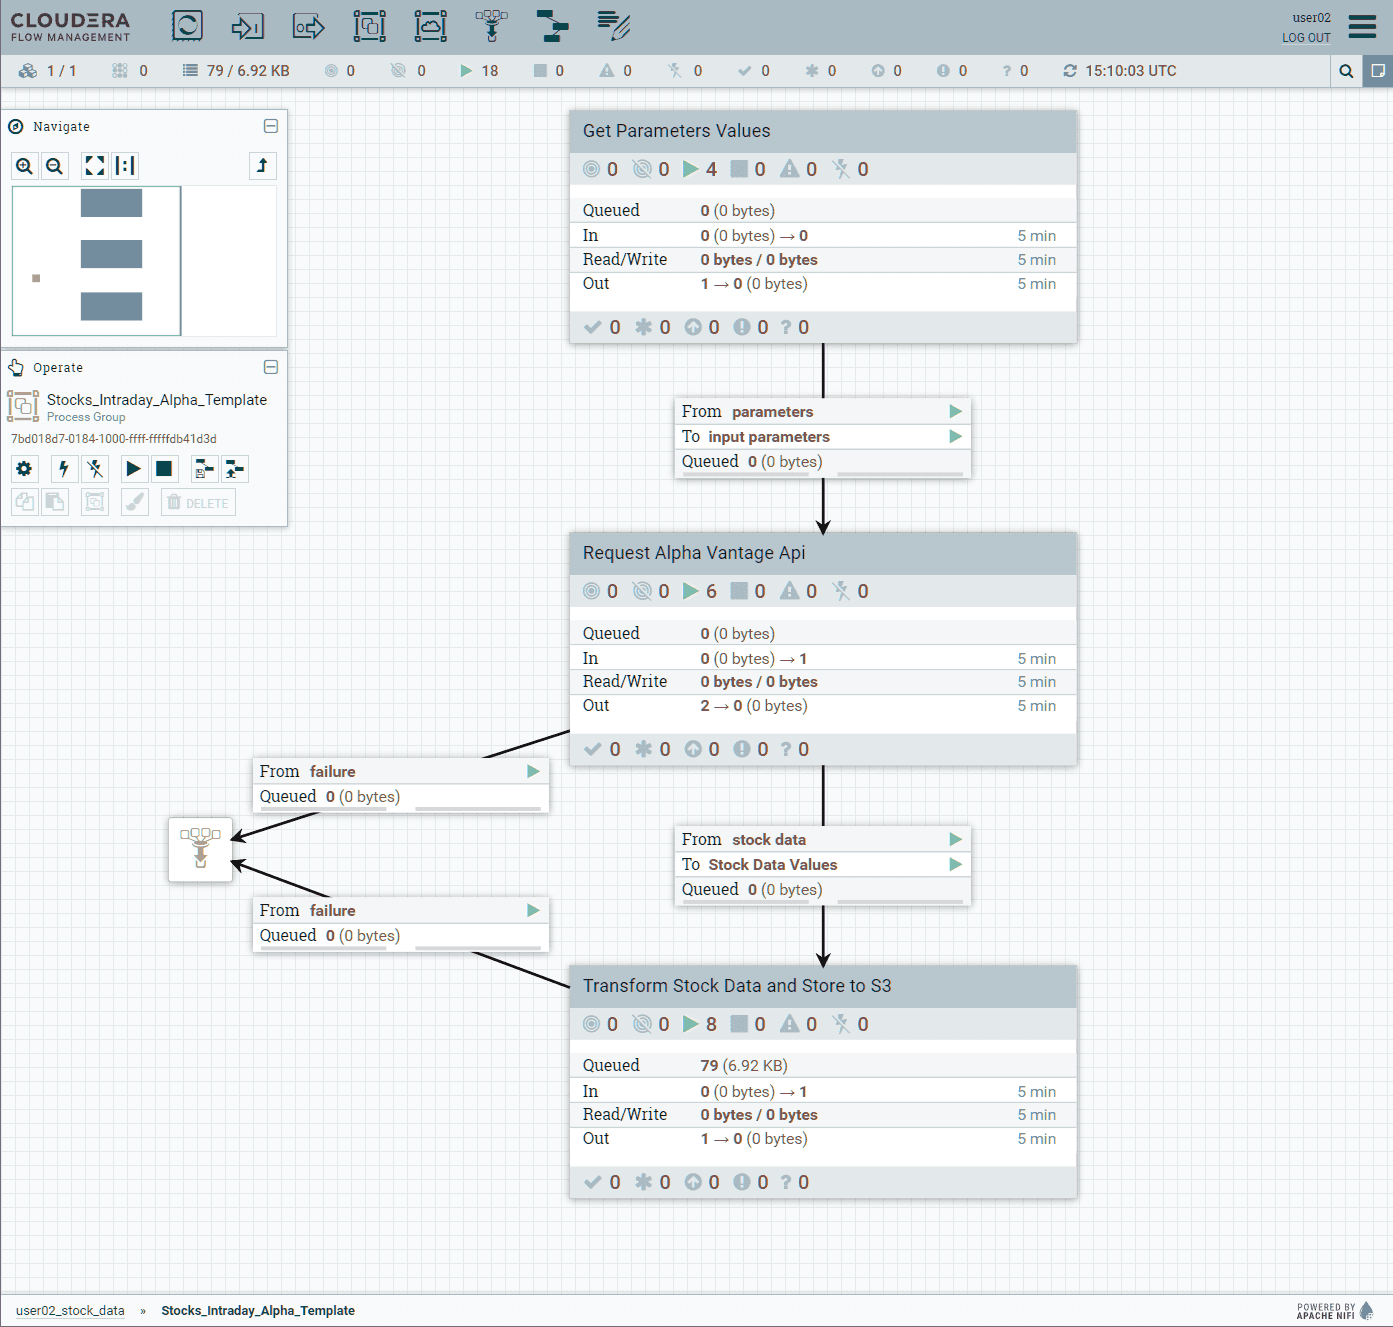
This opens another browser tab with the NiFi flow

-
Take a few minutes to explore and understand the different components of the flow
-
As there is no need to continuously ingest data in order to continue with the lab, go back to Deployment Manager, Actions, and click on Suspend flow
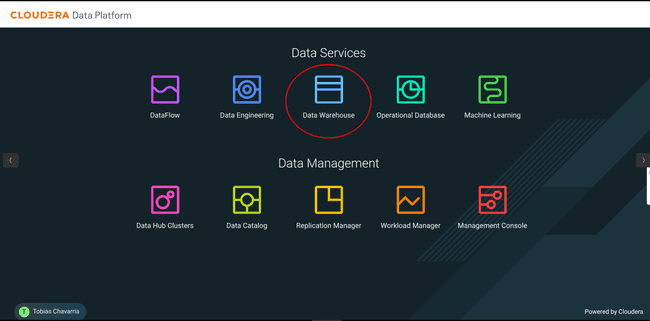
Analytical Storage: Data Warehouse
Our next step is to transfer our raw data from the Data Lake to an analytical store. We chose an Apache Iceberg table for this purpose, a modern data format with many advantages. Now we are going to create the Iceberg table.
Create an Iceberg table
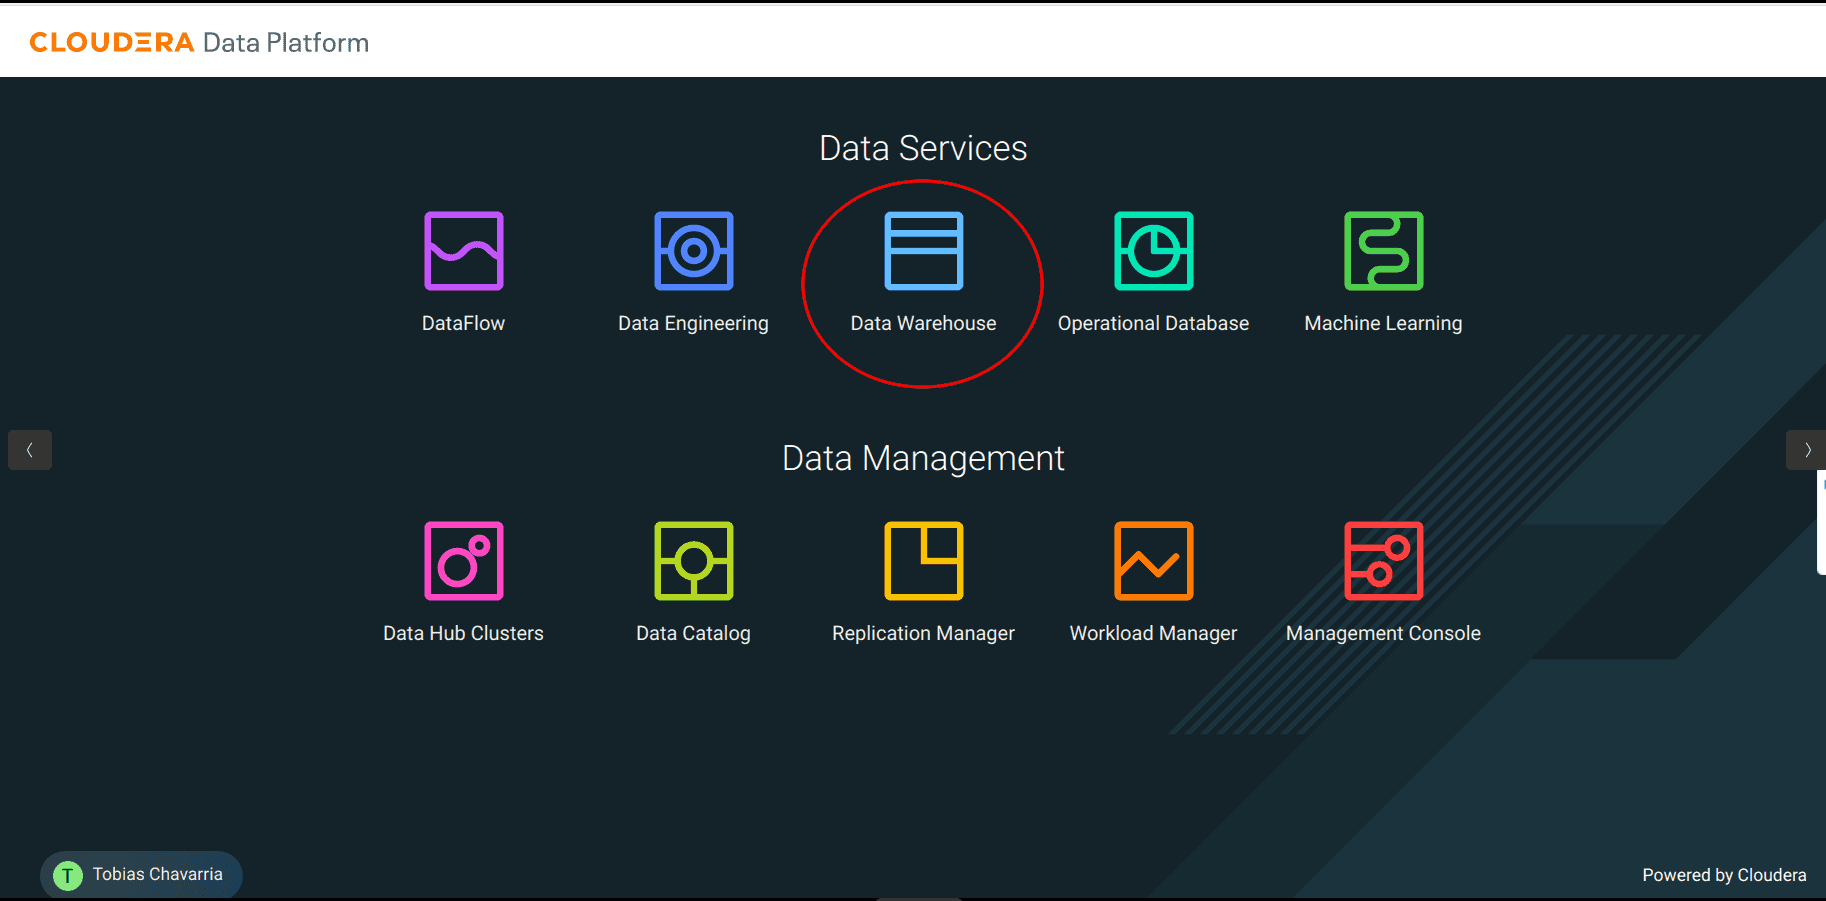
From the CDP Portal:
-
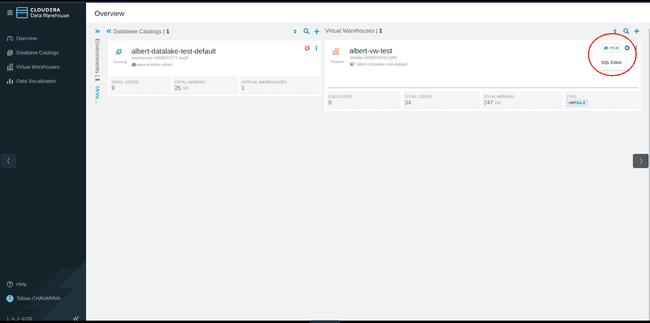
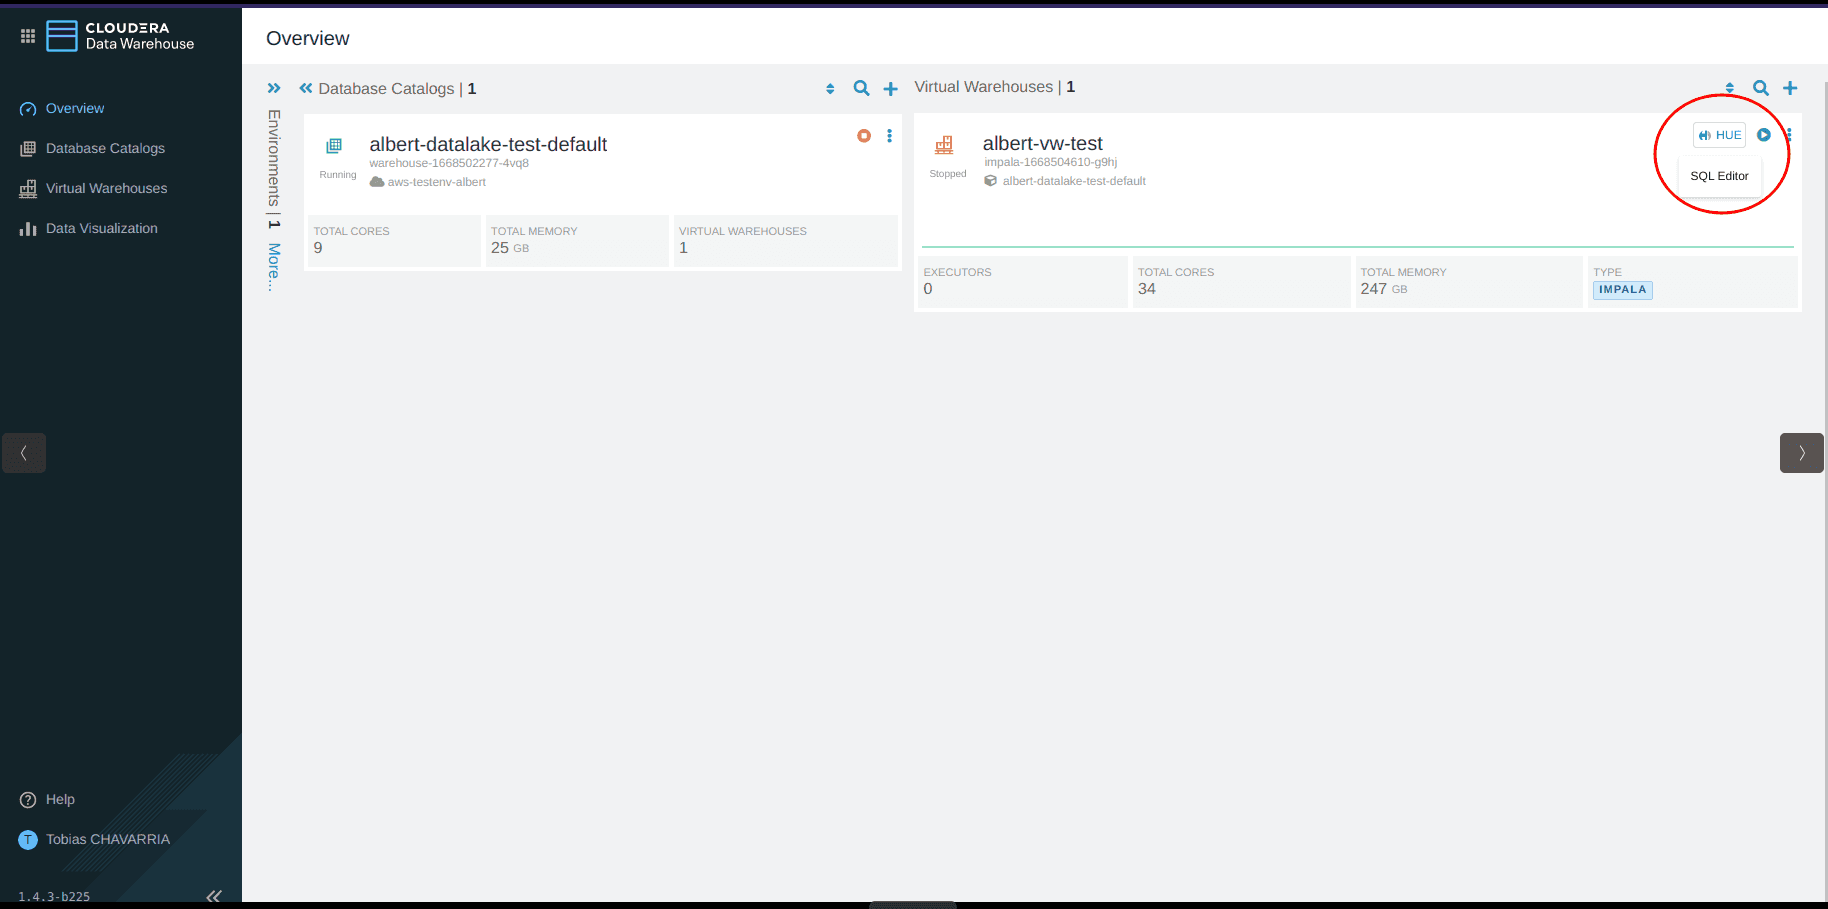
Select Data Warehouse
-
Click the HUE button on the top right corner, this will open the HUE Editor

-
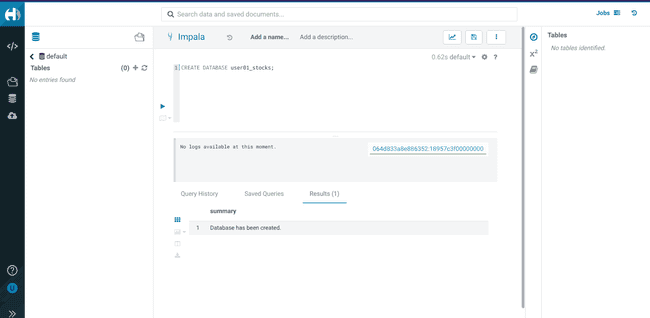
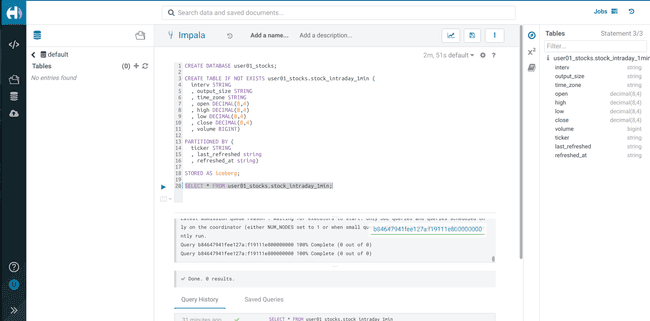
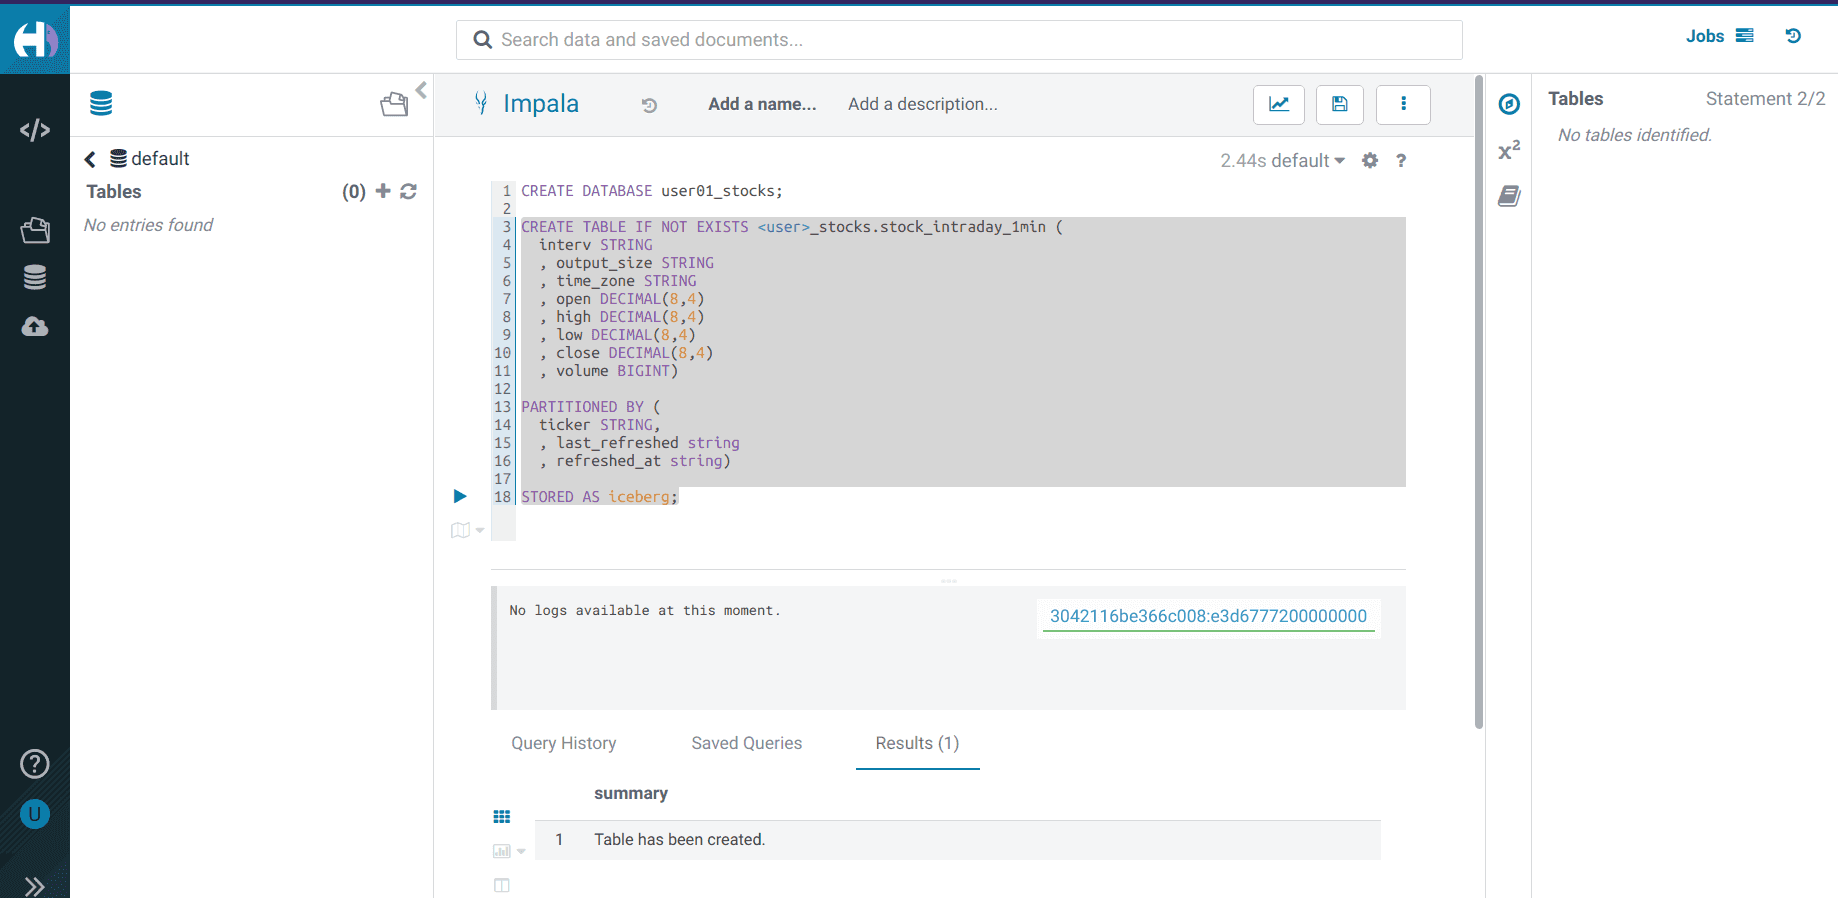
Create a database using your
<username>CREATE DATABASE <username>_stocks;
-
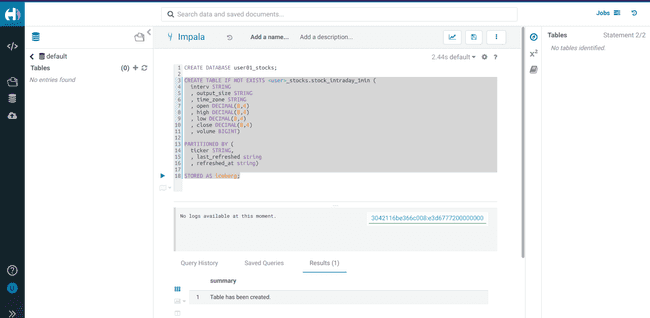
Create an Iceberg table
stock_intraday_1minon the database created in the previous step:CREATE TABLE IF NOT EXISTS <username>_stocks.stock_intraday_1min ( interv STRING , output_size STRING , time_zone STRING , open DECIMAL(8,4) , high DECIMAL(8,4) , low DECIMAL(8,4) , close DECIMAL(8,4) , volume BIGINT) PARTITIONED BY ( ticker STRING , last_refreshed string , refreshed_at string) STORED AS iceberg;
-
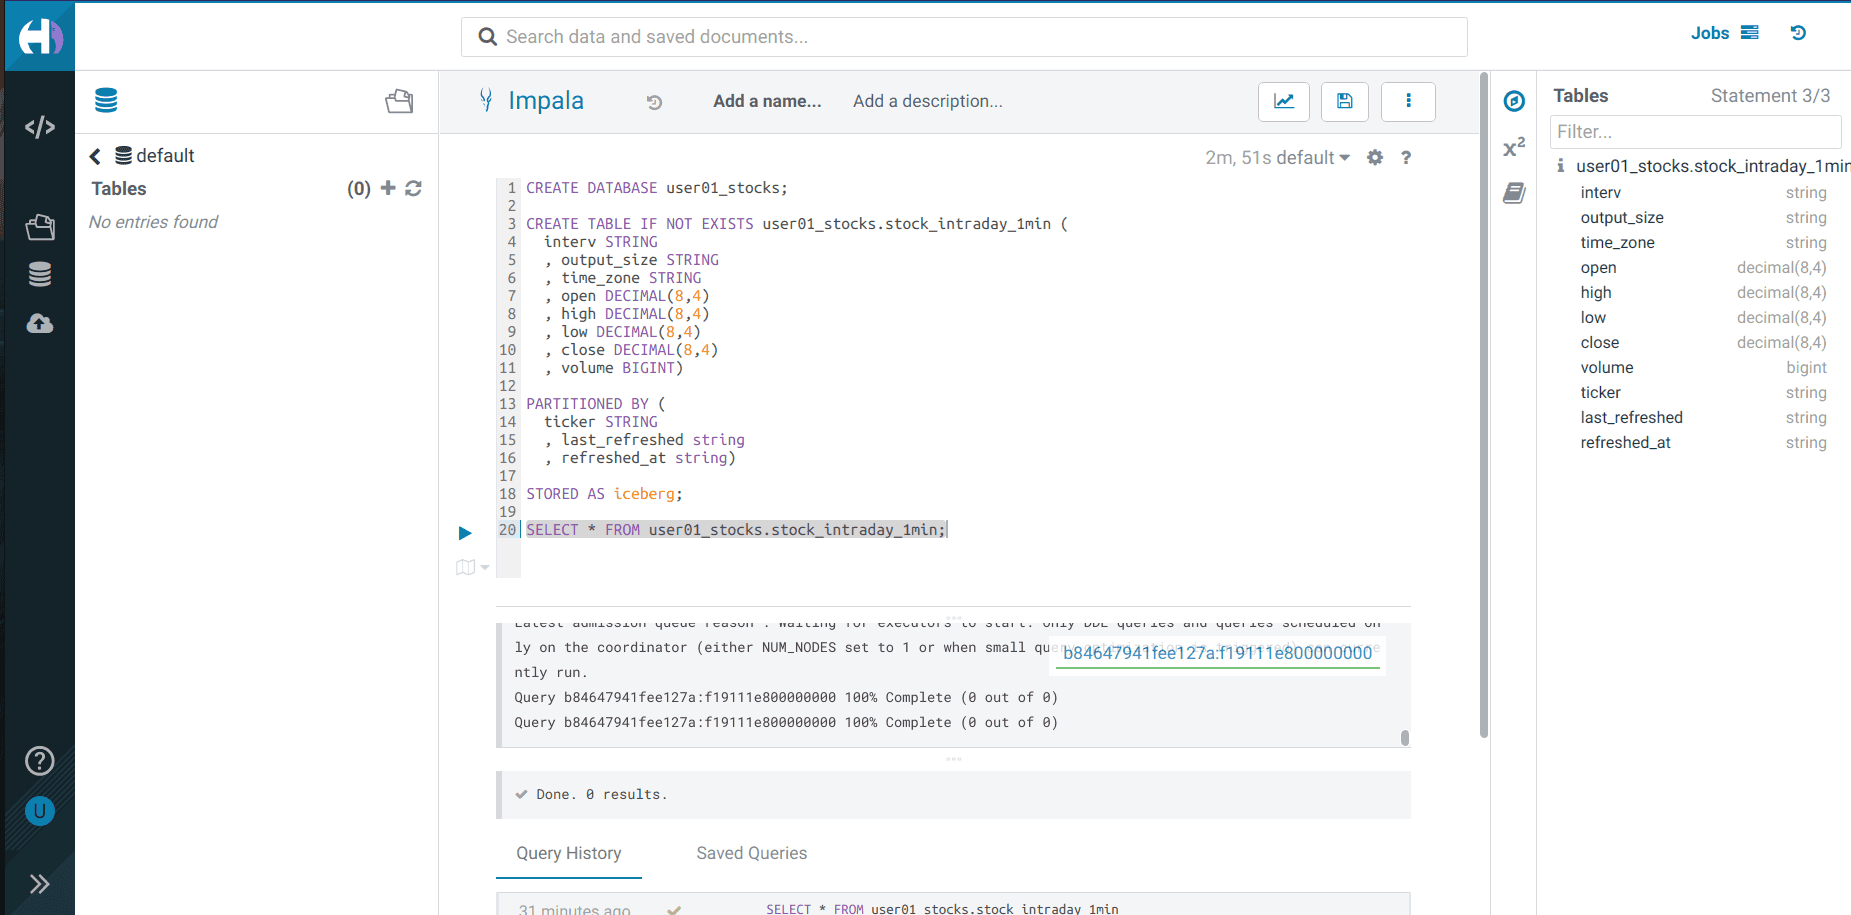
Perform a
SELECTto verify that the required permissions have been setSELECT * FROM <username>_stocks.stock_intraday_1min;

Create a pipeline to load data
Now that our Iceberg table is ready and our data is loaded to the data lake, we need to create a pipeline. This pipeline needs to detect new files in our data lake and load their content into the Iceberg table. The service we use for this purpose is Data Engineering which, as we may remember, is built on Apache Spark.
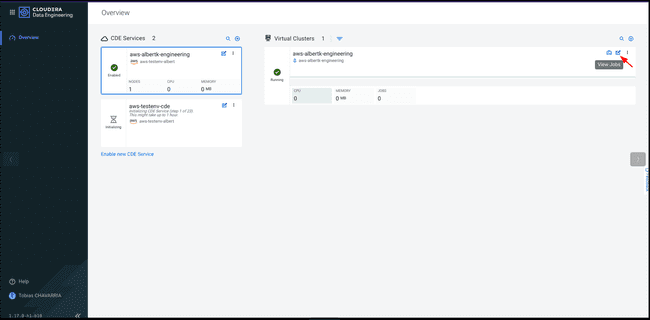
From the CDP Portal:
-
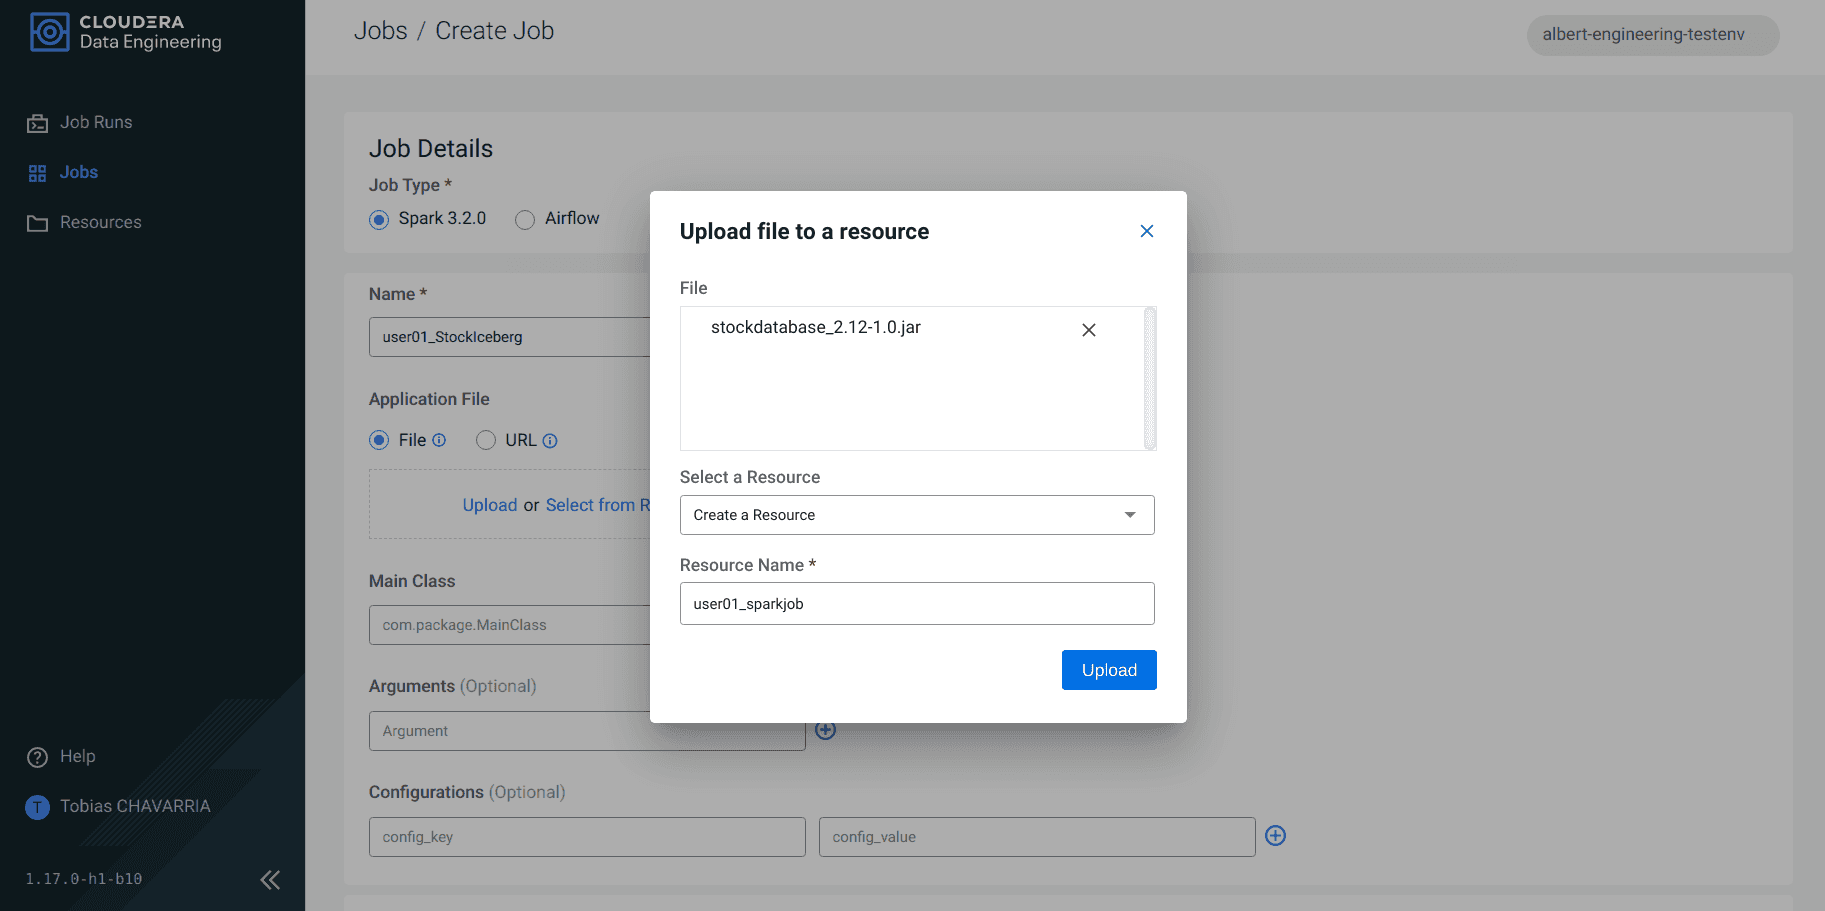
Download this
.jarfile with a pre-compiled Apache Spark job: stockdatabase_2.12-1.0.jar -
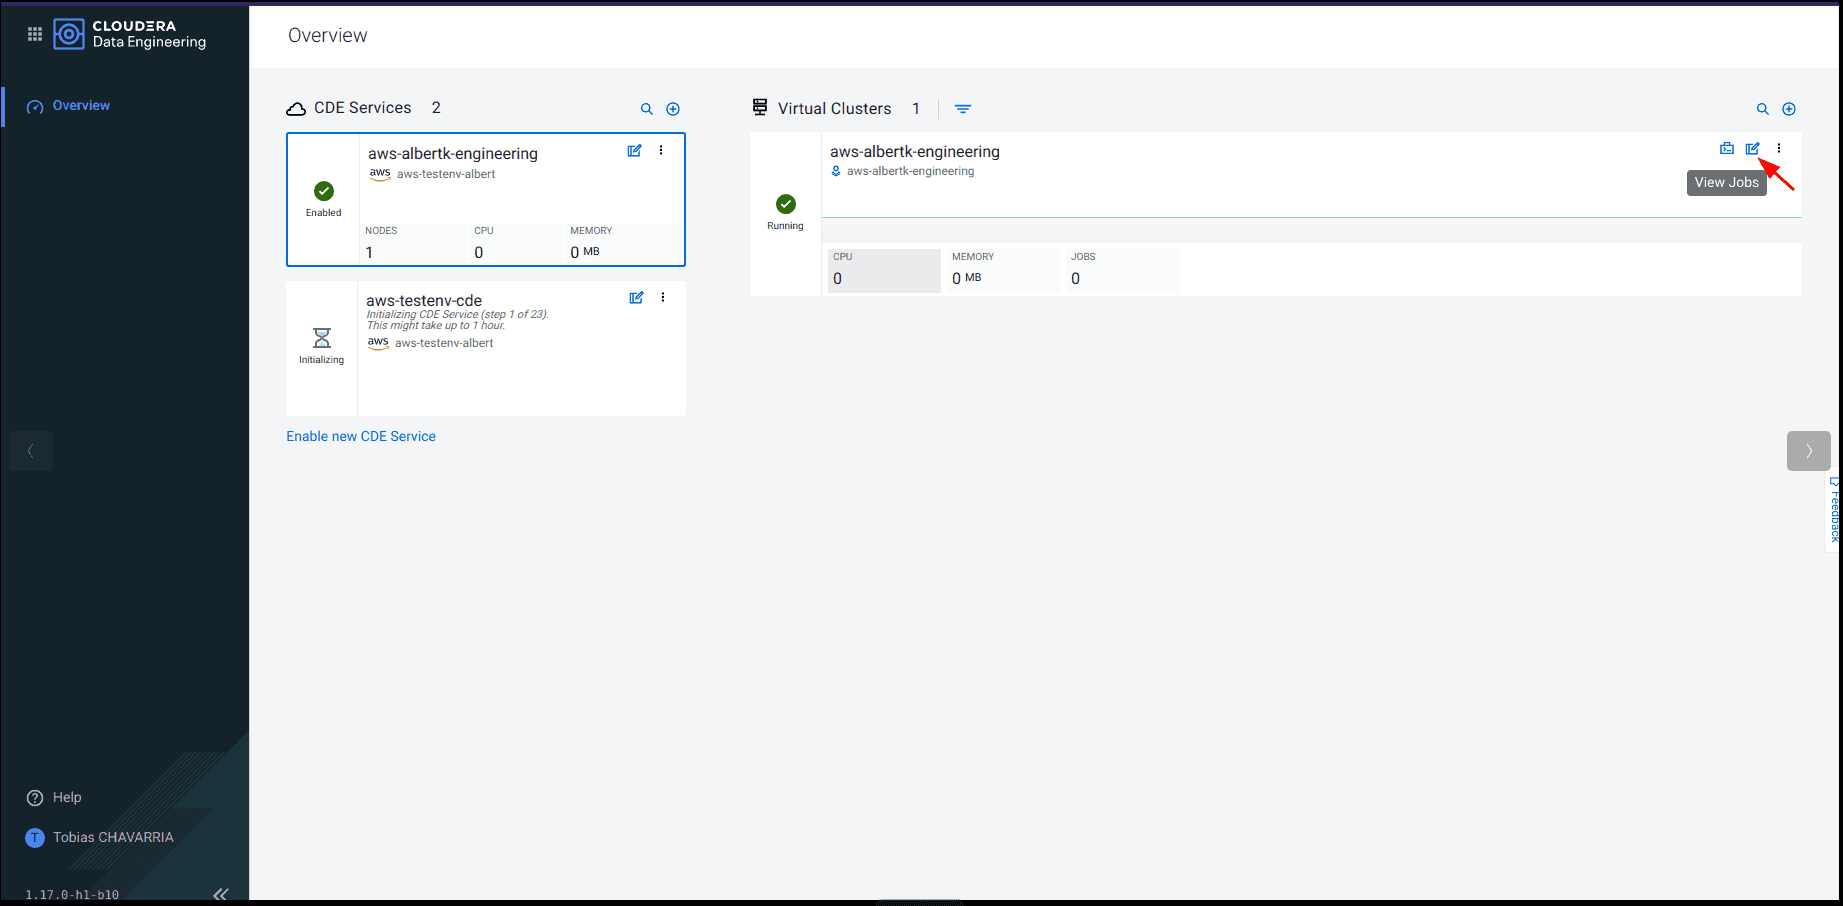
Select Data Engineering
-
On the Virtual Cluster available click the View Jobs button on the top right corner
-
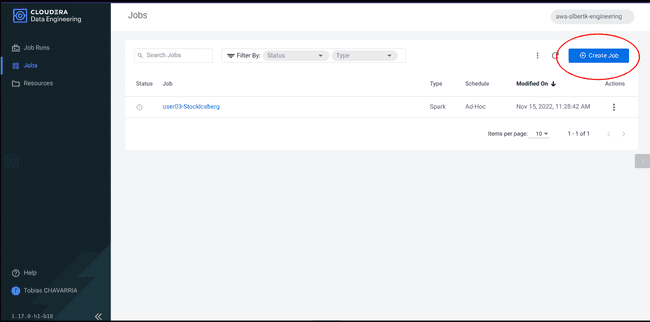
Navigate to the Jobs tab and click on Create a Job
-
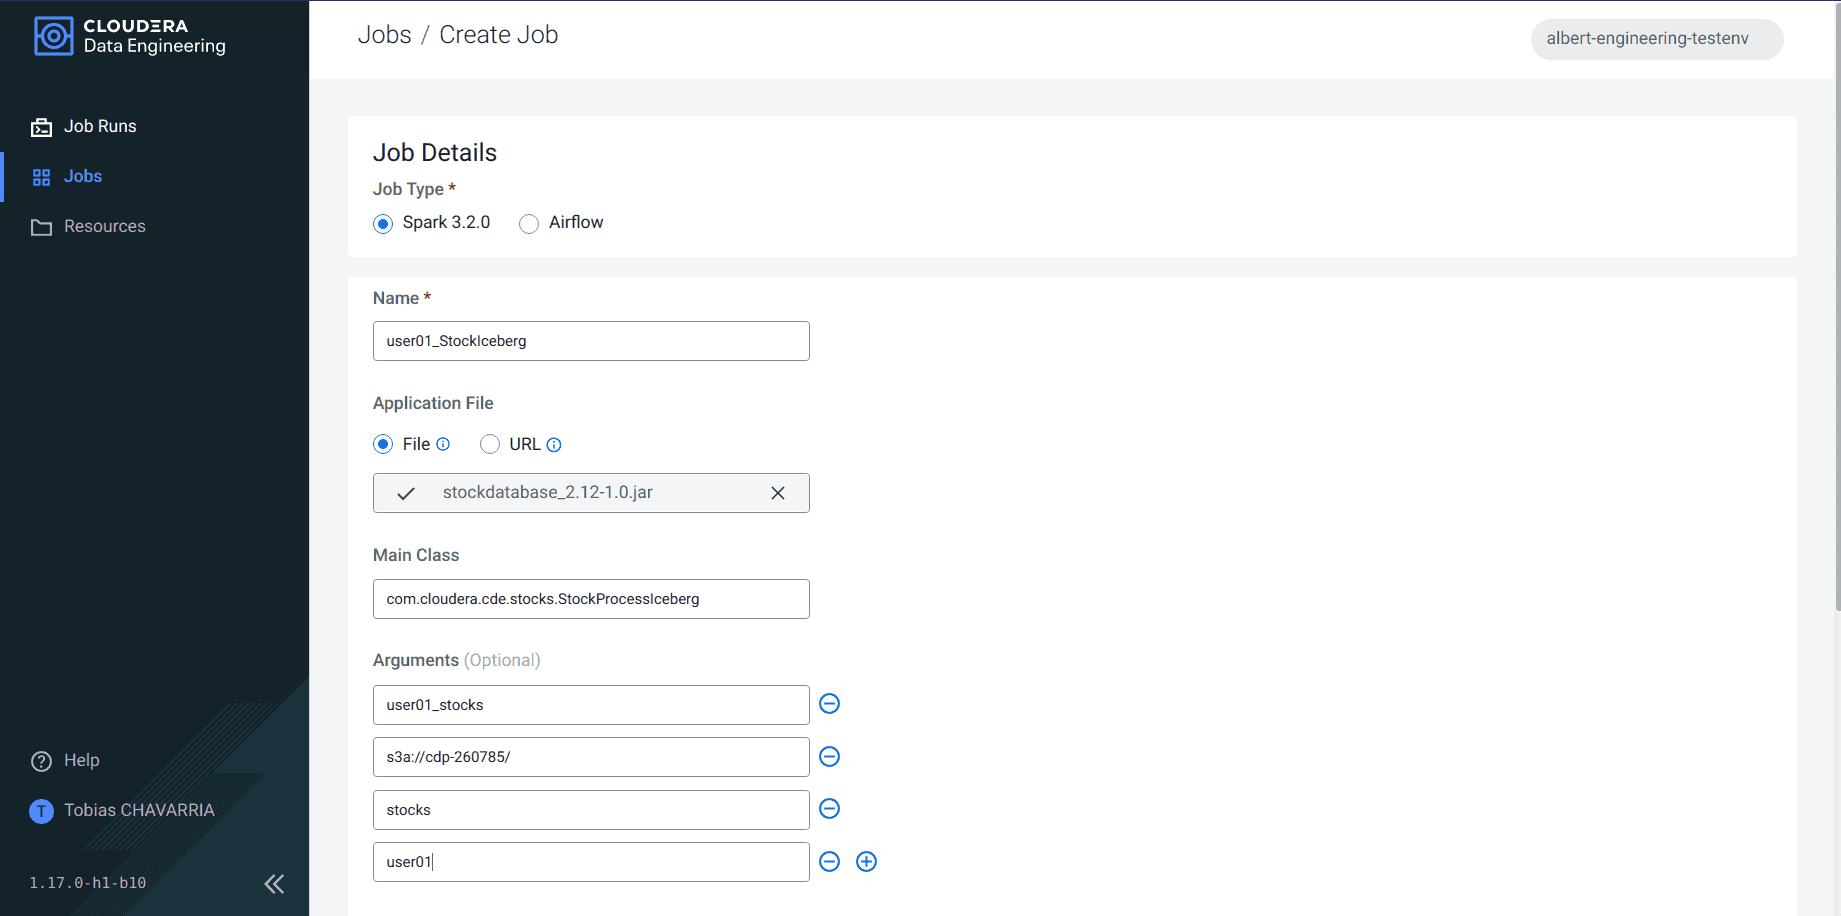
Set the Job details:
- Job type:
Spark 3.2.0 - Name:
<username>_StockIceberg - Application File:
Upload - Main Class:
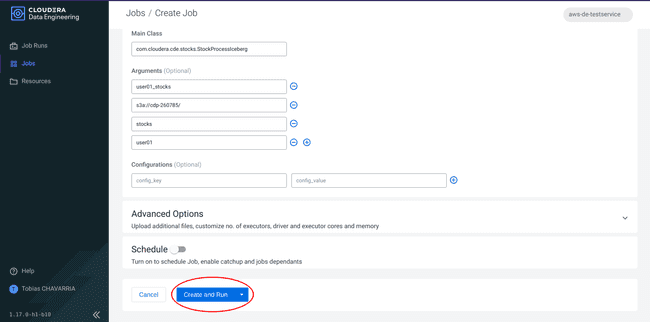
com.cloudera.cde.stocks.StockProcessIceberg - Arguments:
<username>_stockss3a://<data lake's bucket>/stocks<username>

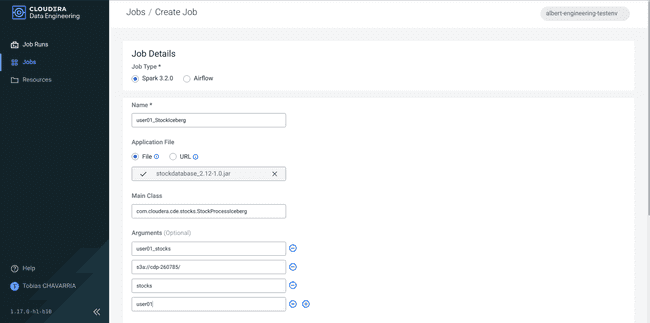
- Job type:
-
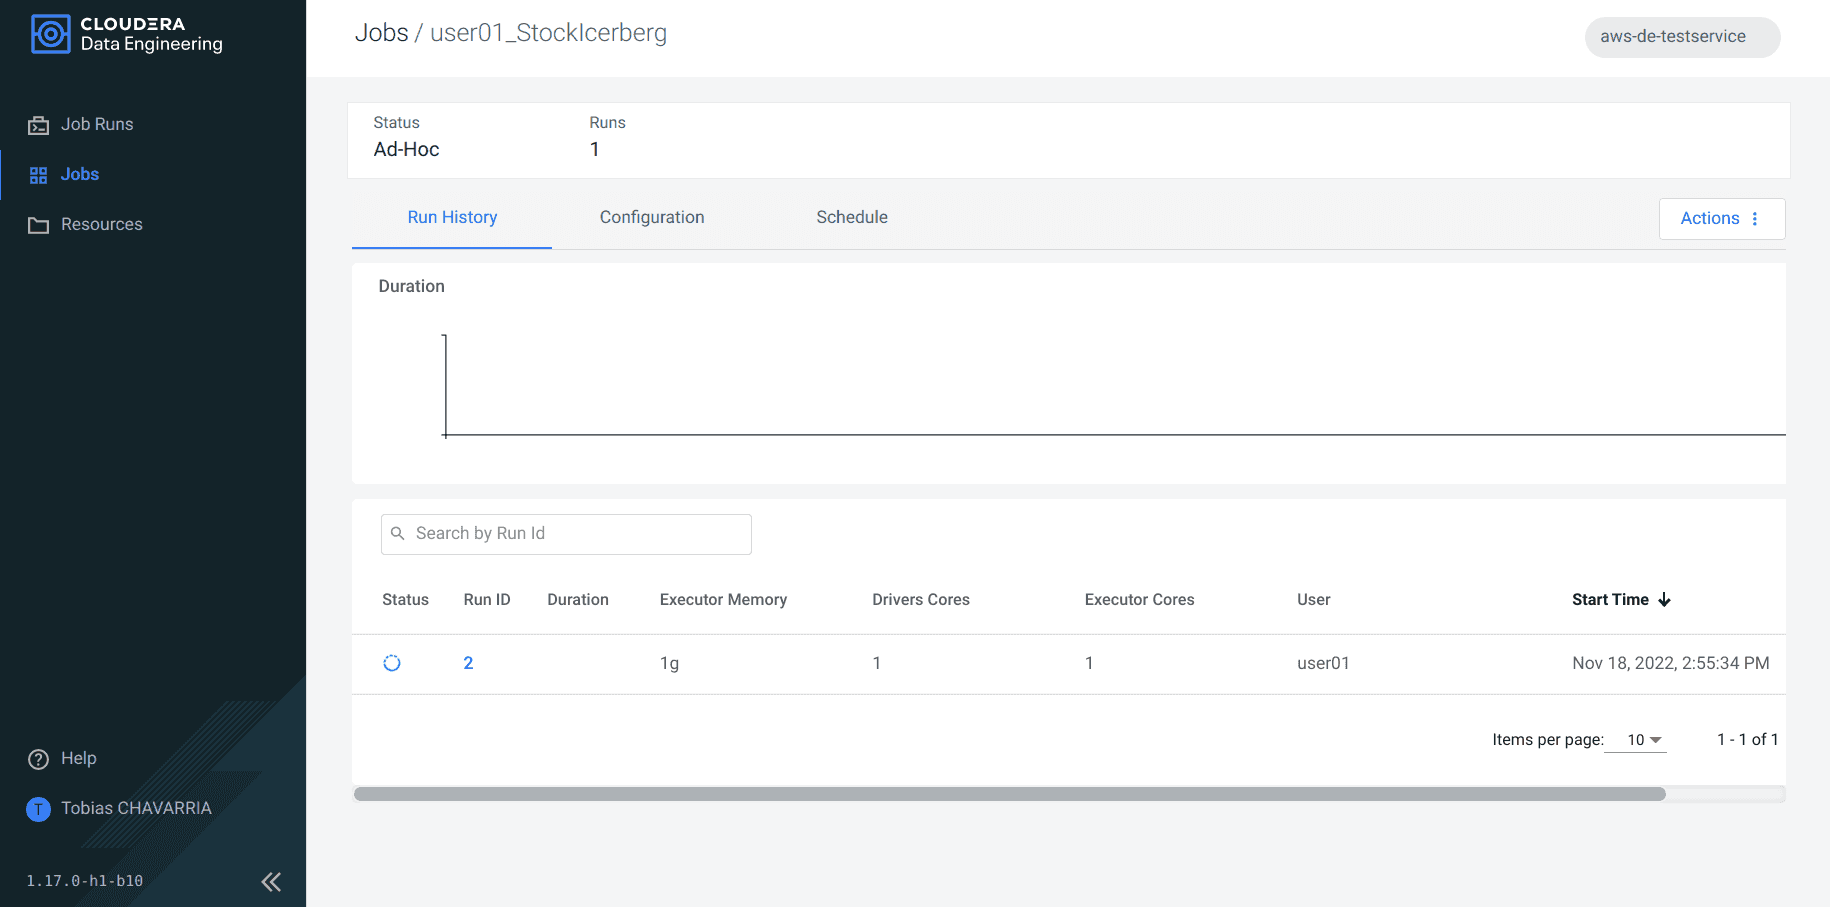
Click on Create and Run
-
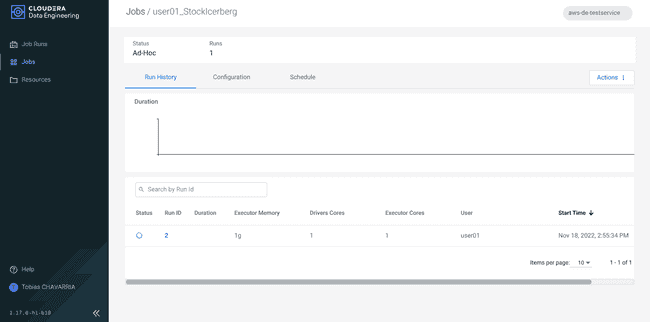
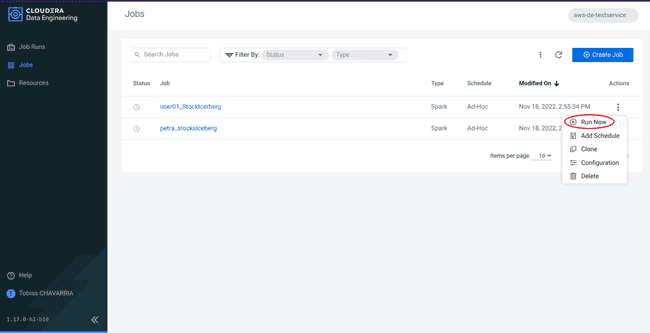
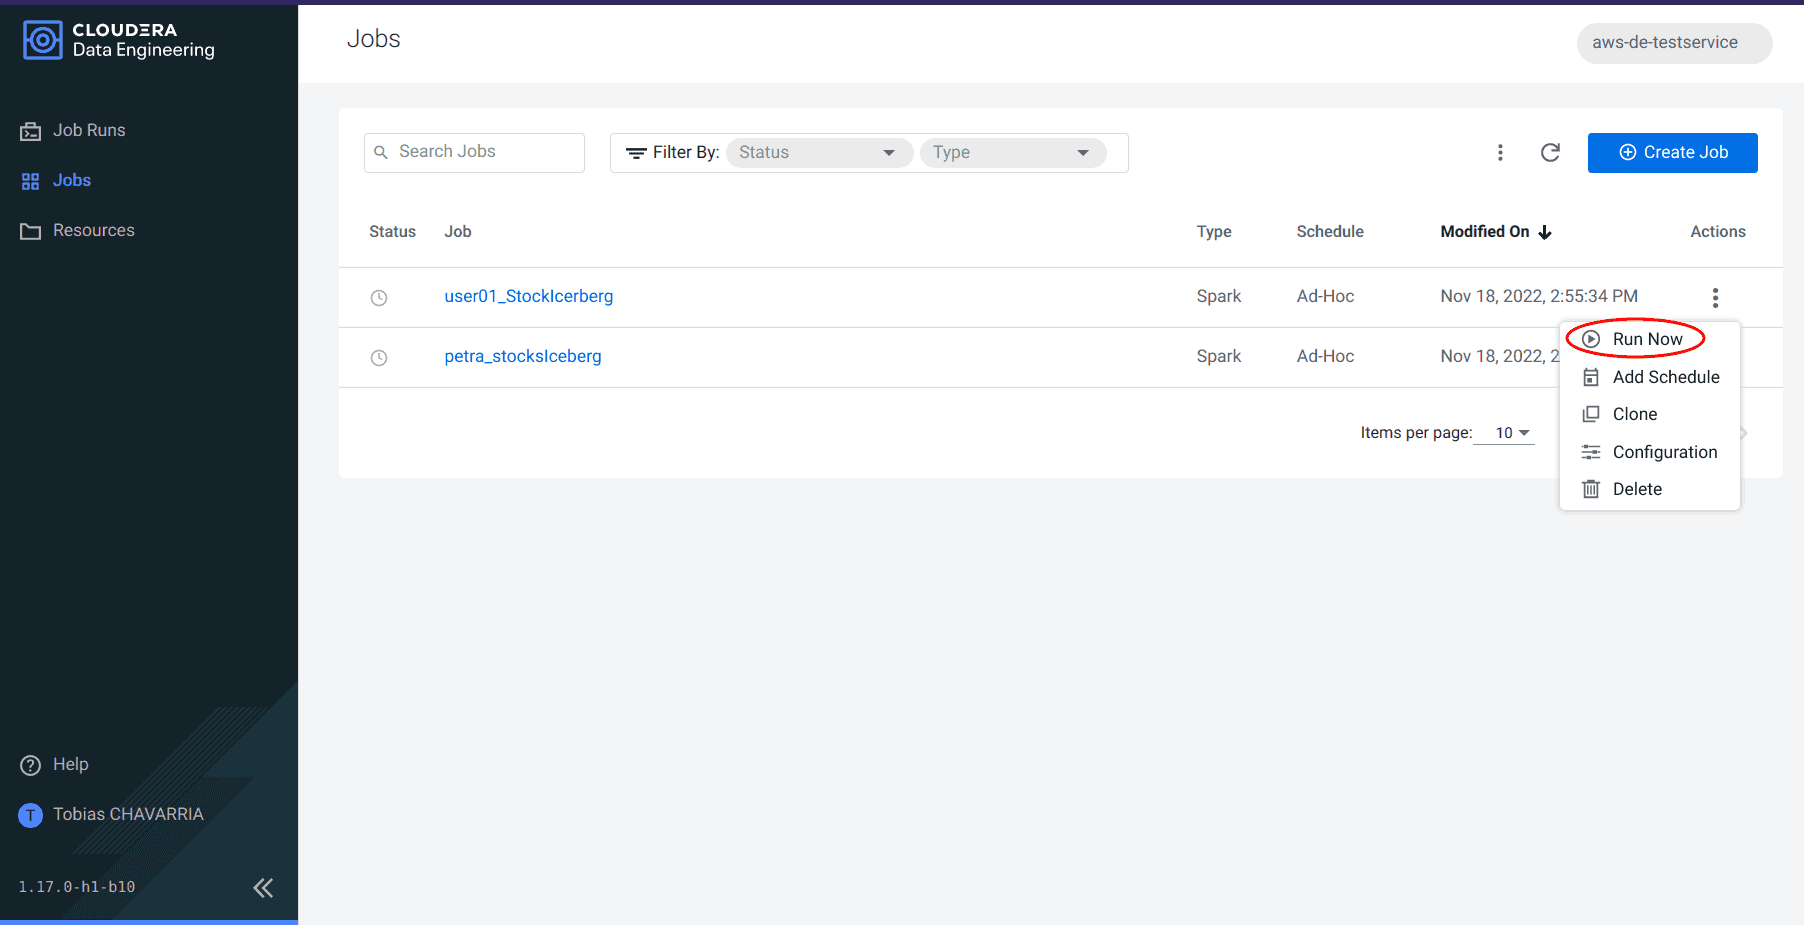
Navigate to Jobs and select the job created above to check the status.


This application does the following:
- Check new files in the
newdirectory - Create a temp table in Spark and identifies duplicated rows (in case that NiFi loaded the same data again)
MERGE INTOthe final table,INSERTnew data orUPDATEif exists- Archive files in the bucket
- After execution, the processed files remain in your S3 bucket but are moved into the
processed-datadirectory
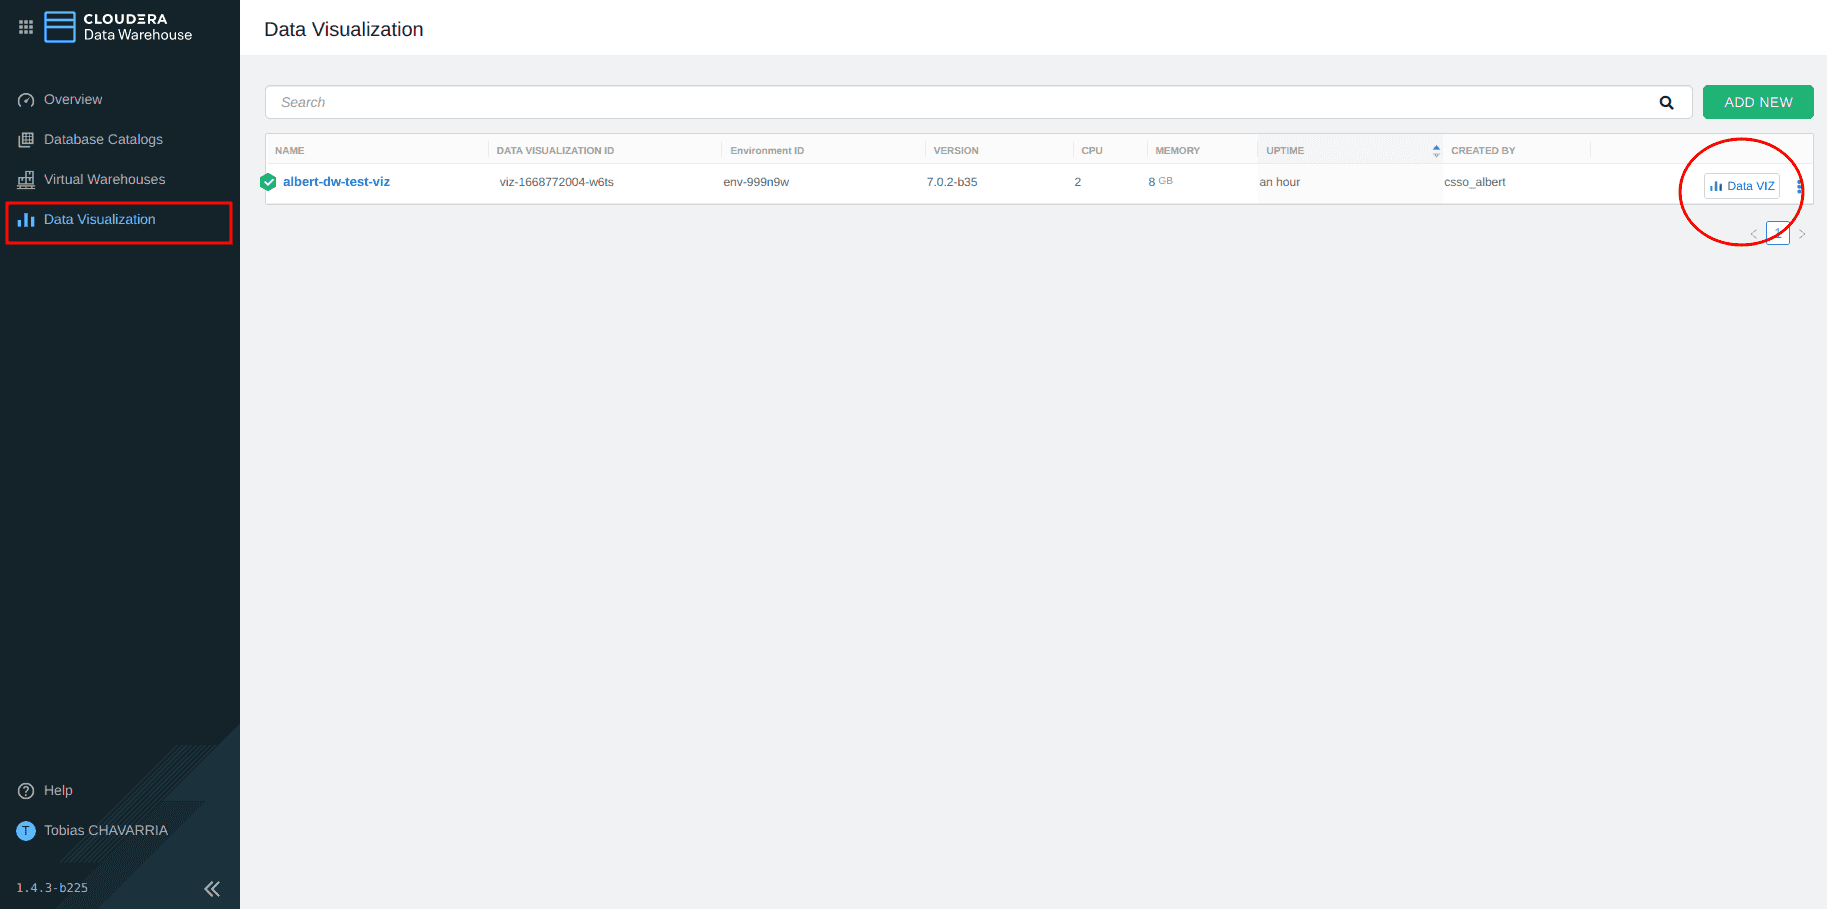
Serving Layer: A Dashboard in CDP Data Visualization
The final step in our end-to-end solution is to create the self-service solution. For this, we use the built-in Data Visualization feature of the Data Warehouse service.
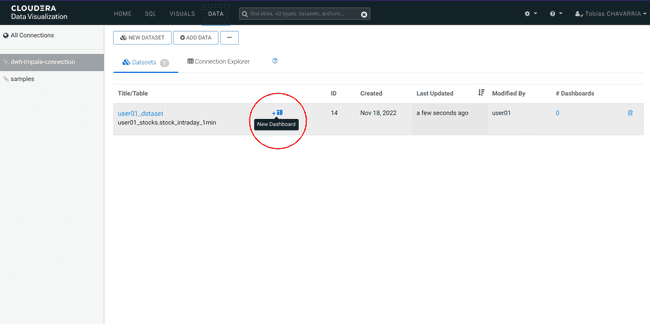
Create a dataset
-
Navigate back to the Cloudera Data Warehouse
-
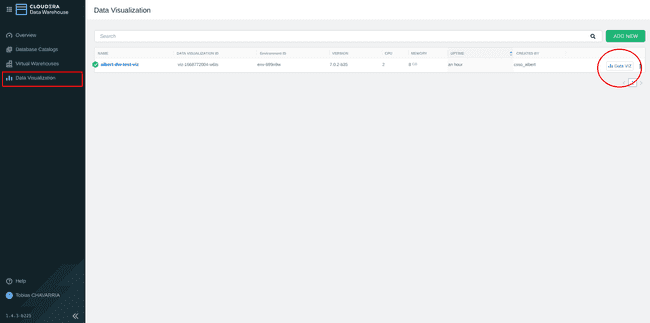
On the left menu choose: Data Visualization and click the Data VIZ button on the right.
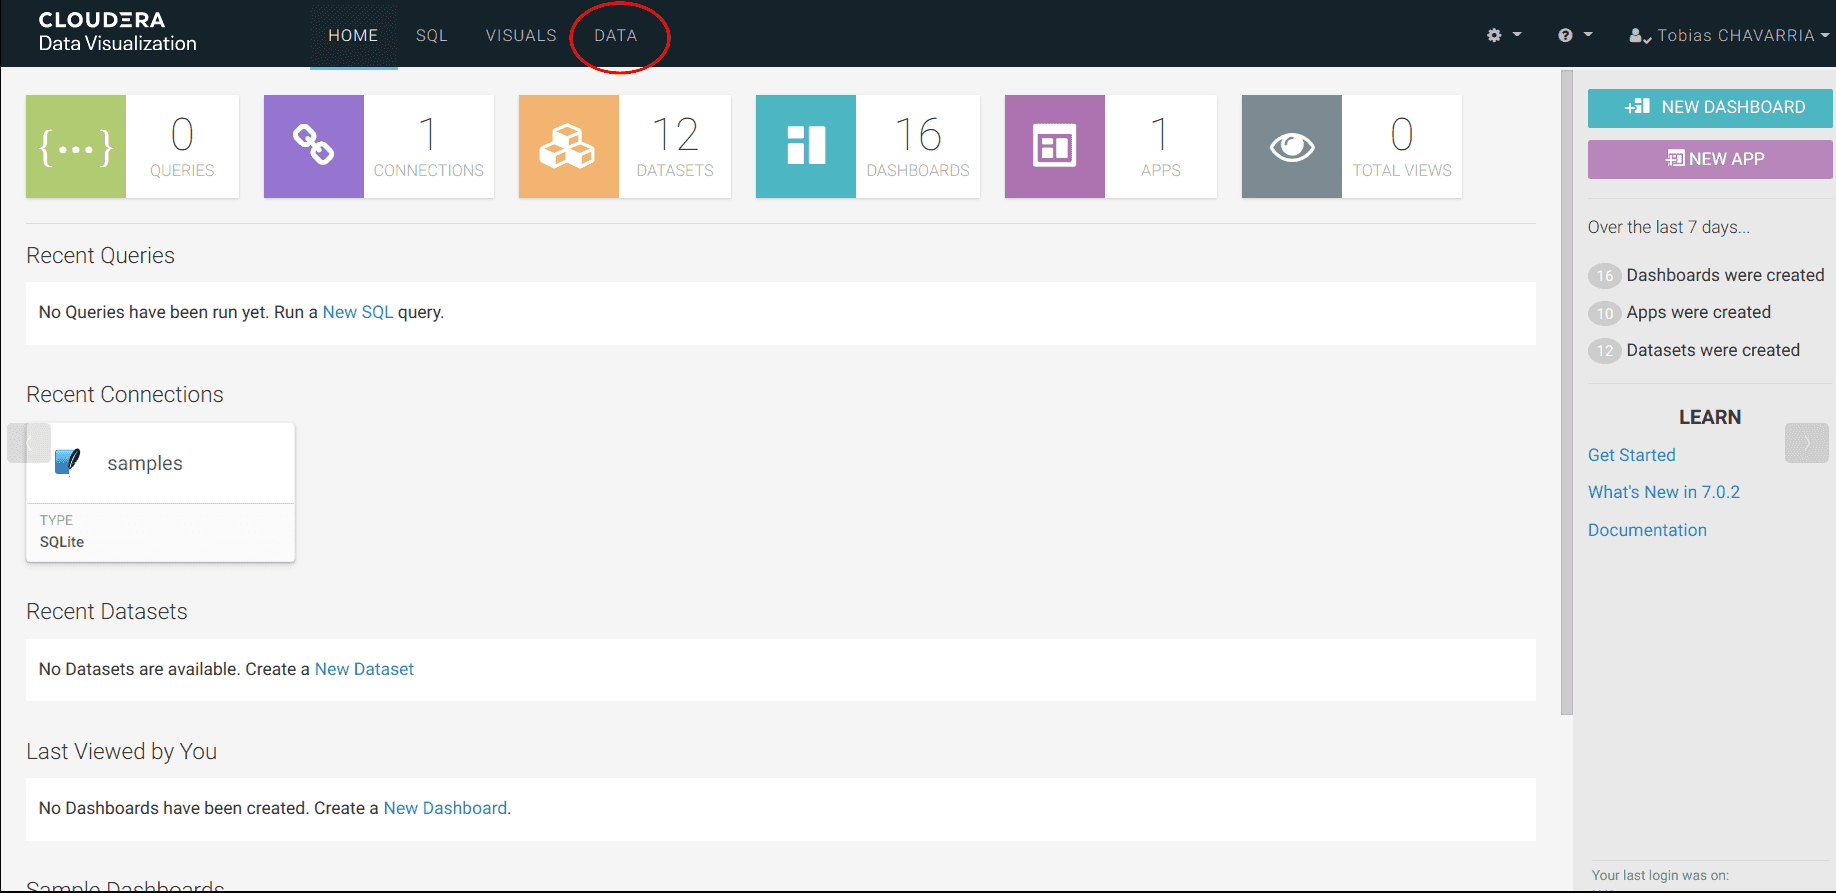
-
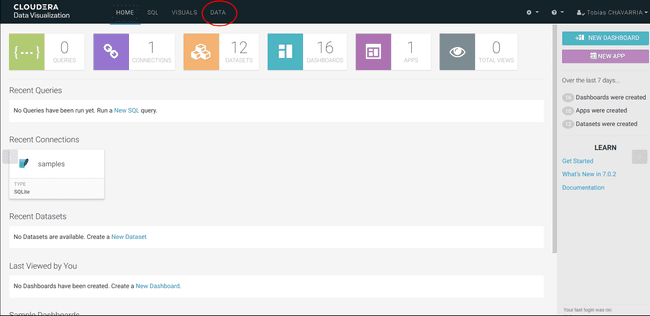
On the top of the screen click on DATA
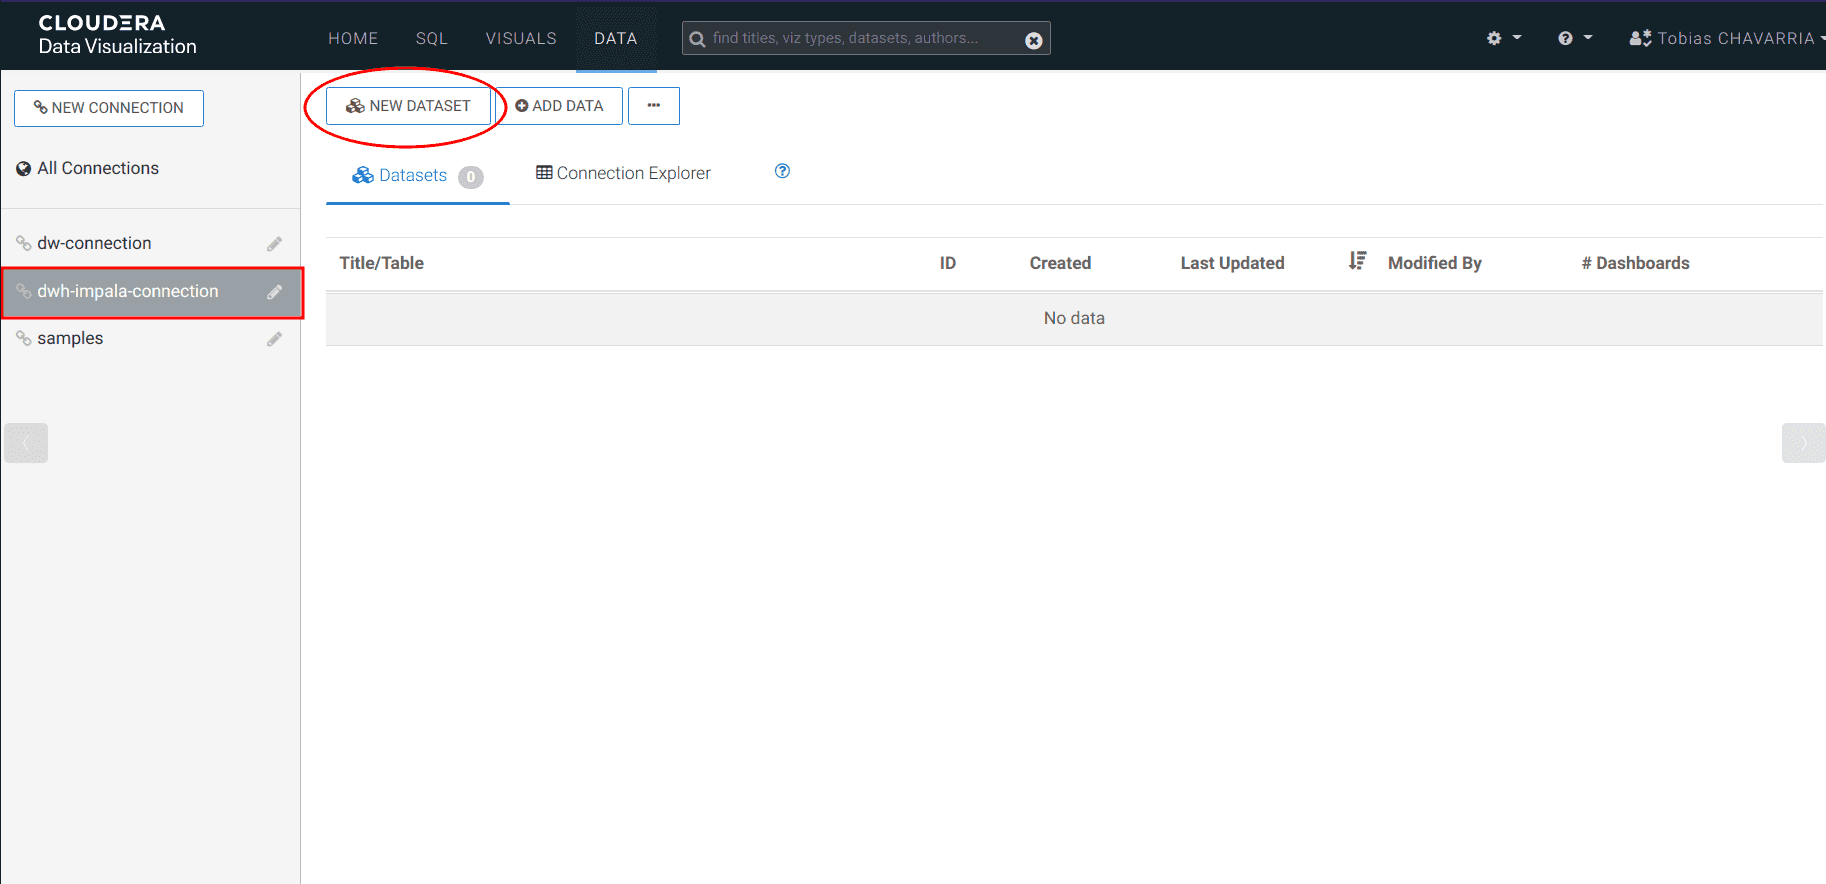
-
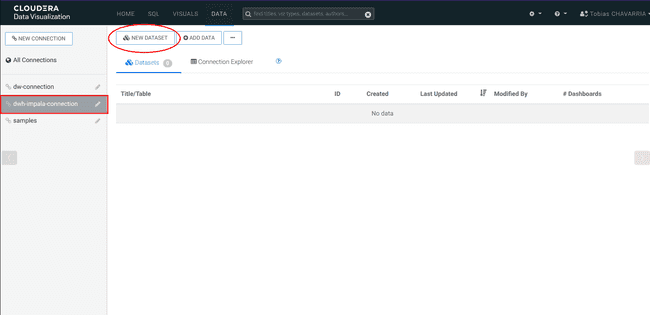
On the left select the dwh-impala-connection connection
-
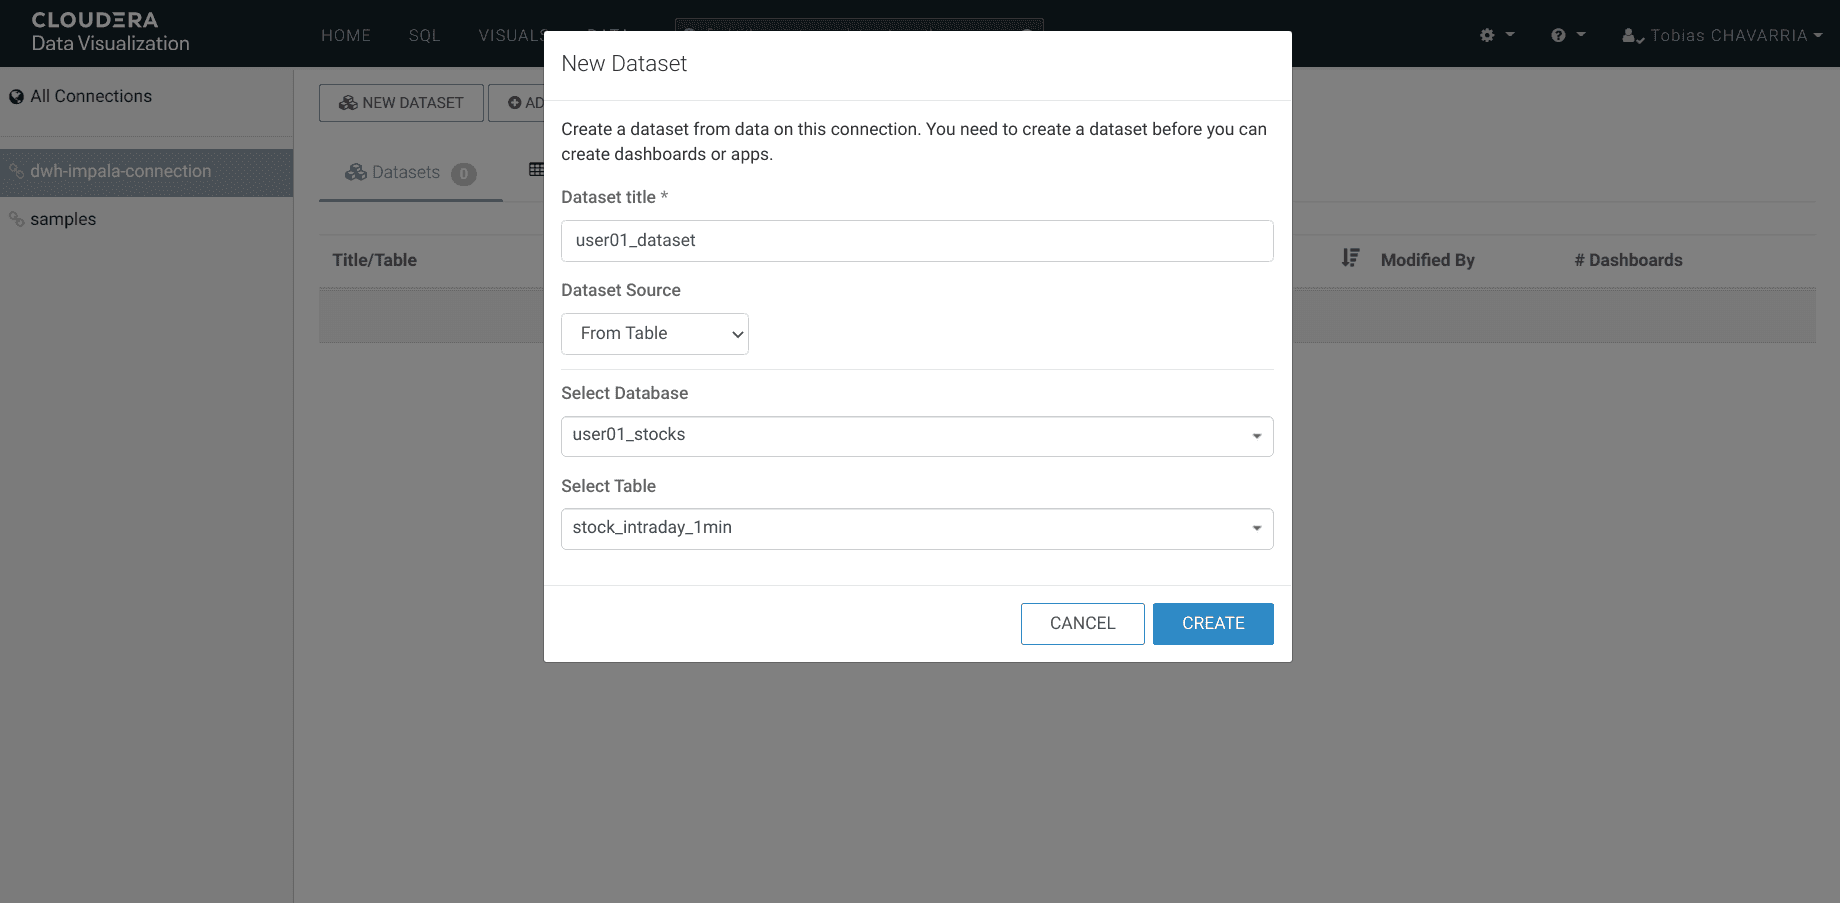
Click on NEW DATASET and set:
- Dataset title:
<username>_dataset - Dataset Source:
From Table - Select Database:
<username>_stocks - Select Table:
stocks_intraday_1min - Create
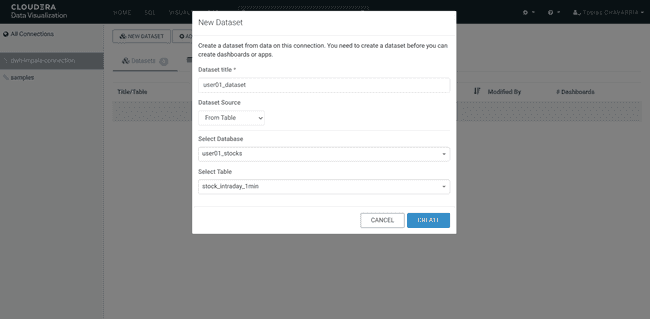
- Dataset title:
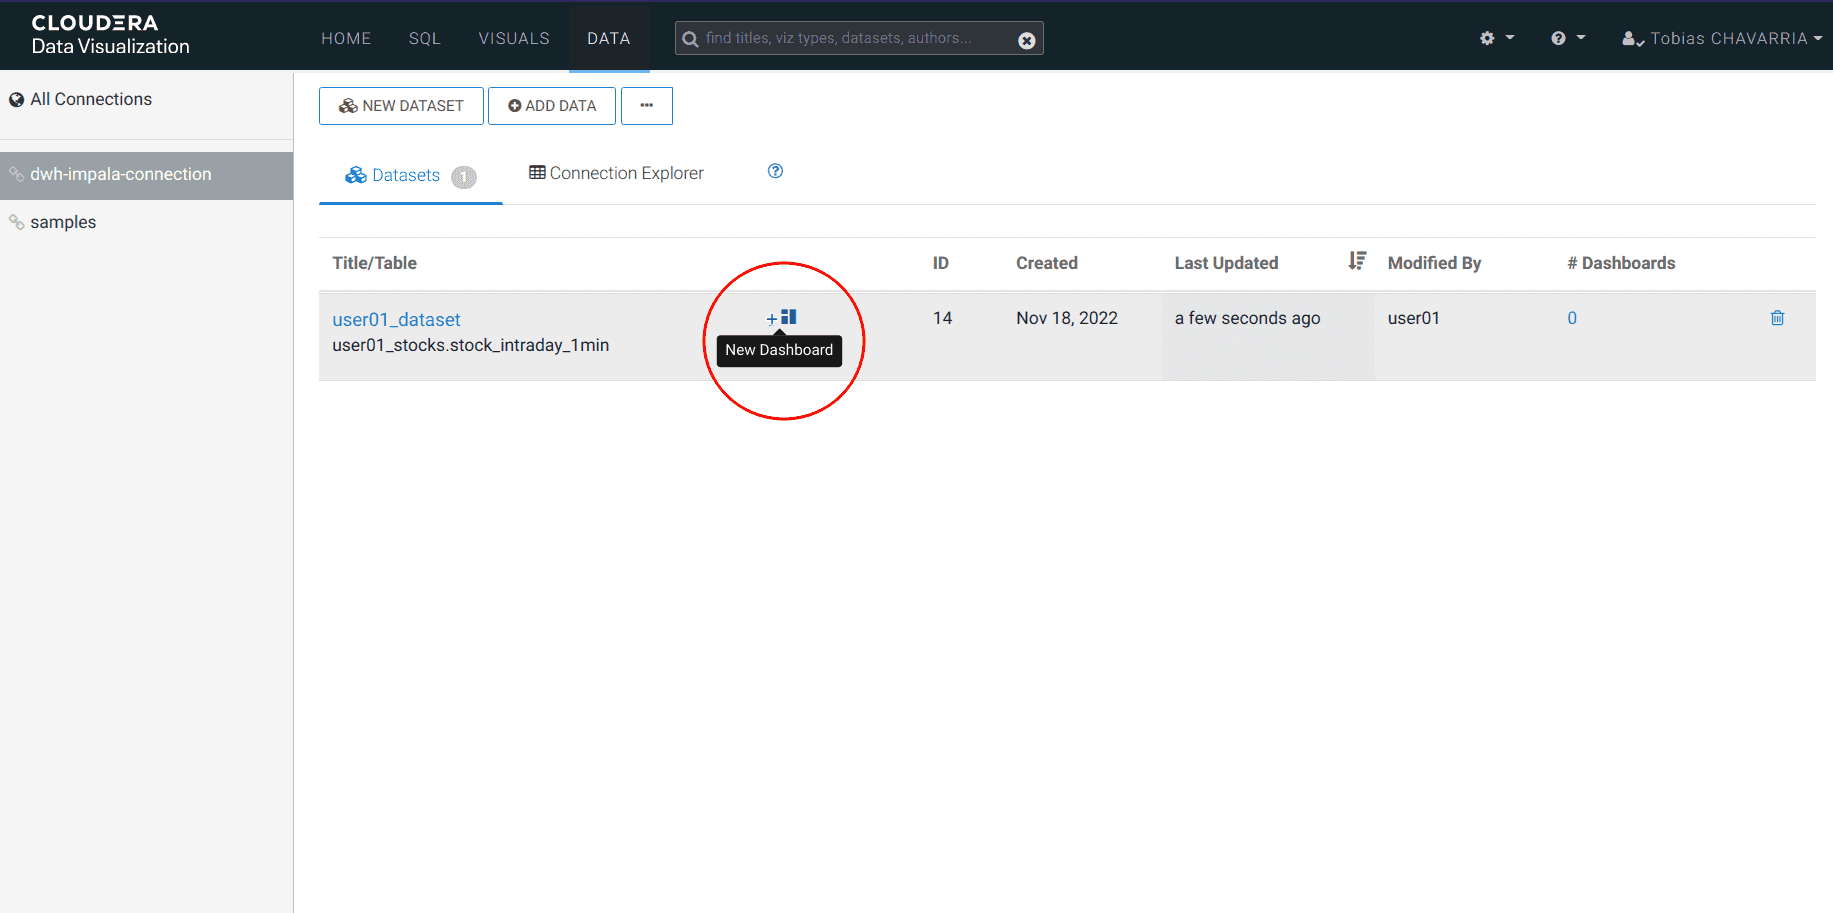
Create a dashboard
-
Click on New Dashboard
-
Wait a few seconds until you get the following
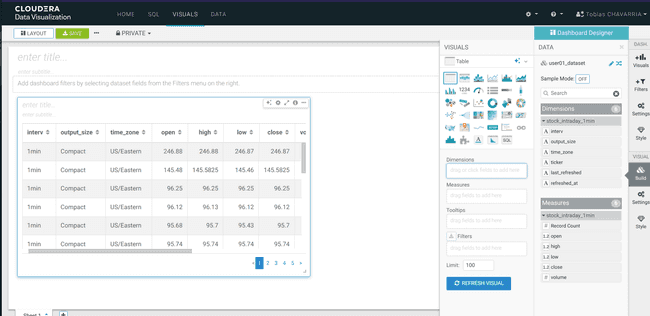
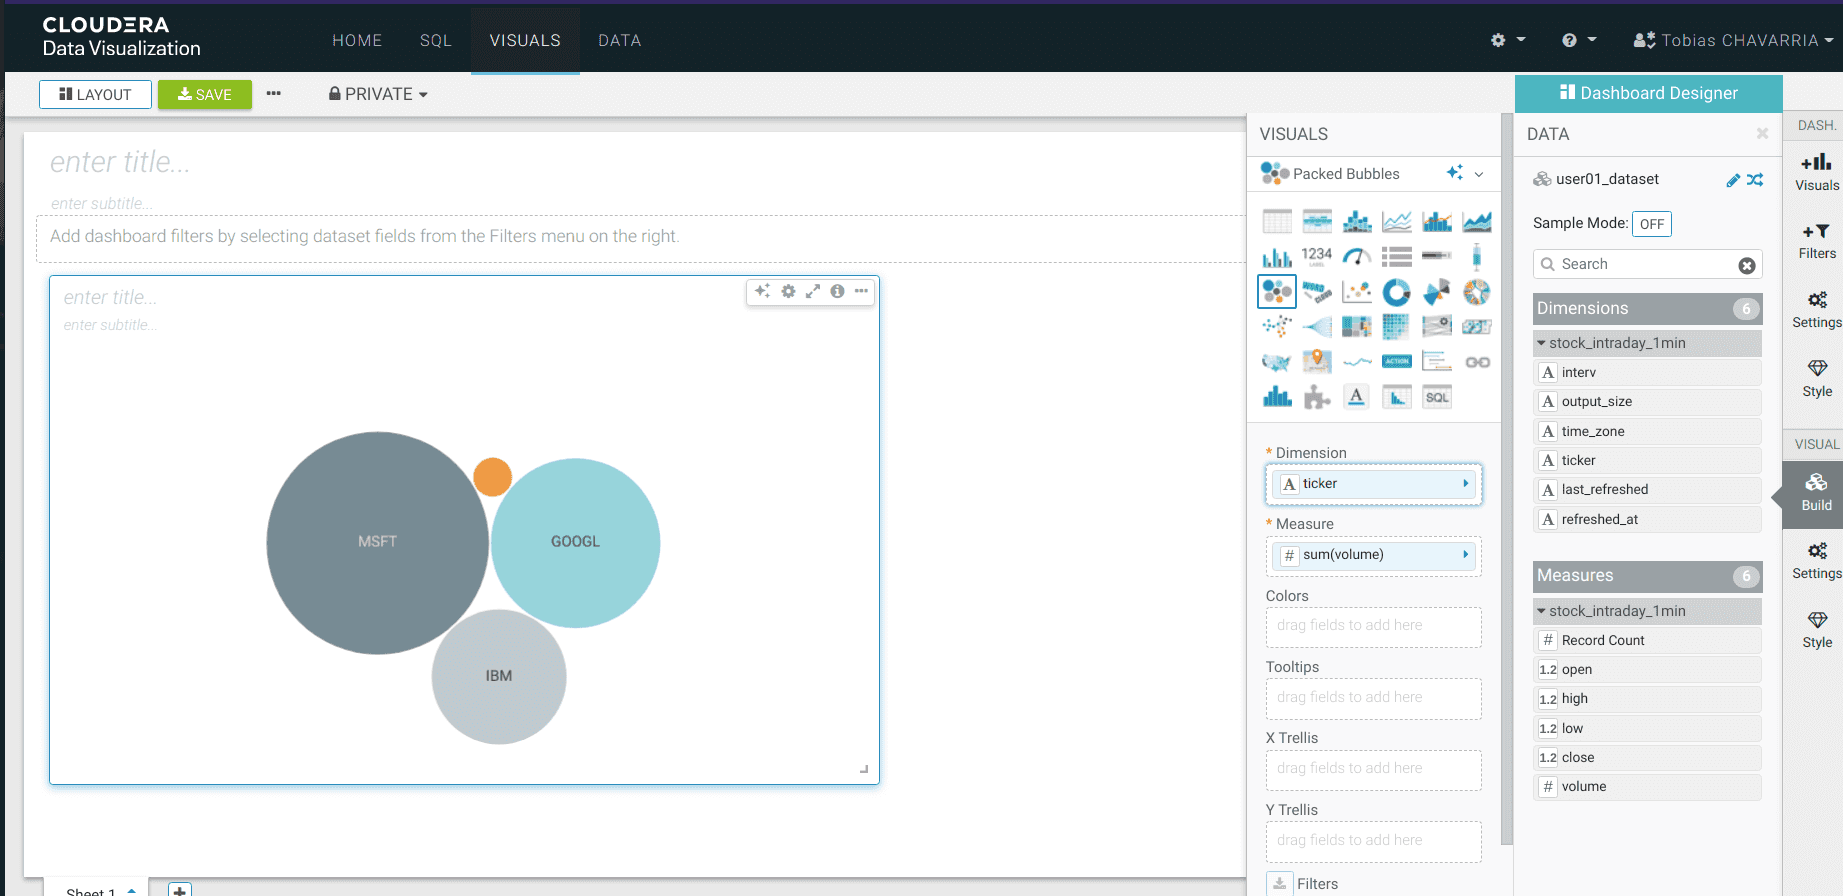
-
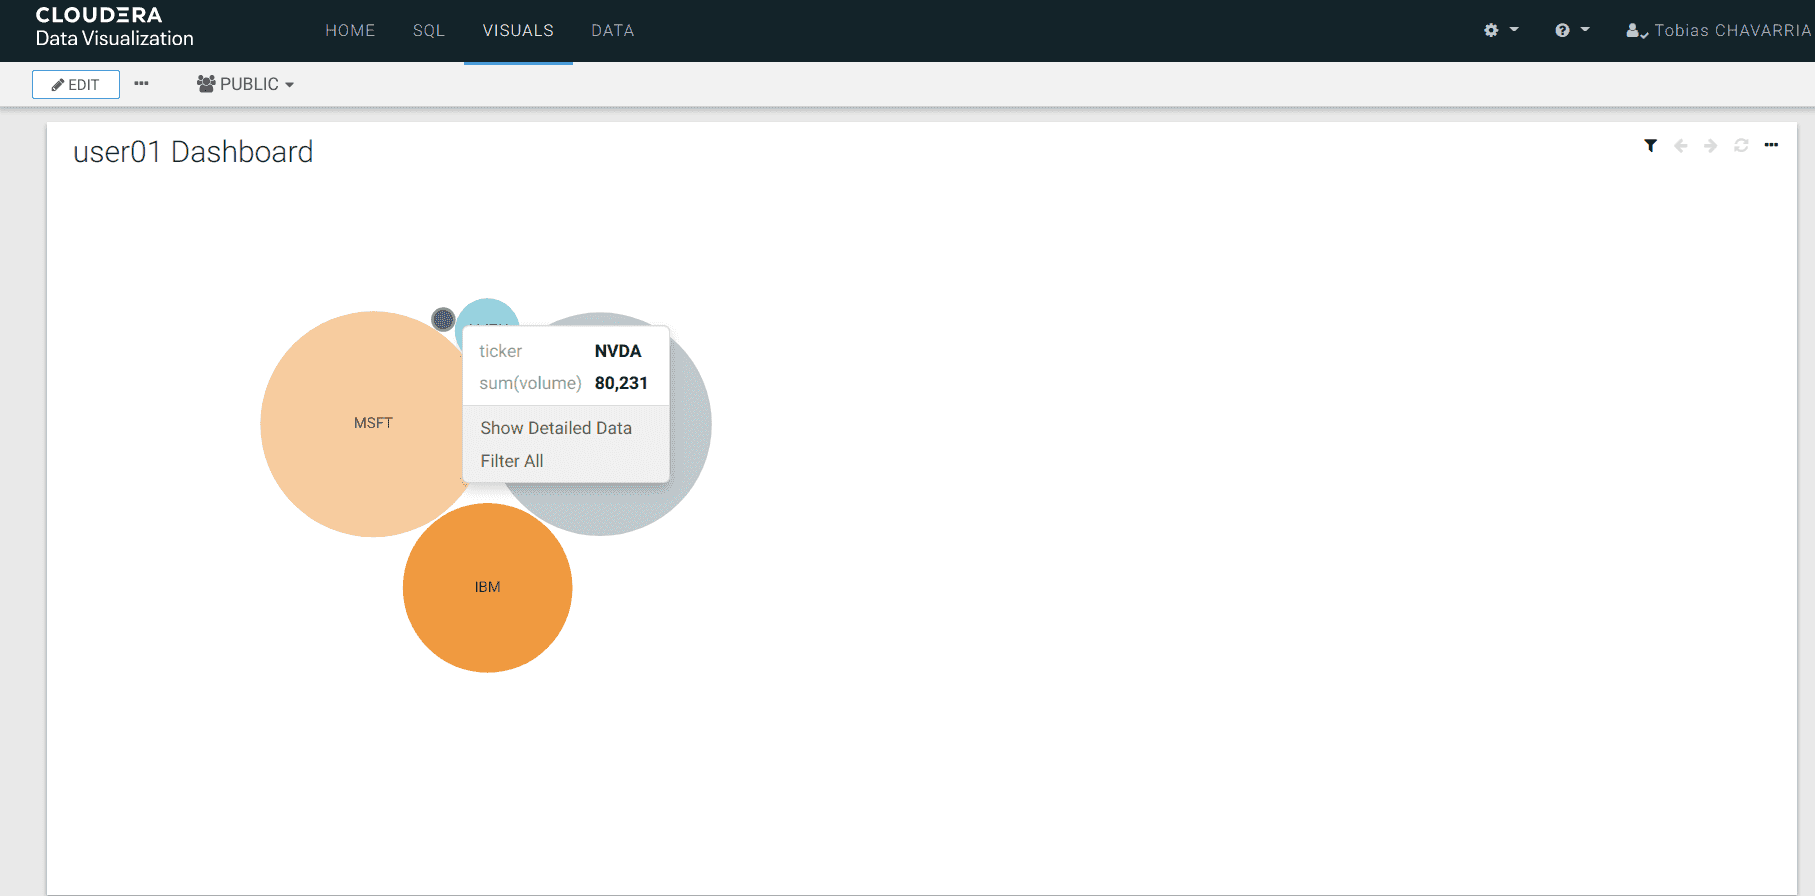
On the Visuals tab drag:
- Dimensions:
ticker - Measure:
volume REFRESH VISUAL- Visuals ->
Packed Bubbles
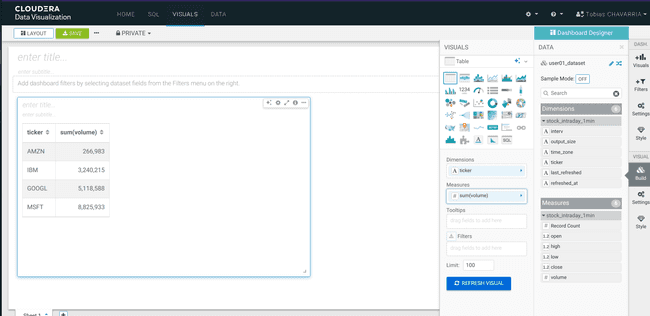

- Dimensions:
-
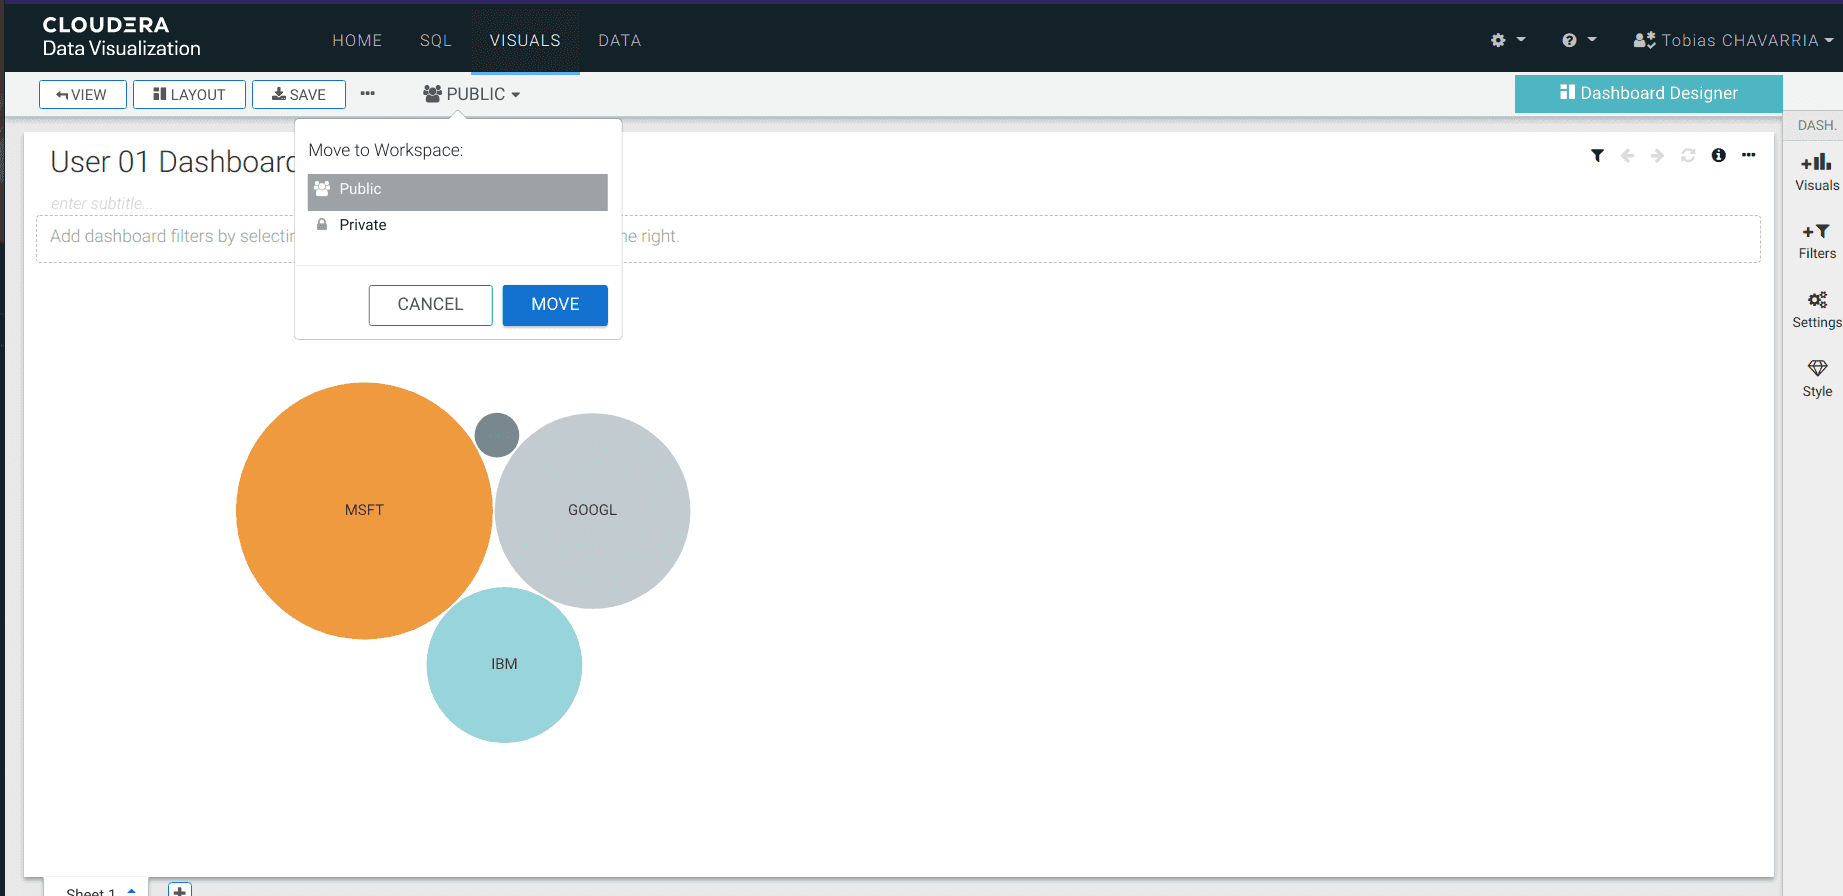
Save the Dashboard and make it public
- Enter a title:
<username> Dashboard - Navigate to the top left corner click on
Save - Change:
Private->Public - Click Move
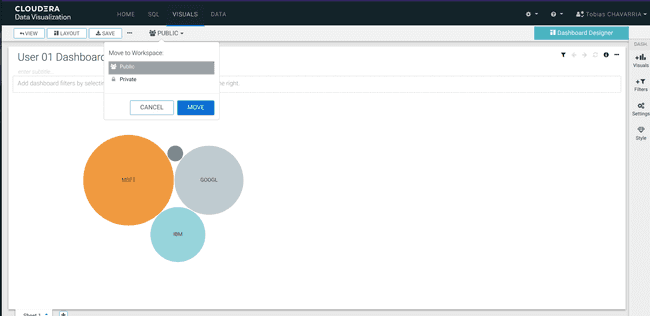
- Enter a title:


And that is it! You have now created an end-to-end big data solution with CDP Public Cloud. Finally, let’s track an additional stock and have it outputted in Data Warehouse.
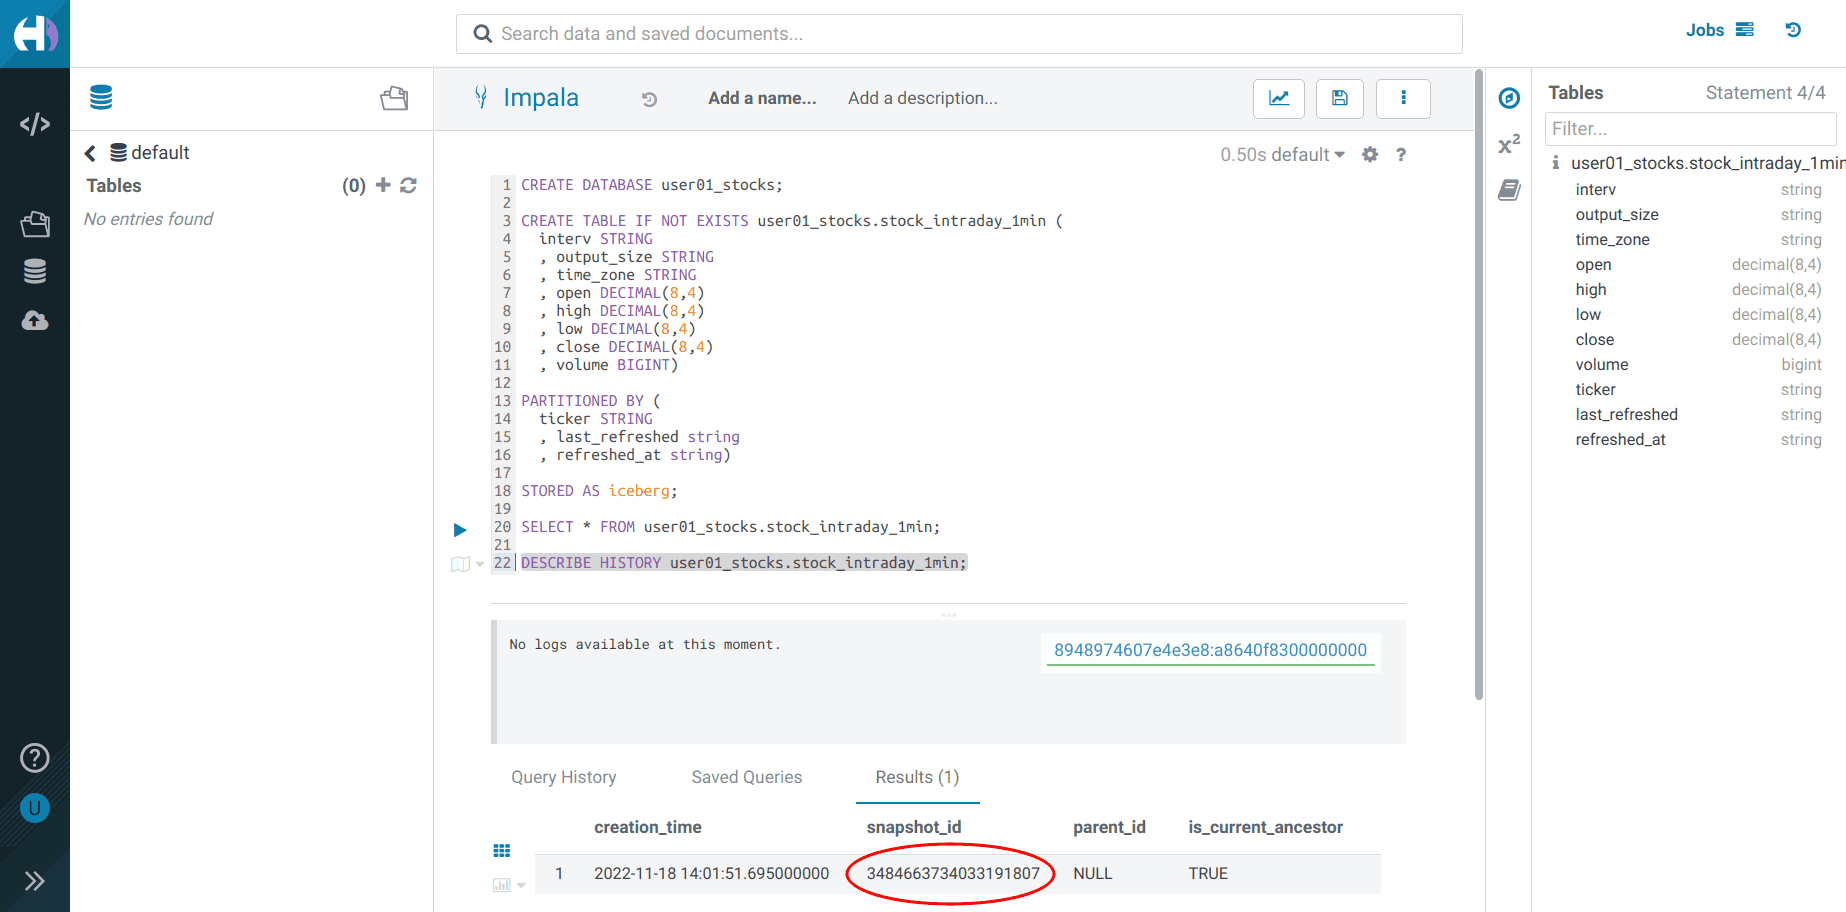
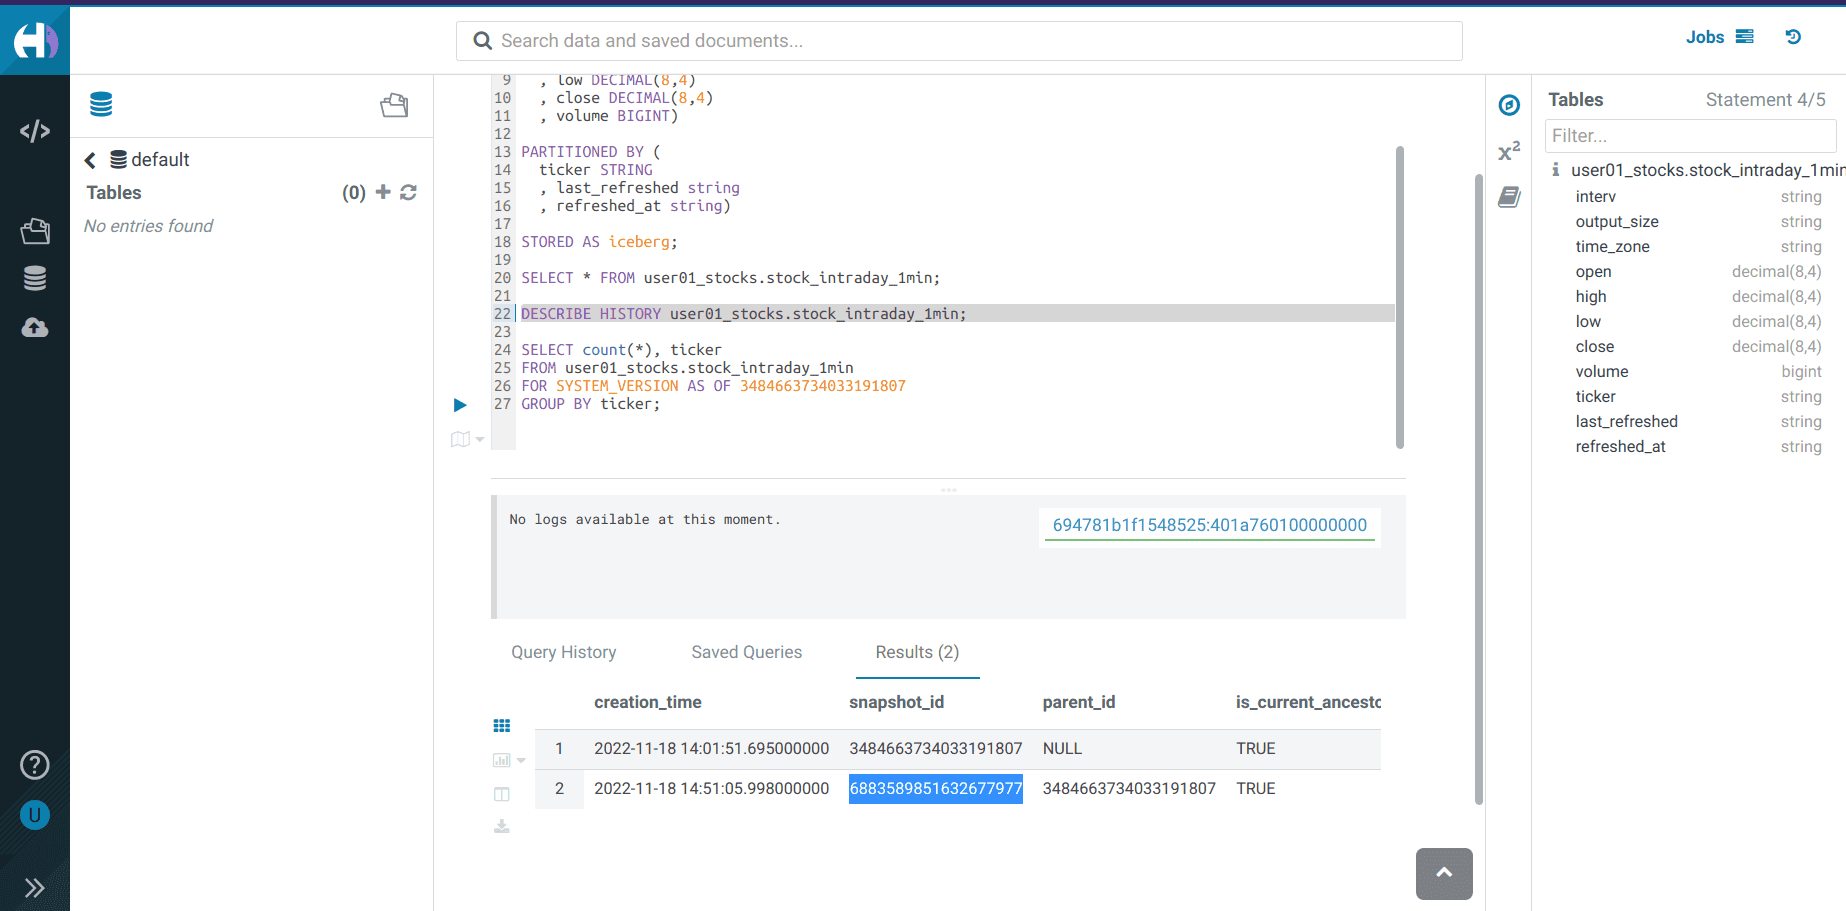
Iceberg snapshots
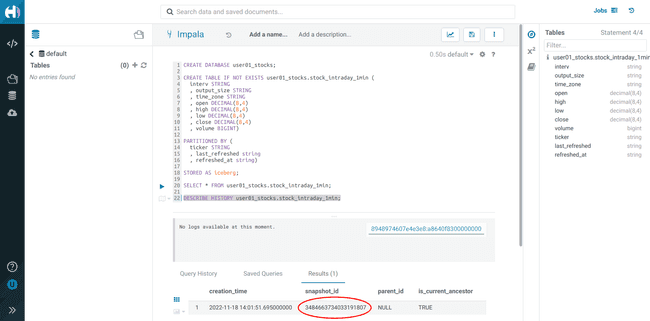
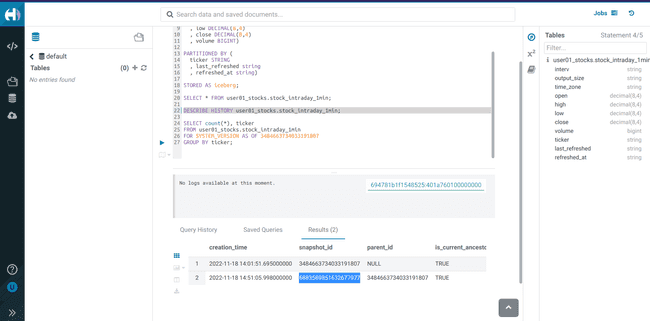
Let’s see the Iceberg table history
-
Go back to the Hue Editor
-
Execute and take note of the
<snapshot_id>DESCRIBE HISTORY <username>_stocks.stock_intraday_1min;
-
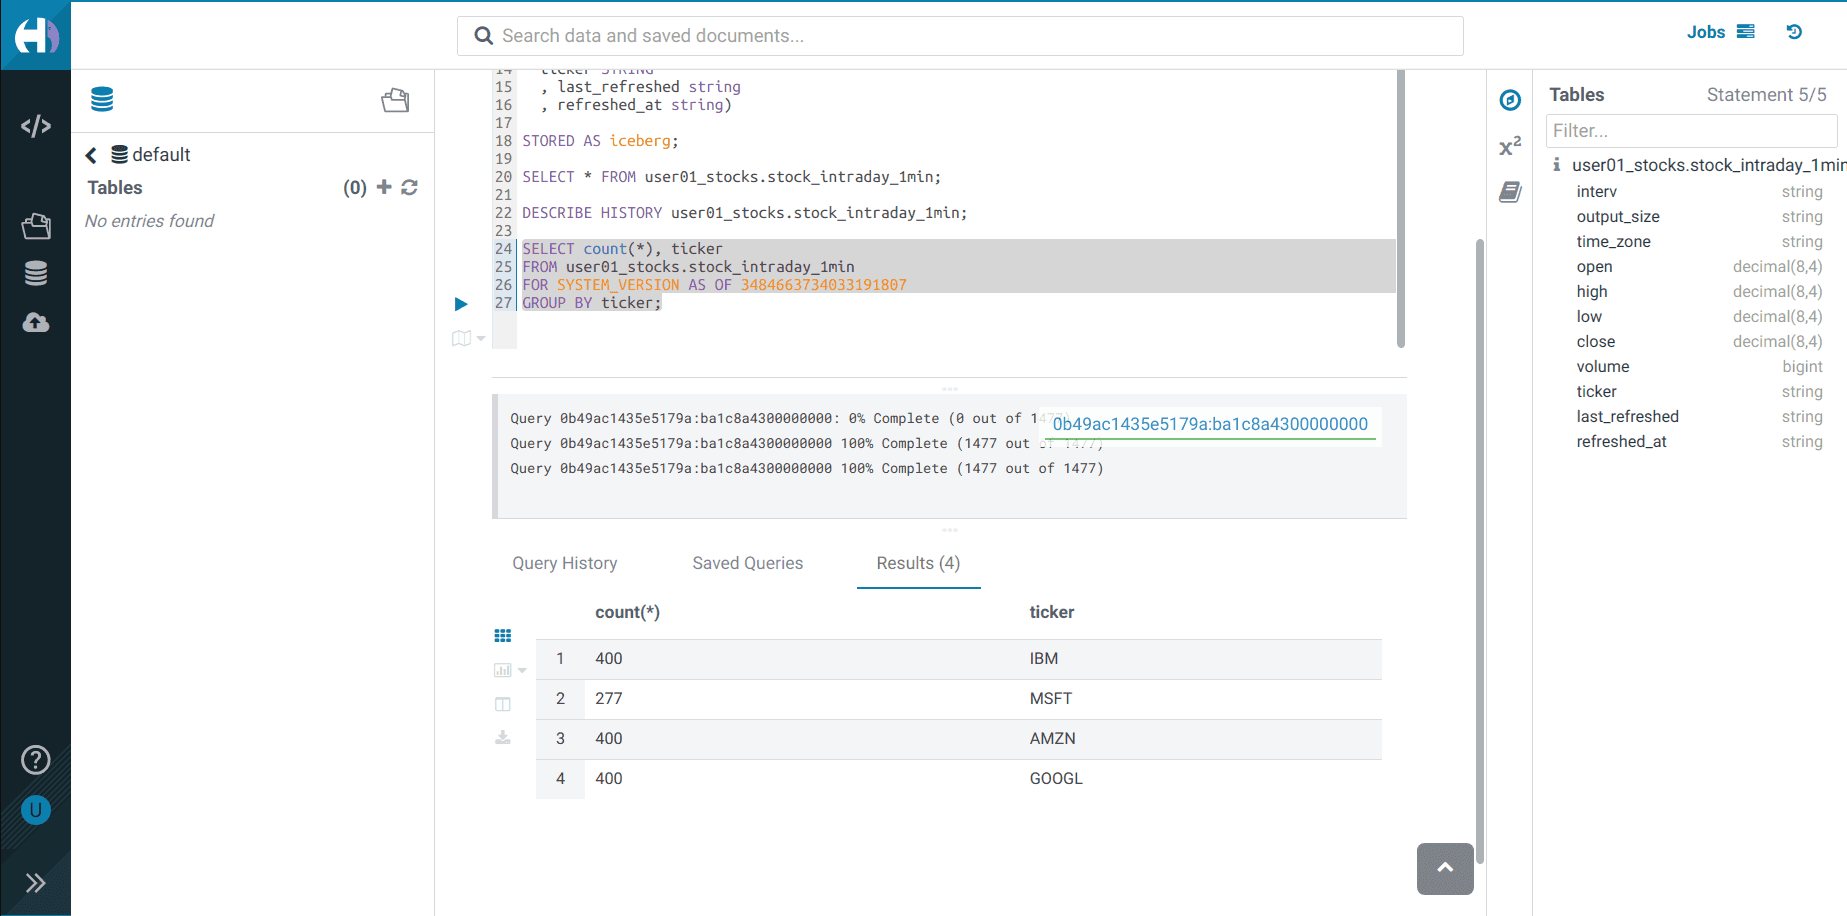
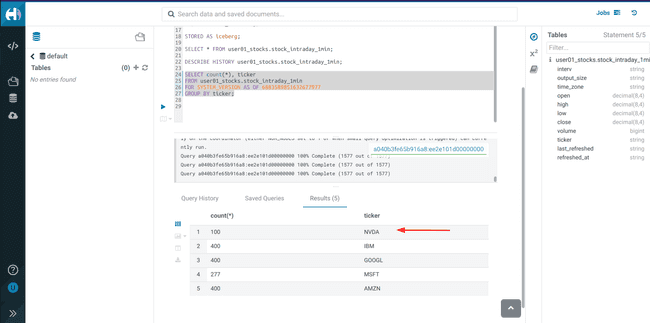
Execute the following Impala query:
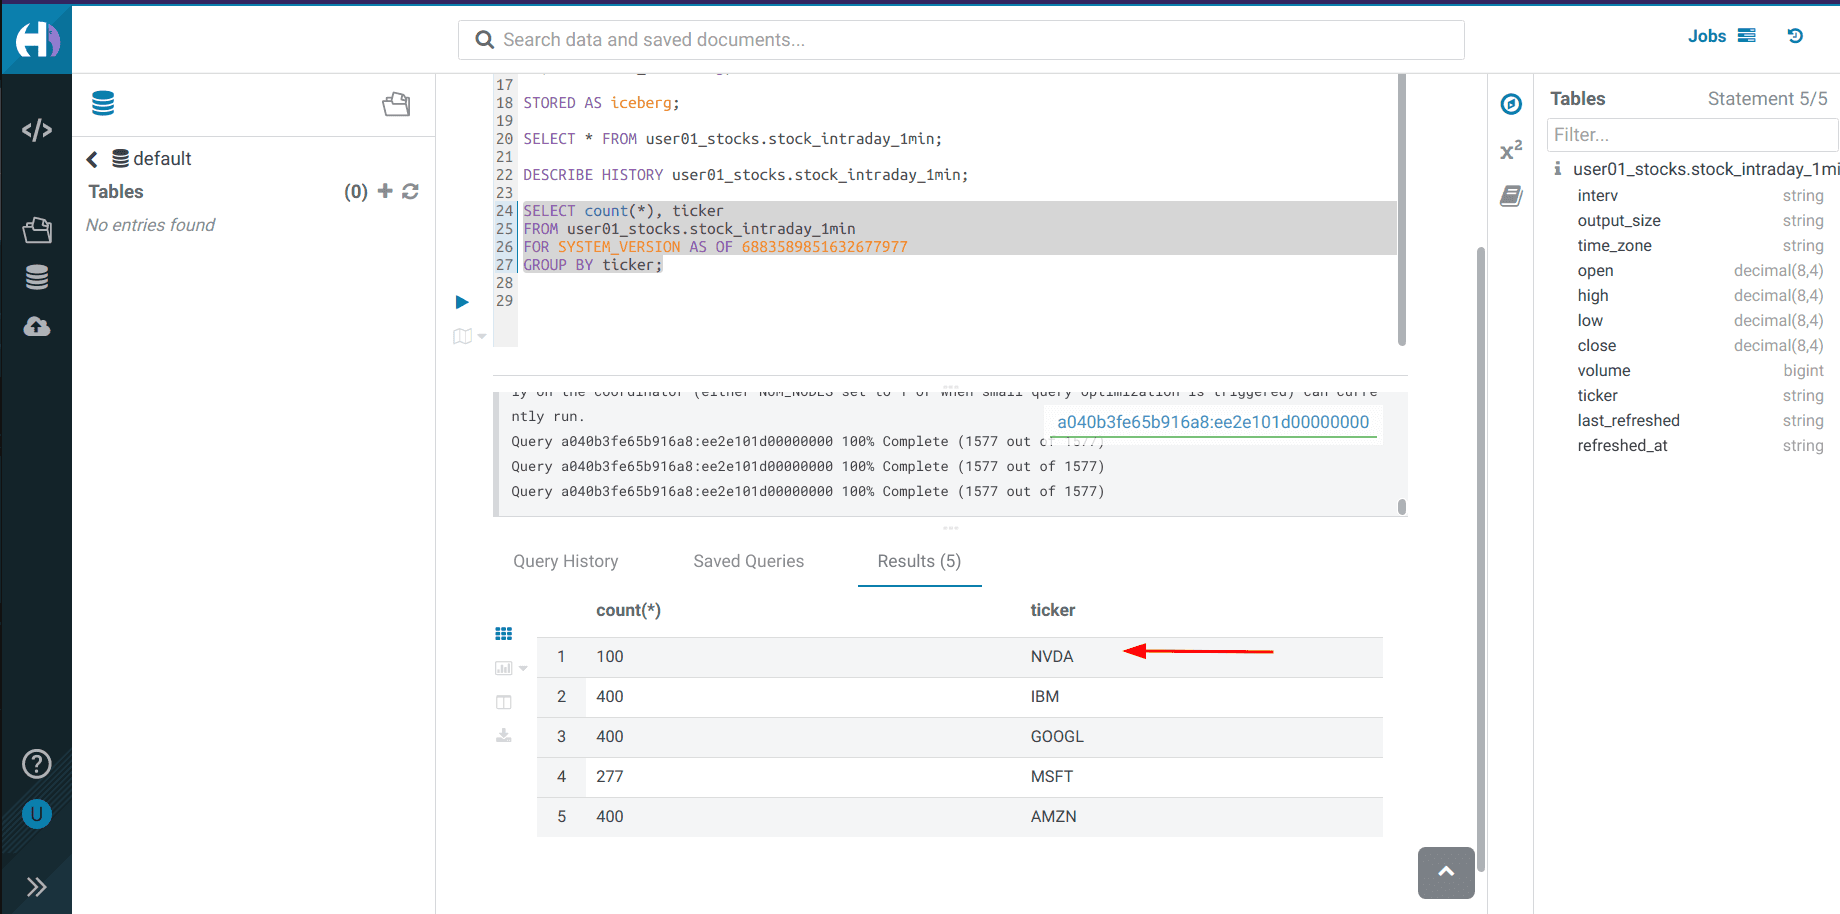
SELECT count(*), ticker
FROM <username>_stocks.stock_intraday_1min
FOR SYSTEM_VERSION AS OF <snapshot_id>
GROUP BY ticker;

Adding a new stock
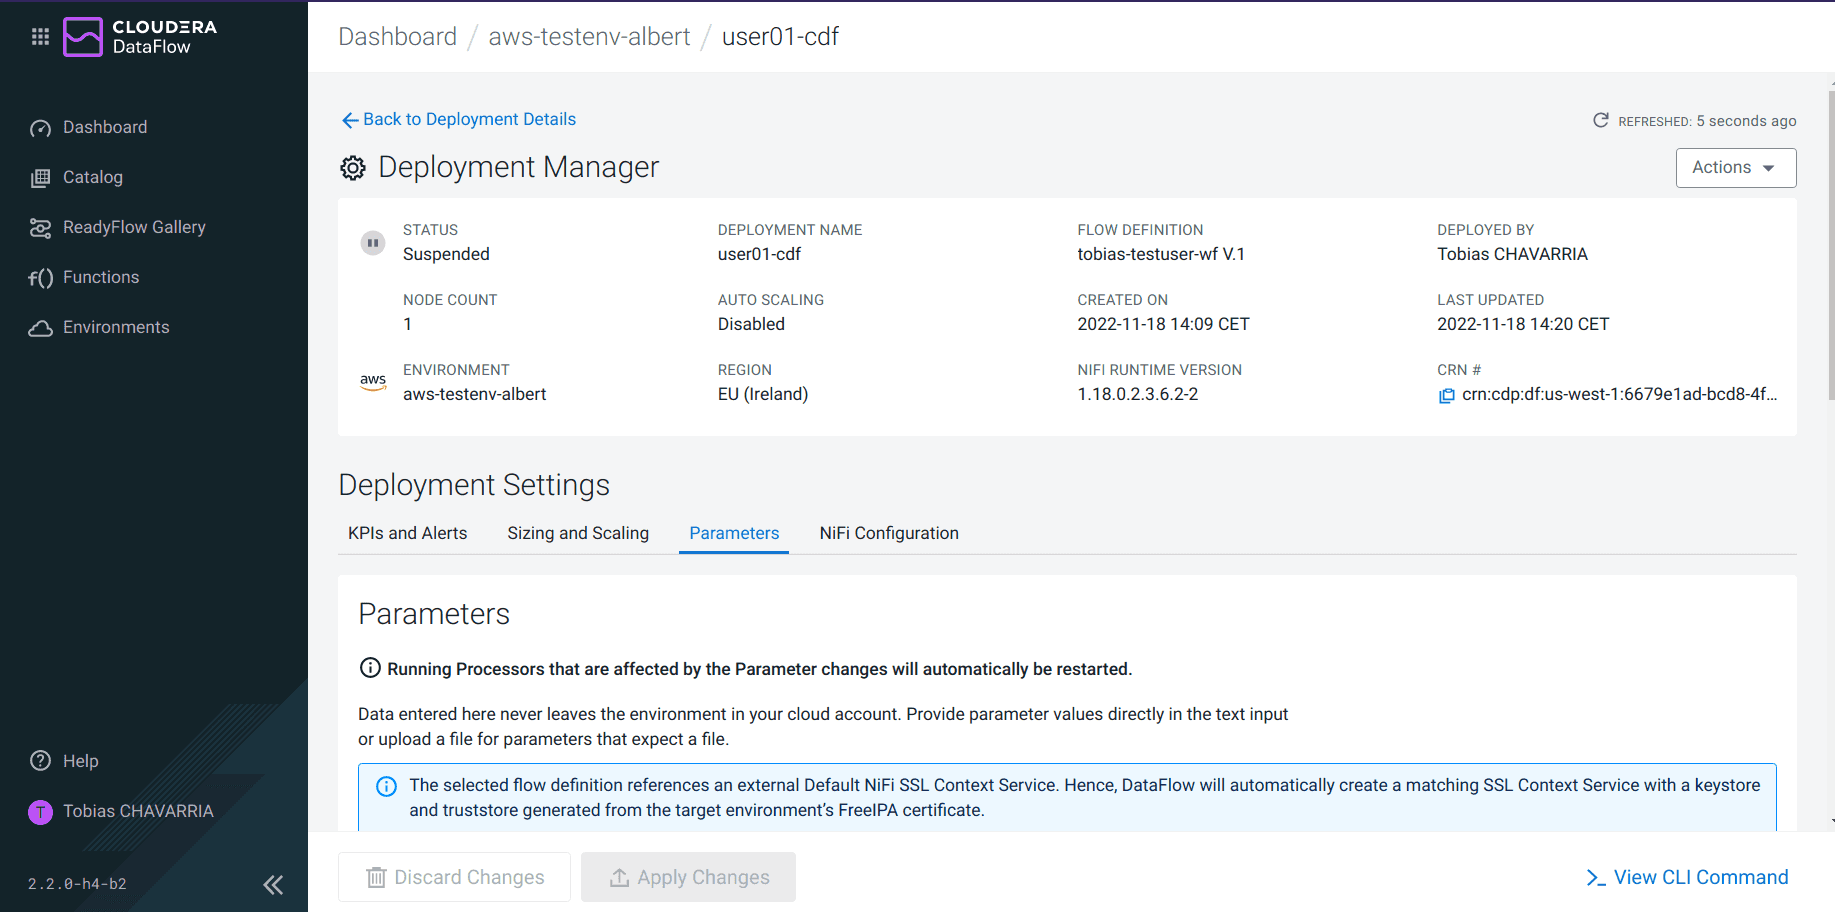
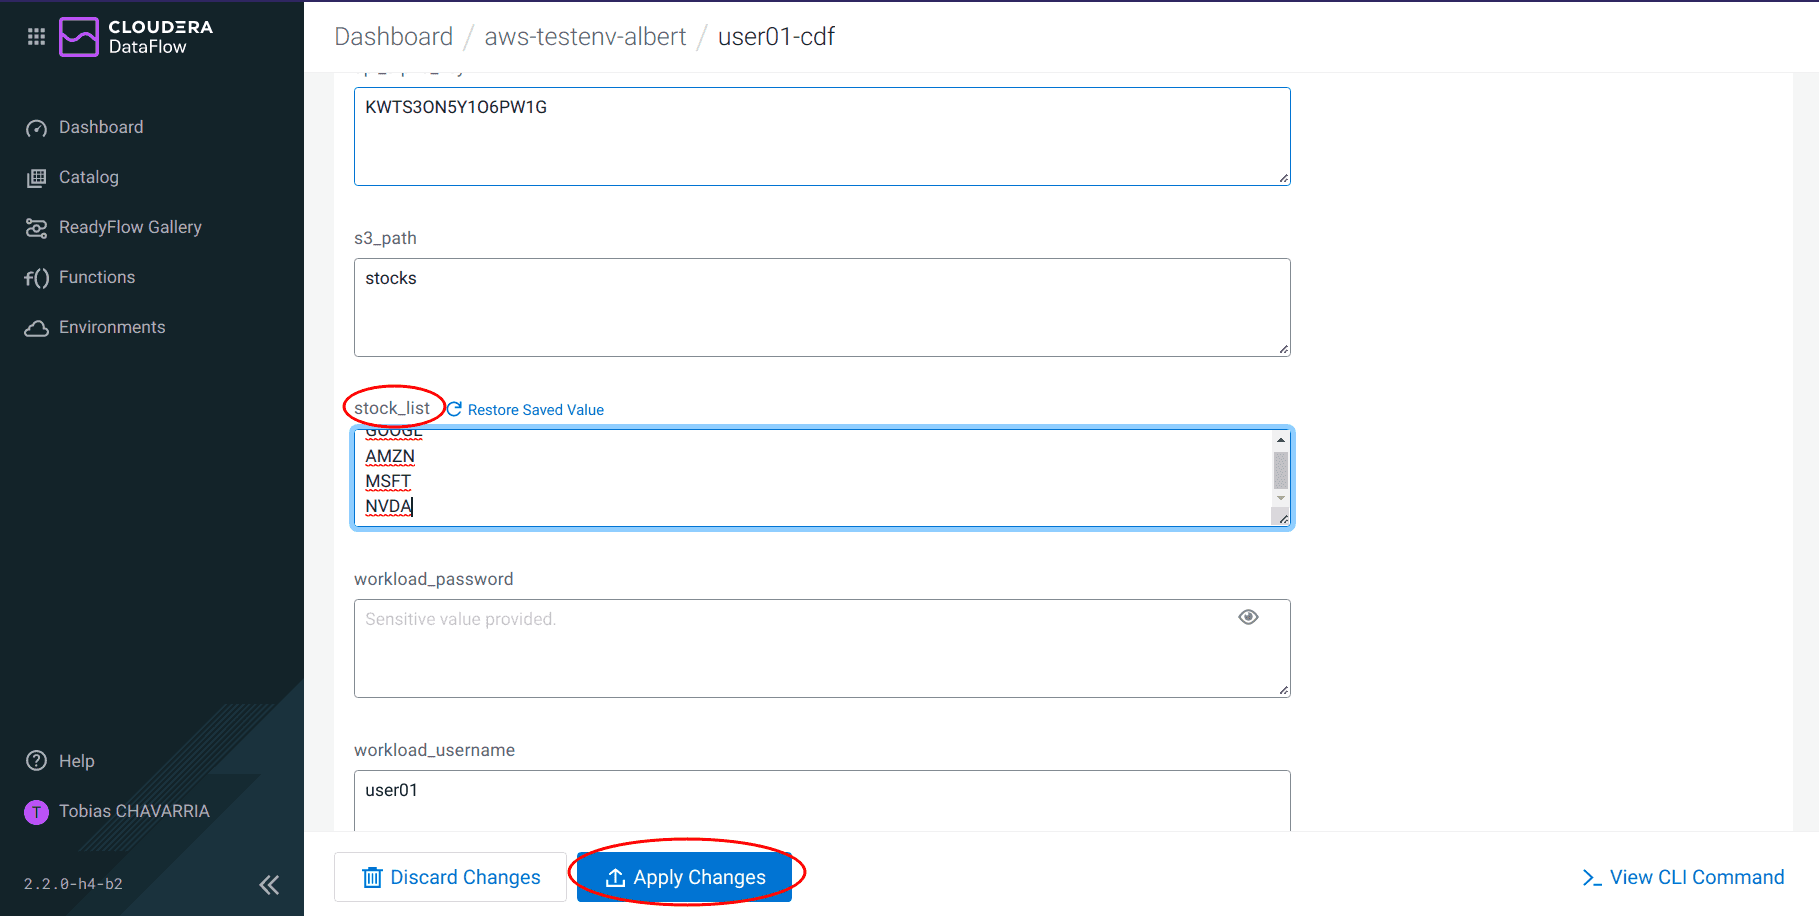
-
Go back to the Deployment Manager of your NiFi Flow (See Step 6)
-
Select Parameters

-
Add on the parameter
stock_listthe stock NVDA (NVIDIA), and click on Apply Changes

-
Once the changes are applied, click on Actions, Start flow
Re-run the Spark Job
-
Go back to the Data Engineering service, tab Jobs
-
Click on the 3 dots of your job and click on Run now
Check new snapshot history
-
Go back to the Hue Editor
-
Check the snap-history again and take note of the new
<snapshot_id>DESCRIBE HISTORY <username>_stocks.stock_intraday_1min; -
Check the new snapshot data
-
Execute a
SELECTusing the new<snapshot_id>to see the new stock data added
-
Run this query without snapshot, to get all values from all parent and child snapshots
SELECT * FROM <username>_stocks.stock_intraday_1min -
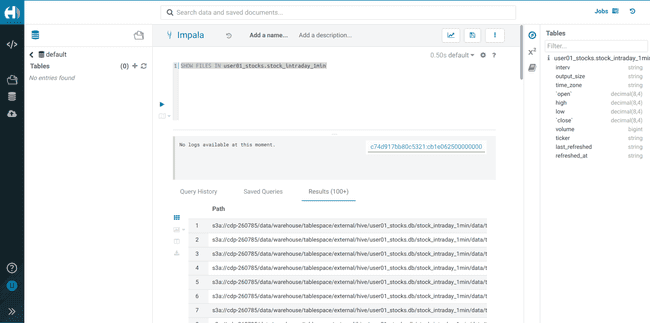
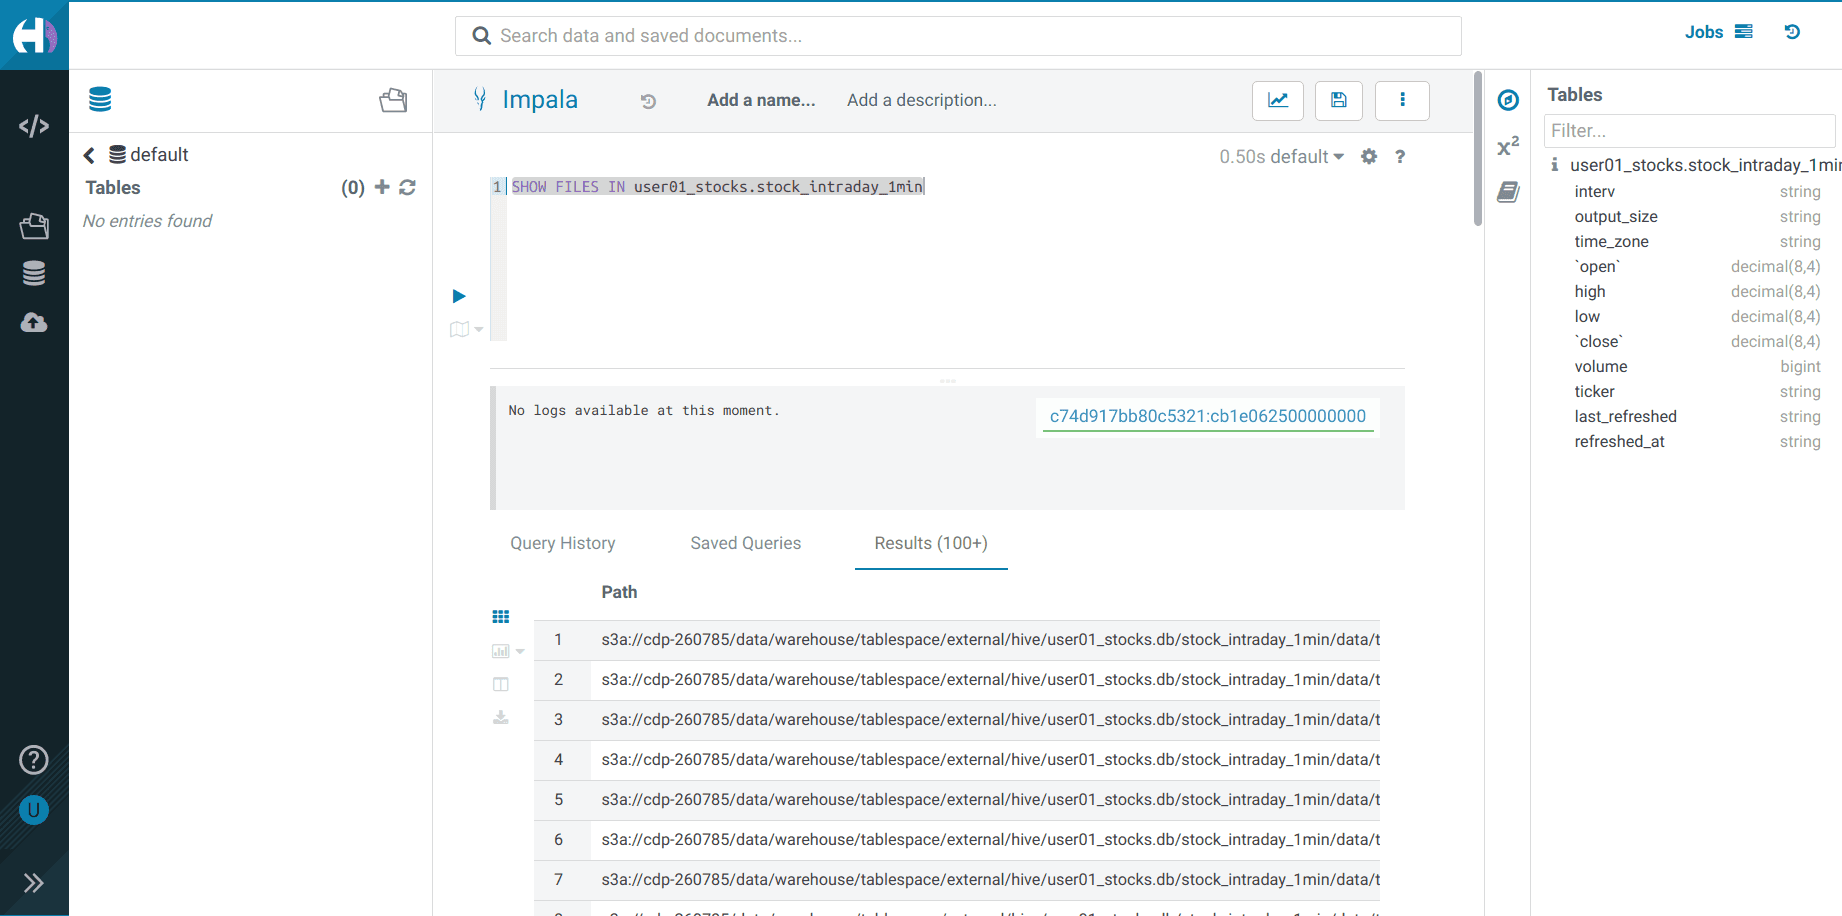
To check the files in the S3 bucket:
SHOW FILES IN <username>_stocks.stock_intraday_1min
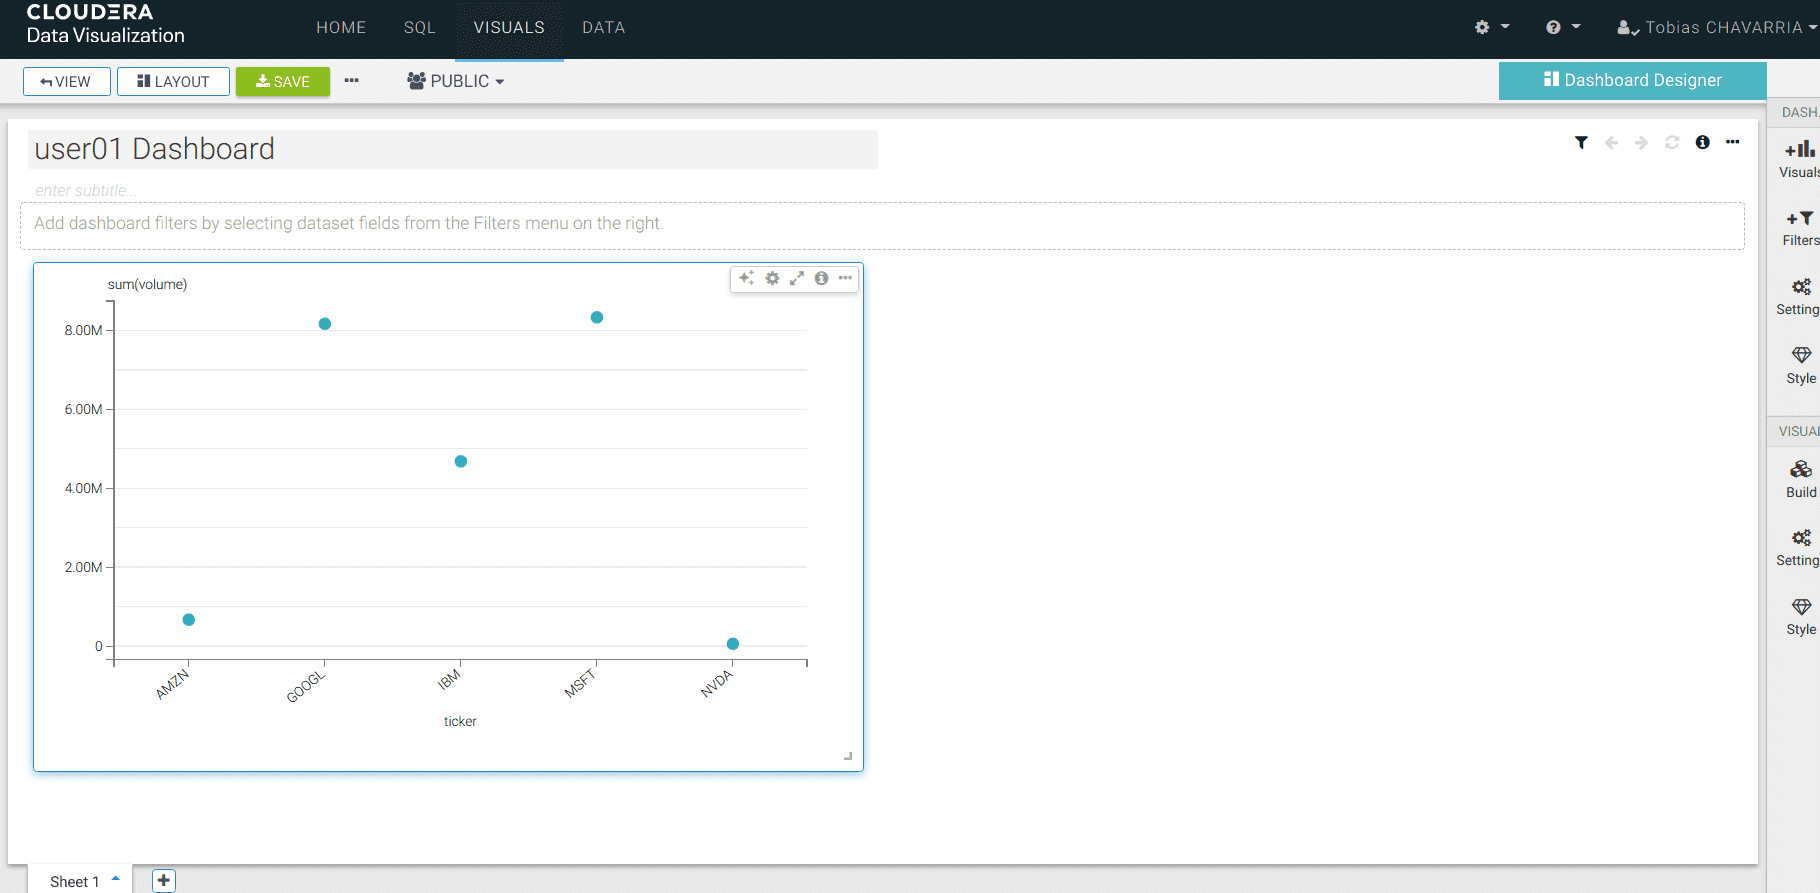
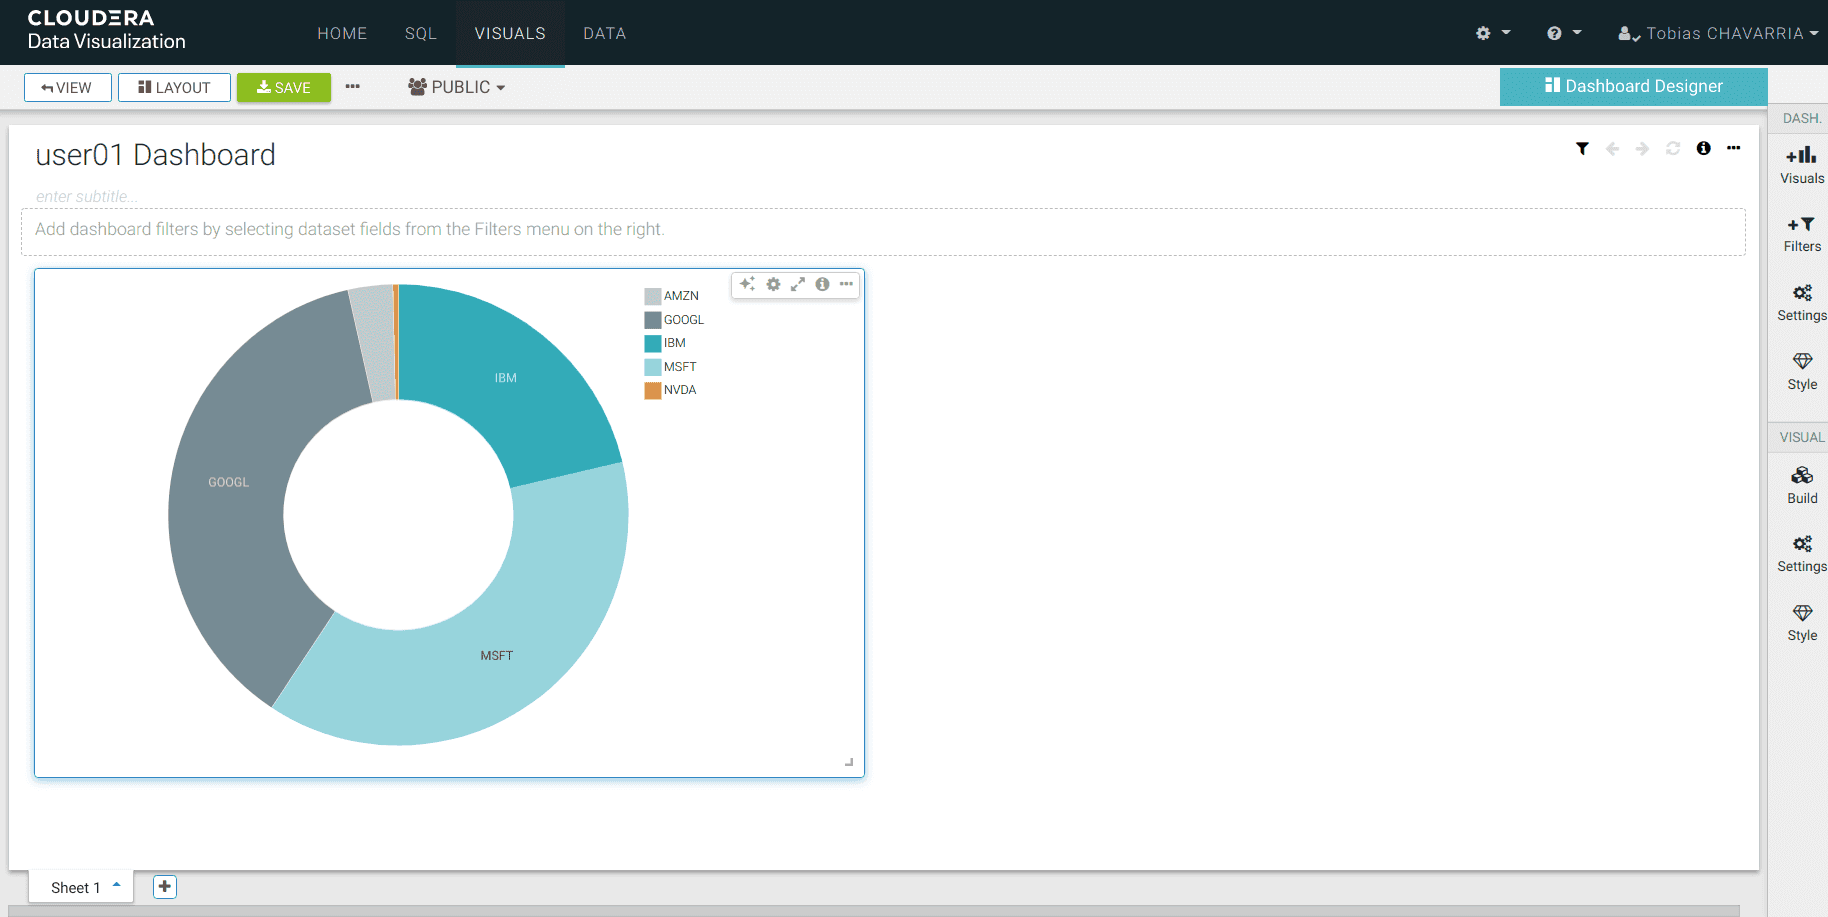
Play around with the visuals
Go back to the Data Visualizations and explore the different options available for the dashboard
This series covered all tasks to set up a data engineering pipeline solution from square one. We started deploying the CDP Public Cloud infrastructure using AWS resources, configured Keycloak for user authentication on that same cluster, managed user permissions and finally constructed a pipleline using the different CDP services. There are some advanced features you may experiment with if you are so inclined. That said, remember that resources created on AWS are not free and that you will incur some costs while your infrastructure is active. Remember to release all your AWS resources when you are done with the lab to avoid unwanted costs.
Source link
