I’m going to show you how you can use Flutter and AWS Amplify to quickly go from nothing to a working cross-platform mobile application with authentication and backend infrastructure. What would usually take a small dev team a week or so to setup can be achieved in a fraction of the time using this toolkit.
If you follow along with this tutorial, it should take you no more than an hour. Well, it took me several hours fighting with various issues, but hopefully I’ve documented them well enough so you shouldn’t hit them.
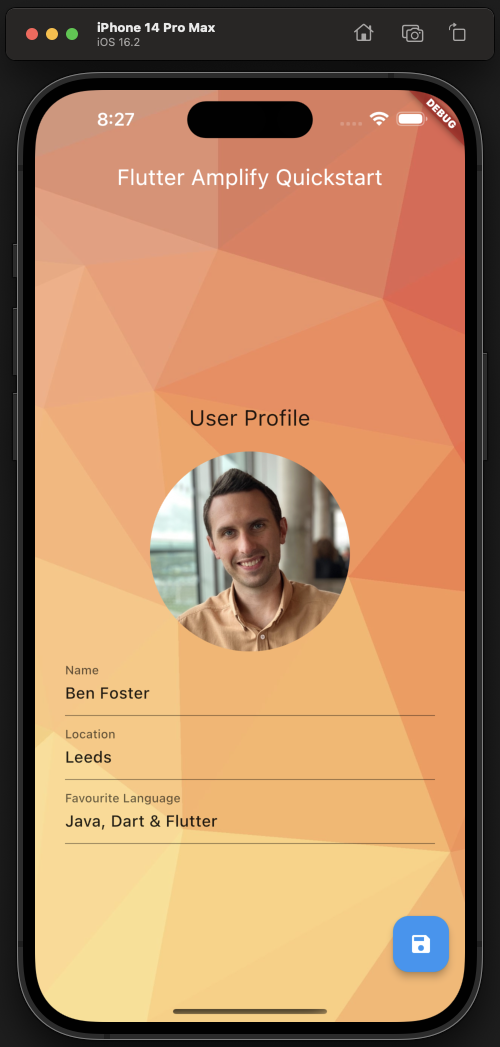
Here’s the finished product. If you want the “here’s one I made earlier version,” follow the steps in the readme, you should have it up and running in around fifteen minutes. Here is the GitHub link.
This tutorial is made up of five parts:
- Prerequisites and Setting Up the Codebase
- Adding Authentication
- Uploading a Profile Picture
- Storing User Details
- Adding Some Design Flair
Recommendation
Flutter is a very mature platform that’s been used for several years now, with a thriving community and many plugins and extensions to achieve most things.
Amplify, too, is a strong platform; however, I did find the API functionality difficult to work with and the Flutter libraries weren’t up to date with the latest announcements and features in Amplify. In particular, working with AppSync GraphQL and DataStore (for offline data store and synchronization) were fairly brittle (as you’ll see later on).
Paired together, these two are a great combination for accelerating the development of mobile app prototypes, but when you feel like you’re bending Amplify to your will, don’t be afraid to ditch it in favor of working directly with the AWS services it abstracts.
The demo app I’ve built holds user profile information—a common requirement of many apps. You can create an account and log in, upload a profile picture, and submit some details about yourself. We’ll go into details on the full-stack—working with Flutter and Dart for app code right down to the likes of DynamoDB to give you a full breadth of what you need to know.
Part One: Prerequisites and Setting Up the Codebase
This tutorial assumes you have the following already setup on your machine:
| Code Editor/ IDE | I use VSCode as it has a good set of Flutter and Dart plugins that speed up development, such as auto loading of dependencies, Dart linting, and intellisense. You’re free to use whatever IDE works for you though |
| AWS Account | Create an AWS account if you don’t already have one. Visit AWS’ official page for steps to create an AWS account.
All of what we’ll use today is part of the free tier, so it shouldn’t cost you anything to follow this tutorial. |
| AWS CLI and AWS Amplify CLI | Install AWS and Amplify CLI tooling.
Make sure you have an up-to-date version of Node and NPM (this is what the CLIs use). Visit Node.Js’ official website to download the up-to-date version. If you need to run multiple versions of Node, I recommend using NVM to manage and switch between them. To install AWS CLI, visit AWS’ official page. |
| XCode (for iOS) | If you don’t have access to a Mac, you can deploy EC2 instances running MacOS in AWS these days, which you can use when you need to build iOS artifacts.
Download Xcode through the Mac App Store. Follow the rest of the steps here to set it up ready for iOS Flutter development. |
| Android Studio (for Android) | Follow the steps here to be ready for Android Flutter development. |
| Flutter SDK | Follow these steps to get Flutter and its dependencies up and running (if you’re on a Mac that is, other guides are available for other OSes). |
Flutter and Amplify have scaffolding tools that create your initial project structure. It’s important to do these in a certain order; otherwise, your folder structure won’t align with what the tools expect, which will cause you a headache to rectify later on.
Make sure you create your codebase structure using Flutter first, then initialize Amplify within it.
I used the official Flutter getting started documentation to kick things off for my demo.
Let’s see if we can get Flutter working. First, to double check you have it correctly installed and added to your PATH, you can run flutter doctor.
If this is your first foray into mobile development, there’ll be a few items that need addressing here. For me it was:
- Installing Android Studio (and Android SDK CLI).
- Installing XCode and CocoaPods.
- Agreeing to terms and conditions for Android and iOS tooling.
Creating Your App Codebase
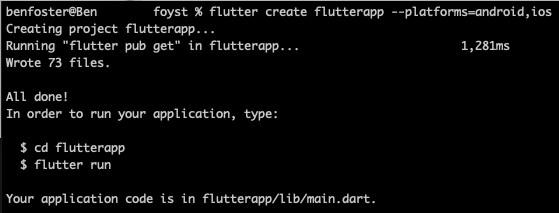
When you have all the prerequisites ready, you can create the Flutter scaffolding. Doing this creates the folder we’ll be working in, so run this command from a parent directory:
flutter create flutterapp --platforms=android,iosI’ve specified Android and iOS as target platforms to remove the unnecessary config for other platforms (e.g. web, Windows, Linux).
You might want to rename the top level directory created at this point in case you don’t want it to match the name of your app. I changed it from “flutterapp” to “flutter-amplify-tutorial” (my git repository name).
At this point, Flutter has created seventy-three files for us. Let’s take a look at what these are:
The folders we’ll be spending most time with are ios/android and lib/. Within the ios and android folders are project resources that can be opened with XCode and Android Studio respectively. These projects act as the interop between the platform-agnostic Dart code and your target platforms, and you can use them to test your app against the respective platforms. Let’s try that with iOS now:
iOS Setup
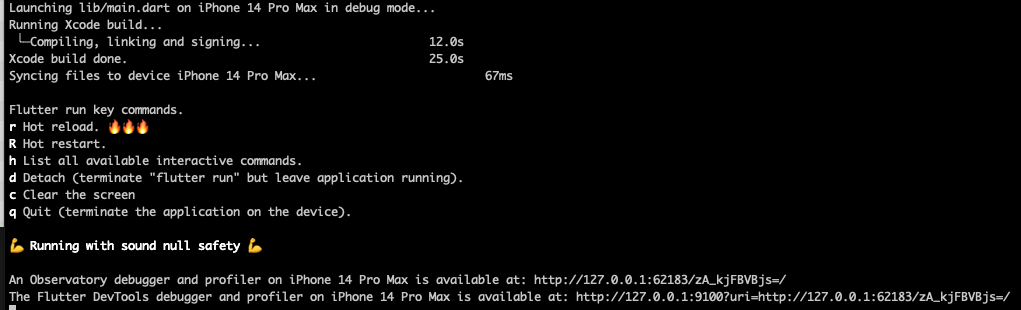
open -a Simulator
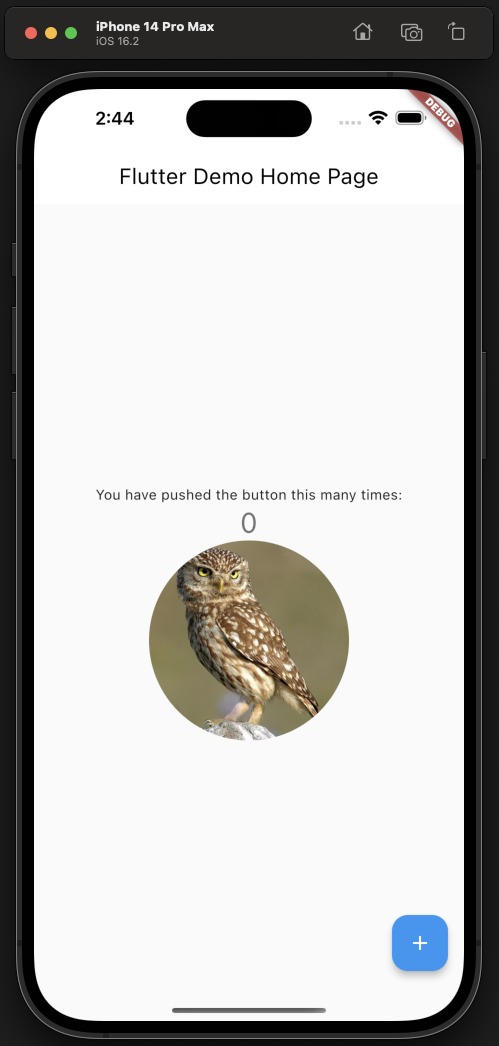
flutter runOn my Mac, with minimal XCode setup, this went from nothing right through to running an iPhone 14 Pro Max simulator with the scaffolded Flutter app running, which is pretty neat.

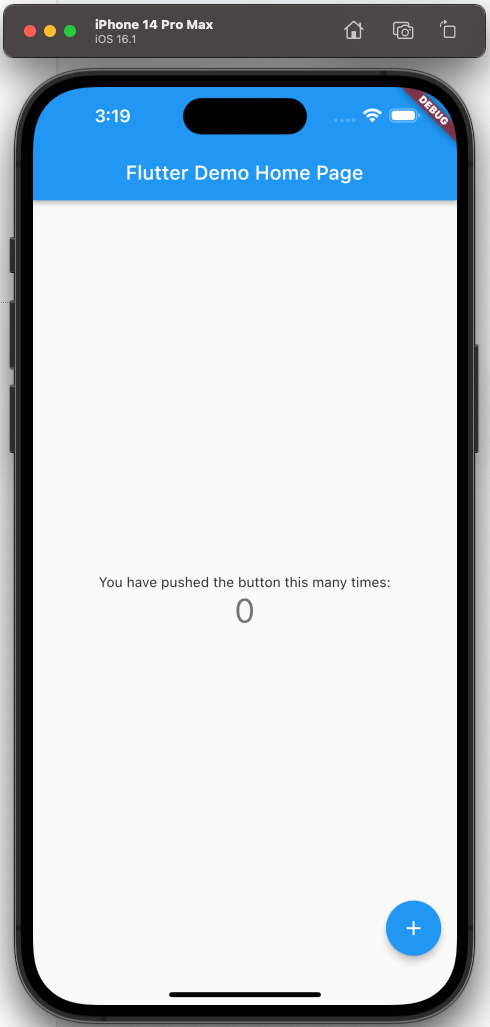
If you see the below: then congratulations, you’ve managed to successfully generate the scaffolding.
You can also open the ios/Runner.xcodeproj project within XCode as well, explore its contents and run against simulators and physical devices like you would do any other XCode project.
Android Setup
Android is a little less straightforward, as you have to explicitly configure an emulator in Android Studio before you can run it. Open the android/flutterapp_android.iml project within Android Studio to begin with, and then you can configure and run an emulator to test the app.
Give Android Studio a few minutes as it downloads Gradle and all the dependencies required to run the app—you can track the progress of this in the bottom right corner progress bar.
When Android Studio has settled down, if you already have a simulated device configured in AVD, you should be able to hit the play button in the top right of the window:
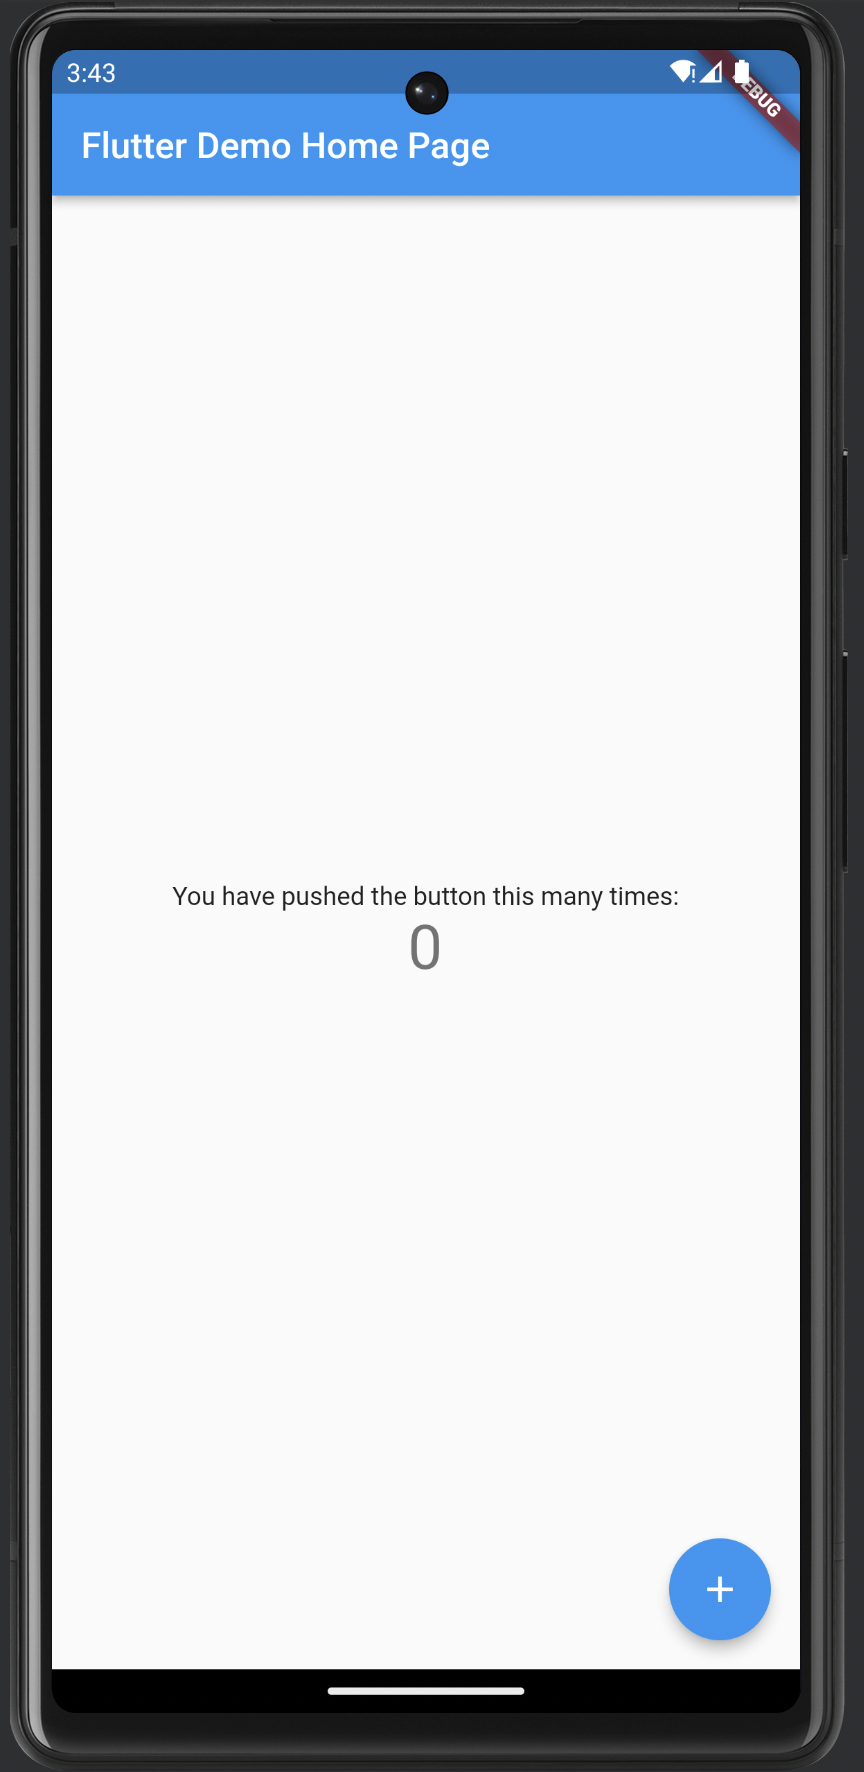
And lo and behold, the same app in Android:

This is demoing the example app code provided when you create a new Flutter project. Over the course of this tutorial, we’ll gradually be replacing this code with our own.
This is a good point to do a git commit, now we’ve got the foundations setup for Flutter development. We’re now at a point where we can start tinkering with the Flutter code and see our results on iOS and Android simultaneously.
Flutter uses Dart for the intermediary language between Android and iOS, and all of the code you’ll be interacting with lives within the lib/ folder. There should be a main.dart file, which is where we’ll start tinkering.
Configure and Deploy a New App Using Amplify
Now that we have the mobile app tooling ready to work with, we need some backend infrastructure to support the app’s functionality.
We’ll use AWS and its numerous services to support our app, but all of it will be managed using the AWS Amplify service. Most of it will be handled transparently for us, and instead of worrying about what services to utilize, we’ll be focusing on what features we want to deploy.
To start with, within your code folder run the following:
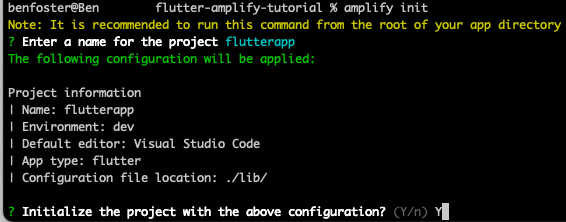
This command initializes AWS Amplify within your project. If you haven’t used it before, it’ll ask you a number of questions. For subsequent people who collaborate on the project running this command sets up their local environment with the Amplify configuration already in place.
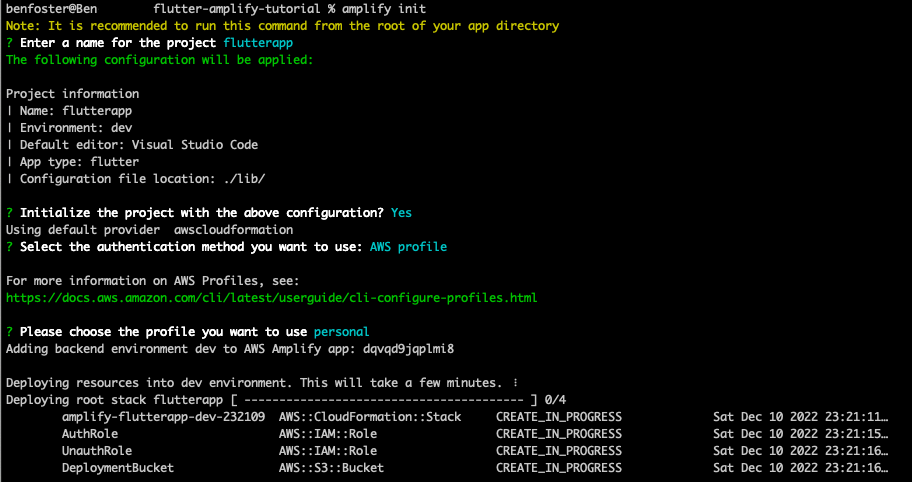
This will provision some initial AWS resources to store the configuration and state of your Amplify app, namely an S3 bucket.
The above deployment progress bar and status may look familiar to some—it’s CloudFormation, and just like AWS CDK, Amplify uses CFN behind the scenes to provision all the required resources. You can open up the CloudFormation stacks console to see it in action:
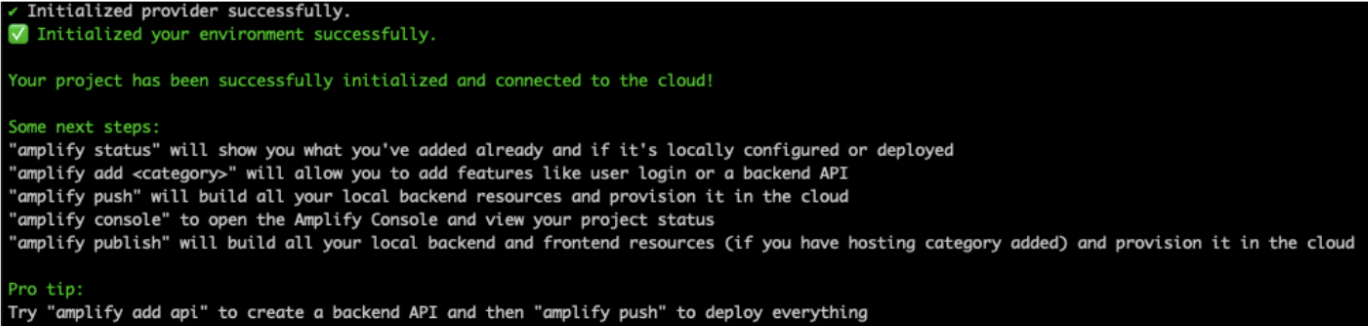
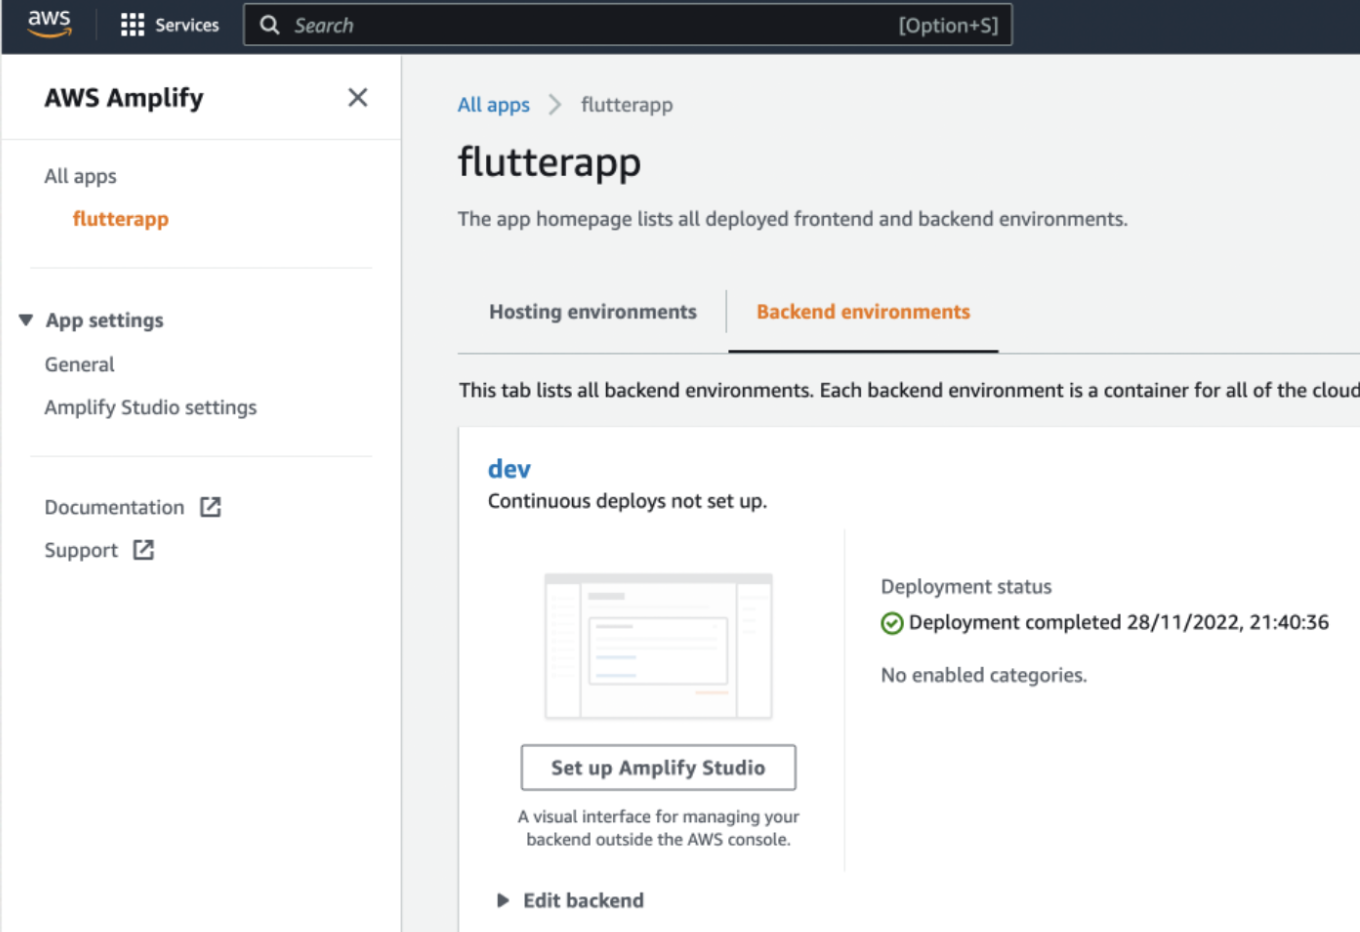
Finally, when the CLI is complete, you should see a confirmation similar to the below, and you’ll be able to see your newly deployed App in the Amplify Console:

Environment Management
AWS Amplify has the notion of “environments,” which are isolated deployments of your application and resources. Historically, the notion of environments had to be created within whatever ecosystem you had: (e.g., CloudFormation, CDK), using the likes of naming conventions and parameters. In Amplify, it is a first class citizen—you can have multiple environments that allow patterns, such as provisioning shared environments, that changes are promoted through (e.g., Dev > QA > PreProd > Prod) as well as providing environments per developer or feature-branch.
Amplify can also configure and provision CI/CD services for you using Amplify hosting add and integrate them into your apps to provide an end-to-end development ecosystem. This sets up CodeCommit, CodeBuild, and CodeDeploy to handle source control management, building, and deployment of applications. This isn’t covered in this tutorial, but could be used to automate building, testing, and publishing of releases to app stores.
Part Two: Adding Authentication
Usually, you’d need to learn about AWS’ authentication service Cognito and supporting services, such as IAM, plumb it all together using something like CloudFormation, Terraform, or CDK. In Amplify, it’s as simple as doing:
Amplify add allows you to add various “features” to your project. Behind the scenes, Amplify will deploy and configure all the required services you need using CloudFormation, so you can focus more on your apps features and less on the plumbing.
When I say it’s as easy as typing those three magic words above… it’s not quite that straightforward. Amplify will ask you various questions to understand how you want people to authenticate and what controls you want in place. If you choose “Default Configuration,” Amplify will set up authentication with sensible defaults to get you up and running quickly. I’m going to choose “Manual Configuration” to demonstrate just how configurable Amplify is.
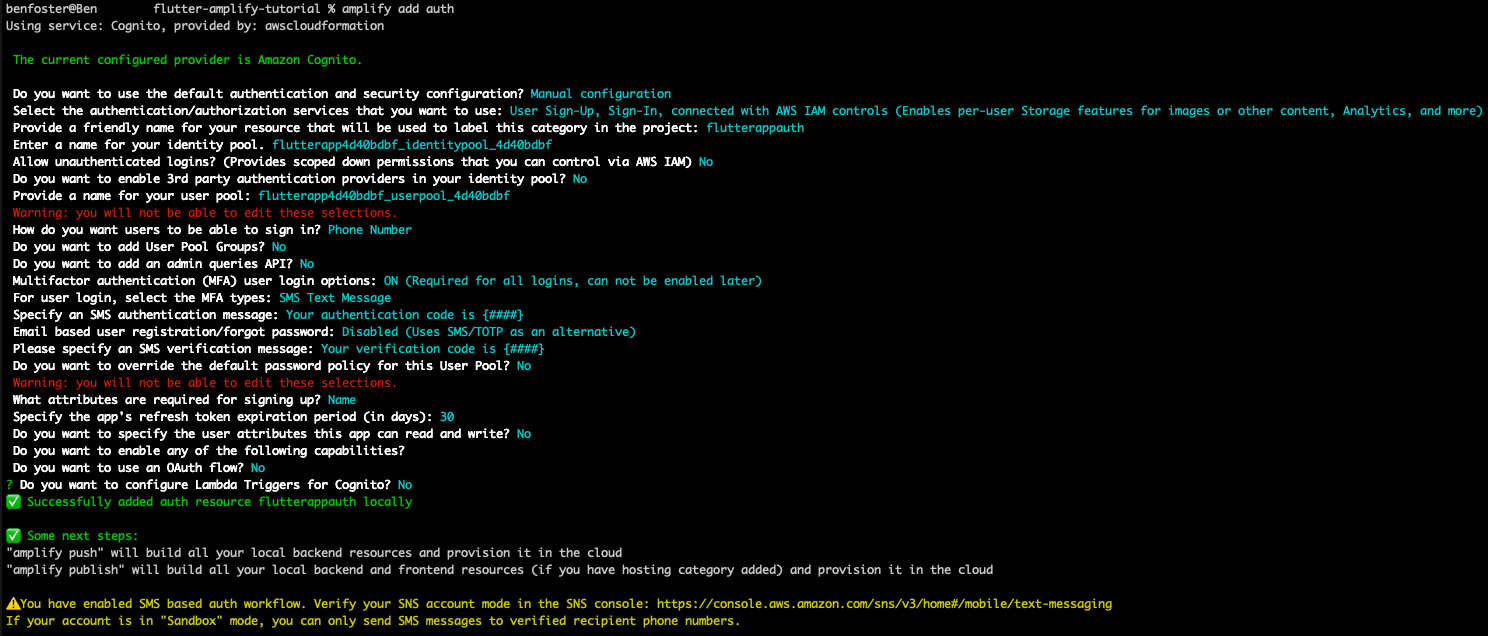
The above setup allows you to create accounts with just your mobile number (no email address needed), and verifies you are the actual owner of that number using MFA for verification and further sign on attempts. I strongly advise using OAuth as a standardized authentication mechanism, but I’ve not used it here for simplicity.
Now, when you add features, they aren’t provisioned immediately. That’s why the commands are eerily quick to complete. All these commands do prepare your Amplify App’s configuration (and local environment) to deploy these features.
To deploy features (or any configuration changes) you need to do a push:
Note: this is different from the amplify publish command, which builds and deploys both backend and frontend services. Push only provisions backend resources (and that’s all we’ll need in this tutorial as we’ll be building mobile apps).
When you add auth (or any Amplify feature), Amplify adds a dart file called lib/amplifyconfiguration.dart. This git is ignored because it contains sensitive credentials relating to your deployed resources and is automatically synced with the Amplify environment you’re working in. You can see more info about this here.
At this point, we have Amplify setup with an app and dev environment created and Cognito configured for auth. It’s a good time to do a git commit if you’re following along, so you can revert back to this point if needed. Amplify should have already created a .gitignore file for you, excluding all the unnecessary files.
Now that we’ve got the backend authentication infrastructure in place, we can start building our mobile app with Flutter.
Authenticating Users in Our App
I’m following the steps outlined in the authentication for the AWS Amplify tutorial here.
This is using the out of the box authentication UI screens and workflow bundled within amplify_flutter. Add Amplify Flutter dependencies by adding the following under “dependencies” within the pubspec.yaml file:
amplify_flutter: ^0.6.0
amplify_auth_cognito: ^0.6.0
If you’re not using the Flutter and Dart extensions within VSCode (or using VSCode) you’ll need to follow this up with a flutter pub get command. If you are, then VSCode will automatically run this when you save the pubspec.yaml file.
There’s a quickstart approach to integrating auth that uses a pre-made Authenticator UI library, great for quickly bootstrapping a sign-in flow that can be customized later. We’ll use that in this tutorial to demonstrate the extensive set of Amplify libraries available, and how quickly you can integrate them into your app.
Steps for integrating the OOTB Authentication library are here.
We can transpose the authenticator decorating widget configured in the example code over the code provided in the Flutter quickstart example like so:
class _MyAppState extends State<MyApp> {
  @override
  Widget build(BuildContext context) {
    return Authenticator(
        child: MaterialApp(
      title: 'Flutter Demo',
      theme: ThemeData(
          // This is the theme of your application.
          //
          // Try running your application with "flutter run". You'll see the
          // application has a blue toolbar. Then, without quitting the app, try
          // changing the primarySwatch below to Colors.green and then invoke
          // "hot reload" (press "r" in the console where you ran "flutter run",
          // or simply save your changes to "hot reload" in a Flutter IDE).
          // Notice that the counter didn't reset back to zero; the application
          // is not restarted.
          primarySwatch: Colors.blue,
          useMaterial3: true),
      home: const MyHomePage(title: 'Flutter Amplify Quickstart'),
      builder: Authenticator.builder(),
    ));
  }

  @override
  void initState() {
    super.initState();
    _configureAmplify();
  }

  void _configureAmplify() async {
    try {
      await Amplify.addPlugin(AmplifyAuthCognito());
      await Amplify.configure(amplifyconfig);
    } on Exception catch (e) {
      print('Error configuring Amplify: $e');
    }
  }
}
What Is a Widget?
It’s the basic building block in Flutter used to compose UI layouts and components. Pretty much everything in Flutter layouts are widgets—columns, scaffolding, padding and styling, complex components, etc. The example on the Flutter getting started docs uses a “Center” Widget followed by a “Text” Widget to display a centrally-aligned piece of text that says “Hello World.”
The above code decorates the MyHomePage widget with an authenticator widget, adds the AmplifyAuthCognito plugin, and takes the configuration that the previous amplify add auth command generated in lib/amplifyconfiguration.dart to automatically connect to your AWS Cognito User Pool.
After running Flutter, run to demo the authentication integration, it took a while for the “Running pod install” step to complete for me. Just be patient (almost 5 minutes).

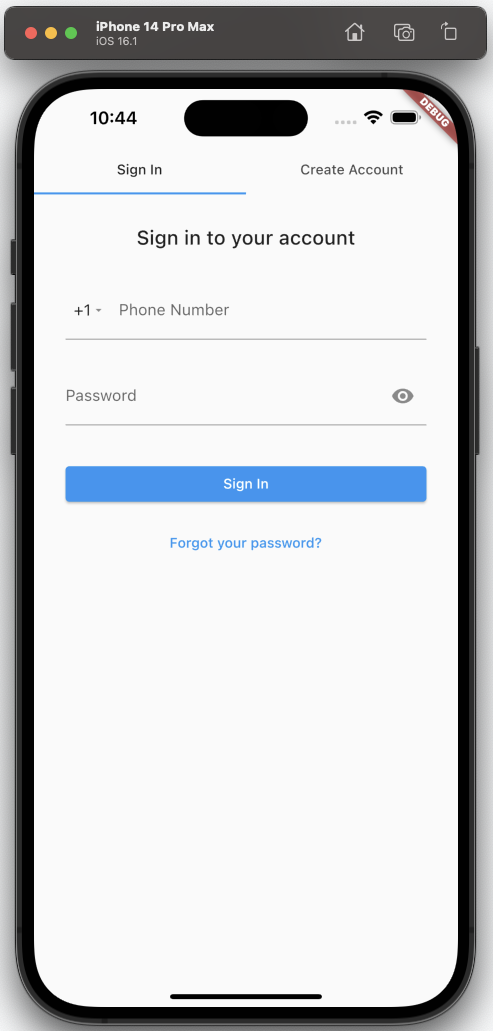
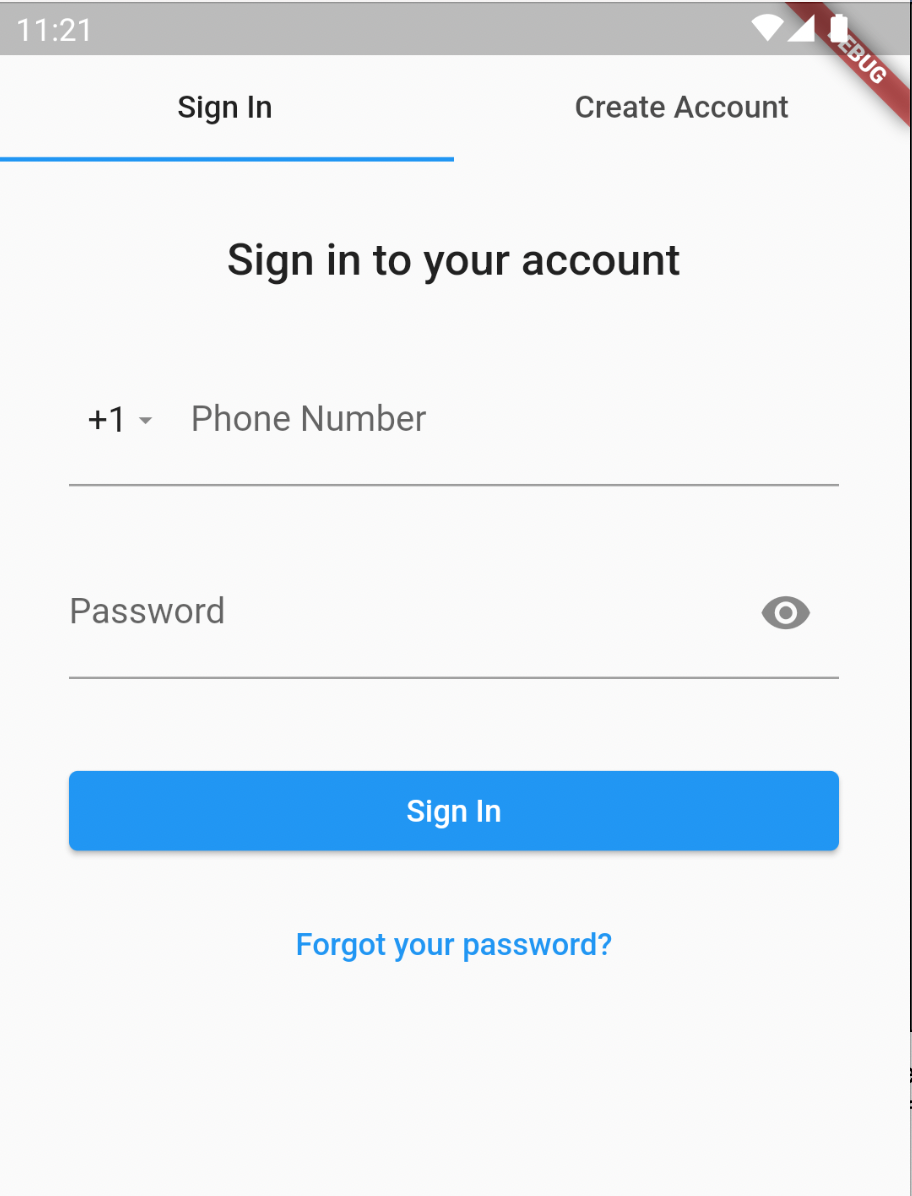
Once those authentication alterations have been made and the app starts up, you’re greeted with a basic but functional login screen.

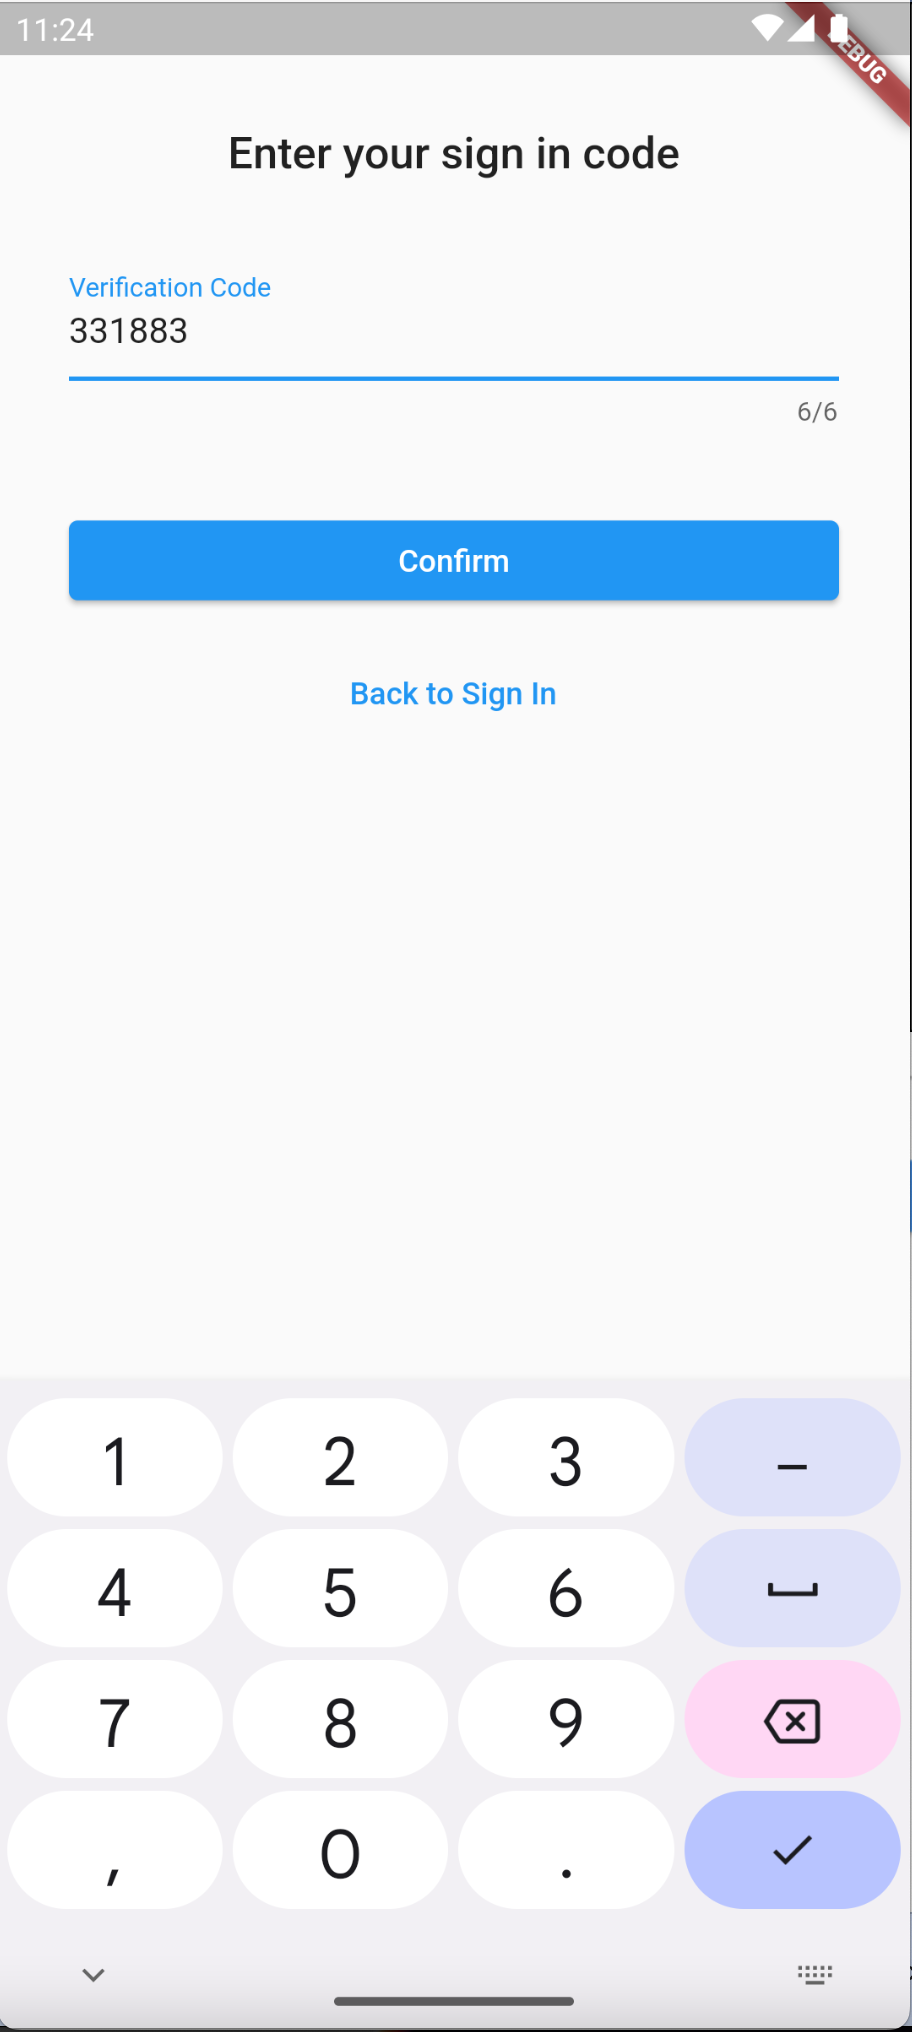
Using the “Create Account” flow, you can provide your phone number and a password, and you’re then presented with an MFA challenge to complete the registration. You can then see that user is created within the Cognito User Pool:

You can test this easily enough on a virtual Android device as well. You don’t even need to leave VSCode if you’ve installed the Flutter and Dart plugins, so opening up Android Studio isn’t necessary. Just select the name of the current active device (iPhone) in the bottom right corner of VSCode, switch to a virtual Android device you have already created, then hit “F5” to start debugging. The experience is pretty similar to iOS:
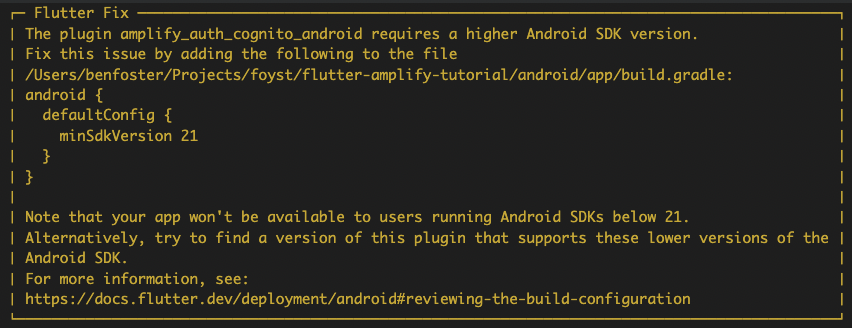
When deploying for the first time after implementing the authentication library, I encountered the following exception when trying to build the app:
uses-sdk:minSdkVersion 16 cannot be smaller than version 21 declared in library [:amplify_auth_cognito_android]Flutter is really helpful in this scenario, as right after this stack trace is dumped it provides a recommendation:
The Flutter SDK appears to already be overriding this in our build.gradle file:
apply from: "$flutterRoot/packages/flutter_tools/gradle/flutter.gradle"

android {
    ...
    defaultConfig {
        // TODO: Specify your own unique Application ID (https://developer.android.com/studio/build/application-id.html).
        applicationId "com.example.flutterapp"
        // You can update the following values to match your application needs.
        // For more information, see: https://docs.flutter.dev/deployment/android#reviewing-the-build-configuration.
        minSdkVersion flutter.minSdkVersion
        targetSdkVersion flutter.targetSdkVersion
        versionCode flutterVersionCode.toInteger()
        versionName flutterVersionName
    }
While Flutter, as a minimum, requires API 16 to be used (declared in flutter.gradle), the Amplify Auth library needs at least 21. To correct this, just change the minSdkVersion from “flutter.minSdkVersion” to “21.”
Once you authenticate, you’re presented with the sample “button clicker” app shown previously. Now, it’s time to start customizing to our needs.
Part Three: Uploading a Profile Picture
In this example, we’ll use this capability to allow users to upload a photo of themselves to be used as their avatar within the app.
Want to add storage features to your app? No problem, just do:
and Amplify will provision the backend services required for your app to use cloud-based storage. Amplify easily integrates Flutter with S3 to allow users of your app to store objects. The flexibility of S3 allows you to store all sorts of assets, and coupled with Cognito and Amplify, you can easily provision private areas for users to store photos, videos, files, etc.
Files can be saved with public, protected or private access:
| Public | Read/Write/Delete by all users |
| Protected | Creating Identify can Write and Delete, everyone else can Read |
| Private | Read/Write/Delete only by Creating Identity |
For our profile picture, we’ll create it with protected access so only the user can update and delete their avatar, but others in the app would be able to view it.
This is where we’ll start styling and building the structure of our app. Flutter is closely integrated with the material design system, used extensively within mobile app development to provide a consistent look and feel. It provides a set of cross-platform compatible components, whose styles can be overridden to build an experience specific to your brand.
The Flutter getting started template already scaffolds some widgets using the MaterialApp widget. We previously decorated this with an authenticator widget. Now, we’ll expand on the MyHomePage child widget of MaterialApp to provide a profile picture.
You compose widgets together in a tree, known as the “Widget Hierarchy.” You always start with a top-level widget. In our app is the authenticator wrapper widget that handles the initial sign in. Scaffold is a good widget to base your layouts on: it’s commonly used as the top-level widget with material apps; and it has a number of placeholders, such as a floating action button, bottom sheet (for swiping up additional details), an app bar, etc.
First off, let’s just add an image widget that’s pointing at a network URL. We’ll later replace this with one we take and upload to S3. I used the following resources to add an image with a rounded placeholder:
- API Flutter
- Google Flutter
In the children array of the nested column widget, add the following container widget:
children: <Widget>[
            const Text(
              'You have pushed the button this many times:',
            ),
            Text(
              '$_counter',
              style: Theme.of(context).textTheme.headline4,
            ),
            Container(
              width: 200,
              height: 200,
              decoration: const BoxDecoration(
                shape: BoxShape.circle,
                image: DecorationImage(
                    image: NetworkImage(
                        'https://flutter.github.io/assets-for-api-docs/assets/widgets/owl.jpg'),
                    fit: BoxFit.fill),
              ),
            )
          ],
We can now display an image from the web:
Next, we’ll allow the user to pick a profile picture from an image on their device. A little bit of googling revealed this library that abstracts the details of selecting images:
- Google: “Pub Dev Packages Image Picker”
Two lines of code is all it takes to prompt the user to select a picture:
final ImagePicker picker = ImagePicker();
final XFile? image = await picker.pickImage(source: ImageSource.gallery);
For iOS, you have to add the NSPhotoLibraryUsageDescription key to the <project root>/ios/Runner/Info.plist Xcode config file to request access to view the user’s photos; otherwise, the app will crash.
We’ll wire this in to a GestureDetector widget, that upon receiving a tap, will prompt the user to pick a picture for their profile picture:
ImageProvider? _image;

...

children: <Widget>[
            const Text(
              'You have pushed the button this many times:',
            ),
            Text(
              '$_counter',
              style: Theme.of(context).textTheme.headline4,
            ),
            GestureDetector(
                onTap: _selectNewProfilePicture,
                child: Container(
                    width: 200,
                    height: 200,
                    decoration: BoxDecoration(
                    shape: BoxShape.circle,
                    image: DecorationImage(
                        image: _image ?? _placeholderProfilePicture(), fit: BoxFit.fill),
                    ),
                ),
            )
            ...
]

void _selectNewProfilePicture() async {
    final ImagePicker picker = ImagePicker();
    final XFile? image = await picker.pickImage(source: ImageSource.gallery);

    if (image != null) {

      var imageBytes = await image.readAsBytes();

      setState(() {
        _image = MemoryImage(imageBytes);
      });
    }
  }

  _placeholderProfilePicture() {
    return const AssetImage("assets/profile-placeholder.png");
  }
Call setState(), updating the widget fields within the Lambda passed to Flutter, so it knows to call the build() function, where the updated state can be used to redraw the widget. In our case, the profile image will be populated, so we’ll create a container widget that displays the image. The null-aware ?? operator provides a default profile placeholder for when the user hasn’t selected a picture yet.
You’ll also need to add a profile placeholder image into your repository and reference it in your pubspec.yml file so it gets picked up in the build. You can use the image from my repo, while adding this to your pubspec.yml file:
# The following section is specific to Flutter packages.
flutter:
...

  # To add assets to your application, add an assets section, like this:
  assets:
    - assets/profile-placeholder.png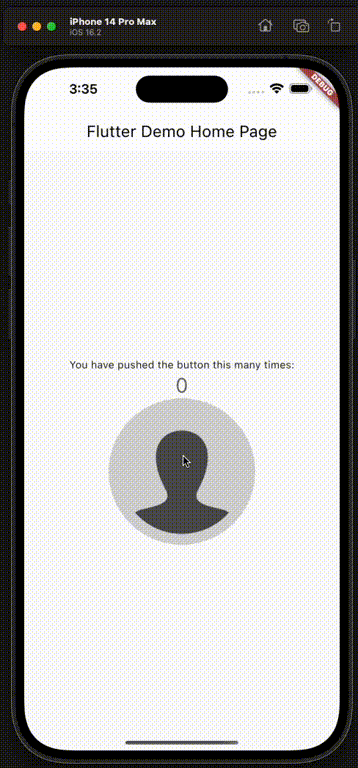
At this point, we’re able to select a profile picture from the device’s photo gallery, and have it displayed as a rounded picture in the app. This picture isn’t persisted anywhere though—once the app closes; it’s lost (and no other users would be able to see your picture either).
What we’re going to do next is hook this up to some cloud storage—AWS S3. When the user selects a photo from their device’s gallery, we’ll upload it to their private area in S3, then have the image widget pull the image from there (instead of directly from the device) itself:
void _selectNewProfilePicture() async {
    final ImagePicker picker = ImagePicker();
    final XFile? image = await picker.pickImage(source: ImageSource.gallery);

    if (image != null) {

      var imageBytes = await image.readAsBytes();

      final UploadFileResult result = await Amplify.Storage.uploadFile(
          local: File.fromUri(Uri.file(image.path)),
          key: profilePictureKey,
          onProgress: (progress) {
            safePrint('Fraction completed: ${progress.getFractionCompleted()}');
          },
          options:
              UploadFileOptions(accessLevel: StorageAccessLevel.protected));

      setState(() {
        _image = MemoryImage(imageBytes);
      });
    }
  }
Now, when our user selects a picture from their device, our app will upload it to S3 and then display it on the screen.
Next up, we’ll get the app to download the user’s profile picture from S3 when it starts up:
@override
  void initState() {
    super.initState();
    _retrieveProfilePicture();
  }

  void _retrieveProfilePicture() async {
    final userFiles = await Amplify.Storage.list(
        options: ListOptions(accessLevel: StorageAccessLevel.protected));
    if (userFiles.items.any((element) => element.key == profilePictureKey)) {
      final documentsDir = await getApplicationDocumentsDirectory();
      final filepath = "${documentsDir.path}/ProfilePicture.jpg";
      final file = File(filepath);
      await Amplify.Storage.downloadFile(
          key: profilePictureKey,
          local: file,
          options:
              DownloadFileOptions(accessLevel: StorageAccessLevel.protected));

      setState(() {
        _image = FileImage(file);
      });
    } else {
      setState(() {
        _image = const AssetImage("assets/profile-placeholder.png");
      });
    }
  }
Next, we’ll refactor the profile picture logic into it’s own re-useable component. You can view the finished component in my GitHub repo that houses all of the logic above. You can then tidy up the _MyHomePageStage component and slot your new widget into the hierarchy like so:
children: <Widget>[
                        Padding(
                          padding: const EdgeInsets.symmetric(vertical: 20),
                          child: Text(
                          'User Profile',
                          style: Theme.of(context).textTheme.titleLarge,
                        )),
                        const ProfilePicture(),
                        TextField(...
To wrap up on the profile picture, we’ll add a loading spinner to provide feedback to users that something is happening. We’ll use a _isLoading boolean field to keep track of when the picture is loading, which will toggle whether the spinner or a picture is shown:
class _ProfilePictureState extends State<ProfilePicture> {
  ImageProvider? _image;
  bool _isLoading = true;

...

void _retrieveProfilePicture() async {
    ...
      setState(() {
        _image = FileImage(file);
        _isLoading = false;
      });
    } else {
      setState(() {
        _image = const AssetImage("assets/profile-placeholder.png");
        _isLoading = false;
      });
    }
  }

void _selectNewProfilePicture() async {
    final ImagePicker picker = ImagePicker();
    final XFile? image = await picker.pickImage(source: ImageSource.gallery);

    if (image != null) {
      setState(() {
        _isLoading = true;
      });

      ....

      setState(() {
        _image = MemoryImage(imageBytes);
        _isLoading = false;
      });
    }
  }
Part Four: Storing User Details (Abridged)
Great, we’ve now got a mobile app skeleton in place that has users, authentication, and profile pictures. Next, let’s see if we can create an API that utilizes user credentials to retrieve additional information about them.
Normally, I would say, “you want an API? Simple:”
This is where the lion’s share of effort and troubleshooting was because, depending on the configuration you choose, it’s not fully supported within the Amplify and Flutter ecosystem. Using the out of the box data store and model can also result in inefficient read patterns, which can very quickly become costly and slow.
Amplify provides a high-level API for interacting with data in AppSync, but in this tutorial, I’ll be using GraphQL with low-level queries as it provides more flexibility and allows using a Global Secondary Index in DynamoDB to avoid table scans. If you want to understand how I got here and what the various pitfalls are, check out “Challenges Working with and Tuning AWS Amplify and Appsync with Flutter.”

Amplify attempts to default the questions asked when creating an API, but you can override any of these by scrolling up to the option you want to change. In this scenario, we want a GraphQL endpoint (to leverage DataStore), and the API authorization to be handled by the Cognito User Pool, as we want to apply fine-grained access control so only the user can update or delete their own details (but other users can view them).
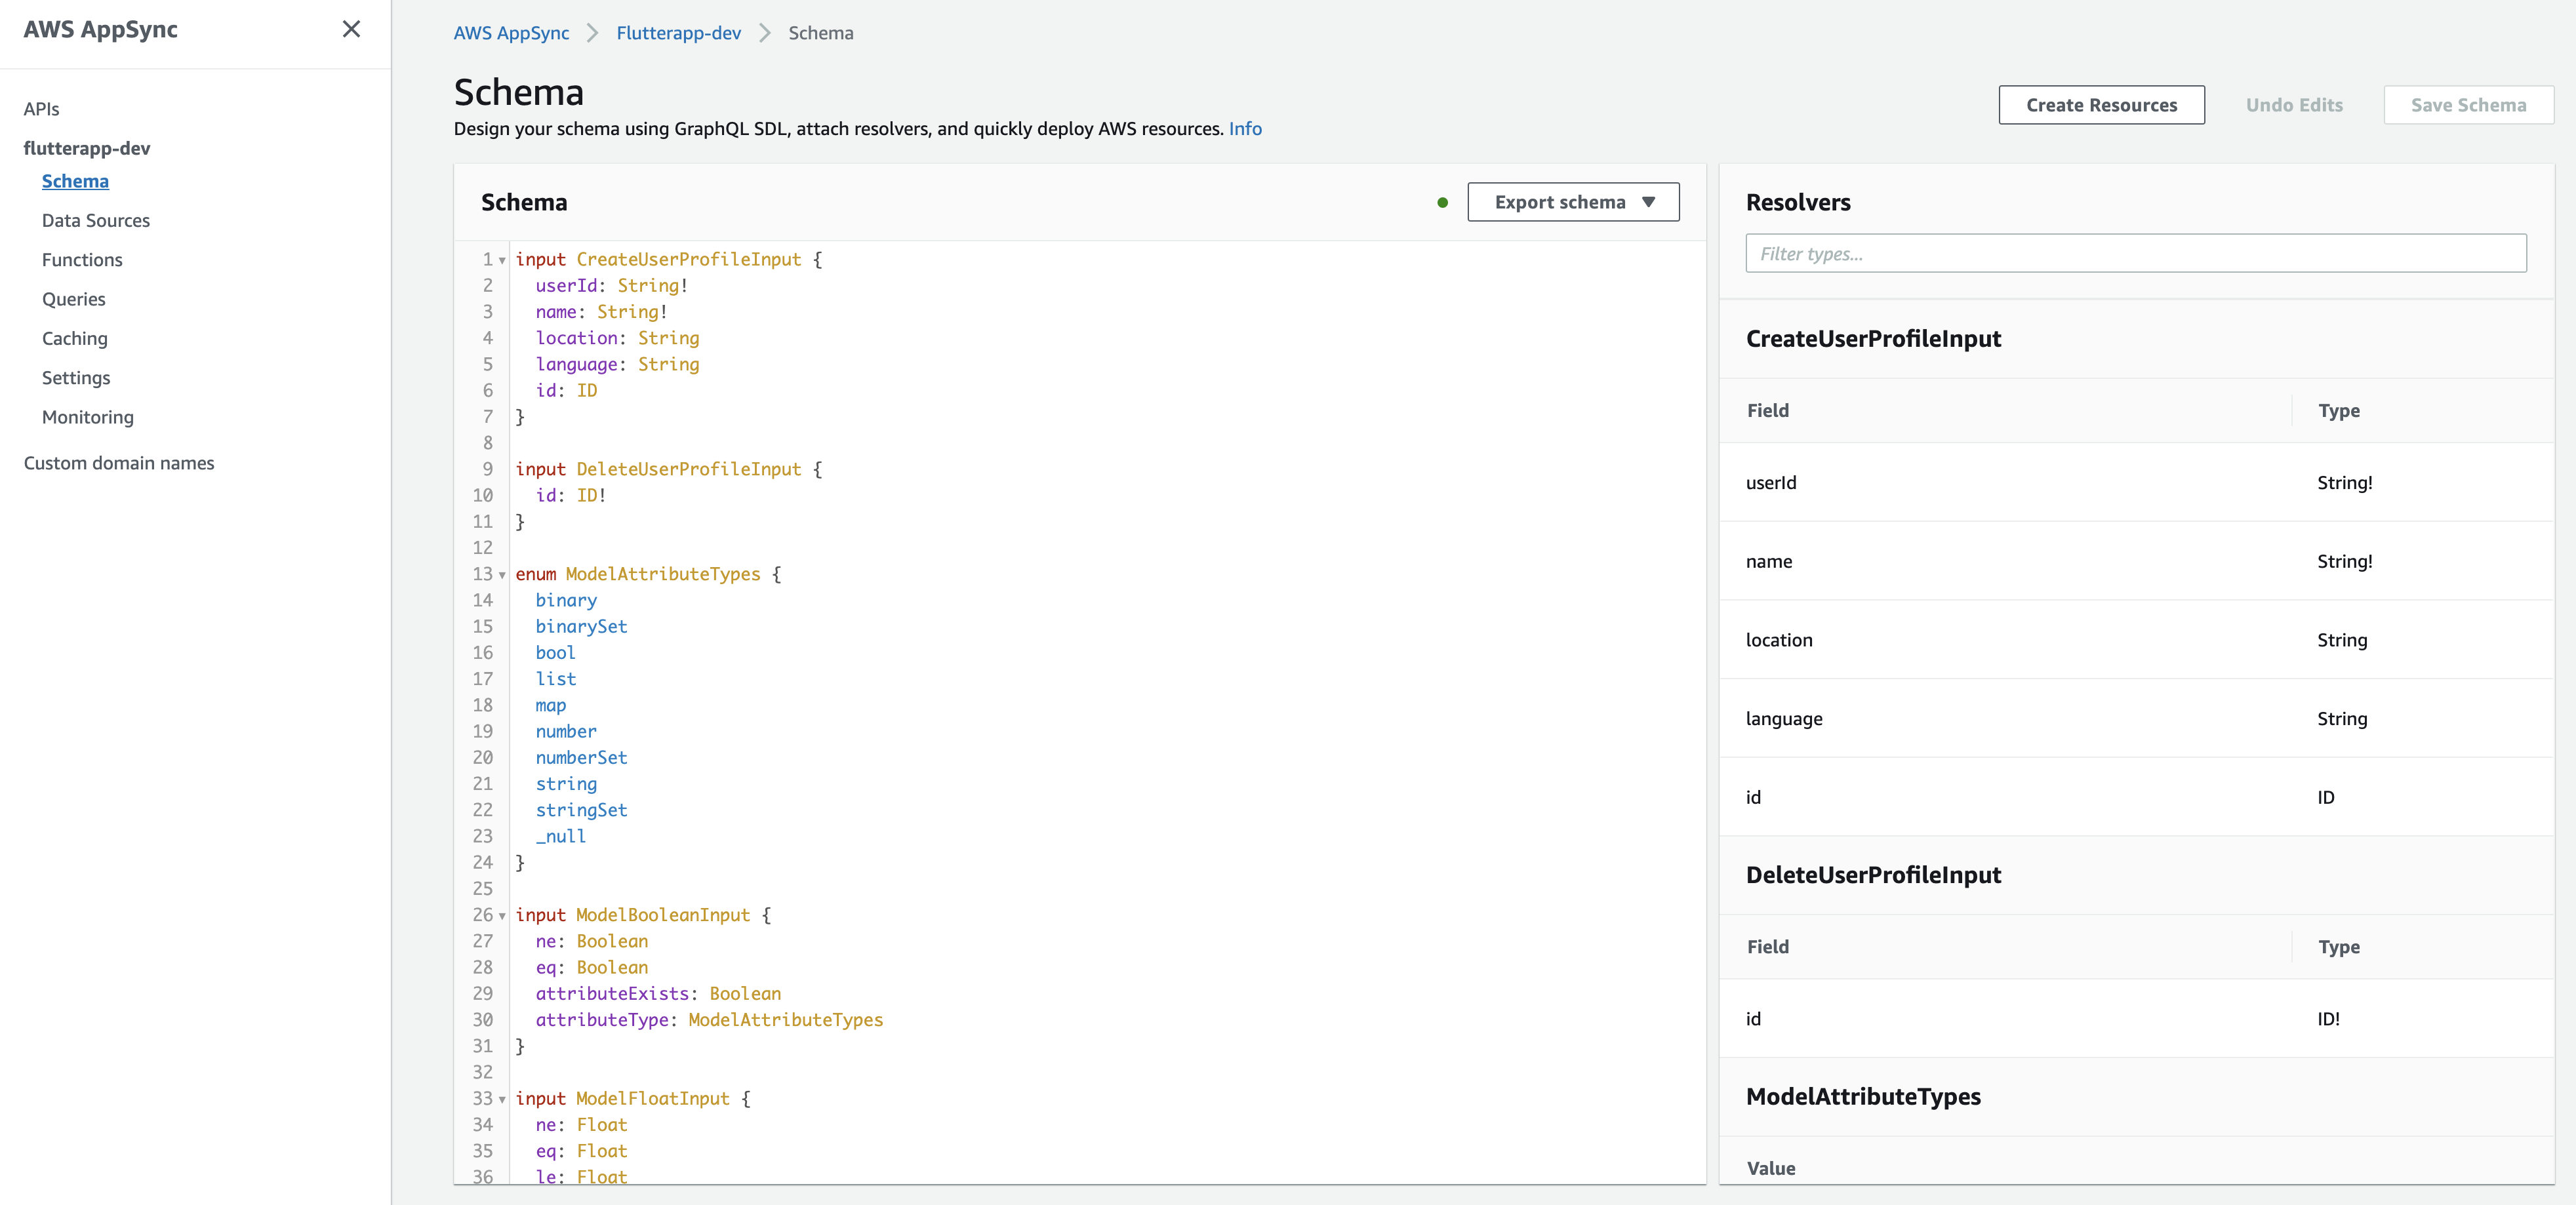
When we create the API, Amplify creates a basic ToDo GraphQL schema type. We’ll update this and add some authorization rules before pushing the API changes.
Modify the “ToDo” template GraphQL schema to cater for our user profile information.
type UserProfile @model
@auth(rules: [
  { allow: private, operations: [read], provider: iam },
  { allow: owner, operations: [create, read, update, delete] }
])
{
  userId: String! @index
  name: String!
  location: String
  language: String
}
Private rule allows logged in users to view the profiles of anyone else. By not using public, we are preventing people who aren‘t logged in from viewing profiles. The IAM provider prevents users from directly accessing the GraphQL API—they need to be using the app and use the “unauthenticated” role within our Cognito identity pool (i.e., logged out) to view user details.
The “owner“ rule allows the user who created the profile to create, read, and update their own profile. In this example, we’re not letting them delete their own profile however.
At this point, we can provision our cloud infrastructure supporting the API feature:
When you change the existing GraphQL model from ToDo to UserProfile, if you’ve previously done an amplify push and provisioned the infrastructure, you may receive an error stating the requested change would require destroying the existing DynamoDB table. Amplify prevents you from doing this incase of lost data from deleting the existing ToDo table. If you get this error you need to run amplify push --allow-destructive-graphql-schema-updates.
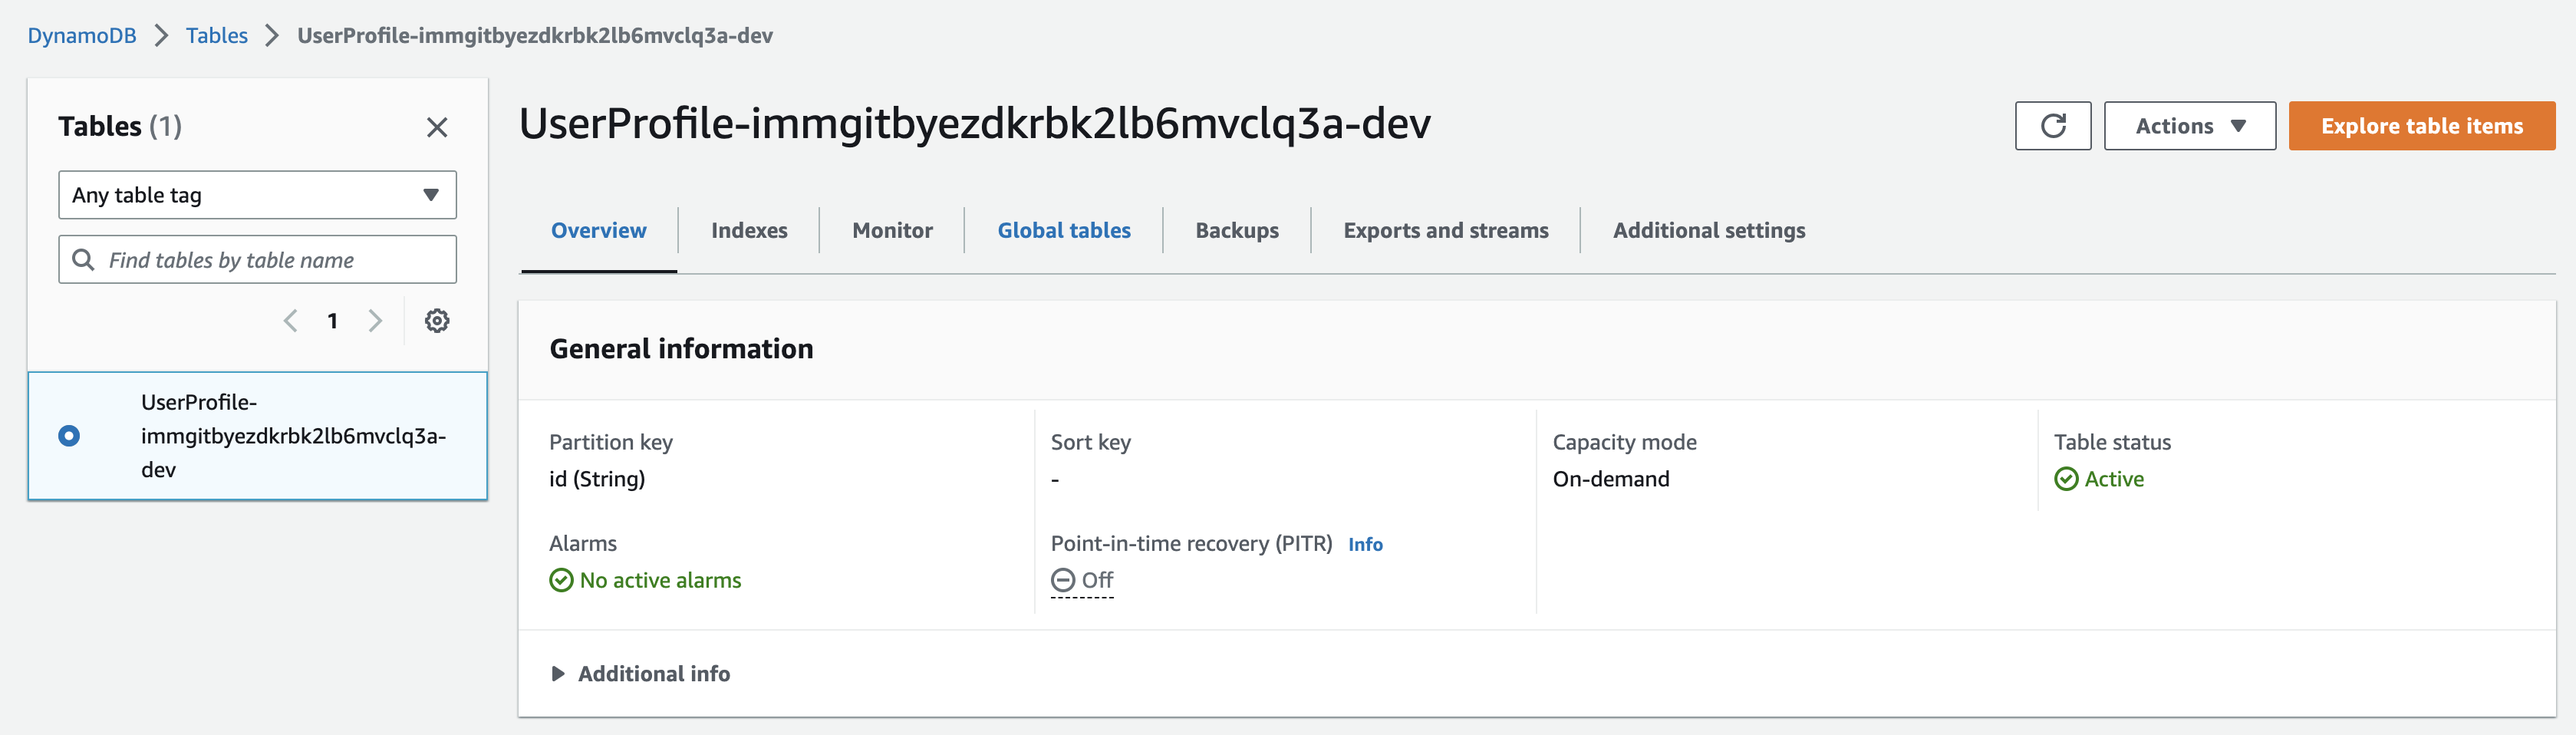
When you do an amplify push, Amplify and CloudFormation will stand up an AppSync GraphQL API, intermediary resolvers and a backing DynamoDB table similar to this:
Once we’ve defined a GraphQL schema, we can use Amplify to generate the Dart code that represents the model and repository layer that can work with the API:
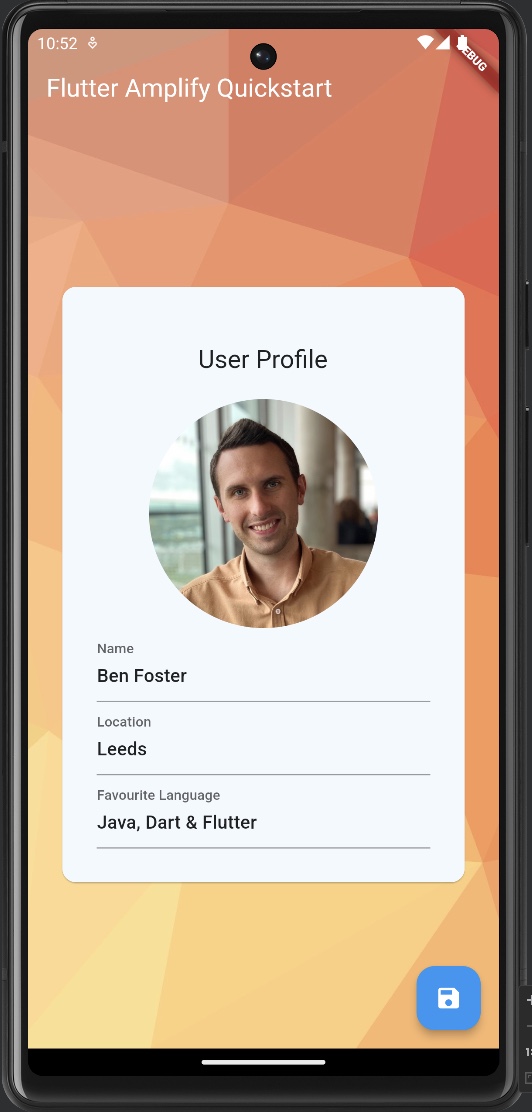
At this point, we can add some input fields onto our page to populate the user’s name, location, and favorite programming language.
This is what the text field changes look like in our _MyHomePageState component:
class _MyHomePageState extends State<MyHomePage> {
  final _nameController = TextEditingController();
  final _locationController = TextEditingController();
  final _languageController = TextEditingController();

  @override
  Widget build(BuildContext context) {
    ...
                      children: <Widget>[
                        Padding(
                          padding: const EdgeInsets.symmetric(vertical: 20),
                          child: Text(
                          'User Profile',
                          style: Theme.of(context).textTheme.titleLarge,
                        )),
                        const ProfilePicture(),
                        TextField(
                          decoration: const InputDecoration(labelText: "Name"),
                          controller: _nameController,
                        ),
                        TextField(
                          decoration:
                              const InputDecoration(labelText: "Location"),
                          controller: _locationController,
                        ),
                        TextField(
                          decoration: const InputDecoration(
                              labelText: "Favourite Language"),
                          controller: _languageController,
                        )
                      ]
Then wire up our TextFields to the AppSync GraphQL API so when the user hits a “Save” floating action button, the changes are synced with DynamoDB:
floatingActionButton: FloatingActionButton(
            onPressed: _updateUserDetails,
            tooltip: 'Save Details',
            child: const Icon(Icons.save),
          ),
        )
      ],
    );
  }

  Future<void> _updateUserDetails() async {
    final currentUser = await Amplify.Auth.getCurrentUser();

    final updatedUserProfile = _userProfile?.copyWith(
            name: _nameController.text,
            location: _locationController.text,
            language: _languageController.text) ??
        UserProfile(
            name: _nameController.text,
            location: _locationController.text,
            language: _languageController.text);

    final request = _userProfile == null
        ? ModelMutations.create(updatedUserProfile)
        : ModelMutations.update(updatedUserProfile);
    final response = await Amplify.API.mutate(request: request).response;

    final createdProfile = response.data;
    if (createdProfile == null) {
      safePrint('errors: ${response.errors}');
    }
  }
Finally, when our users open up the app, we want to pull the latest profile from the cloud. To achieve this, we make a call as part of our _MyHomePageState‘s initialization:
@override
  void initState() {
    super.initState();
    _getUserProfile();
  }

void _getUserProfile() async {
    final currentUser = await Amplify.Auth.getCurrentUser();
    GraphQLRequest<PaginatedResult<UserProfile>> request = GraphQLRequest(
        document:
            '''query MyQuery { userProfilesByUserId(userId: "${currentUser.userId}") {
    items {
      name
      location
      language
      id
      owner
      createdAt
      updatedAt
      userId
    }
  }}''',
        modelType: const PaginatedModelType(UserProfile.classType),
        decodePath: "userProfilesByUserId");
    final response = await Amplify.API.query(request: request).response;

    if (response.data!.items.isNotEmpty) {
      _userProfile = response.data?.items[0];

      setState(() {
        _nameController.text = _userProfile?.name ?? "";
        _locationController.text = _userProfile?.location ?? "";
        _languageController.text = _userProfile?.language ?? "";
      });
    }
  }
We now have an API that we can store data in, secured with Cognito and backed by DynamoDB. Pretty neat considering I’ve not had to write any infra-as-code.
So at this point, we have a means of querying, displaying, and updating a user’s profile information. Feels like another save point to me.
Part Five: Adding Some Design Flair
Finally, the sample app we’ve extended looks a little plain. Time to bring it to life a little.
Now, I’m no UI expert, so I took some inspiration from dribbble.com and decided on a loud background and contrasting white card area for the profile details.
Adding a Background Image
First up, I wanted to add a background image to bring some color into the app.
I had a go at wrapping the children of my Scaffold widget in a Container widget, which you can then apply a decoration property to. It works and it’s the more upvoted solution, but it doesn’t fill the app bar too, which would be nice.
I ended up using this approach, which utilizes a Stack widget to lay a full-height background image under our Scaffold: “Background Image for Scaffold” on Stack Overflow.
The resulting code looks like this:
@override
  Widget build(BuildContext context) {

    return Stack(
      children: [
        Image.asset(
          "assets/background.jpg",
          height: MediaQuery.of(context).size.height,
          width: MediaQuery.of(context).size.width,
          fit: BoxFit.cover,
        ),
        Scaffold(
          backgroundColor: Colors.transparent,
          appBar: AppBar(
            // Here we take the value from the MyHomePage object that was created by
            // the App.build method, and use it to set our appbar title.
            title: Text(widget.title),
            backgroundColor: Colors.transparent,
            foregroundColor: Colors.white,
          ),
          body: Center(
          ...
Well, that looks kinda pretty, but the background is a little jarring against the editable elements on the screen:
So I wrapped the text fields and profile picture in a Card like so, setting some margin and padding so it doesn’t look cramped:
Scaffold(
          backgroundColor: Colors.transparent,
          appBar: AppBar(
            title: Text(widget.title),
            backgroundColor: Colors.transparent,
            foregroundColor: Colors.white,
          ),
          body: Center(
              child: Card(
                  margin: const EdgeInsets.symmetric(horizontal: 30),
                  child: Padding(
                    padding: const EdgeInsets.all(30),
                    child: Column(
                      ...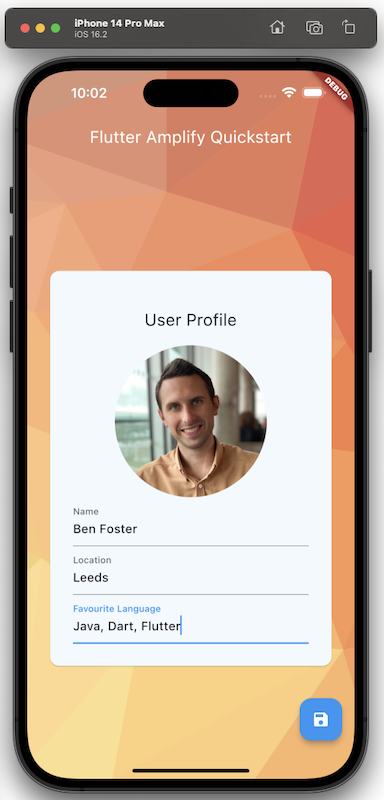
This is one way to do it, although I suspect there’s a more idiomatic approach that utilizes the material design system. Maybe one for another post.
Change the App Icon and Title in Menu
If you want to change the icon of your app, you have to provide a number of variants of your logo, all at different resolutions for iOS and Android separately. Both have separate requirements too (some of which you will ignore to prevent your app from being approved), so this quickly becomes a tedious job.
Thankfully, there is a Dart package that does all of the heavy lifting. Given a source image of your app icon, it can generate all of the permutations required for both platforms.
For this demo app, I just nabbed a random app icon from Google Images:
Following the readme led me to defining this minimal set of config to successfully generate icons. Place this at the bottom of your pubspec.yaml file:
flutter_icons:
  android: true
  ios: true
  remove_alpha_ios: true
  image_path: "assets/app-icon.png"
With the above in place, run this command to generate icon variants needed for both iOS and Android:
flutter pub run flutter_launcher_icons
You should see a raft of icon files generated for Android and iOS in android/app/src/main/res/mipmap-hdpi/ and ios/Runner/Assets.xcassets/AppIcon.appiconset/ respectively.
Changing the app name from what I could find is, unfortunately, still a manual process. Using an article called “How to Change App Name in Flutter—The Right Way in 2023” on Flutter Beads as guidance, I changed the app name in the following two files for iOS and Android respectively:
ios/Runner/Info.plist
<?xml version="1.0" encoding="UTF-8"?>
<!DOCTYPE plist PUBLIC "-//Apple//DTD PLIST 1.0//EN" "http://www.apple.com/DTDs/PropertyList-1.0.dtd">
<plist version="1.0">
<dict>
    <key>CFBundleDevelopmentRegion</key>
    <string>$(DEVELOPMENT_LANGUAGE)</string>
    <key>CFBundleDisplayName</key>
    <string>Flutter Amplify</string> <--- App Name Here
android/app/src/main/AndroidManifest.xml
<manifest xmlns:android="http://schemas.android.com/apk/res/android"
    package="com.example.flutterapp">
   <application
        android:label="Flutter Amplify" <--- App Name Here
        android:name="${applicationName}"
        android:icon="@mipmap/ic_launcher">
This gives you a nice little app icon and title now:
Wrapping Up
So, that concludes how to get up and running with Flutter and AWS Amplify, and hopefully demonstrates how quick it is to deploy the supporting resources and scaffolding code required to quickly prototype a cross-platform mobile application.
I’m keen to get feedback on this tutorial, or any follow up tutorials people would like to see. All feedback is welcome and appreciated!
Issues Encountered
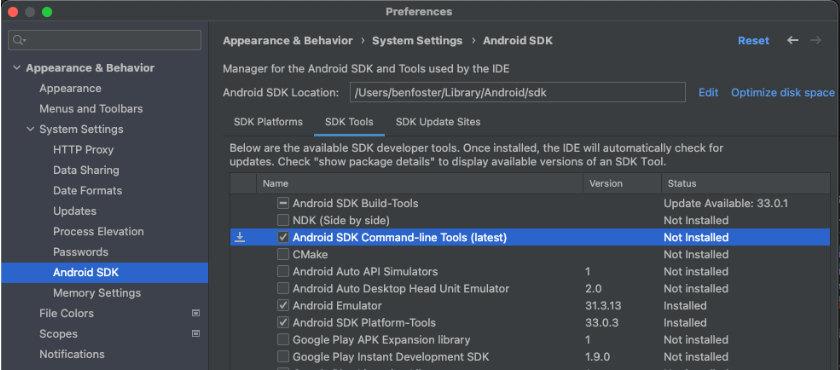
Missing Android Command-Line tools
The location of my Android SDK Manager is:
/Users/benfoster/Library/Android/sdk/tools/bin/sdkmanager
Doing the following installed the Android command-line tools: Stack Overflow “Failed to Install Android SDK Java Lang Noclassdeffounderror JavaX XML Bind A.”

flutter doctor --android-licenses
App Stays Logged in on iOS
While developing, I wanted to repeat the process of signing in to the app. Unfortunately (for me) the app was retaining user information between app closures—closing and reopening the app kept it logged in.
My previous experience with Android development and Amplify convinced me that removing the app and rerunning “flutter run” would remove the user state and start anew. Unfortunately not even this had the desired effect, so I ended up erasing the phone whenever I needed to start with a clean slate:

Source link