Donations Make us online
You may have never heard of the Clojure language before, much less be aware of its use cases for web development. Throughout my career, I’ve worked with several programming languages, but since discovering Clojure, I find myself reaching for it no matter what problem I have to solve.
Clojure is a functional programming language that runs natively on the JVM. The ClojureScript library allows us to compile Clojure into JavaScript and run it in a browser. In this article, I’ll introduce you to Clojure and ClojureScript, demonstrating how your next web application could be your first steps into the happy world of a Clojure developer.
We’ll cover some of the reasons why ClojureScript is a natural fit for web development, particularly with React via a library called Reagent. We’ll then use a build tool called shadow-cljs to write a basic, interactive web application. To follow along with this tutorial, you can find the full code on GitHub. Let’s get started!
Jump ahead:
Why ClojureScript?
There are several compelling reasons to consider Clojure for any kind of development, both on the server and the frontend. For one, the Clojure language itself is functional, and immutability is the default idiom. Additionally, Clojure’s core library, data structures, and literals are concise and powerful.
On the server, Clojure will run on the JVM, and interop with Java allows it to benefit from the Java ecosystem. Using ClojureScript, Clojure compiles to JavaScript as well, and it can interop with JavaScript libraries to provide the same advantages. Typically, we call Clojure source files that are intended to be compiled into JavaScript “ClojureScript files”, although they are still written in the Clojure language.
One of my favorite features in Clojure is the REPL (Read, Eval, Print, Loop), an interactive environment where you can execute your code, greatly reducing feedback loops for iterative development and encouraging exploration and experimentation.
Clojure itself has an active and happy community, so you can troubleshoot any issues you might encounter. There are many excellent resources available for learning Clojure, but for now, we’ll start with a crash course.
:span: A keyword[:div :span]: A vector with keywords in it{:width 100}: A map with a key:widthand a value of100(defn double-me [n]: A function calleddouble-methat takes one argument(* 2 n)): Returns2 * n(double-me 4): An example of calling thedouble-mefunction with4
Congratulations, you’ve just learned nearly the entire syntax used by Clojure!
When it comes to selecting the right tool for any given task, you typically have a few reliable options to choose from. Such is the case with ClojureScript build tools. The ClojureScript compiler itself is considered pretty low level, meaning it will turn Clojure into JavaScript but not much more. Over the last ten years, a handful of build tools have emerged that support incremental compilation as you develop, launching REPLs, running tests, and browser hot reloading:
In this article, we‘ll use shadow-cljs, which has had the most recent development at the time of writing, enjoys community funding, and has the best support for using libraries from npm. In other words, it’s arguably the most solid choice nowadays.
shadow-cljs quickstart
Another excellent reason to choose shadow-cljs is its comprehensive documentation, including the browser quick start, which can generate a running setup on a skeleton project with just a few commands. First, clone the project and install the dependencies:
git clone https://github.com/shadow-cljs/quickstart-browser.git quickstart
cd quickstart
npm install
Now, you’re ready to start shadow-cljs, which will compile your code, serve it to the browser, and watch the filesystem for any changes you make:
npx shadow-cljs watch app
To see the skeleton, you can open http://localhost:8020 in your browser. The following diagram should help you understand what’s going on here:
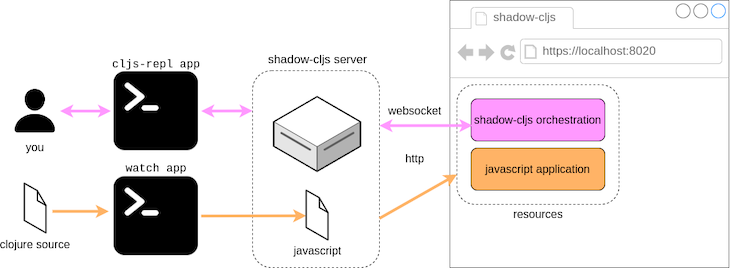
ClojureScript iterative development
The source code generated from the quick start is under quickstart/src/main/starter/browser.cljs. It contains some functions that are hooks to help you get started with your development lifecycle:
init: Called once when the page loads, callingstartas wellstart: Called after new code has been loadedstop: Called before new code is loaded
Let’s try pushing a DOM element into the page. Add the following code to the start function so it looks like the following:
(defn ^:dev/after-load start []
  (.appendChild (js/document.getElementById "app")
                (js/document.createTextNode "Hello, world")))
When you save this source file with your changes, shadow-cljs will compile and push the updated code into your browser to be evaluated. You’ll see “Hello, World!” appear. Together with the fast compilation speed and hot reload functionality, the REPL can really improve your development speed.
Reagent: A rendering framework for ClojureScript
React is a popular library for rendering pages. Its functional, immutable approach is a natural fit for Clojure, and there are several Clojure wrappers that provide a more idiomatic API. Reagent is a safe choice for us here.
Despite being a wrapper, Reagent can perform faster than plain React; Clojure’s immutable data structures can be compared more efficiently than JavaScript objects, resulting in faster decisions about when to re-render a component.
Add Reagent to the :dependencies key in shadow-cljs.edn:
:dependencies
` [[reagent "1.1.1"]]
To pick up the new dependency, we’ll need to restart the npx shadow-cljs watch app. Now, we can write our first Reagent component. It takes the form of a simple Clojure function that returns a Clojure data structure representing HTML, known as Hiccup after the library that popularized the format.
Hiccup is much more concise than HTML and plays nicely with a structural code editor:
(defn- hello-world []
  [:ul
   [:li "Hello"]
   [:li {:style {:color "red"}} "World!"]])
The code above represents the following HTML:
<ul>
  <li>Hello</li>
  <li style="color: red;">World!</li>
</ul>
Next, we need to require the reagent.dom namespace:
(ns starter.browser
  (:require [reagent.dom :as rd]))
Then, we use it to mount our component into the DOM by changing the start function to look like the following:
(defn ^:dev/after-load start []
  (rd/render [hello-world] (js/document.getElementById "app")))
Once you’ve saved the file, the list should be rendered in your browser, and we now have the rendering basics in our application.
Interactivity with ClojureScript
Things start to get interesting when we add interactivity. After all, if your page is static, then you don’t need JavaScript at all. However, before we implement anything, I’d like to introduce you to one of Clojure’s superpowers, the REPL.
REPL
The REPL is a prompt where you can evaluate Clojure expressions. It’s a powerful tool that helps you explore and trial solutions, reducing the feedback loop and making you more productive:
cljs.user=> (+ 1 1)
2
Since we’re building a webpage, it will be helpful to use a browser to perform the evaluation in our REPL. It’s easy to start one; in a new terminal, run the following command:
npx shadow-cljs cljs-repl app
When you open http://localhost:8020 in your browser, it will include some code injected by shadow-cljs to open a WebSocket back to the server. When you type commands into this REPL, they are sent via this WebSocket to be evaluated in the browser, with results returned to your REPL.
Try out the addition example above. How do we know it was evaluated in the browser? Try this next:
(js/alert "Hello, world")
You should see an alert dialogue in your browser, as if you had typed alert ("Hello, world") in the browser’s developer console. To exit the REPL, press Ctrl+D. Let’s use this tool to help with implementing an interactive state in our app.
Atoms
You may be wondering how we can implement mutable state when Clojure’s data structures are immutable. Clojure is a pragmatic language, so there are actually mutable constructs in it, but they are carefully marked, so it’s clear where you’re dealing with something special.
An atom is a mutable reference to an immutable value. You can construct one with (atom nil). The reference can be mutated using swap! or reset!, with ! being the conventional notation for a mutation. You can dereference the atom to get the value using @ or deref.
Try the code below in your REPL:
(def counter (atom 0))
@counter ;; => 0
(swap! counter inc)
@counter ;; => 1
We‘ll use an atom in our application to store some state, but we‘ll use Reagent’s version of an atom. It has the same interface as Clojure’s atom, but it has a secret superpower: when it changes, it can tell React to re-draw the DOM.
We need the Reagent core namespace:
(ns starter.browser
  (:require [reagent.core :as r]
           [reagent.dom :as rd]))
Then, we can create an initial state:
(defonce state (r/atom {:items ["Hello" "World!"]}))
We can write a new component with an input box to allow us to add items into the state:
(defn- new-item []
  [:input
   {:type "text"
    :placeholder "Enter a new item"
    :on-key-down (fn [e]
                  (when (= "Enter" (.-key e))
                     (swap! state update :items conj (.. e -target -value))))}])
Finally, change your “Hello, World!” component to list out the items from the state:
(defn- hello-world []
  [:div
   [new-item]
   [:ul (map (fn [item]
               [:li {:key item} item])
             (:items @state))]])
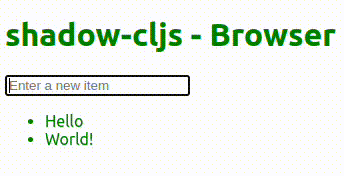
You’ll notice that the “Hello, World!” also includes our new-item component as a child. Now, the code above renders as follows, and when we type a new item into the input and press enter, it joins the list:
You can also use your REPL to inspect this atom:
`(in-ns 'starter.browser)

@state ;; => {:items ["Hello", "World!"]}
You can mutate it too, with the new state being rendered immediately in your browser:
(swap! state update :items conj "Hello REPL!")
This is just a glimpse of the utility of the REPL when developing an application. It’s a constant companion that blends code, data, and state, allowing you to inspect everything with the full power of the language.
What’s next?
If you’re interested in using this codebase to build an actual application, I’d suggest the excellent Reagent cookbook for examples of how to implement particular features. If your application is significantly interactive and you have a lot of state to model, I would also recommend checking out re-frame, an analog of Redux, to bring structure and order to your state management.
Conclusion
We’ve covered a lot of ground, including discussing Clojure itself, the shadow-cljs build tool, the Reagent rendering library, the REPL, and building interactivity using atoms. In each case, we’ve really only scratched the surface; any of these topics has a wealth of resources for diving deeper.
I hope you find Clojure’s simplicity and conciseness appealing. I find this to be one of its enduring qualities that I appreciate every time I see another language.
I’ll admit that it took me several weeks to start thinking in the right way to work harmoniously in Clojure, but that was coming from an imperative Java background a decade ago. Many modern languages have adopted functional paradigms and offer immutable data structures that should make the transition easier.
LogRocket: Full visibility into your production React apps
Debugging React applications can be difficult, especially when users experience issues that are hard to reproduce. If you’re interested in monitoring and tracking Redux state, automatically surfacing JavaScript errors, and tracking slow network requests and component load time,
try LogRocket.


LogRocket
combines session replay, product analytics, and error tracking – empowering software teams to create the ideal web and mobile product experience. What does that mean for you?
Instead of guessing why errors happen, or asking users for screenshots and log dumps, LogRocket lets you replay problems as if they happened in your own browser to quickly understand what went wrong.
No more noisy alerting. Smart error tracking lets you triage and categorize issues, then learns from this. Get notified of impactful user issues, not false positives. Less alerts, way more useful signal.
The LogRocket Redux middleware package adds an extra layer of visibility into your user sessions. LogRocket logs all actions and state from your Redux stores.
Modernize how you debug your React apps —
start monitoring for free.
Source link