This tutorial shows how to structure and draw an anime face with a focus on explaining how it can be constructed from simple shapes.
When drawing it can be helpful to construct complex objects from several basic shapes. The same can also be done with anime and manga characters. This guide shows how you can construct an anime face using such an approach.
The benefits of drawing in this a way include:
- Easier to understand and create the shape of a given object
- Easier to catch and avoid mistakes
- Easier to modify different parts of the drawing
Please note that some aspects of this tutorial may be covered more in depth in other guides here on AnimeOutline. The instructions here are focused on helping you gain a better understanding of the different shapes that a portrait style drawing of an anime character is made up of. While there is some overlapping information with other tutorials there is also plenty of information specific to this one. Be sure to go through the entire thing!
For the proportions of an anime body see the following guide:
How to Draw Anime Girl Full Body Step by Step
Above is the video version of this tutorial. Watch it for a detailed breakdown of the drawing process and then read the more in depth instructions below.
If you like these kinds of videos please be sure to leave a like and to subscribe to the AnimeOutline channel. Your likes and subscriptions are very helpful and very much appreciated.
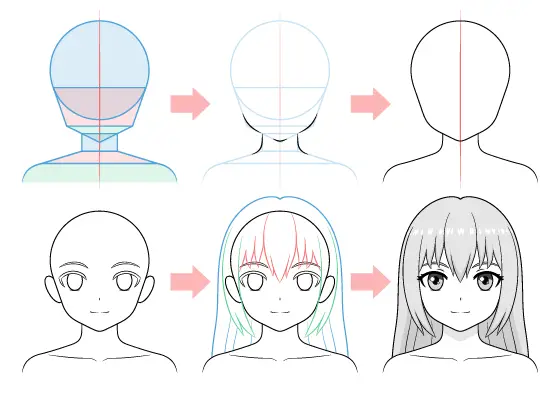
Step 1 – Structure the Head & Shoulders
The basic form of an anime head can be created from or broken down into the three simple shapes shown above.
In this next illustration you can see how they very much resemble one once stacked together.
While drawing out these shapes every time you want to draw an anime character can be a hassle, doing it a few times can be good practise. Afterwards you can simply keep them in mind or only use them when your struggling to get the form of a particular head.
Generally it’s much easier to spot mistakes when looking at a simpler drawing than a more complex one as it’s just less information to process. For example, it’s fairly easy to see if a circle (or what’s supposed to be a circle) isn’t round or if lines that are supposed to be straight aren’t. For this reason beginners can really benefit from viewing a given drawing as several simpler shapes rather than one complex object.
In addition to viewing objects as being made up of simplified shapes it can also be very helpful to use some basic guide lines as is done with the center line (shown in red). Making a vertical line through the middle of your drawing can be very helpful when trying to create one that is symmetrical. The line can help you see if the two halves are uneven in width or if the object is skewed to one side.
In addition to catching mistakes the method used in this tutorial can also make it easier to modify your drawing.
If you want to create a longer or rounder anime face you can either stretch or flatten the red and green shapes accordingly. The third shape (the blue circle) can remain unchanged.
The neck and shoulders can likewise be created from or broken down into several shapes as shown.
When combined with the head they create a very basic portrait-like drawing shown above.
Step 2 – Round the Structure Drawing
Once you have the simplified structure of the head, neck and shoulders you can turn it into an organic one by simply rounding the corners.
Afterwards clean up the drawing by erasing the extra lines so that it looks similar to the above.
Step 3 – Proportions and Position the Facial Features
Once you have an outline of the head you can start adding the facial features. Begin with the eyes. Draw them spaced far enough apart that you can fit another eye in between them.
When it comes to anime eyes the irises are often vertically stretched out. If you were to fully draw out the parts covered by the eyelids they should look like ovals.
At the early stages of the drawing only outline the main forms of the eyelashes and the irises. Leave out all the smaller details until you’ve positioned the major parts of the head/face. This way if you don’t like how things turned out and wish to change something you have to do far less backtracking (less erasing/redrawing).
Position the different parts of the face as follows:
- Eyes – below the horizontal halfway point of the head
- Eyebrows – a little bit above the eyes
- Nose – halfway between the top of the eyes and the bottom of the chin
- Mouth – slightly above the halfway point between the nose and the chin
For more on drawing different parts of the face individually see the following:
- How to Draw Anime & Manga Eyebrows
- How to Draw Anime and Manga Noses
Anime mouths are generally draw with no lips so you can simply add it as a little curve with a gap in the middle (as is fairly common for the style).
For more on drawing anime mouths see:
- How to Draw Anime & Manga Mouths Tutorial
- How to Draw Anime and Manga Mouth Expressions
- How to Draw Anime & Manga Teeth Tutorial
When positioning the ears you can do it in a couple of ways. One is to place them a bit below the eyes with their upper ends and a bit below the nose with their lower ends.
Overall you can make the height of the ears the same as the distance between the top of the eyes and the nose.
When it comes to the ears you can simplify their shapes by again think of them as ovals that are tilted and partially hidden.
For more on drawing anime ears see:
How to Draw Anime & Manga Ears (3 Different Ways)
Please note that even when making a drawing with a hairstyle that totally covers the ears it can sometimes be a good idea to estimate their placement. This way you will know just how much volume the hair needs to properly cover them.
Step 4 – Position& Draw the Collar Bones
The collar bones generally run slightly downwards from the upper ends of the curves of the shoulders.
For more on drawing collar bones see:
How to Draw Anime Neck & Shoulders
You can give them a pair of bumps near their inner ends followed by downwards curves.
Step 5 – Draw the Hair
The illustration above shows the general hair bends/flow for a fairly generic anime hairstyle (straight long hair).
When the head is viewed from the front draw the hair clumps in the middle of the forehead (red) pointing straight down. Draw the ones on the sides with a bit of a curve. The reason for this is that the hair clumps will generally wrap around the curve of the head. The curvature will becomes more obvious the more the clumps move away from it’s center. If you would like a real life example of what is happening here think of a cut through an apple. If you look directly at the cut it will appear to be a straight line. However, if you rotate the apple the cut will start to appear more curved the more you look at it from the side.
The curves of the hair on the sides of the head (green) will be even more obvious. They will also curve a little bit inwards near the bottom as they are not very long. However, longer hair may hang straight down as it’s pulled more by it’s own weight.
The hair on top (in blue) will first somewhat follow the shape of the head (on top) and will then “fan out” as it runs down to the shoulder and is pushed apart when it rests on them.
In the illustration above you can see what things look like when the hair is actually drawn out.
For shorter hairstyles or ones where the hair is pulled back you should also be aware of the hairline.
For an explanation of this see the following tutorial:
How to Draw Anime and Manga Hair – Female
Step 6 – Add the Details of the Eyes
Once you have all major parts of the face outlined add the smaller details of the eyes.
These will be the follow:
- Hints of the Eyelids – as a small curve above each eye
- Reflections – larger for the main light source and smaller for the reflected light (are generally the same shape as the light sources)
- Pupils – oval like the irises
- Hints of Individual Lashes – near the outer curves of each eye (pointy and slightly curved)
For more on drawing anime eyes see the following tutorials:
- How to Draw Female Anime Eyes Tutorial
- How to Draw Anime Eyes and Eye Expressions
Step 7 – Apply Basic Shading (or Color)
Before shading you may wish to outline the hair highlights (light reflecting from it’s smooth surface). Alternatively you can simply create these by leaving white spots as you shade/color the hair.
If drawing digitally you can add the highlights over top of the color/shading.
The highlights do not need to be perfectly aligned but should generally run in a line across the hair.
For other styles of anime and manga hair highlights see the following tutorial:
Different Ways to Draw Anime Hair Highlights
For some basic shading simply fill in the hair, eyebrows and irises with grey. Shade the eyebrows to be slightly darker.
Make the pupils and eyelashes black (or use very dark pencil shading). Give the upper parts of the irises some dark shading as well or make them completely black.
If you would like to create a colored drawing then you can just replace the light grey parts with whatever colors you prefer.
Step 8 – Add the Shadows
The last part of the drawing is adding the shadows. In anime these are generally done using fairly simple “Cel Shading” or shading without gradients where there is an abrupt transition between the light and dark areas of the drawing.
In this example like in most tutorial here on anime outline (and probably most anime scenes) the shading is done in a generic way. The shadows are placed as thought he character is in well lit environment with most of the light coming from above.
In such as setup the shadows will generally be distributed similar to the above examples (shown in blue to make them easier to see).
Shadows will tend to take on the shapes of the objects that cast them. In this particular drawing this is most obvious with the shadow on the neck having roughly the same shape as the chin. However, as this is a stylized anime character soa lot of the shading can be simplified. For example, as anime noses in the front view are often just shown as a dot or a dash the shadow from it is also just a little “blob”.
How dark the shadows are will tend to depend on the intensity of the lighting. For a generic setups as the one described above you do not want too much contrast between the light and dark areas. Aim for something similar to the finished example.
For shading an anime face in different lighting see the following:
How to Shade an Anime Face in Different Lighting
Conclusion
This tutorial shows how to draw an anime face with a focus on constructing it from simple shapes (for the parts where this approach can be helpful). It also looks at the flow of the hair along the different areas of the head and explains some basics of shading.
While structuring an anime face in the way shown in this tutorial can take some extra time it can also be very beneficial in better understanding it’s overall shape and avoiding mistakes (especially if you are a beginner artist).
If you like these types of in depth tutorial that teach good drawing practices with a focus on the anime/manga style, you should also try the following:
- Beginner Guide to Drawing Anime & Manga
- How to Draw Anime Face Side View (With Proportions)
- How to Draw an Anime Boy Full Body Step by Step