We’ve all been there. We’re so focused on working on a Word document that we may forget to save it and then exit without thinking — not to mention system errors or Microsoft Word itself crashing. Conveniently, Microsoft provides a useful feature for the program that can recover everything you might have lost.
Here’s how to recover unsaved Word documents.
Using Word’s Recover Unsaved Documents tool
Microsoft Word has a specific tool you can use to recover an unsaved document. It’s the Recover Unsaved Documents option. Here’s how to use it:
Step 1: Within Microsoft Word and after you open a new, blank document in it, select the File tab. Then choose the Info tab if it’s not already selected by default.
Step 2: Select the Manage document button.
screenshot/Anita George / Digital Trends
Step 3: Choose the Recover unsaved documents option that appears in the menu that pops up.
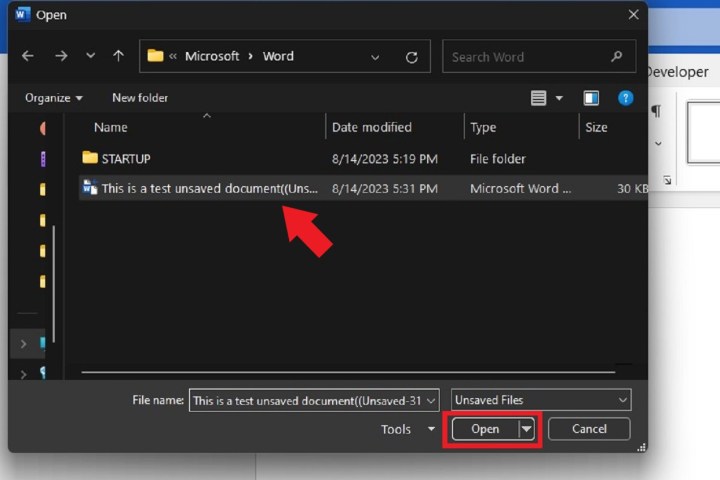
Step 4: Word will display an Open window that should contain your unsaved document. If your unsaved document is listed, select it and then select the Open button on that window.
screenshot/Anita George / Digital Trends
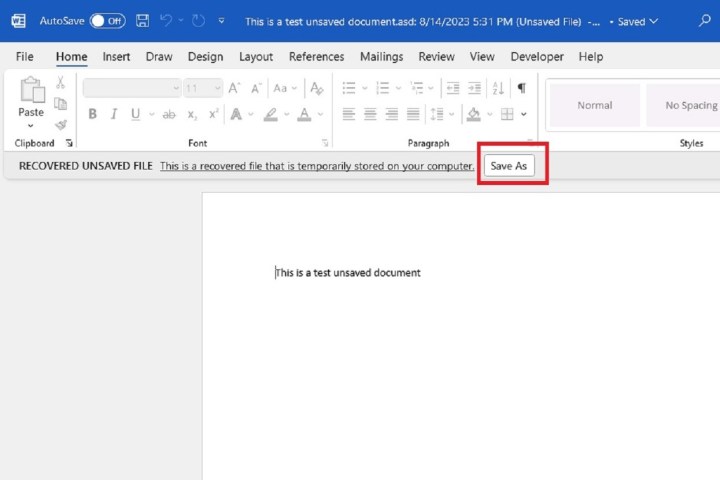
Step 5: After you’ve opened it, Word will show a message at the top of your document stating you’re accessing a recovered file, along with a button to save the file itself (Save as). Go ahead and select that button and follow the usual steps to save your document.
screenshot/Anita George / Digital Trends
Using Document Recovery
If for any reason Microsoft Word crashes while you have an unsaved document open, start Microsoft Word up again. If Word is able to retrieve it, a Document Recovery section will show up on the left side with a timestamp of when it is recovering it from. Select the drop-down menu next to the file’s name and choose the Save As option to safely store it on your PC.
There is one exception to the above and that’s if you have a Microsoft 365 subscription. If that’s the case, according to this Microsoft Learn guide, restarting Word will usually open up any recovered file and display a message with a Save button. For situations with multiple recovered files, the most recently edited recovered file will be opened and the other files will be placed in the Document Recovery section.
Manually searching for AutoRecover files
Are none of the above methods working? You can also recover unsaved Word documents through Microsoft’s AutoRecover feature.
Step 1: Select your Windows Start button and search for .asd. Make a note of the location of these files.
Alternatively, on Word, head to File and then select More > Options. Situated within the sidebar is the Save tab. Select that and then manually copy and paste the AutoRecover file location field into a File Explorer window.

Step 2: If your system finds any Word documents with the .asd extension, go to Word and choose File at the top. Select the Open and Browse tabs.
Step 3: As .asd is not a common file type, you’ll need to select the All files drop-down list and choose All files so it shows up.

Step 4: Select the .asd file and choose Open.
Search your temporary files
If you can’t find any results for the .asd extension, then you can also try the .tmp extension, which represents temporary files.
Step 1: In File Explorer, search for .tmp.
Alternatively, most .tmp files are located within your Documents folder. Navigate to: C:UsersenteryourusernamehereDocuments and search for .tmp within this location.

Step 2: In Microsoft Word, select File and then Open. Choose Folders. Go to the folder where you found the .tmp files within. Again, be sure to select the types of files list and choose All files or you won’t be able to view files with the .tmp extension. Finally, select the file and choose Open.
Enable the Backup Copy option and search your backup files
Another way Microsoft Word stores documents is via the .wbk extension, which is the name associated with backup files.
Step 1: The Backup copy option has to have been enabled. Go to File > More >Options >Advanced, and then navigate to the Save section. Tick the Check box next to the Always create backup copy option. Then select OK.

Step 2: In File Explorer, search for .wbk. If your system does contain any .wbk files, it will be named as Backup of, which is immediately accompanied by the name you had assigned to your missing file. Simply double-click the file to open it in Word.
Microsoft’s official Learn guide on the subject does note that Microsoft 365 subscribers may need to use a different method for locating their backup files, which involves copying and pasting the following locations into File Explorer: C:Users[yourusernamehere]AppDataRoamingMicrosoftWord or C:Users[yourusernamehere]AppDataLocalMicrosoftOfficeUnsavedFiles. Be sure to omit the brackets when you fill in the “yourusernamehere” section with your actual username.
Putting safe measures in place
Relying on the aforementioned methods to recover unsaved Word documents may not always bear fruit. Therefore, modifying the AutoSave tool for Word can save you from any potential mishaps in the future in the event you can’t recover a document.
Step 1: At the top of Microsoft Word, select File, choose More > Options, and then choose the Save tab.
Here, you can customize aspects such as how often your documents are saved. Modify the options provided to your liking and then select the OK button at the bottom.

Step 2: Enable the Backup copy option as we mentioned earlier. Head to File > More > Options >Advanced, and navigate to the Save section. Tick the Check box next to the Always create backup copy option. Then select OK.
Editors’ Recommendations
Source link