Online web editors are web-based applications that allow users to write and edit code on a browser. They work without needing local environments or setups, encouraging accessibility, collaboration, and simplicity.
Online editors offer a simple interface for writing and editing code and time-saving tools like syntax highlighting, line numbering, and auto-completion. Some examples of online web editors include Repl.it, CodePen, and CodeSandbox. In this article, we will cover how to build a web editor with React and the react-monaco-editor package.
Jump ahead:
What is Monaco Editor?
Monaco Editor is a browser-based code editor developed by Microsoft and is used in several of Microsoft’s products, including VS Code, Azure DevOps, and Visual Studio Online. The Monaco Editor is designed to provide a fast and efficient coding experience, with features like syntax highlighting and auto-completion. It also has inbuilt support for various programming languages and technologies, including JavaScript, TypeScript, HTML, CSS, and more.
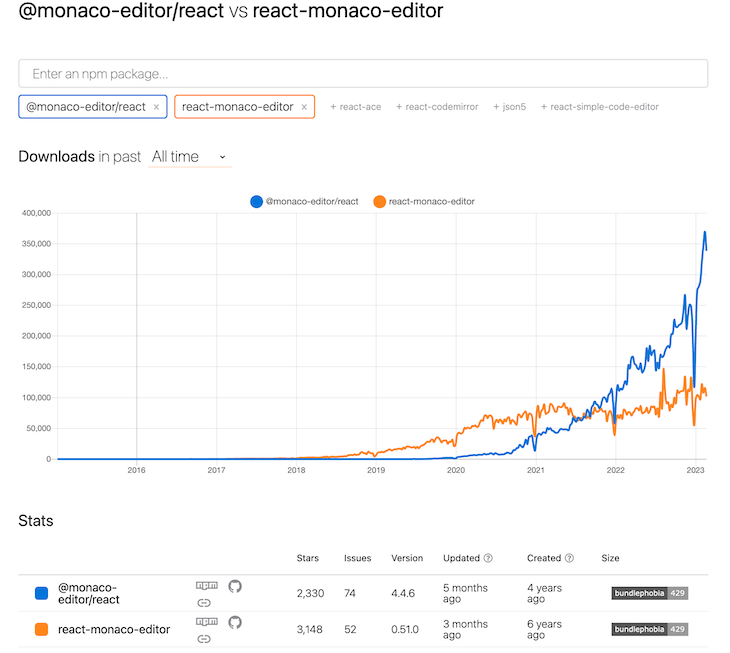
Two packages are available for using React with Monaco Editor: react-monaco-editor and @monaco-editor/react. React-monaco-editor was created six years ago with over 114,000 weekly npm downloads, while the @monaco-editor/react package was designed four years ago and had over 380,000 weekly npm downloads.
react-monaco-editor vs. @monaco-editor/react
The react-monaco-editor package was the first package available for embedding with React and is still actively maintained. However, it requires you to make various webpack changes which are very inconvenient, especially when working with React. This has made the package decline in popularity, as shown by the number of weekly downloads compared to the @monaco-editor/react package.
The @monaco-editor/react package is embeddable with React and does not require any configurations to start using it. Here’s a chart comparing the react-monaco-editor and @monaco-editor/react packages:
Creating a new app and installing dependencies
The first step is to create a new React app by running the command below:
yarn create react-app monaco-editor-with-react
Next, add the react-monaco-editor package with the following command:
yarn add react-monaco-editor
We also need to install some dependencies to work with the react-monaco-editor. Install them by running the command below:
yarn add monaco-editor monaco-editor-core monaco-languageclient
We will also install the Monaco webpack plugin as a devDependency into our React application with the following command:
yarn add --dev monaco-editor-webpack-plugin
Rewiring the React app to work with Monaco Editor
The next step after downloading the dependencies is to make the various webpack changes to allow the Monaco editor to work with our React application. However, it is quite challenging to make webpack changes because webpack configurations are not available to users in Create React App unless they choose to eject the React app by running yarn eject.
Ejecting a React app is a bad idea because our application will lose all the React configurations and will not benefit from the CRA updates. Some solutions for ejecting our application include using packages like react-app-rewired or rewire. You can also use CRACO to eject your React application, but it needs you to install additional plugins.
In this tutorial, we will use the react-app-rewired to rewire our React application. Install the package by running the command below:
yarn add --dev react-app-rewired
Next, create a config-overrides.js file in the root of the project, and paste the following code into it:
// config-overrides.js

const path = require('path');
const MonacoWebpackPlugin = require('monaco-editor-webpack-plugin');

module.exports = function override(config, env) {
  config.plugins.push(new MonacoWebpackPlugin())
  return config;
}
Now, navigate to the App.js file, clear all the boilerplate code, and build the code editor.
Building the code editor in React
To get started building the code editor in React, paste the code below into the App.js file:
import MonacoEditor from 'react-monaco-editor';

function App() {
  return (
      <MonacoEditor
        height="400"
      />
  );
}

export default App;
Let’s go over what it does. In the code above, we imported the MonacoEditor from react-monaco-editor. Next, we embedded that web editor into the application and passed in the height that we wanted the editor to be rendered.
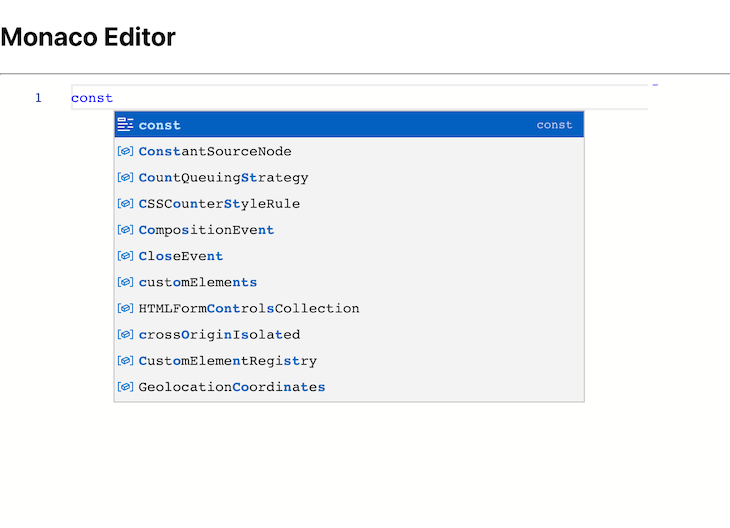
Note, we didn’t pass any language to the editor. The
MonacoEditoruses JavaScript as the default language when no language is specified. This means you can get all of JavaScript’s syntax highlighting and intelligence capabilities.
Now, run yarn start to see the changes that you have made in the browser, which should look like the image below:
Passing options to the editor
You can provide a list of options to the monaco-editor. The options range from setting the font size and font family to choosing the cursor style and choosing if we want to put the minimap in the editor. Now, copy and paste the list of options into the App.js file:
  const options = {
    autoIndent: 'full',
    contextmenu: true,
    fontFamily: 'monospace',
    fontSize: 13,
    lineHeight: 24,
    hideCursorInOverviewRuler: true,
    matchBrackets: 'always',
    minimap: {
      enabled: true,
    },
    scrollbar: {
      horizontalSliderSize: 4,
      verticalSliderSize: 18,
    },
    selectOnLineNumbers: true,
    roundedSelection: false,
    readOnly: false,
    cursorStyle: 'line',
    automaticLayout: true,
  };
In the code block above, we defined some options to customize the appearance and behavior of the editor. The next step is to pass the options to the editor, as shown below:
<MonacoEditor
    height="400"
    options={options}
/>
Opening files in the editor
So far, we have hardcoded the language of the editor by setting it to JavaScript, and we can see that the code editor works. What happens when we try to write code that doesn’t have JavaScript syntax? Take a look at the image below to find out:
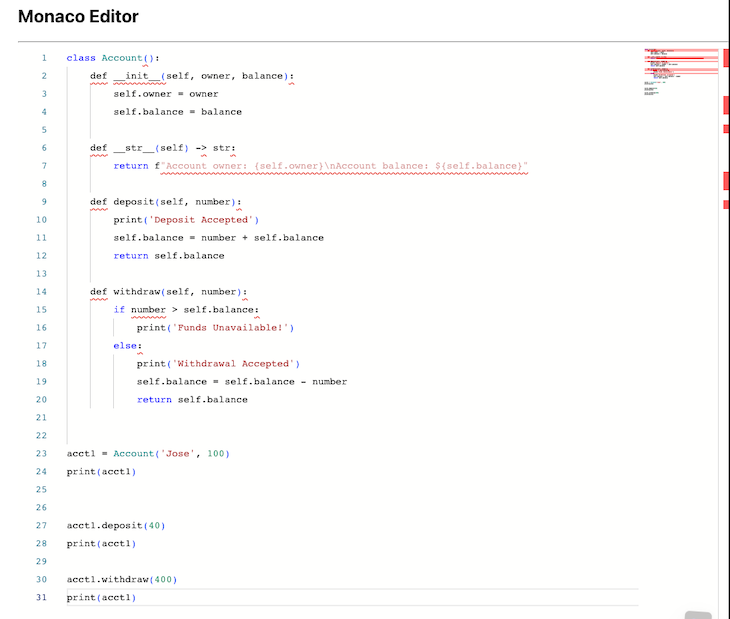
In the image above, we wrote some Python code. You can see that the editor doesn’t recognize the syntax, and that is the cause of the errors and squiggly lines. A solution to this is to upload files from our local machine, check the language of each file, and dynamically pass the language to the editor. Let’s do that in the code block below:
import React, { useState, useEffect } from 'react';
import MonacoEditorfrom 'react-monaco-editor';

const CodeEditor = () => {
  const [code, setCode] = useState('');
  const [file, setFile] = useState();
  const [language, setLanguage] = useState('javascript');

  const handleFileChange = (event) => {
    if (event.target.files) {
      setFile(event.target.files[0]);
    }
  };

  useEffect(() => {
    if (file) {
      var reader = new FileReader();
      reader.onload = async (e) => {
        setCode(e.target.result);
      };
      reader.readAsText(file);
      let newLanguage="javascript";
      const extension = file.name.split('.').pop();
      if (['css', 'html', 'python', 'dart'].includes(extension)) {
        newLanguage = extension;
      }
      setLanguage(newLanguage);
    }
  }, [file]);

// The Options object goes here and is passed to the editor below

  return (
    <div>
      <div>
        <input type="file" onChange={handleFileChange} />
      </div>
      <hr />
      <MonacoEditor
        height="800"
        language={language}
        value={code}
        options={options}
      />
    </div>
  );
};

const App = () => (
  <div>
    <h2>Monaco Editor </h2>
    <CodeEditor />
  </div>
);
export default App;
In the code block above, we created two useState Hooks — one for getting and setting the language of the editor and the other for handling the file state. Next, we made a useEffect Hook to check if there is a file. If there is a file, we get the extension and use it to set the language of the editor to the language of the file that was loaded.
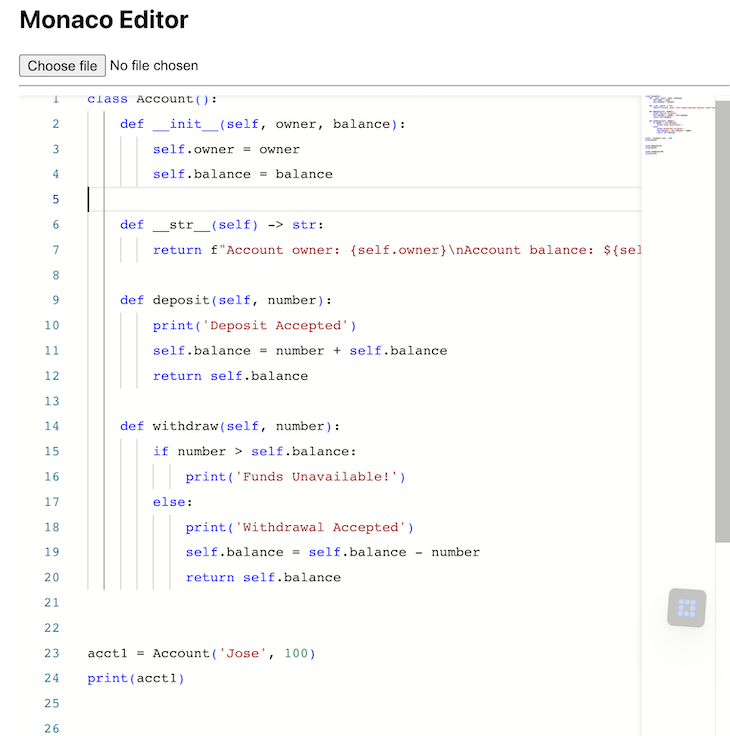
The next step is creating an input button to get files from our machine. Finally, we created a function for handling the file changes and passed it to the onChange handler on the input button. When we save the changes and navigate to the browser, all the errors and squiggly lines disappear because we are now dynamically setting the language of the editor. Here’s what that looks like:
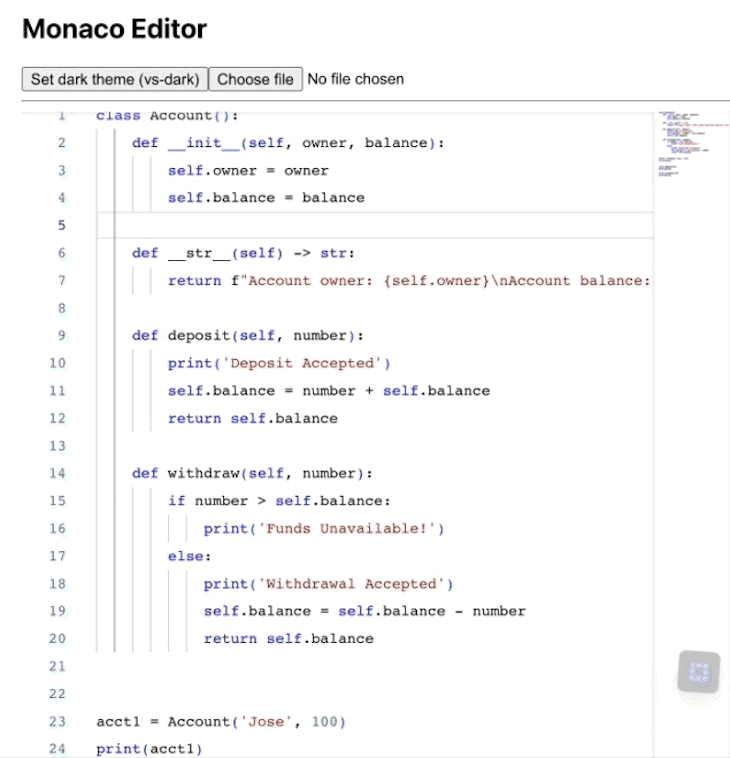
Adding themes to the code editor
Monaco Editor provides themes for use in the editor. Some of these themes include a light theme (the default), a dark theme, and a high-contrast theme. Let’s see how to include the themes in the editor:
// The remaining state hooks here remain the same
const [theme, setTheme] = useState('vs-light');

// The fileChange function and useEffect remains the same

const setDarkTheme = (e) => {
    e.preventDefault();
    setTheme((prev) => (prev === 'vs-dark' ? 'hc-black' : 'vs-dark'));
  };

  const setLightTheme = (e) => {
    e.preventDefault();
    setTheme('vs-light');
  };
In the code above, we are creating two functions: one for setting the light theme and the other for setting the dark theme. In the dark theme function, we get the previous state of the theme and then set it to the other accordingly. The next step is to pass the functions to the buttons that will be used to change the theme. Use the code below:
  return (
    <div>
      <div>
        <button onClick={setDarkTheme} type="button">
          Set dark theme ({theme === 'vs-dark' ? 'hc-black' : 'vs-dark'})
        </button>
        {theme !== 'vs-light' && (
          <button onClick={setLightTheme} type="button">
            Set light theme
          </button>
        )}
        <input type="file" onChange={handleFileChange} />
      </div>
      <hr />
      <MonacoEditor
        height="500"
        language={language}
        value={code}
        options={options}
        theme={theme}
      />
    </div>
  );
};
In the code block above, we set up the buttons that would be used to change the theme of the code editor and then passed the theme to the editor. The results should be as shown in the GIF below:
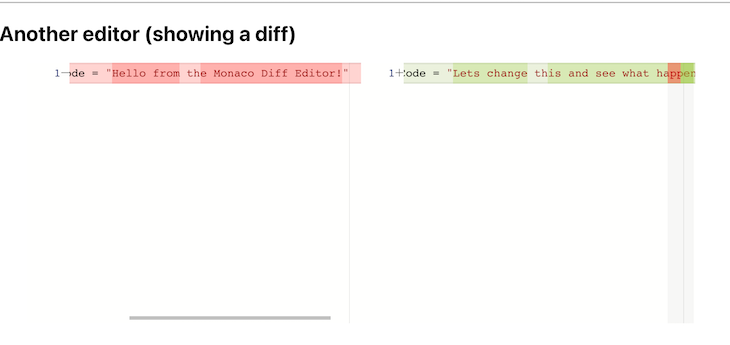
Creating a Diff editor with the Monaco Editor
A Diff editor is used to compare two files. Fortunately, the Monaco Editor offers functionality for creating a Diff editor. Let’s dive into some code and see how to create a Diff editor in the code block below:
import { MonacoDiffEditor } from 'react-monaco-editor';

const DiffEditor = () => {
  const originalCode="const firstCode = "Hello from the Monaco Diff Editor!"";
  const modifiedCode="const secondCode = "Lets change this and see what happens next"";

// The Options objects still remains the same

  return (
    <div>
      <MonacoDiffEditor
        width="800"
        height="300"
        options={options}
        language="javascript"
        original={originalCode}
        value={modifiedCode}
      />
    </div>
  );
};

const App = () => (
  <div className="editor">
    <h2>Another editor (showing a diff)</h2>
    <DiffEditor />
  </div>
);
export default App;
In the code block above, we imported the MonacoDiffEditor from the react-monaco-editor package. We then created two lines of code to compare and passed them to the MonacoDiffEditor as props for the value property and the original property. The original property holds the original value and the value property holds the compared code. The result is shown below:
Conclusion
This article has looked at creating a web editor with React and the react-monaco-editor package. Using React and the react-monaco-editor package can greatly simplify the process of creating a web-based code editor. The react-monaco-editor provides a powerful and efficient editor component with syntax highlighting, autocompletion, and a range of other useful features.
Cut through the noise of traditional React error reporting with LogRocket
LogRocket
is a React analytics solution that shields you from the hundreds of false-positive errors alerts to just a few truly important items. LogRocket tells you the most impactful bugs and UX issues actually impacting users in your React applications.


LogRocket
automatically aggregates client side errors, React error boundaries, Redux state, slow component load times, JS exceptions, frontend performance metrics, and user interactions. Then LogRocket uses machine learning to notify you of the most impactful problems affecting the most users and provides the context you need to fix it.
Focus on the React bugs that matter —
try LogRocket today.
Source link