
There are multiple ways you can deploy your Nodejs app, be it On-Cloud or On-Premises. However, it is not just about deploying your application, but deploying it correctly. Security is also an important aspect that must not be ignored, and if you do so, the application won’t stand long, meaning there is a high chance of it getting compromised. Hence, here we are to help you with the steps to deploy a Nodejs app to AWS. We will show you exactly how to deploy a Nodejs app to the server using Docker containers, RDS Amazon Aurora, Nginx with HTTPS, and access it using the Domain Name.
Tool Stack To Deploy a Nodejs App to AWS
- Nodejs sample app: A sample Nodejs app with three APIs viz, status, insert, and list. These APIs will be used to check the status of the app, insert data in the database and fetch and display the data from the database.
- AWS EC2 instance: An Ubuntu 20.04 LTS Amazon Elastic Compute Cloud (Amazon EC2) instance will be used to deploy the containerized Nodejs App. We will install Docker in this instance on top of which the containers will be created. We will also install a MySQL Client on the instance. A MySQL client is required to connect to the Aurora instance to create a required table.
- AWS RDS Amazon Aurora: Our data will be stored in AWS RDS Amazon Aurora. We will store simple fields like username, email-id, and age will be stored in the AWS RDS Amazon Aurora instance.
Amazon Aurora is a MySQL and PostgreSQL-compatible relational database available on AWS. - Docker: Docker is a containerization platform to build Docker Images and deploy them using containers. We will deploy a Nodejs app to the server, Nginx, and Certbot as Docker containers.
- Docker-Compose: To spin up the Nodejs, Nginx, and Certbot containers, we will use Docker-Compose. Docker-Compose helps reduce container deployment and management time.
- Nginx: This will be used to enable HTTPS for the sample Nodejs app and redirect all user requests to the Nodejs app. It will act as a reverse proxy to redirect user requests to the application and help secure the connection by providing the configuration to enable SSL/HTTPS.
- Certbot: This will enable us to automatically use “Let’s Encrypt” for Domain Validation and issuing SSL certificates.
- Domain: At the end of the doc, you will be able to access the sample Nodejs Application using your domain name over HTTPS, i.e., your sample Nodejs will be secured over the internet.
- PostMan: We will use PostMan to test our APIs, i.e., to check status, insert data, and list data from the database.
As I said, we will “deploy a Nodejs app to the server using Docker containers, RDS Amazon Aurora, Nginx with HTTPS, and access it using the Domain Name.” Let’s first understand the architecture before we get our hands dirty.
Architecture
Deploying a Nodejs app to an EC2 instance using Docker will be available on port 3000. This sample Nodejs app fetches data from the RDS Amazon Aurora instance created in the same VPC as that of the EC2 instance. An Amazon Aurora DB instance will be private and, hence, accessible within the same VPC. The Nodejs application deployed on the EC2 instance can be accessed using its public IP on port 3000, but we won’t.
Accessing applications on non-standard ports is not recommended, so we will have Nginx that will act as a Reverse Proxy and enable SSL Termination. Users will try to access the application using the Domain Name and these requests will be forwarded to Nginx. Nginx will check the request, and, based on the API, it will redirect that request to the Nodejs app. The application will also be terminated with the SSL. As a result, the communication between the client and server will be secured and protected.
Here is the architecture diagram that gives the clarity of deploying a Nodejs app to AWS:

Prerequisites
Before we proceed to deploying a Nodejs app to AWS, it is assumed that you already have the following prerequisites:
- AWS account
- PostMan or any other alternative on your machine to test APIs.
- A registered Domain in your AWS account.
Create an Ubuntu 20.04 LTS EC2 Instance on AWS
Go to AWS’ management console sign-in page and log into your account.
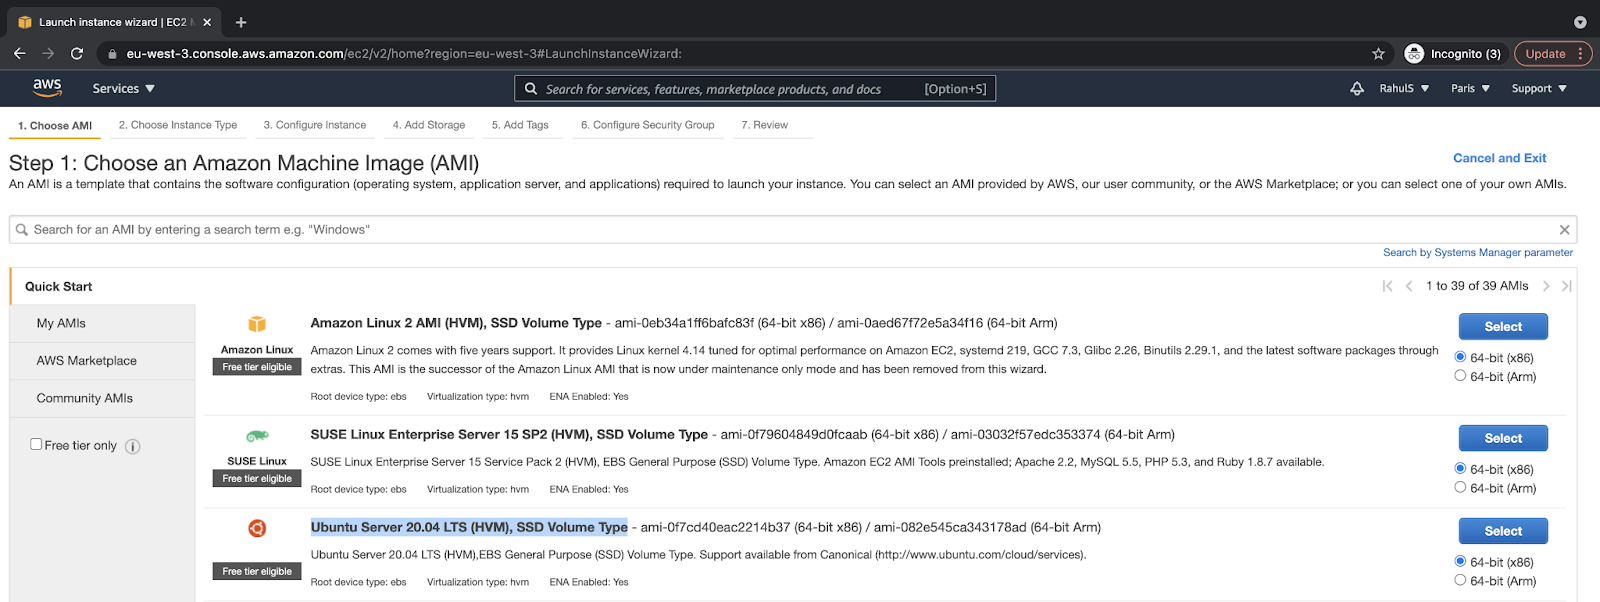
After you log in successfully, go to the search bar and search for “EC2.” Next, click on the result to visit the EC2 dashboard to create an EC2 instance:

Here, click on “Launch instances” to configure and create an EC2 instance:

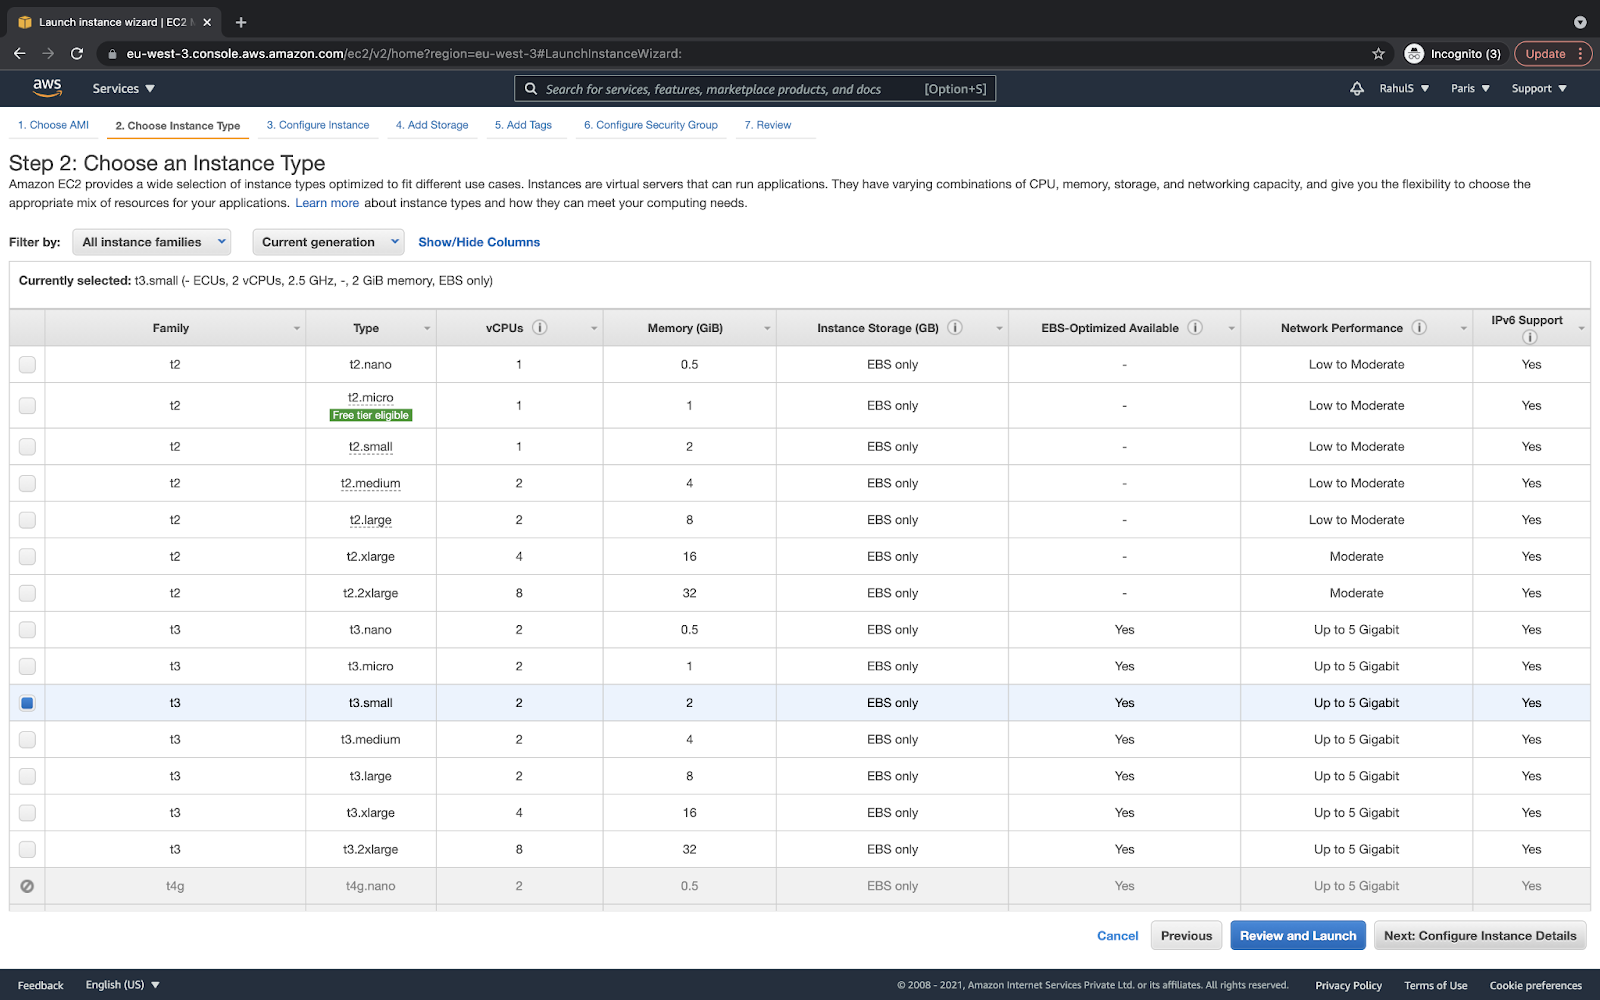
I would recommend you select t3.small only for test purposes. This will have two CPUs and 2GB RAM. You can choose the instance type as per your need and choice:
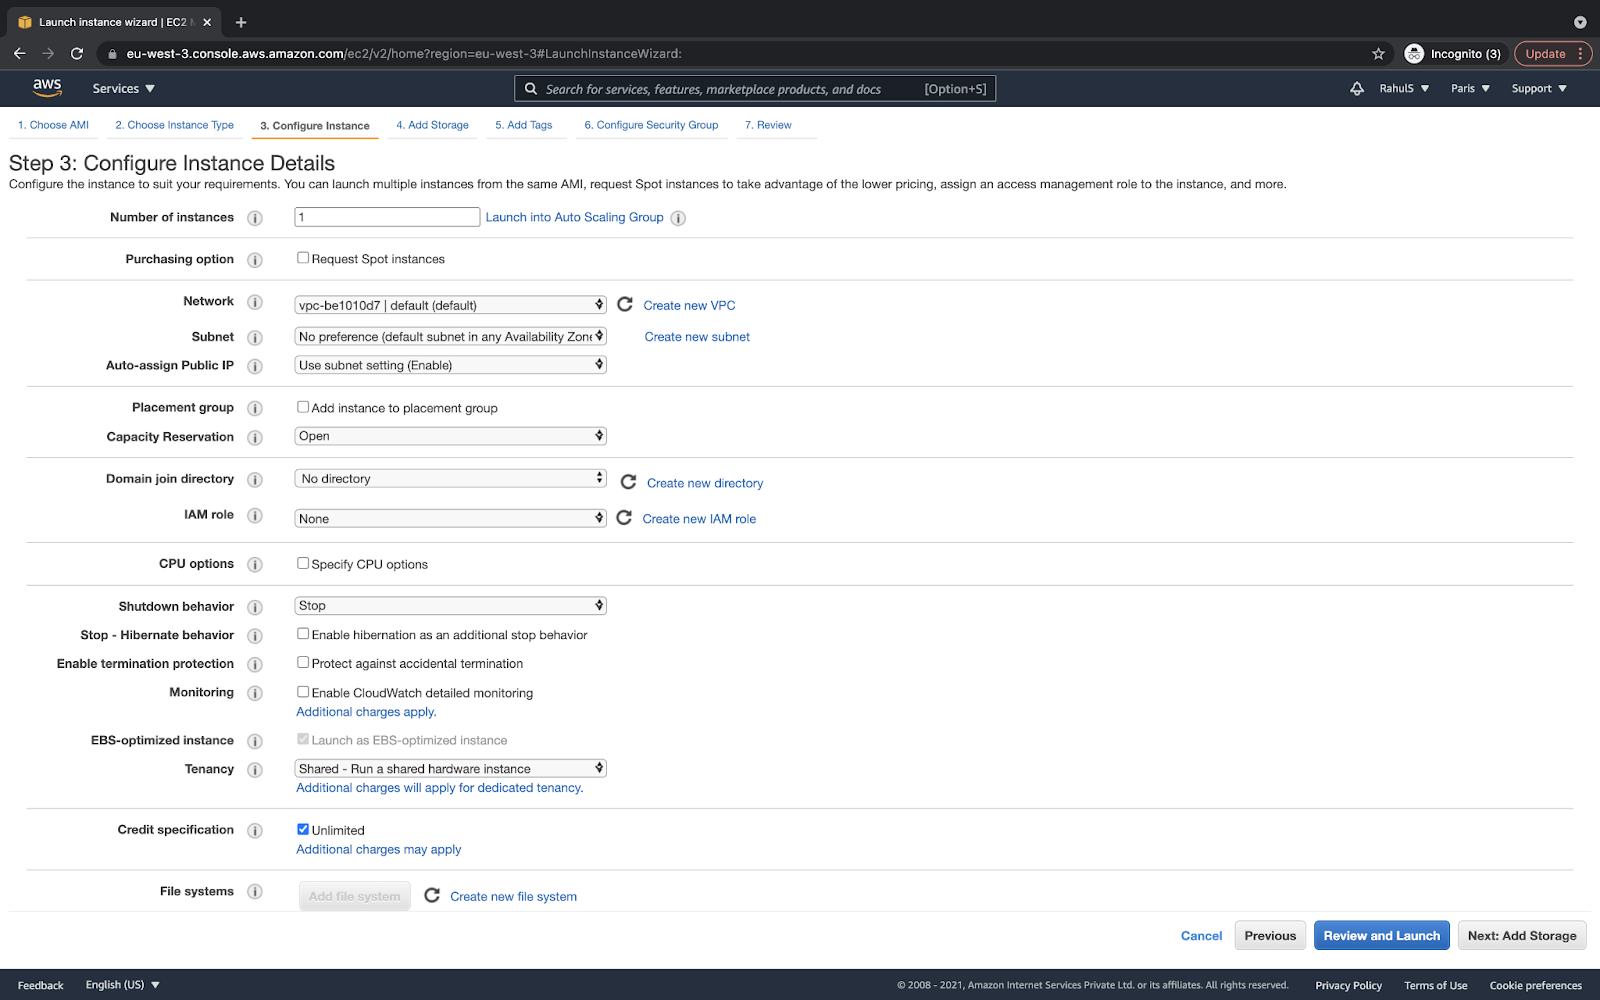
You can keep the default settings and proceed ahead. Here, I have selected the default VPC. If you want, you can select your VPC.
Note: Here, I will be creating an instance in the public subnet:
It’s better to put a larger disk space at 30GB. The rest can be the default:

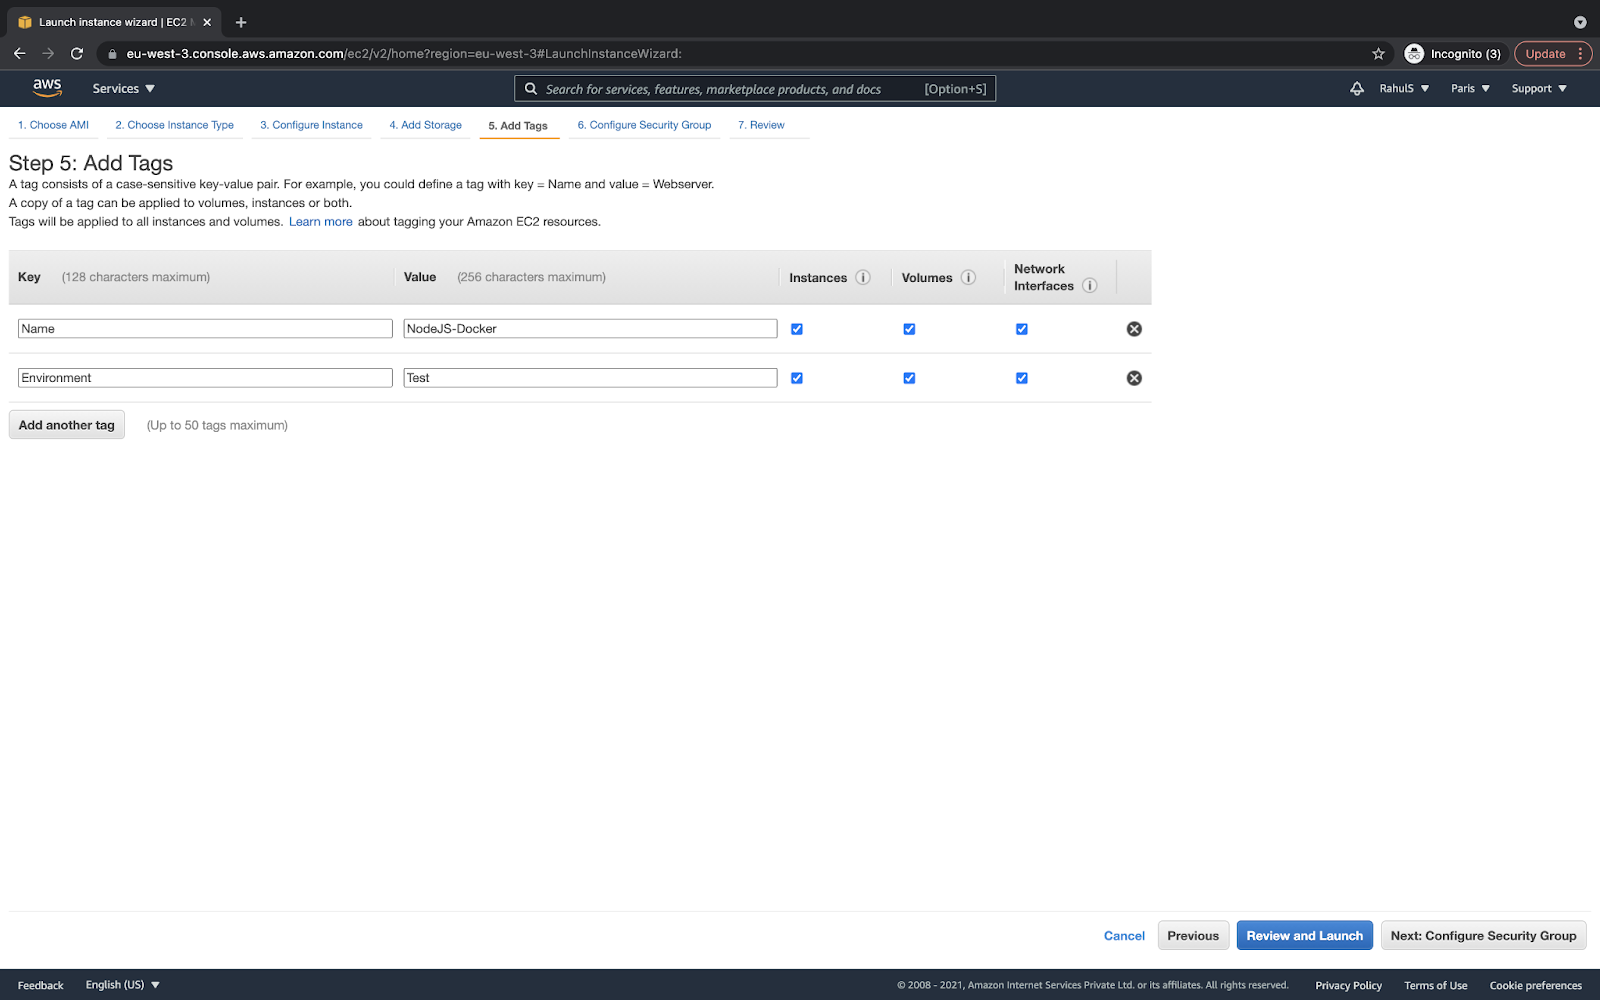
Assign a “Name” and “Environment” tag to any values of your choice. You may even skip this step:
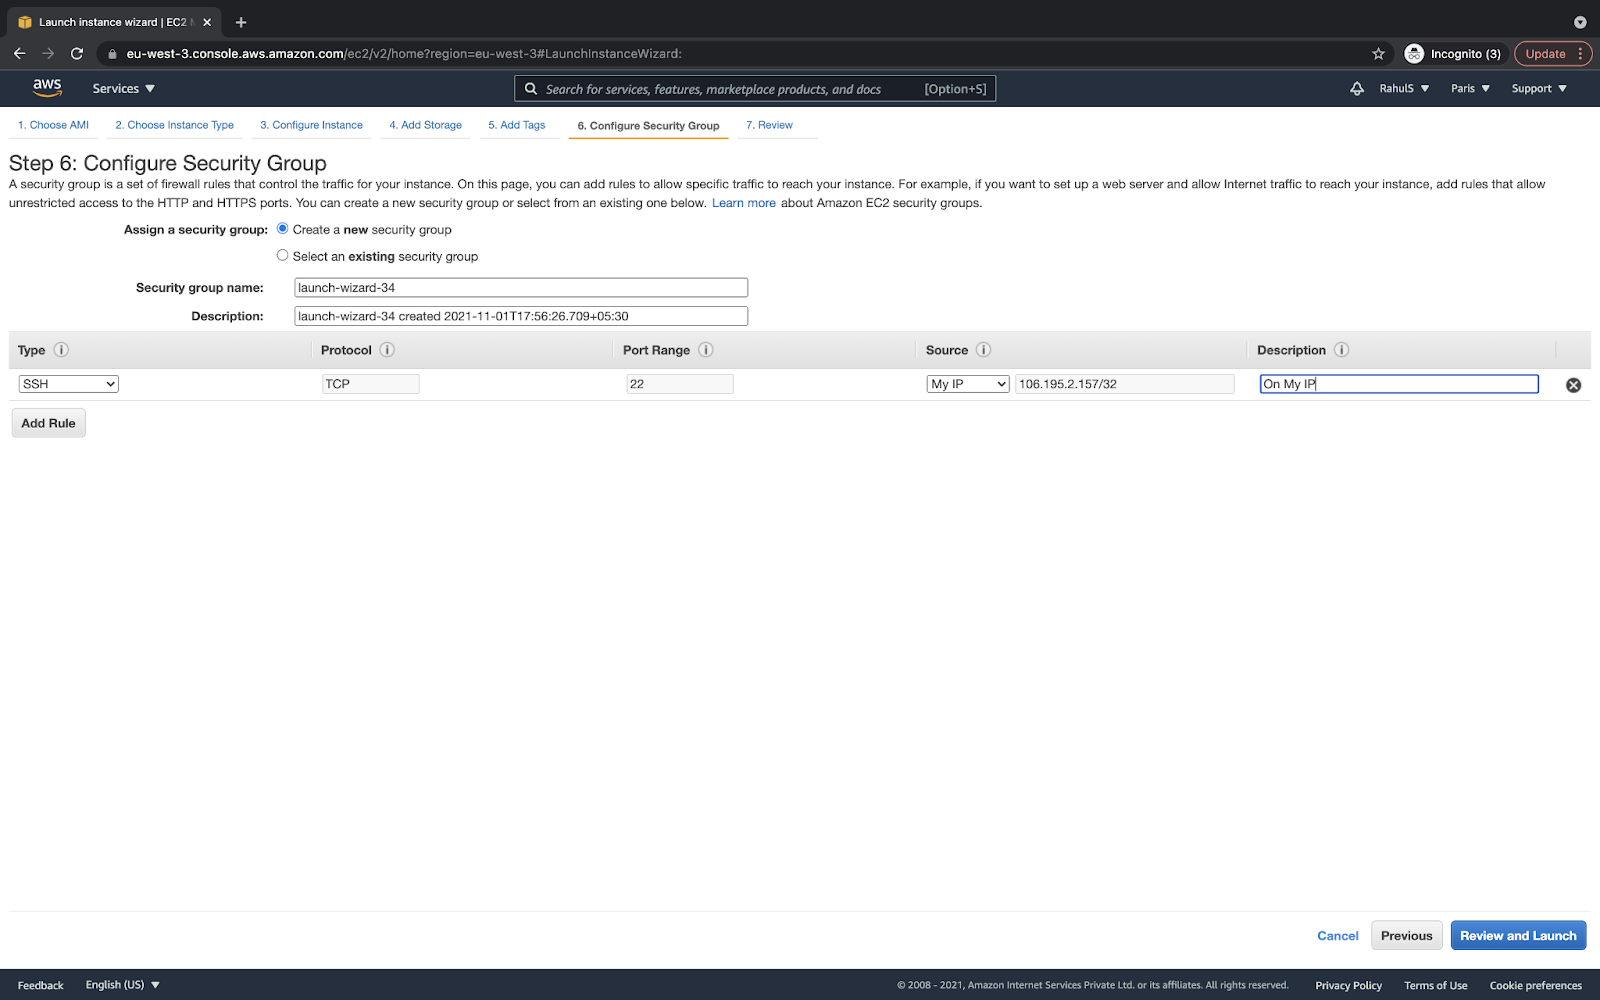
Allow the connection to port 22 only from your IP. If you allow it from 0.0.0.0/0, your instance will allow anyone on port 22:
Review the configuration once, and click on “Launch” if everything looks fine to create an instance:

Before the instance gets created, it needs a key-pair. You can create a new key-pair or use the existing one. Click on the “Launch instances” button that will initiate the instance creation:

To go to the console and check your instance, click on the “View instances” button:
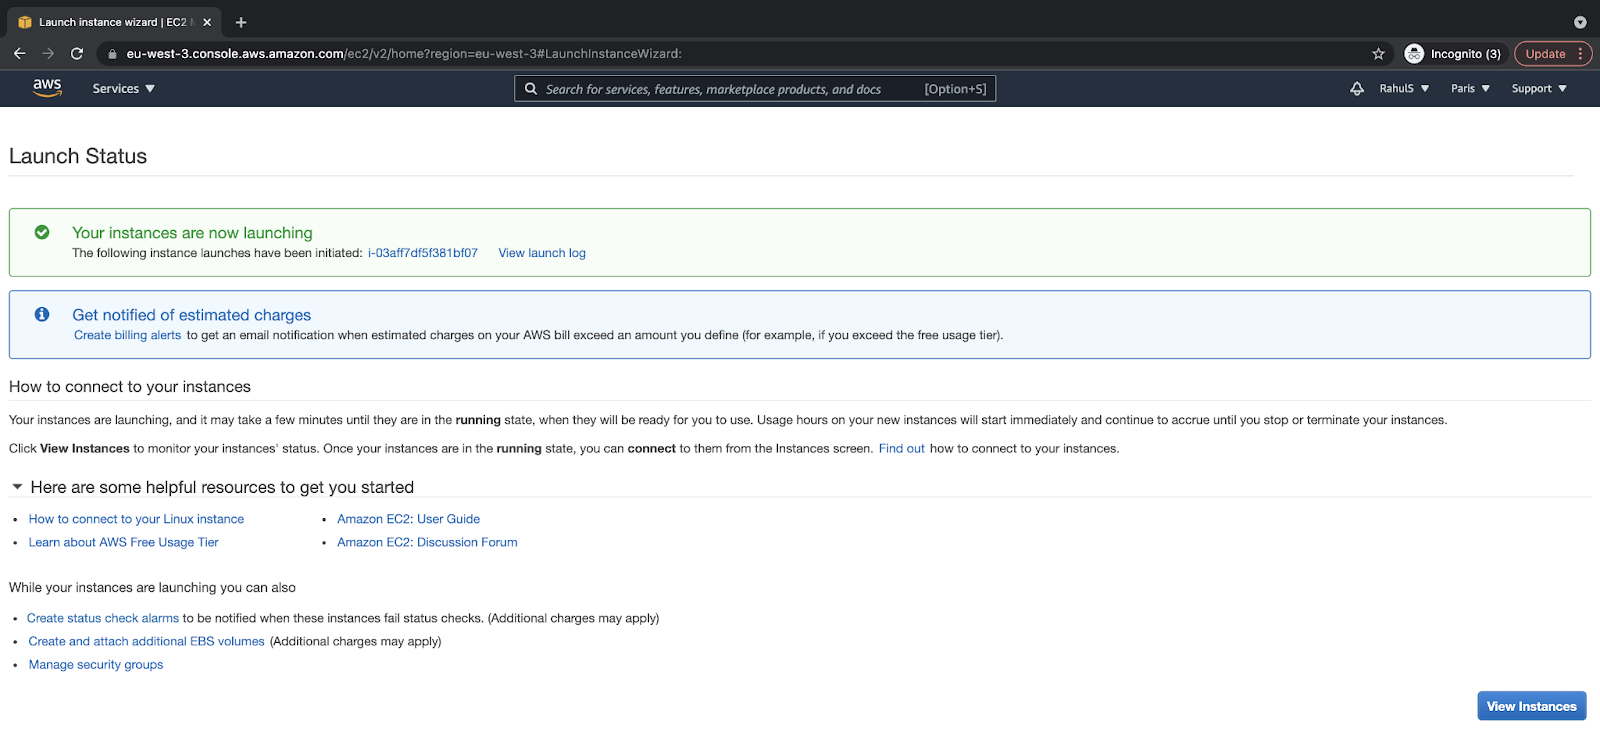
Here, you can see that the instance has been created and is in the “Initiating” phase. Within a minute or two, you can see your instance up and running.
Meanwhile, let’s create an RDS instance:

Create an RDS Aurora With a MySQL Instance on AWS
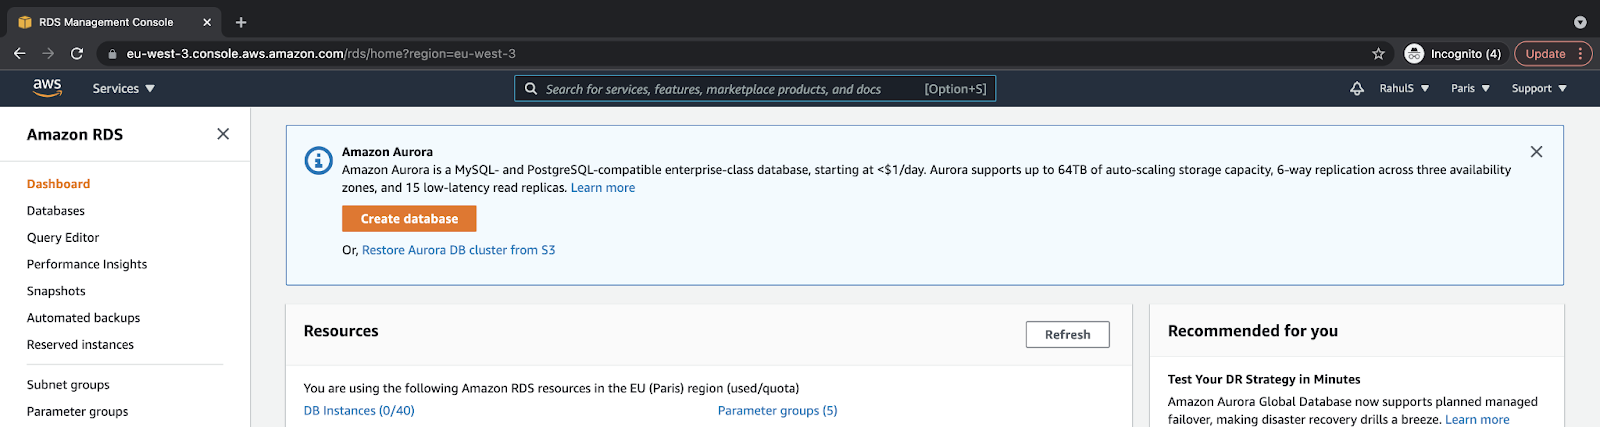
Go to the search bar at the top of the page and search for “RDS.” Click on the result to visit the “RDS Dashboard.”

On the RDS Dashboard, click on the “Create database” button to configure and create the RDS instance:
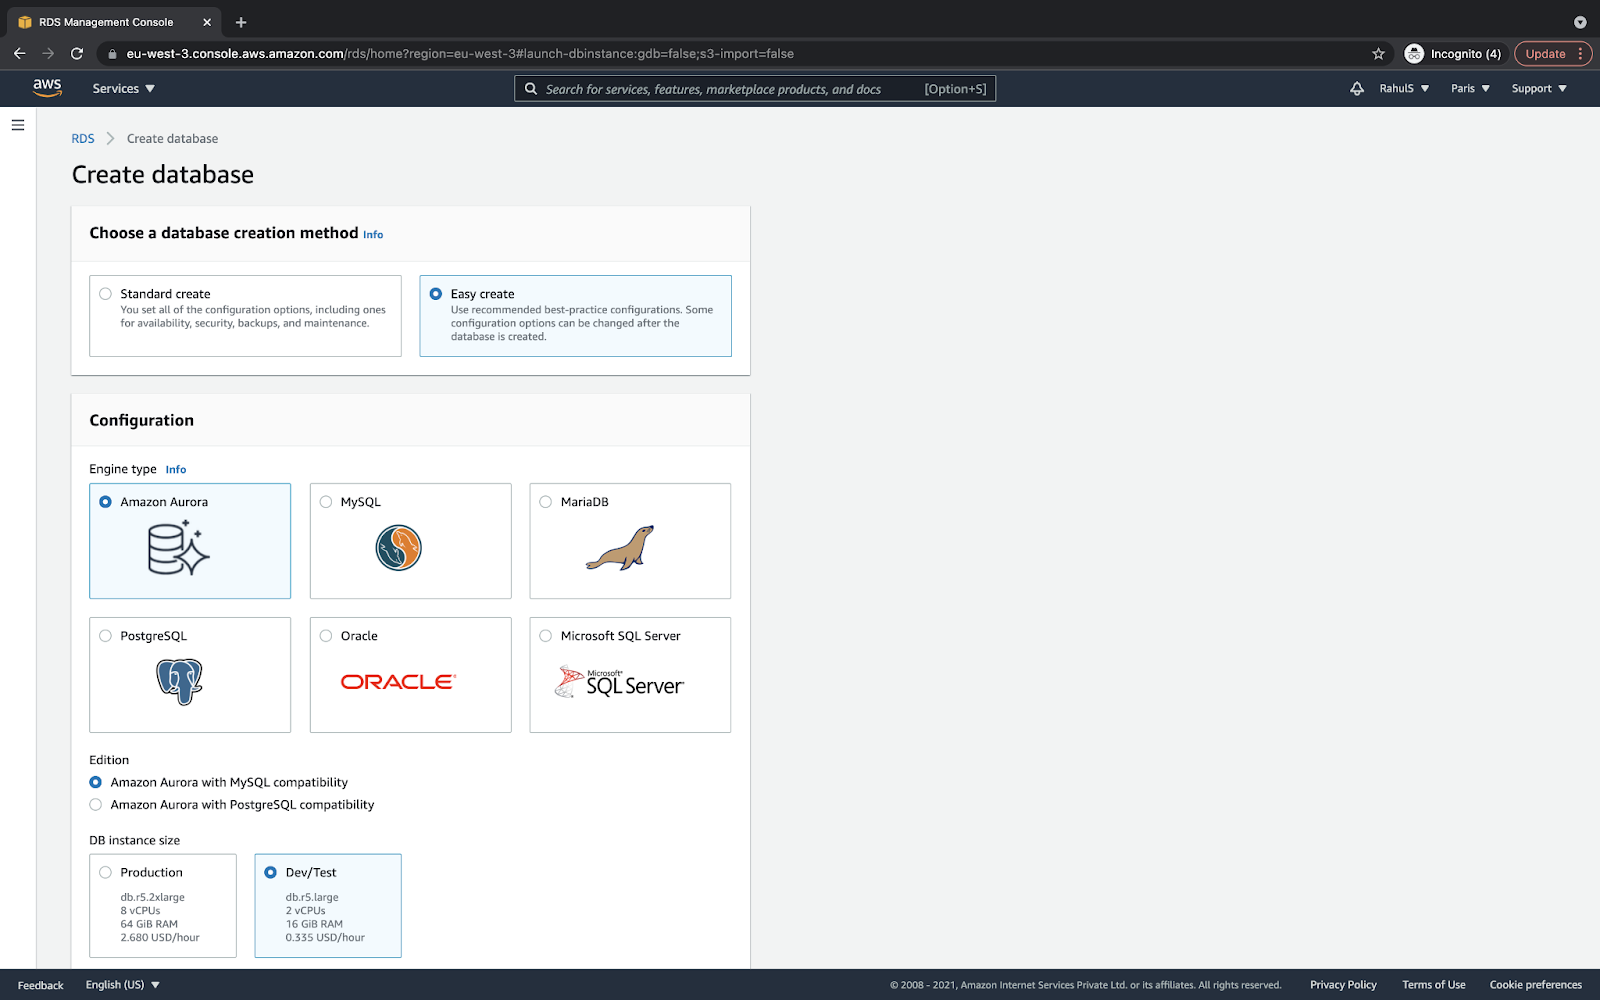
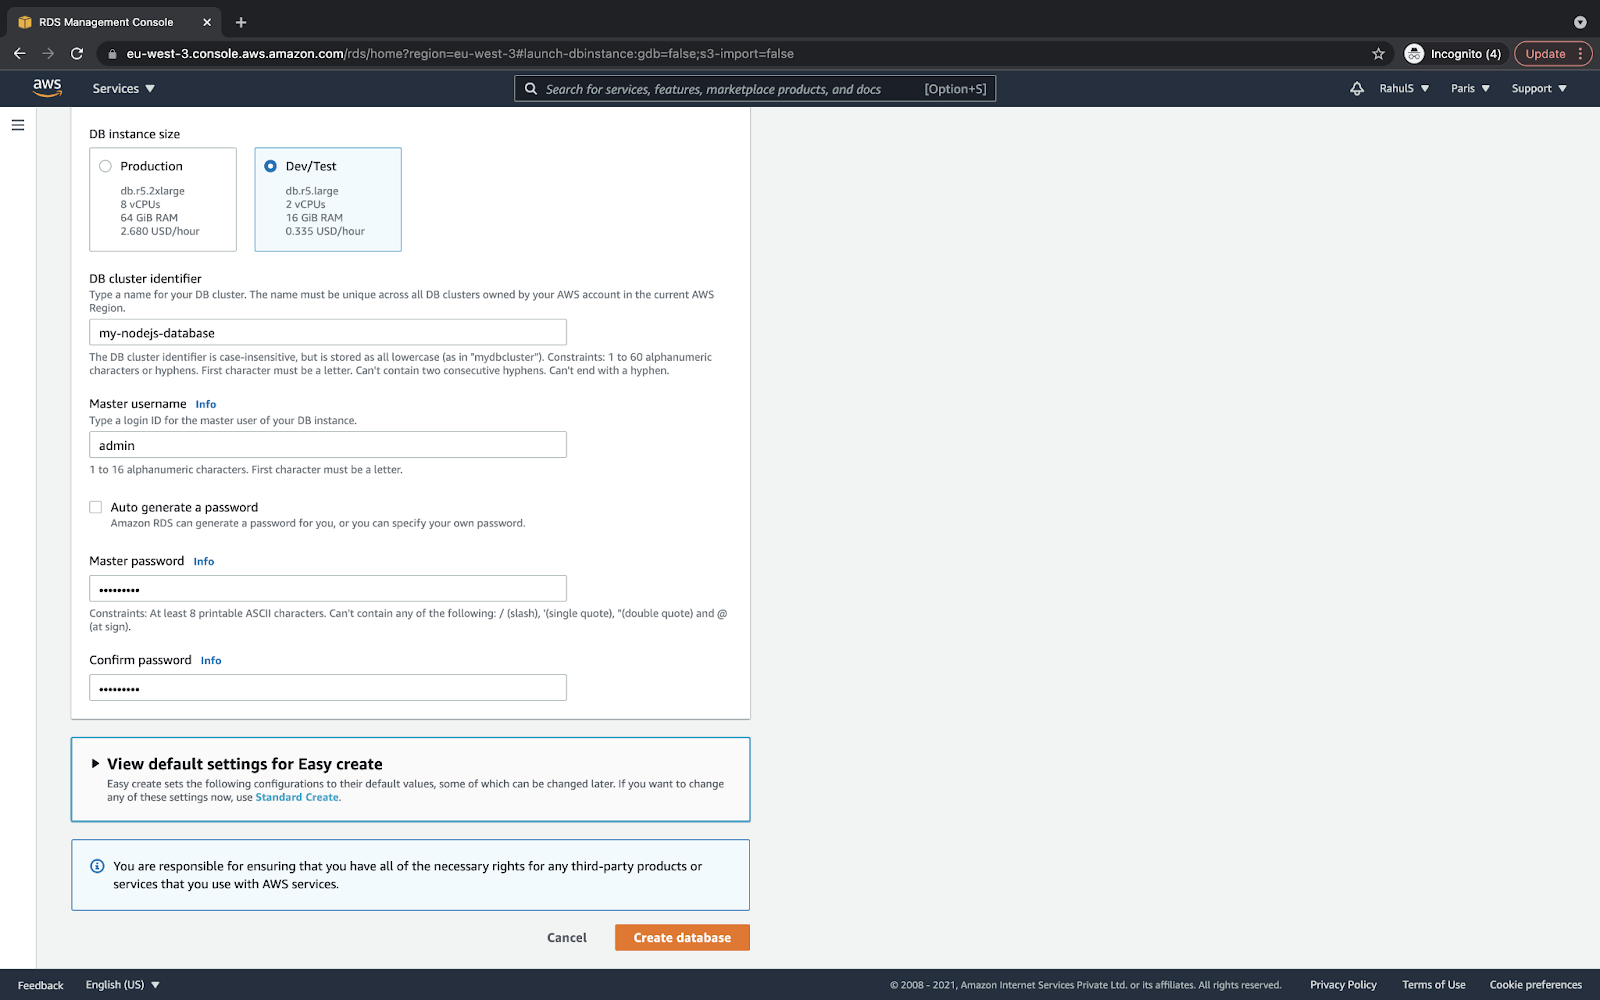
Choose the “Easy create” method, “Amazon Aurora” engine type, and the “Dev/Test” DB instance size as follows:
Scroll down a bit and specify the “DB cluster identifier” as “my-Nodejs-database.” You can specify any name of your choice as it is just a name given to the RDS instance; however, I would suggest using the same name so you do not get confused while following the next steps.
Also, specify a master username as “admin,” its password, and then click on “Create database.”
This will initiate the RDS Amazon Aurora instance creation.
Note: For production or live environments, you must not set simple usernames and passwords:
Here, you can see that the instance is in the “Creating” state. In around 5-10 minutes, you should have the instance up and running:
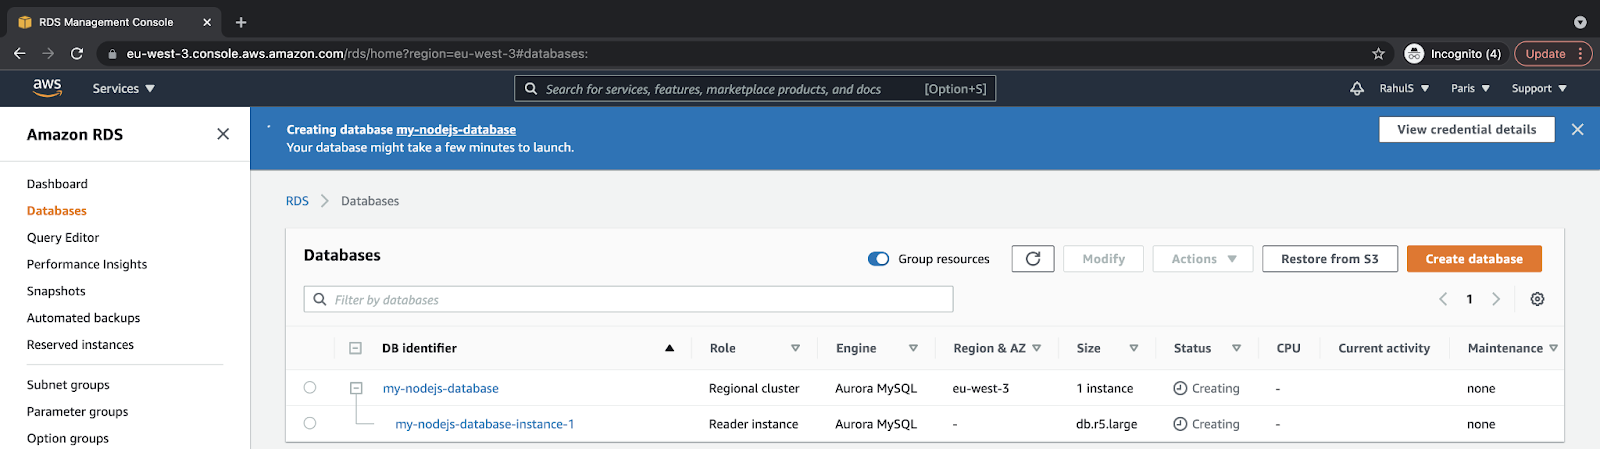
Make a few notes here:
- The RDS Amazon Aurora instance will be private by default, which means the RDS Amazon Aurora instance will not be reachable from the outside world and will only be available within the VPC.
- The EC2 instance and RDS instance belong to the same VPC.
- The RDS instance is reachable from the EC2 instance.
Install Dependencies on the EC2 Instance
Now, you can connect to the instance we created. I will not get into details on how to connect to the instance and I believe that you already know it.
MySQL Client
We will need a MySQL client to connect to the RDS Amazon Aurora instance and create a database in it. Connect to the EC2 instance and execute the following commands from it:
sudo apt updatesudo apt install mysql-client
Create a Table
We will need a table in our RDS Amazon Aurora instance to store our application data. To create a table, connect to the Amazon RDS Aurora instance using the MySQL client we installed on the EC2 instance in the previous step.
Copy the Database Endpoint from the Amazon Aurora Instance:
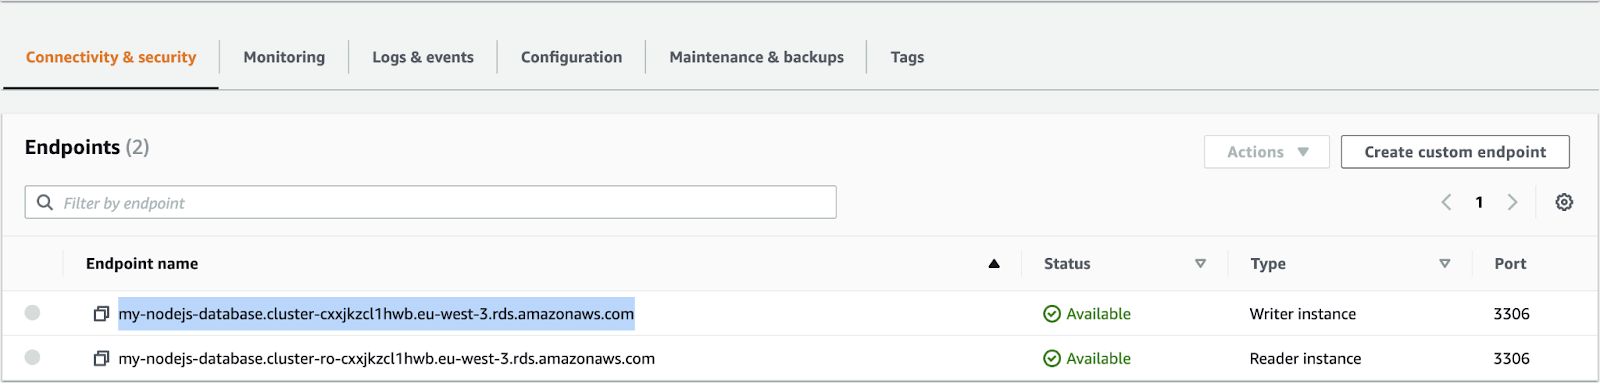
Execute the following common with the correct values:
mysql -u <user-name> -p<password> -h <host-endpoint>
Here, my command looks as follows:
mysql -u admin -padmin1234 -h(here).
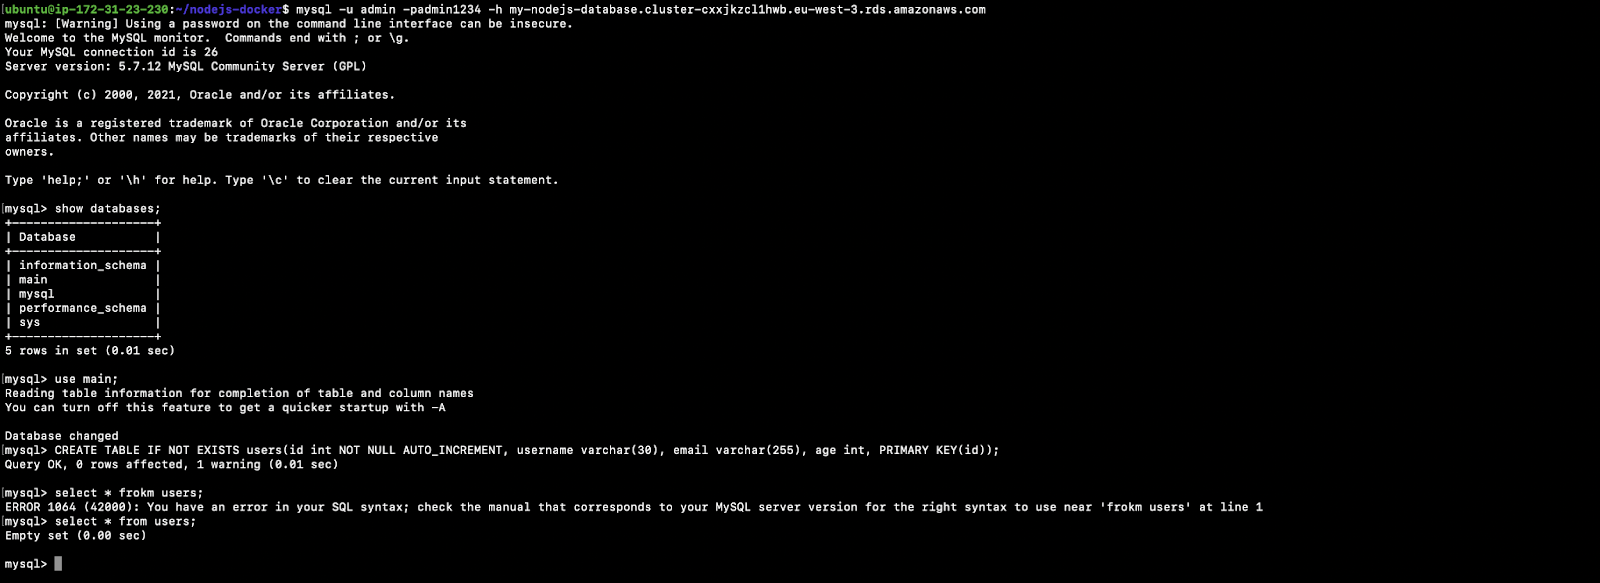
Once you get connected to the Amazon RDS Aurora instance, execute the following commands to create a table named “users:”
show databases;
use main;
CREATE TABLE IF NOT EXISTS users(id int NOT NULL AUTO_INCREMENT, username varchar(30), email varchar(255), age int, PRIMARY KEY(id));
select * from users;
Refer to the following screenshot to understand command executions:
Create an Application Directory
Now, let’s create a directory where we will store all our codebase and configuration files:
pwdcd /home/ubuntu/mkdir Nodejs-dockercd Nodejs-docker
Clone the Code Repository on the EC2 Instance
Clone my Github repository containing all the code. This is an optional step, I have included all the code in this document:
pwdcd /home/ubuntu/- git clone
cp /home/ubuntu/DevOps/AWS/Nodejs-docker/* /home/ubuntu/Nodejs-docker
Note: This is an optional step. If you copy all the files from the repository to the application directory, you do not need to create files in the upcoming steps; however, you will still need to make the necessary changes.
Deploying
Why Should You Use Docker in Your EC2 Instance?
Docker is a containerization tool used to package our software application into an image that can be used to create Docker Containers. Docker helps to build, share and deploy our applications easily.
The first step of Dockerization is installing Docker:
Install Docker
- Check Linux Version:
cat /etc/issue
- Update the apt package index:
sudo apt-get update
- Install packages to allow apt to use a repository over HTTPS:
sudo apt-get install apt-transport-https ca-certificates curl gnupg lsb-release
- Add Docker’s official GPG key:
- curl -fsSL (here) |
sudo gpg –dearmor -o /usr/share/keyrings/docker-archive-keyring.gpg
- curl -fsSL (here) |
- Set up the stable repository:
echo “deb [arch=amd64 signed-by=/usr/share/keyrings/docker-archive-keyring.gpg](here)$(lsb_release -cs) stable” | sudo tee /etc/apt/sources.list.d/docker.list > /dev/null
- Update the apt package index:
sudo apt-get update
- Install the latest version of Docker Engine and containerd:
sudo apt-get install docker-ce docker-ce-cli containerd.io
- Check Docker version:
docker—version
- Manage Docker as a non-root user:
- Create ‘docker’ group:
sudo groupadd docker
- Add your user to the docker group:
sudo usermod -aG docker <your-user-name>
- Create ‘docker’ group:
- Exit:
- exit
- Login back to the terminal.
- Verify that you can run Docker commands without sudo:
docker run hello-world
- Upon executing the above run command, you should see the output as follows:
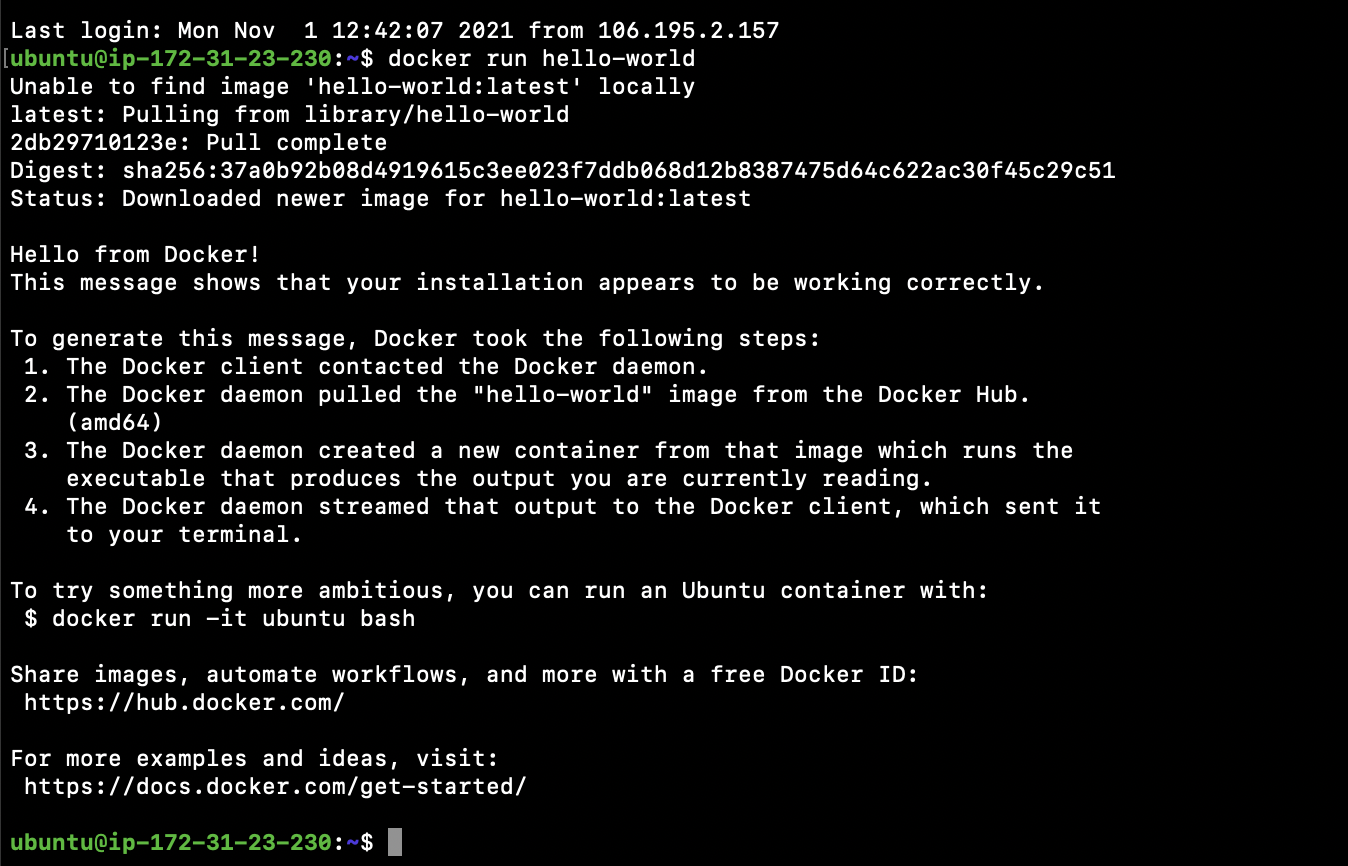
14. Refer to the following screenshot to see the command that I have executed:

Dockerize Your Node.js Application in the EC2 Instance
Once you have Docker installed, the next step is to Dockerize the app. Dockerizing a Nodejs app means writing a Dockerfile with a set of instructions to create a Docker Image.
Let’s create Dockerfile and a sample Nodejs app:
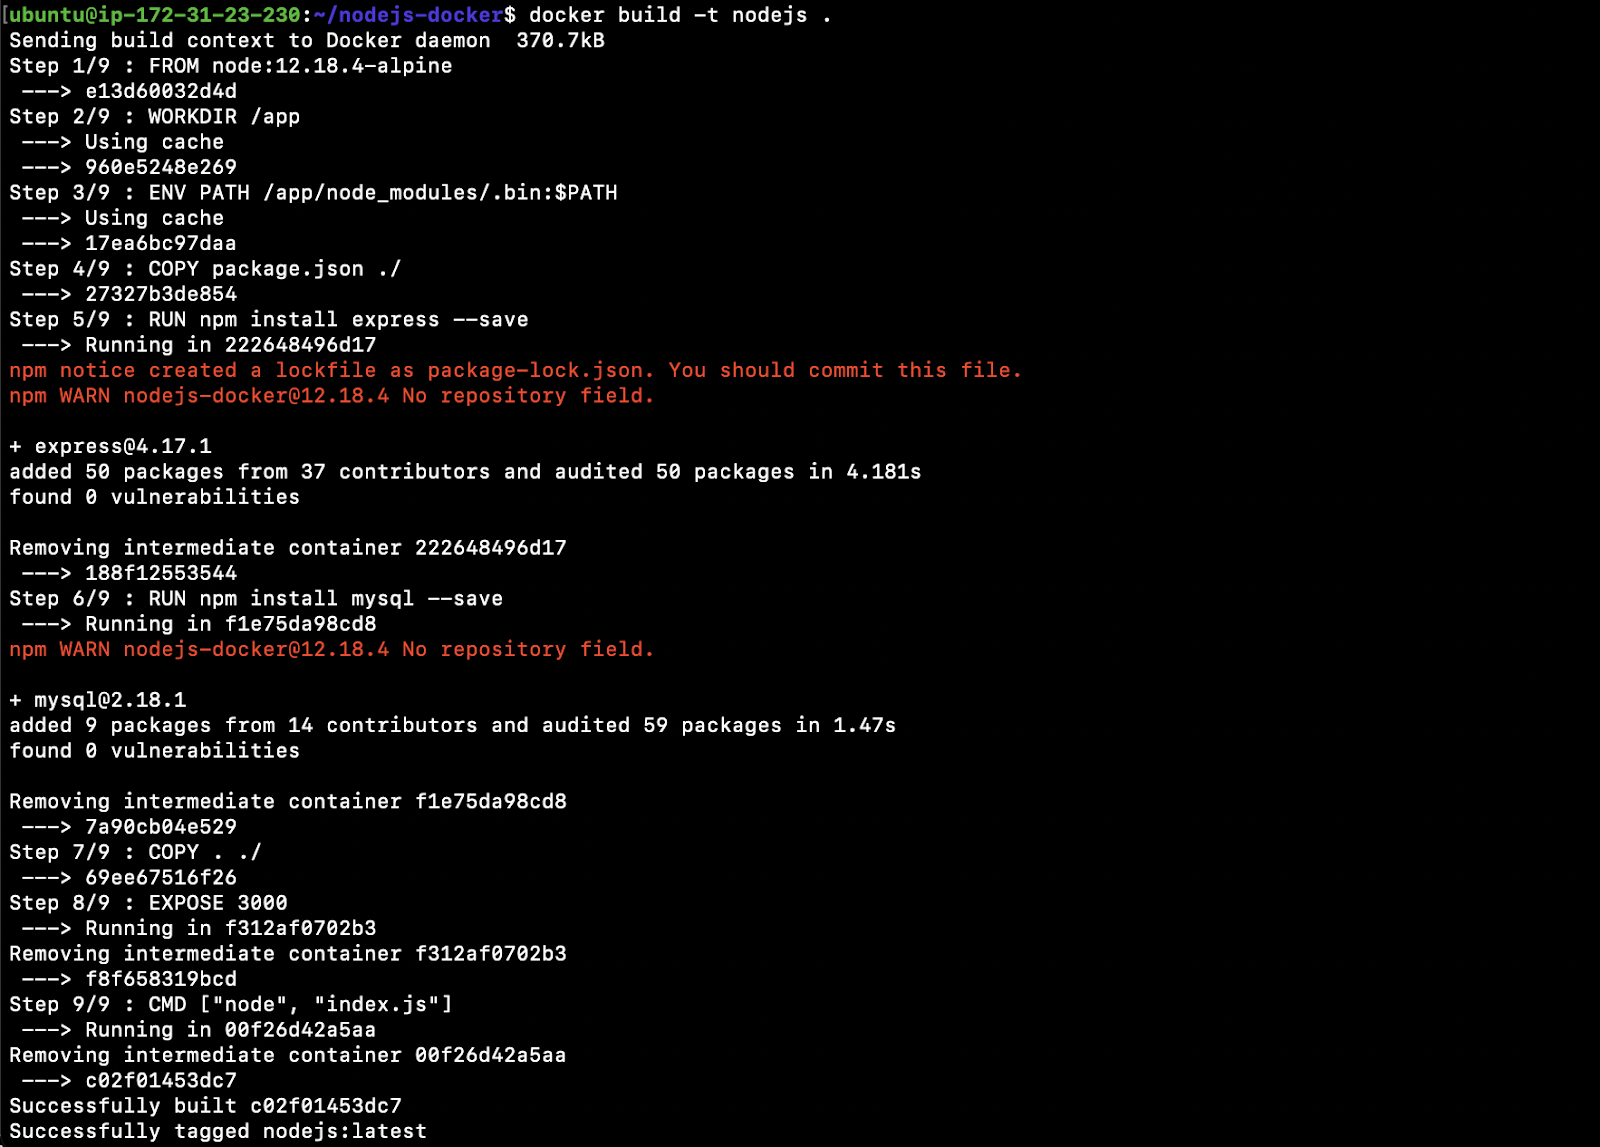
pwdcd /home/ubuntu/Nodejs-docker- Create Dockerfile and paste the following it it; alternatively, you can copy the content from my GitHub repository here:
- vim Dockerfile:
#Base Image node:12.18.4-alpine
FROM node:12.18.4-alpine
#Set working directory to /app
WORKDIR /app
#Set PATH /app/node_modules/.bin
ENV PATH /app/node_modules/.bin:$PATH
#Copy package.json in the image
COPY package.json ./

#Install Packages
RUN npm install express --save
RUN npm install mysql --save

#Copy the app
COPY . ./
#Expose application port
EXPOSE 3000

#Start the app
CMD ["node", "index.js"]- Create
index.jsand paste the following in it; alternatively, you can copy the content from my GitHub repository here. This will be our sample Nodejs app:vim index.js:
const express = require('express');
const app = express();
const port = 3000;
const mysql = require('mysql');
const con = mysql.createConnection({
    host:
"my-Nodejs-database.cluster-cxxjkzcl1hwb.eu-west3.rds.amazonAWS.com",
    user: "admin",
    password: "admin1234"
});

app.get('/status', (req, res) => res.send({status: "I'm up and running"}));
app.listen(port, () => console.log(`Dockerized Nodejs Applications is listening on port ${port}!`));

app.post('/insert', (req, res) => {
    if (req.query.username && req.query.email && req.query.age) {
        console.log('Received an insert call');
        con.connect(function(err) {
            con.query(`INSERT INTO main.users (username, email, age) VALUES ('${req.query.username}', '${req.query.email}', '${req.query.age}')`, function(err, result, fields) {
                if (err) res.send(err);
                if (result) res.send({username: req.query.username, email: req.query.email, age: req.query.age});
                if (fields) console.log(fields);
            });
        });
    } else {
        console.log('Something went wrong, Missing a parameter');
    }
});

app.get('/list', (req, res) => {
    console.log('Received a list call');
    con.connect(function(err) {
        con.query(`SELECT * FROM main.users`, function(err, result, fields)
{
            if (err) res.send(err);
            if (result) res.send(result);
        });
    });
});
In the above file, change the values of the following variables with the one applicable to your RDS Amazon Aurora instance:
- host: (here)
- user: “admin”
- password: “admin1234”
- Create
package.jsonand paste the following in it; alternatively, you can copy the content from my GitHub repository here:vim package.json:
{
“name”: “Nodejs-docker”,
“version”: “12.18.4”,
“description”: “Nodejs on ec2 using docker container”,
“main”: “index.js”,
“scripts”: {
“test”: “echo ”Error: no test specified” && exit 1″
},
“author”: “Rahul Shivalkar”,
“license”: “ISC”
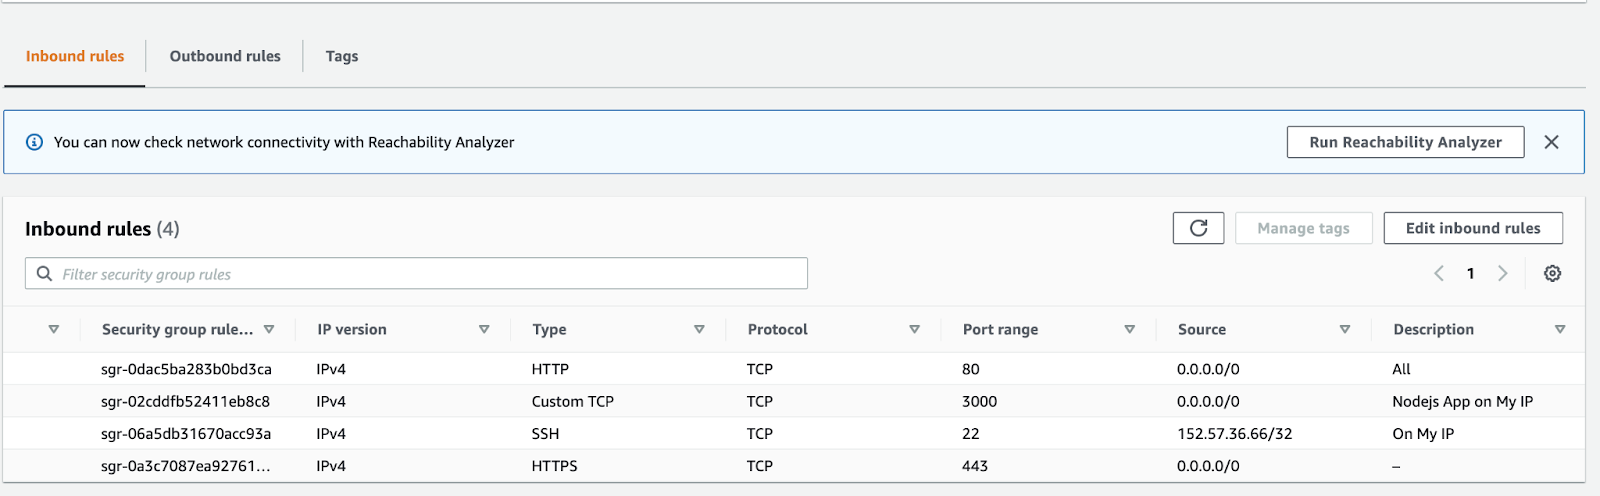
}Update the AWS Security Group
To access the application, we need to add a rule in the “Security Group” to allow connections on port 3000. As I said earlier, we can access the application on port 3000, but it is not recommended. Keep reading to understand our recommendations:
1. Go to the “EC2 dashboard,” select the instance, switch to the “Security” tab, and then click on the “Security groups link:”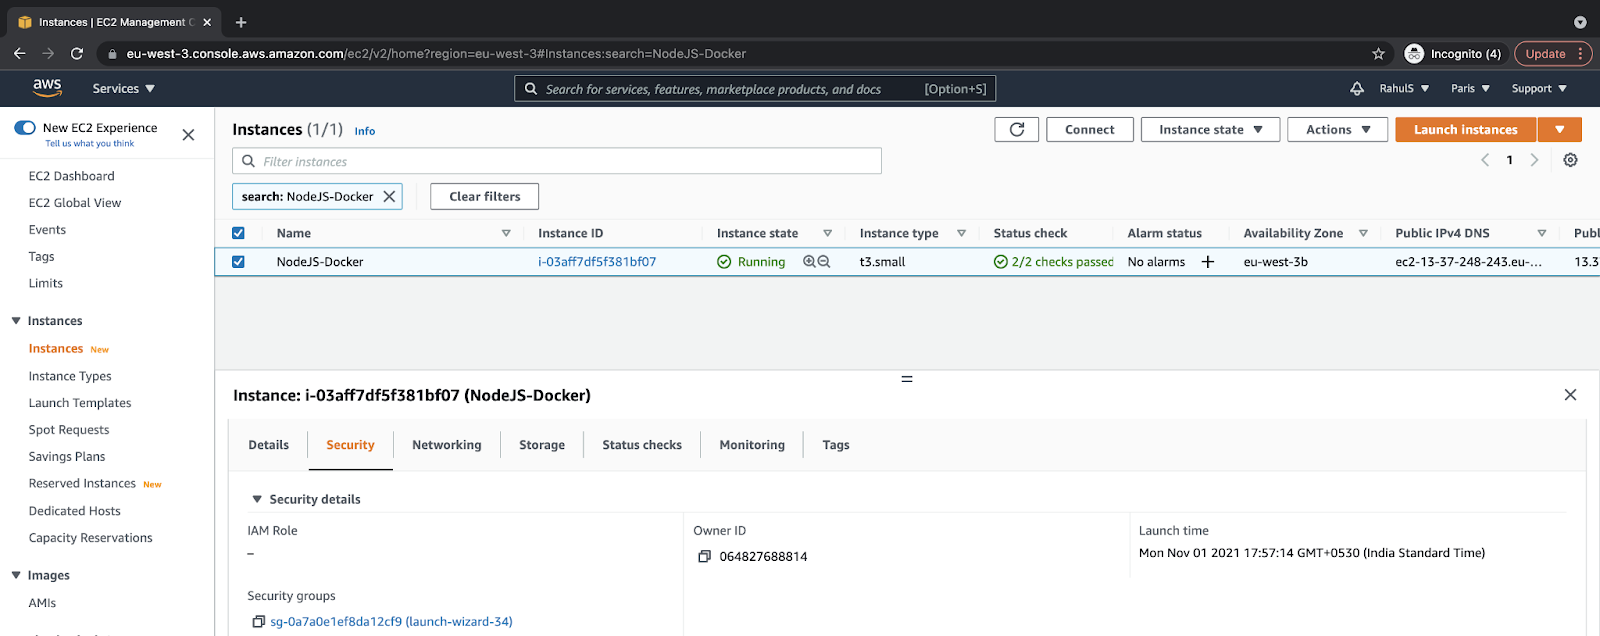
2. Select the “Inbound rules” tab and click on the “Edit inbound rules” button: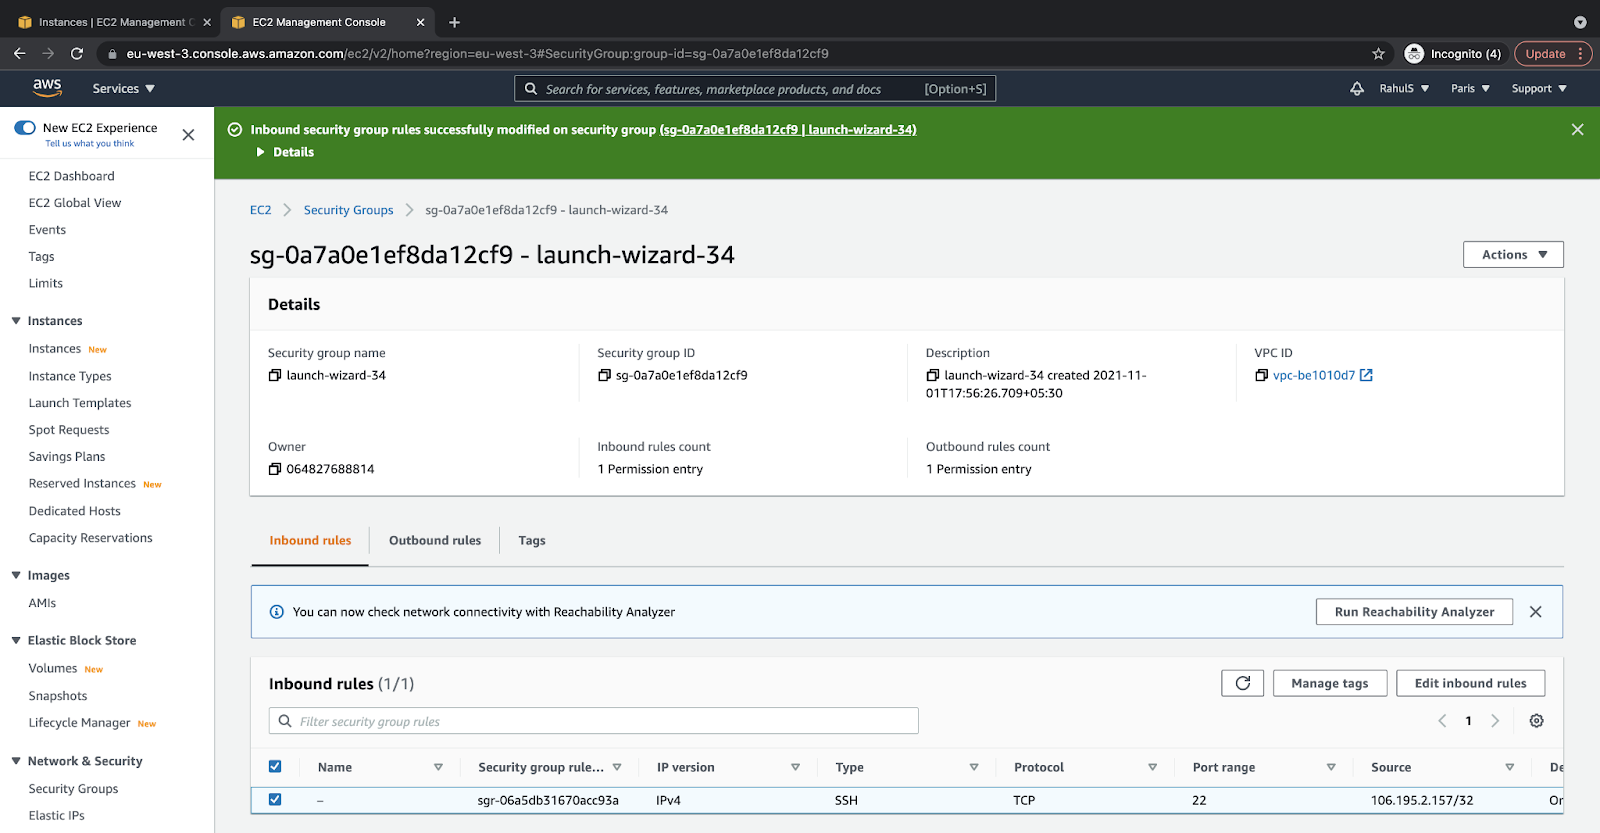
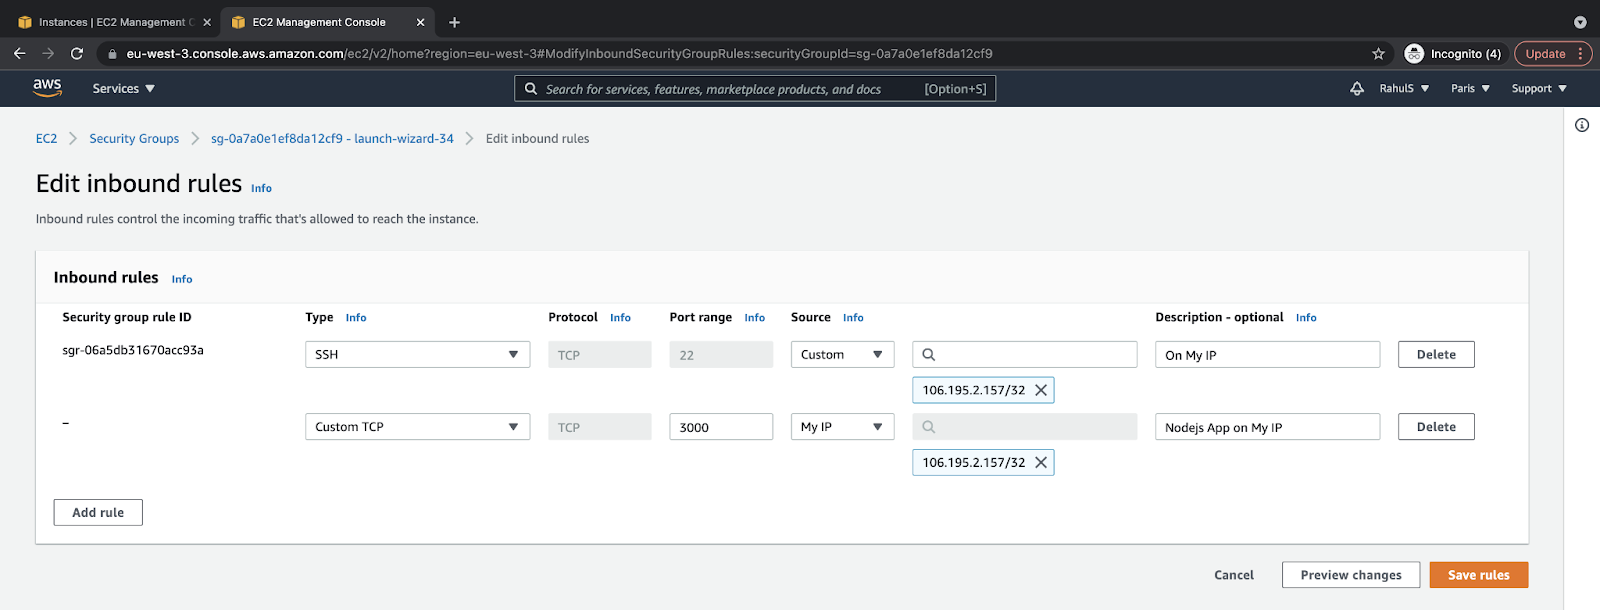
3. Add a new rule that will allow external connection from “MyIp” on the “3000” port:
Deploy the Node.js Server on the EC2 Server (Instance)
- Let’s build a Docker image from the code that we have:
cd /home/ubuntu/Nodejs-dockerdocker build -t Nodejs:
2. Start a container using the image we just build and expose it on port 3000:
docker run –name Nodejs -d -p 3000:3000 Nodejs
3. You can see the container is running:
- docker ps
4. You can even check the logs of the container:
- docker logs Nodejs
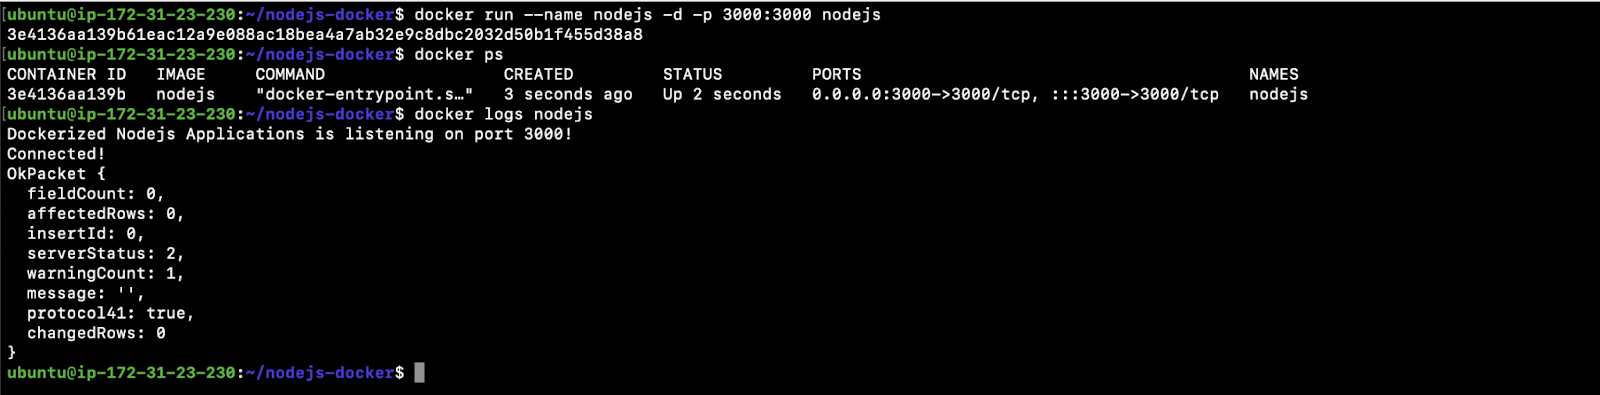
Now we have our Nodejs App Docker Container running.
5. Now, you can access the application from your browser on port 3000:
- Check the status of the application on
/statusapi using the browser:

- You can insert some data in the application on
/insertAPI using the Postman app using POST request: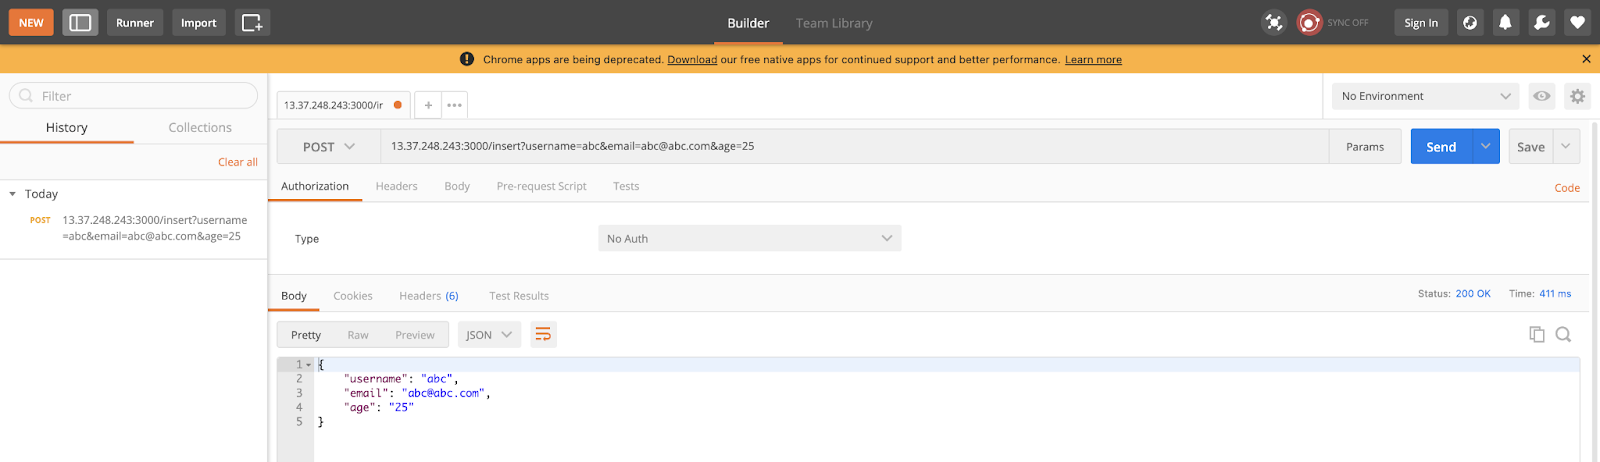
- You can list the data from your application by using
/listAPI from the browser:

- Alternatively, you can use the curl command from within the EC2 instance to check status, insert data, list data:
- Stop and remove the container:
docker stop Nodejsdocker rm Nodejs
In this section, we tried to access APIs available for the application directly using the Public IP:Port of the EC2 instance. However, exposing non-standard ports to the external world in the Security Group is not at all recommended. Also, we tried to access the application over the HTTP protocol, which means the communication that took place from the “Browser” to the “Application” was not secure and an attacker can read the network packets.
To overcome this scenario, it is recommended to use Nginx.
Nginx Setup
Let’s create an Nginx conf that will be used within the Nginx container through a Docker Volume. Create a file and copy the following content in the file; alternatively, you can copy the content from here as well:
cd /home/ubuntu/Nodejs-dockermkdir nginx-confvim nginx-conf/nginx.conf
server {

        listen 80;

        listen [::]:80;

        location ~ /.well-known/acme-challenge {

                allow all;

                root /var/www/html;

        }

        location / {

                rewrite ^ https://$host$request_uri? permanent;

        }

}

server {

        listen 443 ssl http2;

        listen [::]:443 ssl http2;

        server_name Nodejs.devopslee.com www.Nodejs.devopslee.com;

        server_tokens off;
        ssl_certificate /etc/letsencrypt/live/Nodejs.devopslee.com/fullchain.pem;
        ssl_certificate_key /etc/letsencrypt/live/Nodejs.devopslee.com/privkey.pem;
        ssl_buffer_size 8k;
        ssl_dhparam /etc/ssl/certs/dhparam-2048.pem;
        ssl_protocols TLSv1.2 TLSv1.1 TLSv1;
        ssl_prefer_server_ciphers on;
        ssl_ciphers ECDH+AESGCM:ECDH+AES256:ECDH+AES128:DH+3DES:!ADH:!AECDH:!MD5;
        ssl_ecdh_curve secp384r1;
        ssl_session_tickets off;
        ssl_stapling on;
        ssl_stapling_verify on;
        resolver 8.8.8.8;
        location / {
                try_files $uri @Nodejs;
        }
        location @Nodejs {
                proxy_pass http://Nodejs:3000;
                add_header X-Frame-Options "SAMEORIGIN" always;
                add_header X-XSS-Protection "1; mode=block" always;
                add_header X-Content-Type-Options "nosniff" always;
                add_header Referrer-Policy "no-referrer-when-downgrade" always;
                add_header Content-Security-Policy "default-src * data: 'unsafe-eval' 'unsafe-inline'" always;
        }
        root /var/www/html;
        index index.html index.htm index.nginx-debian.html;
}
In the above file, make changes in the three lines mentioned below. Replace my subdomain.domain, i.e., Nodejs.devopslee, with the one that you want and have:
server_name: (here)ssl_certificate:/etc/letsencrypt/live/Nodejs.devopslee.com/fullchain.pem;ssl_certificate_key:/etc/letsencrypt/live/Nodejs.devopslee.com/privkey.pem;
Why do you need Nginx in front of the node.js service?
Our Nodejs application runs on a non-standard port 3000. Nodejs provides a way to use HTTPS; however, configuring the protocol and managing SSL certificates that expire periodically within the application code base, is something we should not be concerned about.
To overcome these scenarios, we need to have Nginx in front of it with an SSL termination and forward user requests to Nodejs. Nginx is a special type of web server that can act as a reverse proxy, load balancer, mail proxy, and HTTP cache. Here, we will be using Nginx as a reverse proxy to redirect requests to our Nodejs application and have SSL termination.
Why not Apache?
Apache is also a web server and can act as a reverse proxy. It also supports SSL termination; however, there are a few things that differentiate Nginx from Apache. Due to the following reasons, mostly Nginx is preferred over Apache. Let’s see them in short:
- Nginx has a single or a low number of processes, is asynchronous and event-based, whereas Apache tries to make new processes and new threads for every request in every connection.
- Nginx is lightweight, scalable, and easy to configure. On the other hand, Apache is great but has a higher barrier to learning.
Docker-Compose
Let’s install docker-compose as we will need it:
- Download the current stable release of Docker Compose:
sudo curl -L “(uname -s)-$(uname -m)” -o /usr/local/bin/docker-compose
- Apply executable permissions to the
docker-composebinary we just downloaded in the above step:sudo chmod +x /usr/local/bin/docker-compose
- Test to see if the installation was successful by checking the
docker-composeversion:docker-compose –version
- Create a
docker-compose.yamlfile; alternatively, you can copy the content from my GitHub repository here. This will be used to spin the Docker containers of our application tech stack we have:cd /home/ubuntu/Nodejs-dockervim docker-compose.yml
version: '3'
services:
  Nodejs:
    build:
      context: .
      dockerfile: Dockerfile
    image: Nodejs
    container_name: Nodejs
    restart: unless-stopped
    networks:
      - app-network
  webserver:
    image: nginx:mainline-alpine
    container_name: webserver
    restart: unless-stopped
    ports:
      - "80:80"
      - "443:443"
    volumes:
      - web-root:/var/www/html
      - ./nginx-conf:/etc/nginx/conf.d
      - certbot-etc:/etc/letsencrypt
      - certbot-var:/var/lib/letsencrypt
      - dhparam:/etc/ssl/certs
    depends_on:
      - Nodejs
    networks:
      - app-network
  certbot:
    image: certbot/certbot
    container_name: certbot
    volumes:
      - certbot-etc:/etc/letsencrypt
      - certbot-var:/var/lib/letsencrypt
      - web-root:/var/www/html
    depends_on:
      - webserver
    command: certonly --webroot --webroot-path=/var/www/html --email my@email.com --agree-tos --no-eff-email --staging -d Nodejs.devopslee.com  -d www.Nodejs.devopslee.com
    #command: certonly --webroot --webroot-path=/var/www/html --email my@email.com --agree-tos --no-eff-email --force-renewal -d Nodejs.devopslee.com  -d www.Nodejs.devopslee.com
volumes:
  certbot-etc:
  certbot-var:
  web-root:
    driver: local
    driver_opts:
      type: none
      device: /home/ubuntu/Nodejs-docker/views/
      o: bind
  dhparam:
    driver: local
    driver_opts:
      type: none
      device: /home/ubuntu/Nodejs-docker/dhparam/
      o: bind
networks:
  app-network:
    driver: bridge
In the above file, make changes in the line mentioned below. Replace my subdomain.domain, i.e., Nodejs.devopslee, with the one you want and have. Change IP for your personal email:
–email EMAIL: Email used for registration and recovery contact.
- command:
certonly –webroot –webroot-path=/var/www/html –email my@email.com –agree-tos –no-eff-email –staging -d Nodejs.devopslee.com -d www.Nodejs.devopslee.com
Update the AWS Security Groups
This time, expose ports 80 and 443 in the security group attached to the EC2 instance. Also, remove 3000 since it is not necessary because the application works through port 443:
Include the DNS change
Here, I have created a sub-domain “here” that will be used to access the sample Nodejs application using the domain name rather than accessing using an IP.
You can create your sub-domain on AWS if you already have your domain:
Create 2 “Type A Recordsets” in the hosted zone with a value as EC2 instances’ public IP.
One Recordset will be “subdomain.domain.com” and the other will be “www.subdomain.domain.com.”
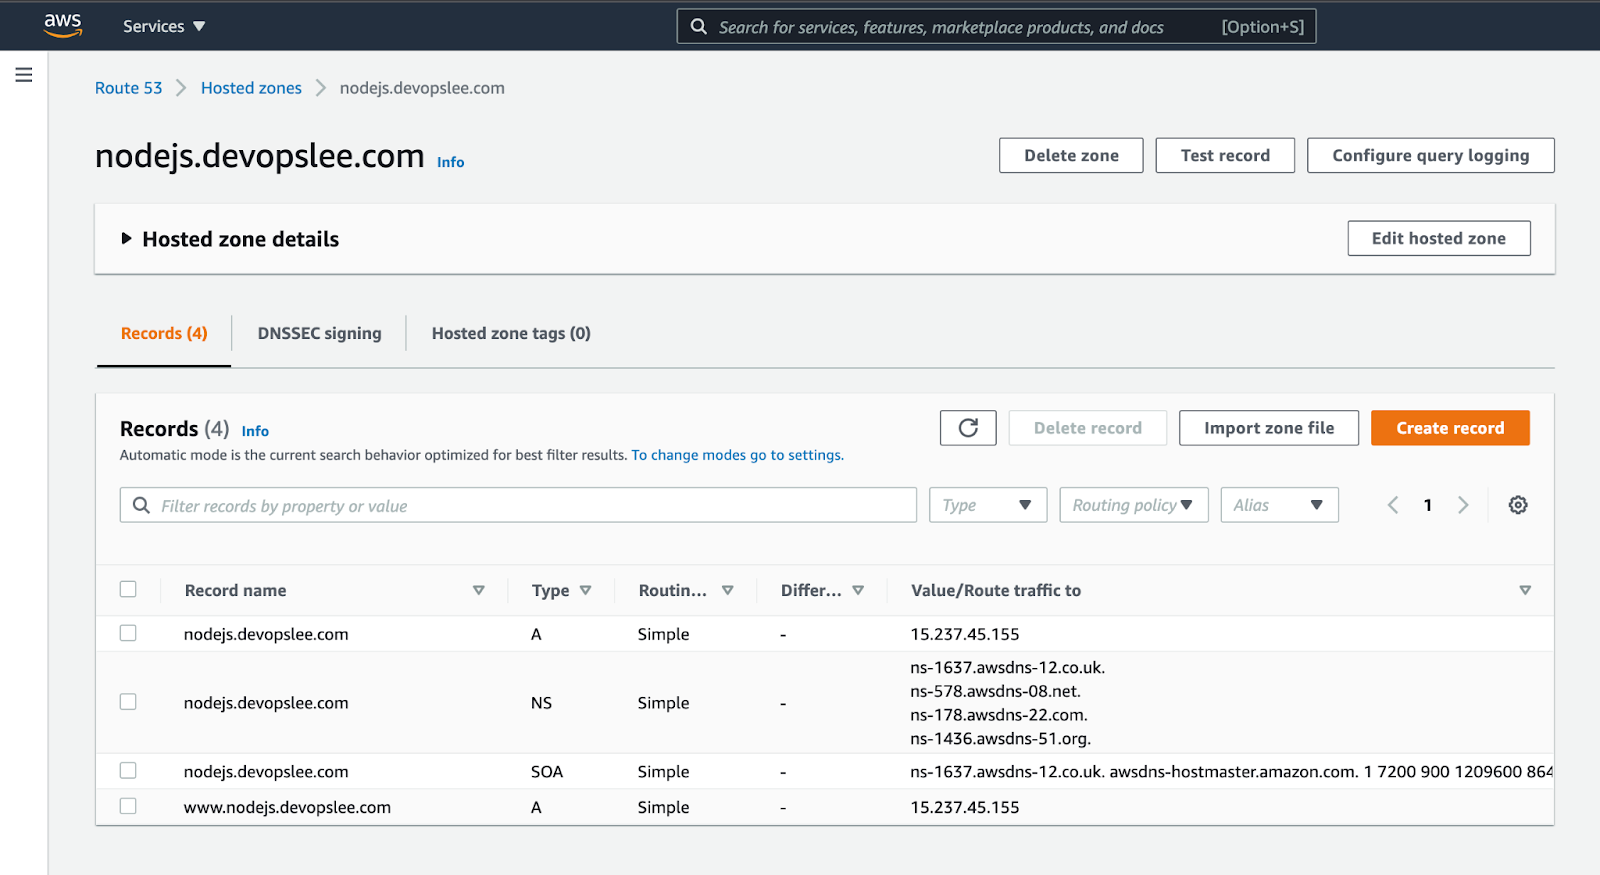
Here, I have created “Nodejs.devopslee.com” and “www.Nodejs.devopslee.com,” both pointing to the Public IP of the EC2 instance.
Note: I have not assigned any Elastic IP to the EC2 instance. It is recommended to assign an Elastic IP and then use it in the Recordset so that when you restart your EC2 instance, you don’t need to update the IP in the Recordset because public IPs change after the EC2 instance is restarted.
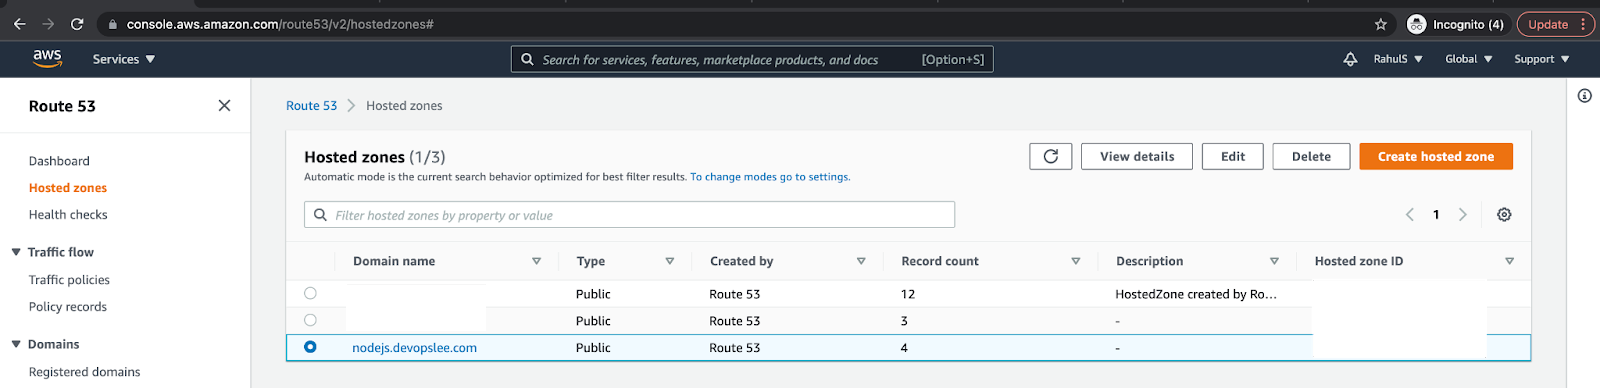
Now, copy values of the “Type NS Recordset” we will need these in the next steps:
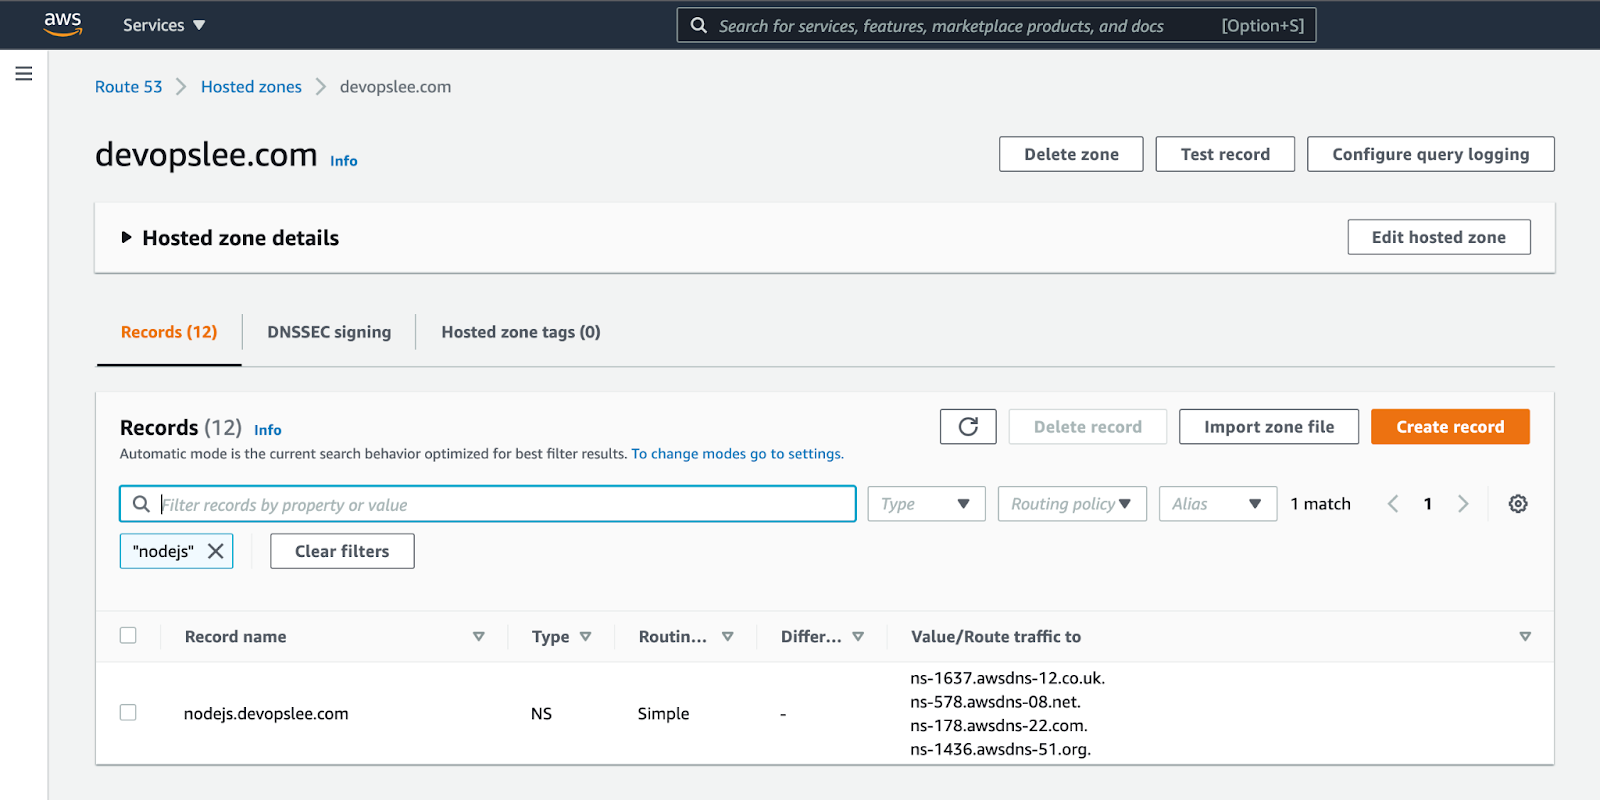
Go to the “Hosted zone” of your domain and create a new “Record” with your “subdomain.domain.com” adding the NS values you copied in the previous step:
Now, you have a sub-domain that you can use to access your application.
In my case, I can use “Nodejs.devopslee.com” to access the Nodejs application. We are not done yet. Now, the next step is to secure our Nodejs web application.
Include the SSL Certificate
Let’s generate our key that will be used in Nginx:
cd /home/ubuntu/Nodejs-dockermkdir viewsmkdir dhparamsudo openssl dhparam -out /home/ubuntu/Nodejs-docker/dhparam/dhparam-2048.pem 2048
Deploy Nodejs App to EC2 Instance
We are all set to start our Nodejs app using docker-compose.
This will start our Nodejs app on port 3000, Nginx with SSL on port 80 and 443. Nginx will redirect requests to the Nodejs app when accessed using the domain. It will also have a Certbot client that will enable us to obtain our certificates.
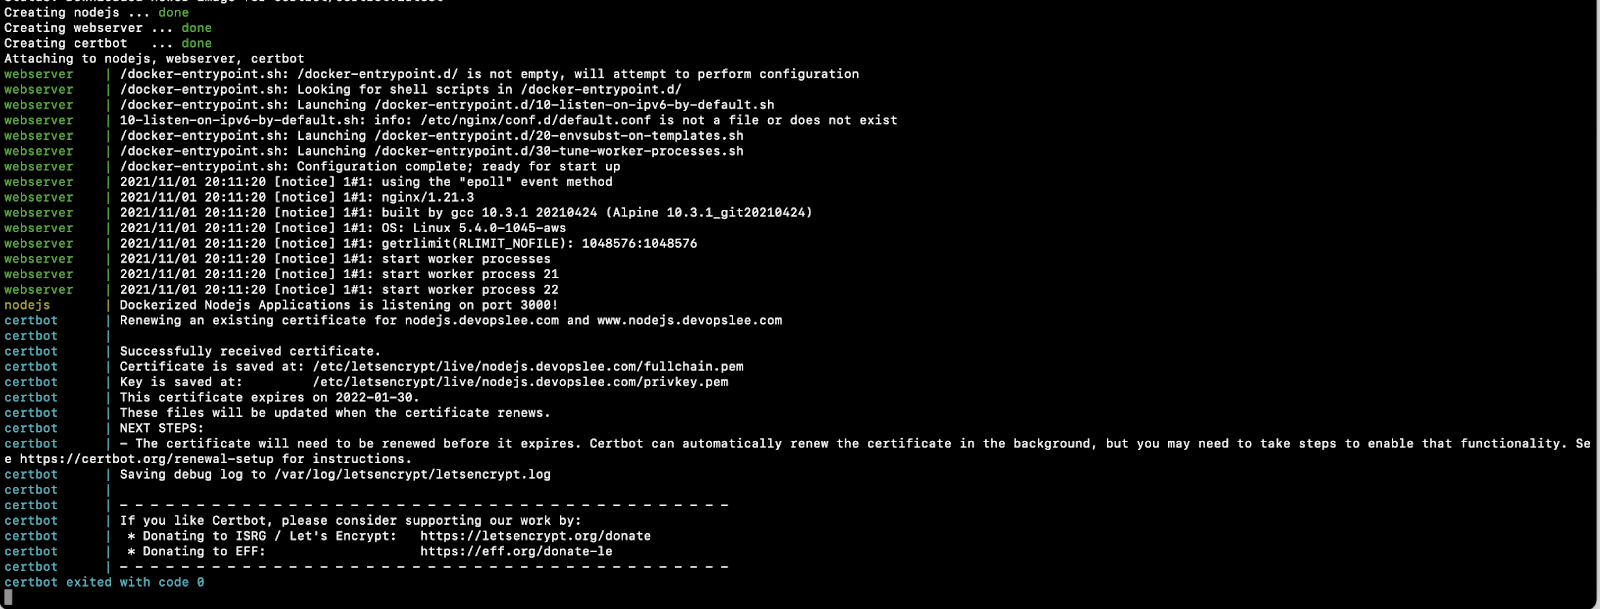
docker-compose up
After you hit the above command, you will see some output as follows. You must see a message as “Successfully received certificates.”
Note: The above docker-compose command will start containers and will stay attached to the terminal. We have not used the -d option to detach it from the terminal:
You are all set, now hit the URL in the browser and you should have your Nodejs application available on HTTPS:
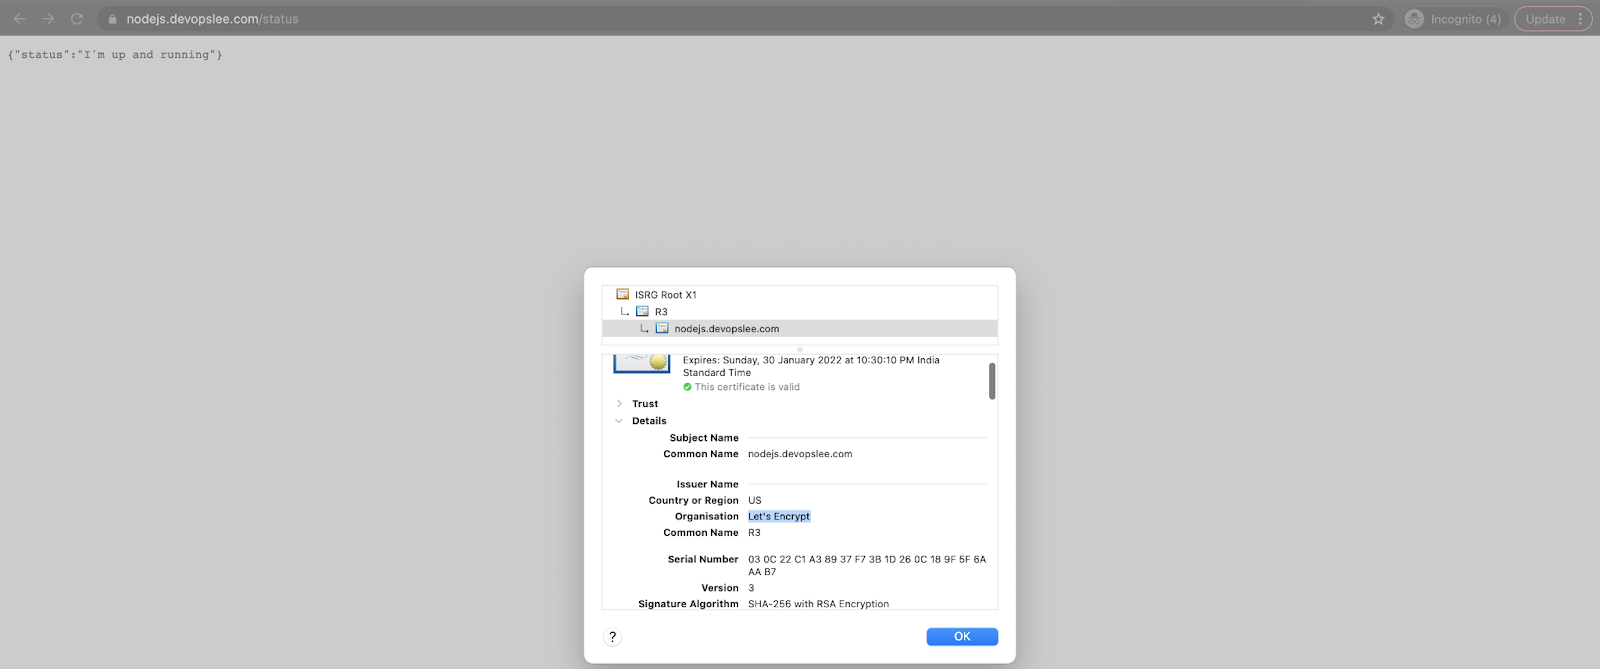
You can also try to hit the application using the curl command:
- List the data from the application:
curl(here)
- Insert an entry in the application:
curl -XPOST(here)
- Again list the data to verify if the data has been inserted or not:
curl(here)


Auto-Renewal of SSL Certificates
Certificates we generate using “Let’s Encrypt” are valid for 90 days, so we need to have a way to renew our certificates automatically so that we don’t end up with expired certificates.
To automate this process, let’s create a script that will renew certificates for us and a cronjob to schedule the execution of this script.
- Create a script with
–dry-runto test our script:vim renew-cert.sh
#!/bin/bash

COMPOSE="/usr/local/bin/docker-compose --no-ansi"
DOCKER="/usr/bin/docker"

cd /home/ubuntu/Nodejs-docker/
$COMPOSE run certbot renew --dry-run && $COMPOSE kill -s SIGHUP webserver
$DOCKER system prune -af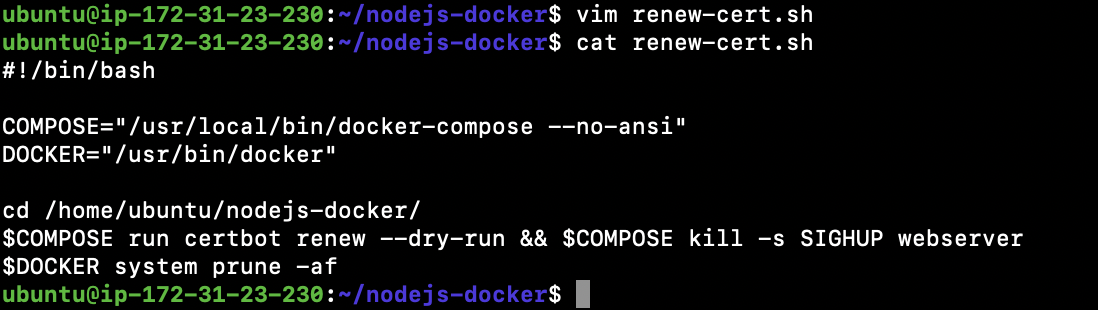
- Change permissions of the script to make it executable:
chmod 774 renew-cert.sh
- Create a cronjob:
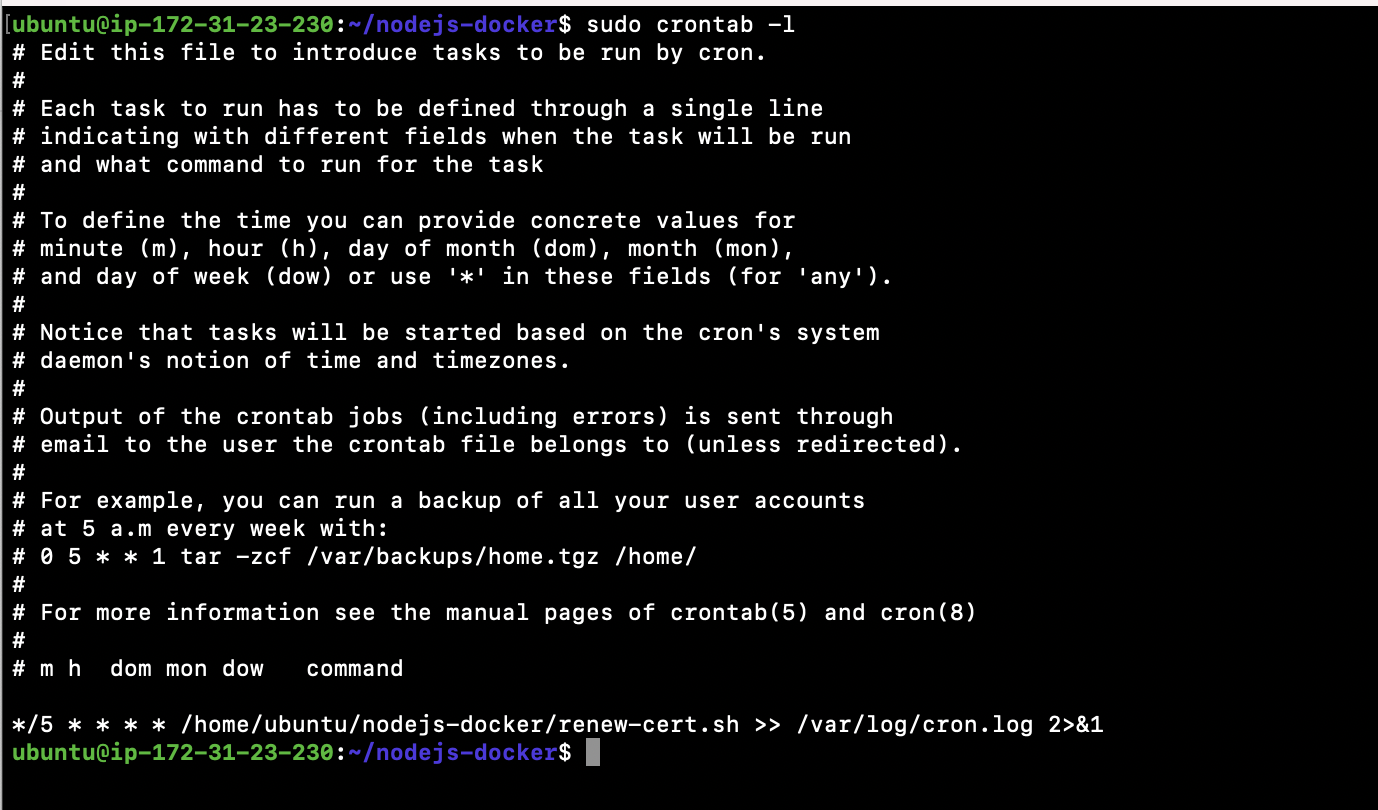
sudo crontab -e
*/5 * * * * /home/ubuntu/Nodejs-docker/renew-cert.sh >> /var/log/cron.log 2>&1- List the cronjobs:
sudo crontab -l
5. Check logs of the cronjob after five mins, as we have set a cronjob to be executed on every fifth minute:
tail -f /var/log/cron.lo
In the above screenshot, you can see a “Simulating renewal of an existing certificate….” message. This is because we have specified the “–dry-run” option in the script.
- Let’s remove the “–dry-run” option from the script:
vim renew-cert.sh
#!/bin/bash

COMPOSE="/usr/local/bin/docker-compose --no-ansi"
DOCKER="/usr/bin/docker"

cd /home/ubuntu/Nodejs-docker/
$COMPOSE run certbot renew && $COMPOSE kill -s SIGHUP webserver
$DOCKER system prune -af
This time you won’t see such a “Simulating renewal of an existing certificate….” message. This time the script will check if there is any need to renew the certificates, and if required will renew the certificates else will ignore and say “Certificates not yet due for renewal.”
What Is Next on How To deploy the Nodejs App to AWS?
We are done with setting up our Nodejs application using Docker on AWS EC2 instance; however, there are other things that come into the picture when you want to deploy a highly available application for production and other environments. The next step is to use an Orchestrator, like ECS or EKS, to manage our Nodejs application at the production level. Replication, auto-scaling, load balancing, traffic routing, and monitoring container health does not come out of the box with Docker and Docker-Compose. For managing containers and microservices architecture at scale, you need a container orchestration tool like ECS or EKS.
Also, we did not use any Docker repository to store our Nodejs app Docker Image. You can use AWS ECR, a fully managed AWS container registry offering high-performance hosting.
Conclusion
To deploy Nodejs app to AWS does not mean just creating a Nodejs application and deploying it on the AWS EC2 instance with a self-managed database. There are various aspects like containerizing the Nodejs App, SSL termination, and domain for the app that come into the picture when you want to speed up your software development, deployment, security, reliability, and data redundancy.
In this article, we saw the steps to dockerize the sample Nodejs application, using AWS RDS Amazon Aurora and deploying a Nodejs app to EC2 instance using Docker and Docker-Compose. We enabled SSL termination to our sub-domain to be used to access the Nodejs application. We saw the steps to automate domain validation and SSL certificate creation using Certbot along with a way to automate certificate renewal that is valid for 90 days.
This is enough to get started with a sample Nodejs application; however, when it comes to managing your real-time applications, 100s of microservices, 1000s of containers, volumes, networking, secrets, egress-ingress, you need a container orchestration tool. There are various tools, like self-hosted Kubernetes, AWS ECS, AWS EKS, that you can leverage to manage the container life cycle in your real-world applications.
Source link