
Web development, like most technologies, moves in waves and cycles. Static websites were all we had in the beginning. But, pretty soon, developers were hacking together the first server-generated sites thanks to Perl and PHP. This was the advance that would eventually kickstart frameworks like Laravel, Django, or Rails.
Mobile devices would come to change how people consume the web. So long server-generated websites, hello client-rendered applications. The next wave brought frameworks that could give users a more app-like experience—without reloads—like React or AngularJS.
While single-page applications provided a smoother experience, they have their drawbacks. Namely, longer page loads caused by all the extra JavaScript that has to be parsed and executed. Not to mention all the work it took to optimize for search engines.
Astro is a prime example of the current wave we have been in since Next.js, taking us full circle: a web framework that combines server and client rendering to get the best of both worlds.
What Is Astro?
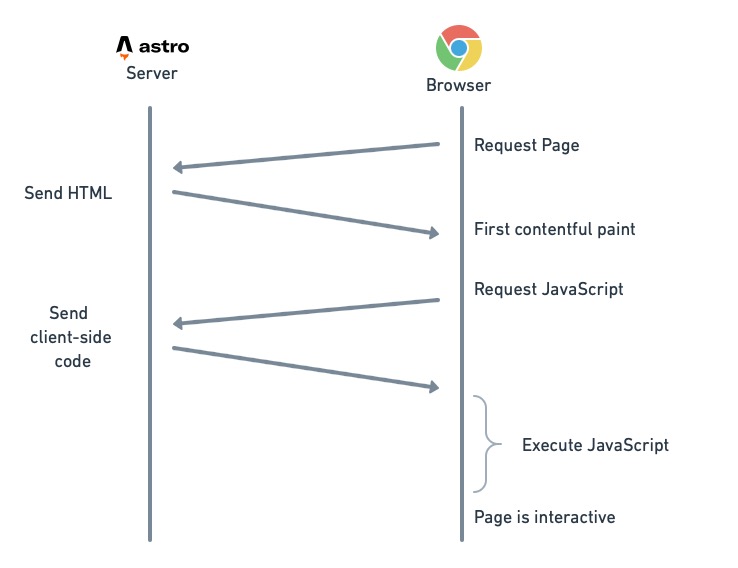
Astro is an open-source framework for generating web applications on top of popular UI frameworks like React, Preact, Vue, or Svelte. An Astro page is composed of several independent components. To improve load times, Astro strips away all JavaScript and prerenders pages in the server unless developers mark a component as interactive, in which case, Astro will send the minimum amount of JavaScript required for interactivity.
Astro favors generating static and server-rendered sites without JavaScript in the browser. Developers can opt-in to client-side rendering for given routes or parts of the page.
Thanks to this strategy, Astro pages load quickly, as no JavaScript needs to execute for the first render. In a process called hydration, Astro will “pour” JavaScript into components to make them dynamic.
Getting Started With Astro
To get started with Astro, install Node version 16.12.0 or higher and run the following command. Follow the on-screen wizard and choose to create an empty project when prompted:
$ npm create astro@latest

astro   v1.9.1 Launch sequence initiated.

✔ Where would you like to create your new project? … awesome-website
✔ How would you like to setup your new project? › an empty project
✔ Template copied!
✔ Would you like to install npm dependencies? (recommended) … yes
✔ Packages installed!
✔ Would you like to initialize a new git repository? (optional) … yes
✔ Git repository created!
✔ How would you like to setup TypeScript? › Relaxed
✔ TypeScript settings applied!

next   Liftoff confirmed. Explore your project!
Next, you can start the website in developer mode by entering the directory of the project you just created and running: npm run dev and visiting http://localhost:3000.
Pages and Routes
The interesting stuff in Astro happens inside the src folder. Checking what’s there, we see a single directory called pages with an index.astro file.
Astro pages are a mix of HTML, Javascript, or TypeScript. This is the default index.astro:
---
---

<html lang="en">
   <head>
       <meta charset="utf-8" />
       <link rel="icon" type="image/svg+xml" href="https://feeds.dzone.com/favicon.svg" />
       <meta name="viewport" content="width=device-width" />
       <meta name="generator" content={Astro.generator} />
       <title>Astro</title>
   </head>
   <body>
       <h1>Astro</h1>
   </body>
</html>
You may have noticed that Astro files start with fences delineated with ---. Whatever code we put inside these fences is executed on the server and prerendered before serving the page.
Below the frontmatter, we find the content for this route, an augmented HTML form that allows for variables. We can, for example, define a variable in the frontmatter and use it in HTML like this:
---
// src/pages/index.astro
const title = "Astro";
---

<html lang="en">
   <head>
       <meta charset="utf-8" />
       <link rel="icon" type="image/svg+xml" href="https://feeds.dzone.com/favicon.svg" />
       <meta name="viewport" content="width=device-width" />
       <meta name="generator" content={Astro.generator} />
       <title>{title}</title>
   </head>
   <body>
       <h1>{title}</h1>
   </body>
</html>
Astro uses a file-based routing, so every file in the pages folder is mapped to a route in the website. For example, if we create a file called greetings.astro, we should see its contents at http://localhost:3000/greetings:
---
const greeting = "Hello, world!";
---

   <html lang="en">
       <head>
           <meta charset="utf-8" />
           <link rel="icon" type="image/svg+xml" href="https://feeds.dzone.com/favicon.svg" />
           <meta name="viewport" content="width=device-width" />
           <meta name="generator" content={Astro.generator} />
           <title>Astro</title>
       </head>
       <body>
           <h1>{greeting}</h1>
       </body>
   </html>
In addition to .astro files, Astro can parse Markdown, MDX, JSX JavaScript, and TypeScript files. For instance, if we want to write a blog post in Markdown, we create a post.md file under the pages folder. Visiting the route will make Astro convert it into HTML on the fly:
---
title: 'Learning Astro'
pubDate: 2023-01-10
description: 'A post written in Markdown.'
author: 'Tommy'
---

# Learning Astro

This Markdown file should be rendered as HTML when I visit http://localhost:3000/post
Components
Astro components are *.astro files with reusable code and HTML. We can use components to write elements like headers, footers, navigation bars, buttons, and forms—anything that can be expressed as HTML can constitute a component.
Let’s create our first component in src/components/Header.astro:
---
// src/components/Header.astro
---
<meta charset="utf-8" />
<link rel="icon" type="image/svg+xml" href="https://feeds.dzone.com/favicon.svg" />
<meta name="viewport" content="width=device-width" />
<meta name="generator"
<title>Astro</title>
Once defined, we can import it to any page (or other components) and use it like this:
---
import Header from "../components/Header.astro";
---

<html lang="en">
   <head>
       <Header />
   </head>
   <body>
   </body>
</html>
Astro components are no different from pages. Any code defined between fences is executed on the server. JavaScript is stripped out before sending the content to the browser.
Layouts
Layouts are used to refine reusable UI structures. They are technically components, so the syntax stays the same.
Let’s replace the content of index.astro with a layout:
---
// src/pages/index.astro
import SiteLayout from "../layouts/SiteLayout.astro";
---

<SiteLayout></SiteLayout>
As you can see, layouts are stored in the src/layouts folder by convention.
Layouts, like components, can include other components. Here, we have extracted the structure in index.astro and added a Footer component:
---
// src/layouts/SiteLayout.astro
import Header from "../components/Header.astro";
import Footer from "../components/Footer.astro";
---

<html lang="en">
    <head>
        <Header />
    </head>
    <body>
        <Footer />
    </body>
</html>
Props and Slots
So far, our website has been completely static. To pass data between pages and components, we need to understand how props and slots work.
Components and layouts can define and accept props (short for properties) via the global Astro.props. Values passed through props are accessible to the component before rendering.
We can read props in our component like this:
---
// src/components/Header.astro
const { title } = Astro.props;
---

<meta charset="utf-8" />
<link rel="icon" type="image/svg+xml" href="https://feeds.dzone.com/favicon.svg" />
<meta name="viewport" content="width=device-width" />
<meta name="generator"
<title>{title}</title>
The value of title can be supplied when the component is called, which, in the following example, happens through the SiteLayout layout:
---
// src/layouts/SiteLayout.astro
import Header from "../components/Header.astro";
import Footer from "../components/Footer.astro";
---
<html lang="en">
    <head>
        <Header title = "Welcome my Astro Blog!" />
    </head>
    <body>
        <Footer />
    </body>
</html>Note: you need spaces surrounding the equal sign, i.e., title="Hello" is NOT correct. Instead, it should be: title = "Hello".
Slot elements create placeholders for content to be injected later. To see how it works, we can add a <slot /> element in src/layouts/SiteLayout.astro:
---
// src/layouts/SiteLayout.astro
import Header from "../components/Header.astro";
import Footer from "../components/Footer.astro";
---

<html lang="en">
    <head>
        <Header title = "Welcome my Astro Blog!" />
    </head>
    <body>
        <slot />
        <Footer />
    </body>
</html>
Now, the HTML inside <SiteLayout> is injected into the point where the slot is located:
---
// src/pages/index.astro
import SiteLayout from "../layouts/SiteLayout.astro";
---

<SiteLayout>
    <p>This content is rendered in the slot</p>
</SiteLayout>
Nesting components, layouts, props, and slots give us the flexibility to create reusable UI files across the website.
Islands and Hydration
Up to this point, we have not shipped any JavaScript to the user; everything is prerendered and served as pure HTML+CSS. How do we make Astro send JavaScript to the browser? For that, we need to understand the islands architecture.
The island architecture pattern aims to reduce the amount of JavaScript needed browser-side. Less JavaScript means less data sent and less computational power required on the user’s device. An island is an autonomous component that bundles HTML, CSS, and—optionally—JavaScript. In the islands pattern, a page is made up of several independent islands.
 The islands architecture allows combining static HTML, server-rendered content, and interactive client-rendered components on one page without conflicts.
Each island is prerendered, so there is no interactivity right after the page loads. Once the initial page is ready, the islands are converted into interactive content in a process called hydration. Hydration is a technique that converts static content delivered via static hosting or server-side rendering into a dynamic page by attaching event handlers to the HTML elements.
Using Islands
An example showing how Astro implements islands is in order. Let’s first add a UI integration to the project. The following command installs @astrojs/preact and preact:
Let’s create a simple button to test the integration:
// src/components/MyButton.jsx

export default function MyButton() {

const clicked = () => { console.log('Hello!') };

return (
    <div>
      <button style={{ color: 'purple' }} onClick={clicked}>Click me</button>
    </div>
  )
}
As usual, Astro will try to strip away any JavaScript. So, nothing would happen if we instantiated the component with <MyButton />. We need to tell Astro we want this component treated as an island and hydrated accordingly by adding the template directive client:load:
---
import MyButton from "../components/MyButton.jsx";
---

<html lang="en">
    <body>
        <MyButton client:load />
    </body>
</html>
Clicking the button should print “Hello!” in the browser console.
The client directive caused Astro to hydrate the component. There are five levels of hydration with different priorities:
client:loadhydrates the component as soon as possible.client:idlehydrates the component when the page is done loading. Useful for low-priority components that don’t need immediate interactivity.client:visible={string}hydrates the component as soon as it appears in the viewport.client:media={string}takes a CSS query as an argument and loads the component as soon as it’s fulfilled.client:onlyskips HTML rendering entirely and renders the component in-browser.
Conclusion
The popularity of this project has been nothing short of astronomical: in the first five months since the Astro 1.0 release, the project has amassed over 25,000 stars on GitHub. The success of Astro is not accidental. The Astro team has made a web framework that offers great ergonomics for developers and fast-loading websites for users, even if they are on low-power devices or slow connections.
Thanks for reading, and happy building!
Source link
