For over half of 2021, I worked on a complete rewrite of kentcdodds.com. You’re
reading this on the rewrite of this site! Are you using dark mode or light mode?
Have you signed in and selected your team yet? Have you tried to call
into the Call Kent Podcast? This blog post isn’t about these and other
features of the new site, but how I built it. There’s too much to dive deep in a
single blog post. I just want to give you an overview of the technologies and
libraries I used to make this experience for you.
If you haven’t read it already, get a higher-level overview of what this website
can do for your learning and advancement as a software engineer by reading
Introducing the new kentcdodds.com
first.
I’ve migrated from Postgres/Redis to SQLite. Read about that in the post I
Migrated from a Postgres Cluster to Distributed SQLite with
LiteFS.
Before we get too far into this I want to make my one thing clear. If this was a
simple developer’s blogfolio site, my tech choices could be labeled as
over-engineering and I would agree. However, I wanted to build an above and
beyond experience, so I had to make thoughtful architectural decisions. What I’m
doing on this site could definitely not be done with wordpress and a CDN 😆
If you’re a beginner looking for how to build your personal website, this blog
post is definitely not the place to learn that. If I were to build a simple
personal website, I would still use Remix.run, but I would
probably have it running on netlify serverless functions and write the content
as markdown which has built-in support in Remix. That would be drastically
simpler.
But again, that’s not what kentcdodds.com is. If you’re interested in how to
productively build a maintainable website using modern tools that is fast all
over the world despite every user getting content that’s completely unique to
them, then please continue.
Oh, and one more thing to give context on what this site can do:
First, to give you an idea of the scale we’re talking here. So here are a few
stats:
At the time of this writing (October 2021) here are the
cloc stats:
$ npx cloc ./app ./types ./tests ./styles ./mocks ./cypress ./prisma ./.github
     266 text files.
     257 unique files.
      15 files ignored.

github.com/AlDanial/cloc v 1.90  T=0.16 s (1601.9 files/s, 194240.7 lines/s)
-------------------------------------------------------------------------------
Language                     files          blank        comment           code
-------------------------------------------------------------------------------
TypeScript                     219           2020            583          21582
CSS                             10            198            301           4705
JSON                             7              0              0            609
YAML                             2             43             13            232
SQL                              7             20             25             52
JavaScript                       4              2              3             42
Markdown                         1              0              0              2
TOML                             1              0              2              1
-------------------------------------------------------------------------------
SUM:                           251           2283            927          27225
-------------------------------------------------------------------------------
And to get a sense of the amount of content I have on this site, here’s a word
count:
$ find ./content -type f | xargs wc -w | tail -1
  280801 total
That’s more than the first three Harry Potter books combined.
And adding up the amount of content on the four seasons of
the Chats with Kent Podcast comes to about 35 hours of content + the
ever-growing 3 hours of content on the brand new Call Kent Podcast
which incidentally is also more than it takes to listen to Jim Dale read the
first three Harry Potter books (unless you listen at 3x like me
#subtlebrag 🙃).
27k lines of code isn’t like your work project where a half dozen teams have
been contributing code for the last 8 years or anything, but it’s nothing like
your blogfolio site either. This is a legit full-stack web application with a
database, cache, user accounts, etc. I’m fairly confident that this is the
biggest Remix application in existence at the moment.
I didn’t do this whole thing by myself. You can check out
the credits page for details on contributors. I was the primary code
contributor and I made all the architecture decisions (and mistakes? only time
will tell 😅) for the site.
The first commit was in
November 2020.
Most development has taken place in the last 4-5 months. There are ~945 commits
so far 🤯.

Here are the primary technologies used in this project (in no particular order):
- React: For the UI
- Remix: Framework for the Client/Server/Routing
- TypeScript: Typed JavaScript (necessary for
any project you plan to maintain) - XState: State machine tool making complex component
state management simple - Prisma: Fantastic ORM with stellar migrations and
TypeScript client support - Express: Node server framework
- Cypress: E2E testing framework
- Jest: Unit/Component testing framework
- Testing Library: Simple utilities for testing
DOM-based user interfaces - MSW: Fantastic tool for mocking HTTP requests in the
browser/node - Tailwind CSS: Utility classes for
consistent/maintainable styling - Postcss: CSS processor (pretty much just use it for
autoprefixer and tailwind) - Reach UI: A set of accessible UI components every app
needs (accordion/tabs/dialog/etc…) - ESBuild: JavaScript bundler (used by Remix and
mdx-bundler). - mdx-bundler: Tool for compiling
and bundling MDX for my site content (blog posts and some simple pages). - Octokit: Library making interacting
with the GitHub API easier. - Framer Motion: Great React Animation library
- Unified: Markdown/HTML parser/transformer/compiler
system. - Postgres: Battle tested SQL database
- Redis: In-memory database–key/value store.
Here are the services this site uses:
Deployment pipeline
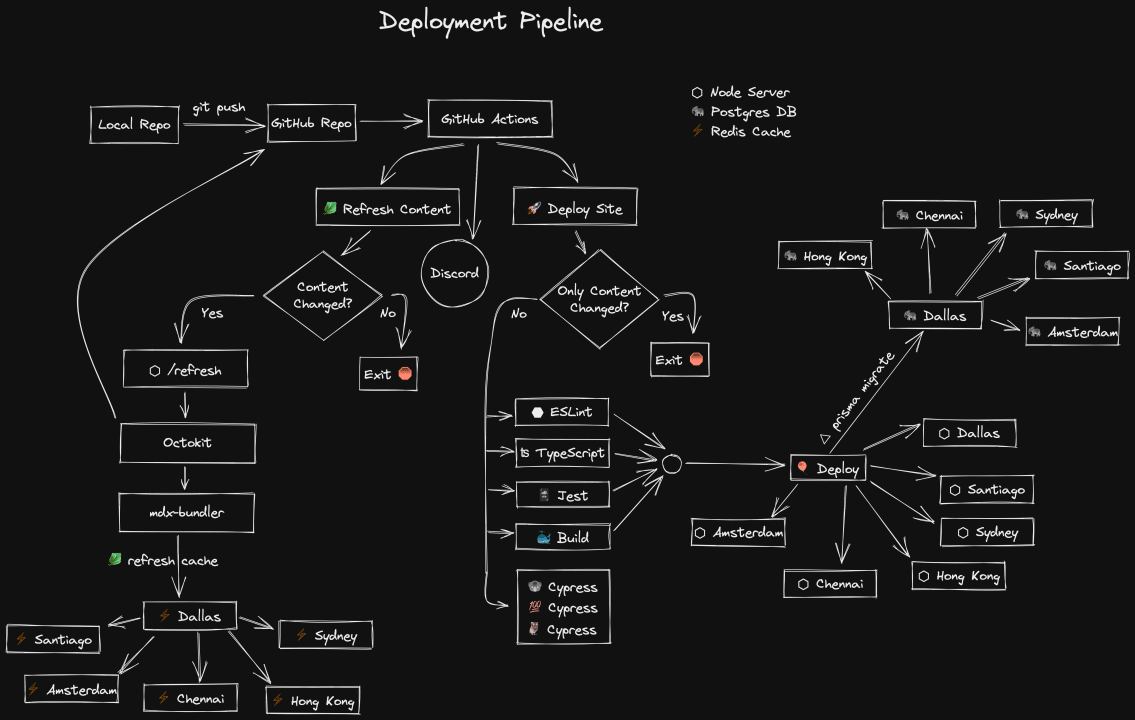
I think it can be quite instructive of overall architecture to describe how an
app is deployed. The Excalidraw diagram above
describes it visually. Allow me to describe it in written form as well:
First, I commit a change to the local repo. Then I push my changes to the (open
source) GitHub repository. From there, I have two GitHub Actions that run
automatically on every push to the main branch.
The “Discord” circle just indicates that I’ve got a GitHub webhook installed for
discord so each success/failure will result in a message in a channel on discord
so I can easily keep track of how things are going at any time.
GitHub Actions: 🥬 Refresh Content
The first GitHub action is called “🥬 Refresh Content” and is intended to
refresh any content that may have changed. Before describing what it does, let
me explain the problem it solves. The previous version of kentcdodds.com was
written with Gatsby and due to the SSG nature of Gatsby every time I wanted to
make a content change, I would have to rebuild my entire site (which could take
anywhere from 10-25 minutes).
But now that I have a server and I’m using SSR, I don’t have to wait for a
complete rebuild to refresh my content. My server can access all the content
directly from GitHub via the GitHub API. The problem is that this adds a lot of
overhead to each request for my blog posts. Add to that time to compile the MDX
code and you’ve got yourself a really slow blog. So I’ve got myself a Redis
cache for all of this. The issue then is the problem of caches: invalidation. I
need to make sure that when I make an update to some content, the Redis cache
gets refreshed.
And that’s what this first GitHub action does. First it determines all content
changes that occurred between the commit that’s being built and the commit of
the last time there was a refresh (that value is stored in redis and my server
exposes an endpoint for my action to retrieve it). If any of the changed files
were in the ./content directory, then the action makes an authenticated POST
request to another endpoint on my server with all the content files that were
changed. Then my server retrieves all the content from the GitHub API,
recompiles the MDX pages, and pushes the update to the Redis cache which Fly.io
automatically propagates to the other regions.
This reduces what used to take 10-25 minutes down to 8 seconds. And it saves me
computational resources as well because fixing a typo in my content doesn’t
necessitate a rebuild/redeploy/cache bust of the whole site.
I realize that using GitHub as my CMS is a little odd, but wonderful people
like you contribute improvements to my open source content all the time and I
appreciate that. So by keeping things in GitHub, that can continue. (Note the
edit link at the bottom of every post).
GitHub Actions: 🚀 Deploy
The second GitHub action deploys the site. First, it determines whether the
changes are deployable to begin with. If the only thing that changed was
content, then there’s no reason to bother redeploying thanks to the refresh
content action. The vast majority of my commits on my old site were content-only
changes so this helps save the trees 🌲🌴🌳
Once it’s determined that we have deployable changes, then we kick off multiple
steps in parallel:
- ⬣ ESLint: Linting the project for simple mistakes
- ʦ TypeScript: Type checking the project for type errors
- 🃏 Jest: Running component and unit tests
- ⚫️ Cypress: Running end-to-end tests
- 🐳 Build: Building the docker image
The Cypress step is further parallelized by splitting my E2E tests into three
individual containers which split the tests between them to run them as quickly
as possible.
You might notice that there are no arrows coming out of the Cypress step. This
is intentional and temporary. Currently I do not fail the build if the E2E
tests fail. So far, I haven’t been worried about deploying something that’s
broken and I didn’t want to hold up a deploy because I accidentally busted
something for the 0 users who expect things to be working. The E2E tests are
also the slowest part of the deployment pipeline and I want to get things
deployed quickly. Eventually I’ll probably care more about whether I break the
site, but for now I’d rather have things deploy faster. I do know when those
tests fail.
Once ESLint, TypeScript, Jest, and the Build all successfully complete, then we
can move on to the deploy step. On my end this bit is simple. I simply use the
Fly CLI to deploy the docker container that was created in the build step. From
there Fly takes care of the rest. It starts up the docker container in each of
the regions I’ve configured for my Node server: Dallas, Santiago, Sydney, Hong
Kong, Chennai, and Amsterdam. When they’re ready to receive traffic, Fly
switches traffic to the new instance and then shuts down the old one. If there’s
a startup failure in any region, it rolls back automatically.
Additionally, this step of the deploy uses prisma’s migrate feature to apply any
migrations I’ve created since the last migration (it stores info on the last
migration in my Postgres DB). Prisma performs the migration on the Dallas
instance of my Postgres cluster and Fly automatically propagates those changes
to all other regions instantly.
And that’s what happens when I say: git push or click the “Merge” button 😄
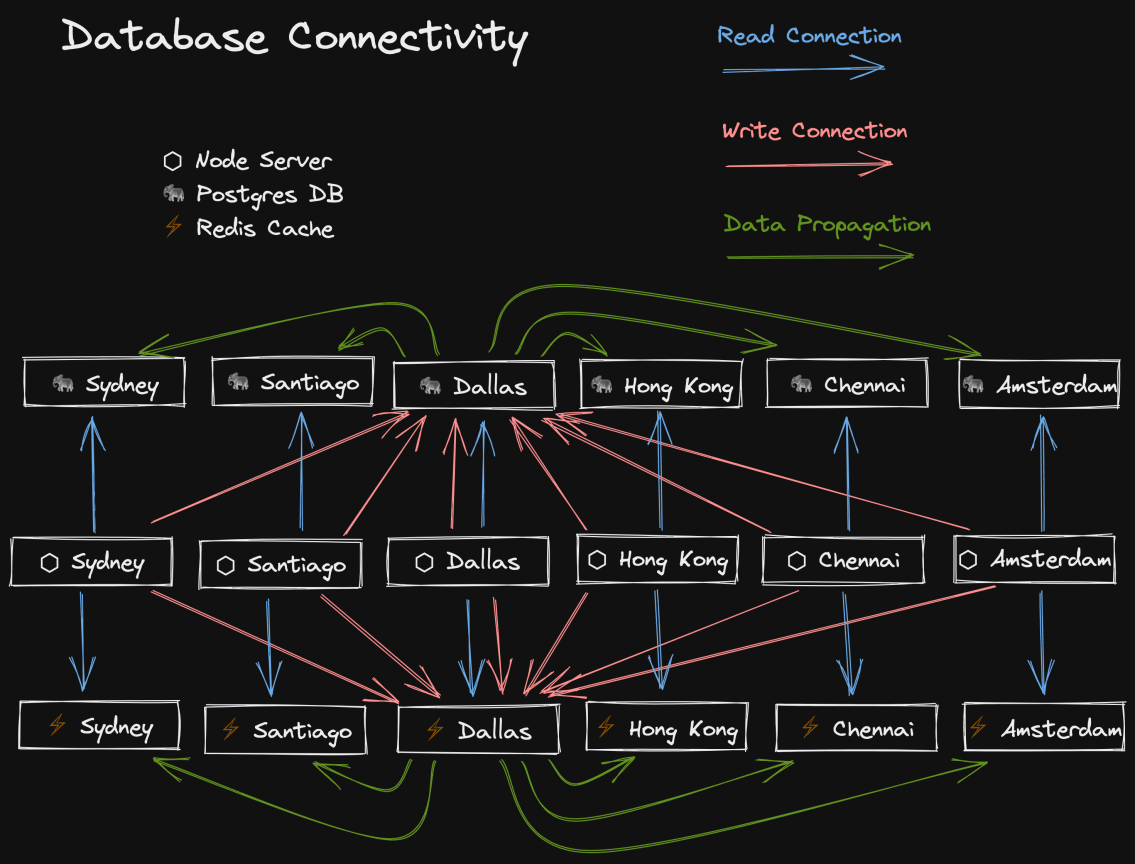
Database Connectivity
One of the coolest parts of Fly.io (and the reason I chose Fly over alternative
Node server hosts) is the ability to deploy your app to multiple regions all
over the world. I’ve chosen 6 based on the analytics from my previous site, but
they have many more.
Deploying the Node server to multiple regions is only part of the story though.
To really get the network performance benefits of colocation, you need your data
to be close by as well. So Fly also supports hosting Postgres and Redis clusters
in each region as well. This means when an authorized user in Berlin goes to
The Call Kent Podcast, they hit the closest server to them (Amsterdam)
which will query the Postgres DB and Redis cache that are located in the same
region, making the whole experience extremely fast wherever you are in the
world.
What’s more, I don’t have to make the trade-off of vendor lock-in. At any time I
could take my toys home and host my site anywhere else that supports deploying
Docker. This is why I didn’t go with a solution like Cloudflare Workers and
FaunaDB. Additionally, I don’t have to retrofit/limit my app to the constraints
of those services. I’m extremely happy with Fly and don’t expect to leave any
time soon.
But that doesn’t mean this is all trade-off free (nothing is). All of this
multi-regional deployment comes with the problem of consistency. I’ve got
multiple databases, but I don’t want to partition my app by region. The data
should be the same in all those databases. So how do I ensure consistency? Well,
we choose one region to be our primary region, and then make all other regions
read-only. Yup, so the user in Berlin won’t be able to write to the database in
Amsterdam. But don’t worry, all instances of my Node server will make a read
connection to the closest region so reads (by far the most common operation) are
fast, and then they also create a write connection to the primary region so
writes can work. And as soon as an update happens in the primary region, Fly
automatically and immediately propagates those changes to all other regions.
It’s very very fast and works quite well!
Fly makes doing this quite easy and I’m super happy with it. That said, there’s
one other problem this creates that we need to deal with.
Fly Request Replays
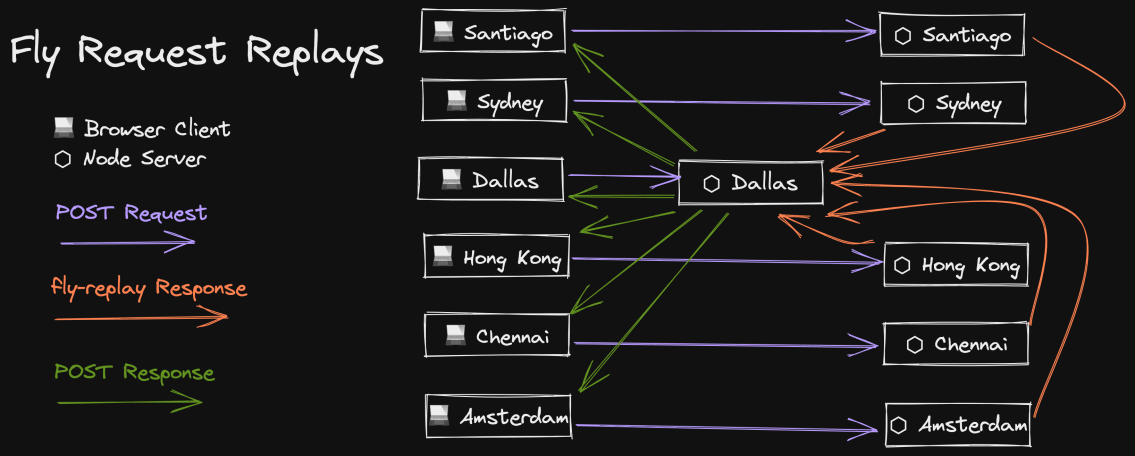
One problem with the read/write connections I use to make multi-regional
deployment super fast is that if our friend in Berlin writes to the database and
then reads the data they just wrote, it’s possible they will read the old data
before Fly has finished propagating the update. Data propagation normally
happens in milliseconds, but in cases where the data is large (like when you
submit a recording to The Call Kent Podcast),
it’s quite possible your next read will beat Fly.
One way to avoid this problem is to make sure that once you’ve done a write, the
rest of the request performs its reads against the primary database.
Unfortunately this makes the code a bit complex.
Another approach Fly supports is to “replay” a request to the primary region
where the read and write connections are both on the primary region. You do this
by sending a response to the request with the header fly-replay: REGION=dfw
and Fly will intercept that response, prevent it from going back to the user,
and replay the exact same request to the region specified (dfw is Dallas which
is my primary region).
So I have a middleware in my express app that simply automatically replays all
non-GET requests. This does mean that those requests will take a bit longer for
our friend in Berlin, but again, those requests don’t happen very often, and
honestly I don’t know of a better alternative anyway 🙃.
I’m really happy with this solution!
When I’m developing locally, I have my postgres and redis databases running in a
docker container via a simple docker-compose.yml. But I also interact with a
bunch of 3rd party APIs. As of the time of this writing (September 2021), my app
works with the following third party APIs:
api.github.comoembed.comapi.twitter.comapi.tito.ioapi.transistor.fms3.amazonaws.comdiscord.com/apiapi.convertkit.comapi.simplecast.comapi.mailgun.netres.cloudinary.comwww.gravatar.com/avatarverifier.meetchopra.com
Phew! 😅 I’m a big believer in being able to work completely offline. It’s fun
to go up into the mountains with no internet connection and still be able to
work on your site (and as I type this, I’m on an airplane without internet). But
with so many 3rd party APIs how is this possible?
Simple: I mock it with MSW!
MSW is a fantastic tool for mocking network requests in both the browser and
node. For me, 100% of my 3rd party network requests happen in Remix loaders on
the server, so I only have MSW setup in my node server. What I love about MSW is
that it’s completely nonintrusive on my codebase. The way I get it running is
pretty simple. Here’s how I start my server:
node .And here’s how I start it with mocks enabled:
node --require ./mocks .That’s it. The ./mocks directory holds all my MSW handlers and initializes MSW
to intercept HTTP requests made by the server. Now I’m not going to say it was
easy writing the mocks for all of these services, it’s a fair amount of code and
took me a bit of time. But boy it’s really helped me stay productive. My mock is
much faster than the API and doesn’t rely on my internet connection one bit.
It’s a huge win and I strongly recommend it.
For several of the APIs I have mocked, I’m just using faker.js to create
random fake data that conforms to the types I’ve written for these APIs. But for
the GitHub APIs, I actually happen to know what the response should be even if
I’m not connected to the internet, because I’m literally working in the
repository that I’ll be requesting content from! So my GitHub API mock actually
reads the filesystem and responds with actual content. This is how I work on
my content locally. And I don’t have to do anything fancy in my source code. As
far as my app is concerned, I’m just making network requests for the content,
but MSW intercepts it and lets me respond with what’s on the file system.
To take it a step further, Remix auto-reloads the page when files change and I
have things set up so whenever there’s a change in the content, the redis cache
for that content is automatically updated (yup, I use the redis cache locally
too) and I trigger Remix to reload the page. If you can’t tell, I think this
whole thing is super cool.
And because I have this set up with MSW to work locally, I can make my E2E tests
use the same thing and stay resilient. If I want to run my E2E tests against the
real APIs, then all I have to do is not --require ./mocks and everything’s
hitting real APIs.
MSW is an enormous productivity and confidence booster for me.
As described earlier with the architecture diagrams, I host my redis cache with
Fly.io. It’s phenomenal. But I’ve built my own little abstraction for
interacting with redis to have some interesting qualities that I think are worth
talking about.
First, the problems: I want my site to be super fast, but I also want to do
things on each request that take time. Some things I want to do could even be
described as slow or unreliable. So I use Redis to cache things. This can take
something that takes 350ms down to 5ms. However, with caching comes the
complication of cache invalidation. I’ve described how I do this with my
content, but I’m caching a lot more than that. Most of my 3rd party APIs are
cached and even the results of a few of my Postgres queries are cached (Postgres
is pretty fast, but on my blog I execute ~30 queries on every page).
Not everything is cached in Redis either, some things are cached via the
lru-cache module (lru stands for “least-recently-used” and helps your cache
avoid out of memory errors). I use the in-memory LRU cache for very short-lived
cache values like the postgres queries.
With so many things that need to be cached, an abstraction was needed to make
the invalidation process simpler and consistent. I was too impatient to find a
library that would work for me, so I just built my own.
Here’s the API:
type CacheMetadata = {
  createdTime: number
  maxAge: number | null
}
// it's the value/null/undefined or a promise that resolves to that
type VNUP<Value> = Value | null | undefined | Promise<Value | null | undefined>

async function cachified<
  Value,
  Cache extends {
    name: string
    get: (key: string) => VNUP<{
      metadata: CacheMetadata
      value: Value
    }>
    set: (
      key: string,
      value: {
        metadata: CacheMetadata
        value: Value
      },
    ) => unknown | Promise<unknown>
    del: (key: string) => unknown | Promise<unknown>
  },
>(options: {
  key: string
  cache: Cache
  getFreshValue: () => Promise<Value>
  checkValue?: (value: Value) => boolean
  forceFresh?: boolean | string
  request?: Request
  fallbackToCache?: boolean
  timings?: Timings
  timingType?: string
  maxAge?: number
}): Promise<Value> {
  // do the stuff...
}

// here's an example of the cachified credits.yml that powers the /credits page:
async function getPeople({
  request,
  forceFresh,
}: {
  request?: Request
  forceFresh?: boolean | string
}) {
  const allPeople = await cachified({
    cache: redisCache,
    key: 'content:data:credits.yml',
    request,
    forceFresh,
    maxAge: 1000 * 60 * 60 * 24 * 30,
    getFreshValue: async () => {
      const creditsString = await downloadFile('content/data/credits.yml')
      const rawCredits = YAML.parse(creditsString)
      if (!Array.isArray(rawCredits)) {
        console.error('Credits is not an array', rawCredits)
        throw new Error('Credits is not an array.')
      }

      return rawCredits.map(mapPerson).filter(typedBoolean)
    },
    checkValue: (value: unknown) => Array.isArray(value),
  })
  return allPeople
}
That’s a lot of options 😶 But don’t worry, I’ll walk you through them. Let’s
start with the generic types:
Valuerefers to the value that should be stored/retrieved from the cacheCacheis just an object that has aname(for logging), andget,set,
anddelmethods.CacheMetadatais info that gets saved along with the value for determining
when the value should be refreshed.
And now for the options:
keyis the identifier for the value.cacheis the cache to use.getFreshValueis the function that actually retrieves the value. This is
what we would be running every time if we didn’t have a cache in place. Once
we get the fresh value, that value is set in thecacheat thekey.checkValueis a function that verifies the value retrieved from the
cache/getFreshValueis correct. It’s possible that I deploy a change to
thegetFreshValuethat changes theValueand if the value in the cache
isn’t correct then we want to forcegetFreshValueto be called to avoid
runtime type errors. We also use this to check that what we got from
getFreshValueis correct and if it’s not then we throw a helpful error
message (definitely better than a type error).forceFreshallows you to skip looking at the cache and will call
getFreshValueeven if the value hasn’t expired yet. If you provide a string
then it splits that string by,and checks whether thekeyis included in
that string. If it is then we’ll callgetFreshValue. This is useful for when
you’re calling a cachified function which calls other cachified functions
(like the function that retrieves all the blog mdx files). You can call that
function and only refresh some of the cache values, not all of them.requestis used to determine the default value offorceFresh. If the
request has the query parameter of?freshand the user has the role of
ADMIN(so… just me) thenforceFreshwill default totrue. This allows
me to manually refresh the cache for all resources on any page. I don’t need
to do this very often though. You can also provide a value of,-separated
cache key values to force only those cache values to be refreshed.fallbackToCacheif we tried toforceFresh(so we skipped the cache) and
getting the fresh value failed, then we might want to fallback to the cached
value rather than throwing an error. This controls that and defaults to
true.timingsandtimingsTypeare used for another utility I have for tracking
how long things take which then gets sent back in theServer-Timingheader
(useful for identifying perf bottlenecks).maxAgecontrols how long to keep the cached value around before trying to
refresh it automatically.
When the value is read from the cache, we return the value immediately to keep
things fast. After the request is sent, we determine whether that cached value
is expired and if it is, then we call cachified again with forceRefresh set
to true.
This has the effect of making it so no user ever actually has to wait for
getFreshValue. The trade-off is the last user to request the data after the
expiration time gets the old value. I think this is a reasonable trade-off.
I’m pretty happy with this abstraction and it’s possible that I’ll eventually
copy/paste this section of the blog post to a README.md for it as an open
source project in the future 😅
Ok folks… Cloudinary is incredible. All the images on this site are hosted on
cloudinary and then delivered to your browser in the perfect size and format for
your device. It took a little work (and a lot of money… Cloudinary is not
cheap) to make this magic happen, but it’s saving a TON of internet bandwidth
for you and makes the images load much faster.
One of the reasons my Gatsby site took so long to build was that every time I
ran the build, gatsby had to generate all the sizes for all my images. The
Gatsby team helped me put together a persistent cache, but if I ever needed to
bust that cache then I’d have to run Netlify a few times (it would timeout) to
fill up the cache again so I could deploy my site again 😬
With Cloudinary, I don’t have that problem. I just upload the photo, reference
the cloudinary ID in my mdx, and then my site generates the right sizes and
srcset props for the <img /> tag. Because Cloudinary allows transforms in
the URL, I’m able to generate an image that’s exactly the dimensions I want for
those props.
Additionally, I’m using Cloudinary to generate all the social images on the site
so they can be dynamic (with text/custom font and everything). I’m doing the
same for the images on The Call Kent Podcast. It’s bonkers.
Another cool thing I’m doing that you may have noticed on the blog posts is on
the server I make a request for the banner image that’s only 100px wide with a
blur transform. Then I convert that into a base64 string. This is cached along
with the other metadata about the post. Then when I server-render the post, I
server-render the base64 blurred image scaled up (I also use backdrop-filter
with CSS to smooth it out a bit from the upscale) and then fade-in the full-size
image when it’s finished loading. I’m pretty darn happy with this approach.
Cloudinary blows my mind and I’m happy to pay the cost for what I get from it.
I’ve been using MDX to write my blog posts ever
since I left Medium. I really love that I can easily
have interactive bits in the middle of my blog posts without having to handle
them in any special way in the code of my site.
When I moved from Gatsby’s build-time compilation of MDX to Remix’s with
on-demand compilation, I needed to find a way to do that on-demand compilation.
Right around this time was when xdm was created (a much faster and
runtime-free MDX compiler). Unfortunately it’s just a compiler, not a bundler.
If you’re importing components into your MDX, you need to make sure those
imports will resolve when you run that compiled code. I decided what I needed
wasn’t just a compiler. I needed a bundler.
No such bundler existed, so I made one:
mdx-bundler. I started with
rollup and then gave esbuild a try and was blown away. It’s out-of-this-world
fast (though still not fast enough to bundle-on-demand so I do cache the
compiled version).
As one might expect, I do have several unified plugins (remark/rehype) to
automate some things for me during compilation of the mdx. I have one for
auto-adding affiliate query params for amazon and egghead links. I have another
for converting a link to a tweet into a completely custom twitter embed (way
faster than using the twitter widget thing) and one for converting egghead video
links into video embeds. I’ve got another custom one (borrowed from a secret
package by Ryan Florence) for syntax highlighting based on Shiki, and one for
optimizing inline cloudinary images.
Unified is really powerful and I love using it for my markdown-based content.
Alright my friends. Let’s talk about Prisma. I am not a database person… At
all. All the backend stuff is outside of my wheelhouse. What’s funny though is
Remix makes the backend so approachable that most of the work I’ve been doing
over the past few months has been backend stuff 😆 And I couldn’t be happier
with how simple Prisma makes working with a database. Not just querying
Postgres, but also data migrations. It’s truly amazing how approachable Prisma
makes it. So let’s talk about those things.
Migrations
With prisma, you describe your database models via a schema.prisma file. Then
you can tell Prisma to use that to update your database to reflect your schema.
If you ever need to change your schema, you can run
prisma migrate dev --name <descriptive-name> and prisma will generate the SQL
queries necessary to make the table updates for your schema changes.
If you’re careful about how you do this, you can make zero downtime migrations.
Zero downtime migrations aren’t unique to prisma, but prisma does make creating
these migrations much simpler for me, a guy who hasn’t done SQL in years and
never really liked it anyway 😬 During the development of my site, I had 7
migrations, and two of those were breaking schema changes. The fact that I of
all people managed to do this should be endorsement enough 😅
TypeScript
The schema.prisma file can also be used to generate types for your database
and this is where things get really awesome. Here’s a quick example of a query:
const users = await prisma.user.findMany({
  select: {
    id: true,
    email: true,
    firstName: true,
  },
})
// This is users type. To be clear, I don't have to write this myself,
// the call above returns this type automatically:
const users: Array<{
  id: string
  email: string
  firstName: string
}>
And if I wanted to get the team then:
const users = await prisma.user.findMany({
  select: {
    id: true,
    email: true,
    firstName: true,
    team: true, // <-- just add the field I want
  },
})
And now suddenly the users array is:
const users: Array<{
  id: string
  email: string
  firstName: string
  team: Team
}>
And oh, what if I wanted to also get all the posts this user has read? Do I need
some graphql resolver magic? Nope! Check this out:
const users = await prisma.user.findMany({
  select: {
    id: true,
    email: true,
    firstName: true,
    team: true,
    postReads: {
      select: {
        postSlug: true,
      },
    },
  },
})
And now my users array is:
const users: Array<{
  firstName: string
  email: string
  id: string
  team: Team
  postReads: Array<{
    postSlug: string
  }>
}>
Now that’s what I’m talking about! And with Remix, I can easily query directly
in my loader, and then have that typed data available in my component:
export async function loader({request}: DataFunctionArgs) {
  const users = await prisma.user.findMany({
    select: {
      id: true,
      email: true,
      firstName: true,
      team: true,
      postReads: {
        select: {
          postSlug: true,
        },
      },
    },
  })
  return json({users})
}

export default function UsersPage() {
  const data = useLoaderData<typeof loader>()
  return (
    <div>
      <h1>Users</h1>
      <ul>
        {/* all this auto-completes and type checks!! */}
        {data.users.map(user => (
          <li key={user.id}>
            <div>{user.firstName}</div>
          </li>
        ))}
      </ul>
    </div>
  )
}
And if I decide I don’t need some data on the client, I simply update the prisma
query and TypeScript will make sure I didn’t miss anything. It’s just fantastic.
Prisma has made me, a frontend developer, feel empowered to work directly with
a database.
A while back, I tweeted some words that I’m eating…

Here are the only reasonable options for authentication in apps:
1. Use a cloud provider for auth
2. Have a team dedicated to auth for the company’s apps
3. Use HTTP basic auth because security clearly doesn’t matter that much for you anyway 🤷♂️
Yup, that’s right… I hand-rolled my own authentication on this site. But I had
a good reason! Remember all the talk above about making things super fast by
collocating the node servers and databases close to users? Well, I’d kinda undo
all that work if I used an authentication service. Every request would have to
go to the region that provider supported to verify the user’s logged in state.
How disappointing would that be?
Around the time I was working on the authentication problem, Ryan Florence did
some live
streams where he implemented
authentication for his own Remix app. It didn’t look all that complicated. And
he was kind enough to give me an outline of the things that are required and I
got most of it done in just one day!
Something that helped a great deal was using magic links for authentication.
Doing this means I don’t need to worry about storing passwords or handling
password resets/changes. But this wasn’t just a selfish/lazy decision. I feel
strongly that magic links are the best authentication system for an app like
mine. Keep in mind that pretty much every other app has a “magic link”-like auth
system even if it’s implicit because of the “reset password” flow which emails
you a link to reset your password. So it’s certainly not any less secure. In
fact, actually more secure because there’s no password to lose.
Oh, and before you say:
But if there’s no password, I can’t use my password manager and I’ll forget
which of my 30 email addresses I used to sign up on your site!
Your password manager can definitely store login information that has only an
email address and no password. Do that.
Ok, let’s take a look at a diagram of the authentication flow:
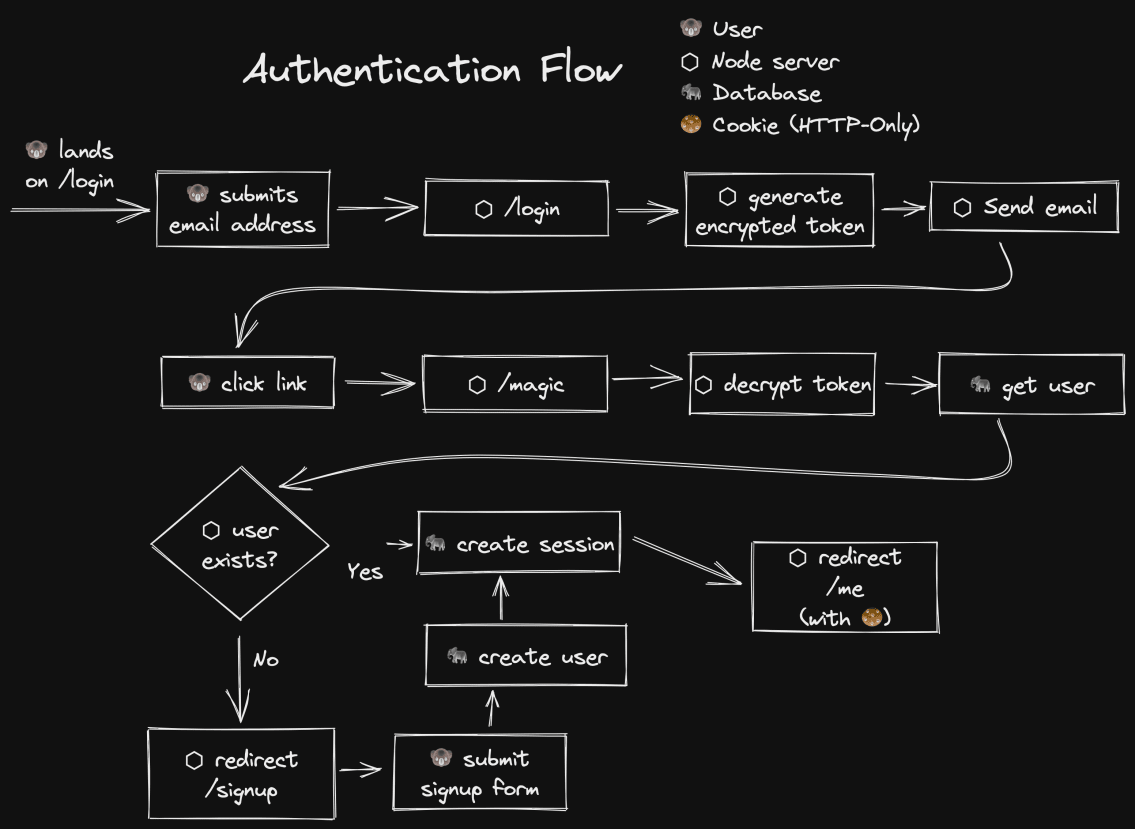
Some things I want to point out with this flow is that there’s no interaction
with the database until the user has actually signed up. Also, the flow for sign
up and login are the same. This simplifies things a fair amount for me.
Now, let’s take a look at what happens when a user navigates to an authenticated
page.
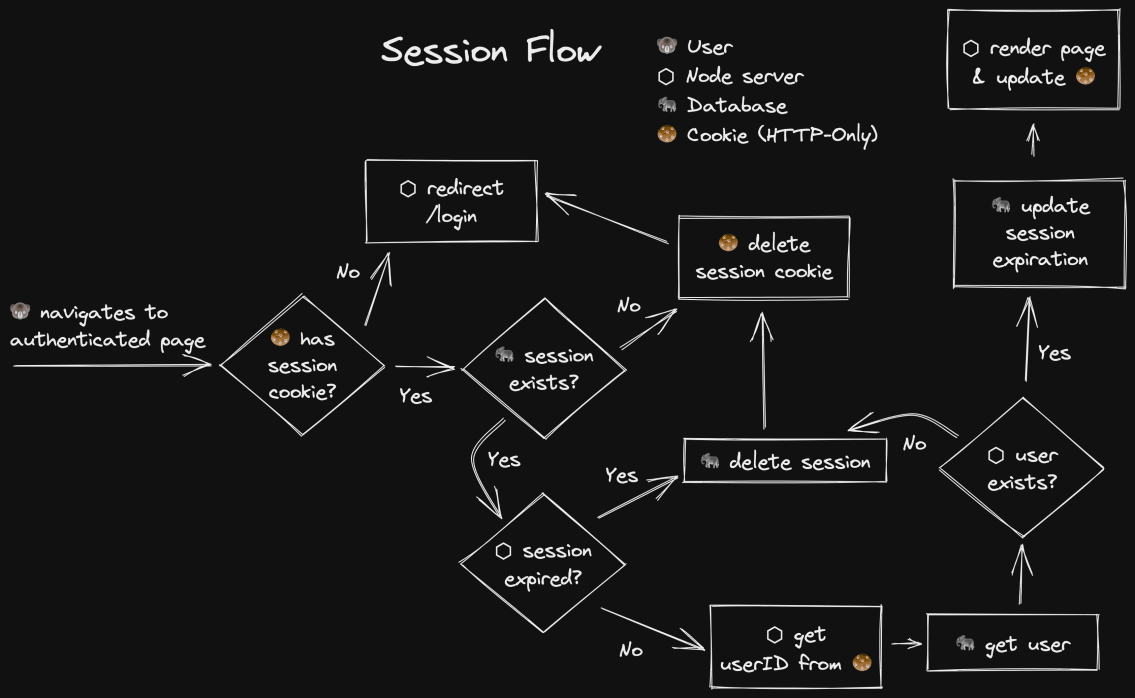
The basics of this is pretty simple:
- Get the session ID from the session cookie
- Get the user ID from the session
- Get the user
- Update the expiration time so active users rarely need to re-authenticate
- If any of these fails, cleanup and redirect
It’s honestly not as complicated as I remembered it being when I hand-rolled
authentication years ago in other apps I worked on. Remix helps make it much
easier with its cookie session abstraction.

Ok folks. Of all tools I’m using, Remix has made the biggest impact on my
productivity and the performance of my website. Remix enables me to do all this
cool stuff without over complicating my codebase.
I’m definitely going to be writing a lot of blog posts about Remix in the
future, so subscribe to keep up with that. But here’s a quick list
of why Remix has been so fantastic for me:
- The ease of communicating between the server and client. Data over-fetching
is no longer a problem because it’s so easy for me to filter down what I want
in the server code and have exactly what I need in the client code. Because
of this there’s no need for a huge and complicated graphql backend and client
library to deal with that issue (you can definitely still use graphql with
remix if you want to though). This one is huge and I will write many blog
posts about this in the coming months. - The auto-performance I get from Remix’s use of the web platform. This is also
a big one that will require multiple blog posts to explain. - The ability to have CSS for a specific route and know that I won’t clash with
CSS on any other route. 👋 goodbye CSS-in-JS. - The fact I don’t have to even think about a server cache because Remix
handles all that for me (including after mutations). All my components can
assume the data is ready to go. Managing exceptions/errors is declarative.
And Remix doesn’t implement its own cache but instead leverages the browser
cache to make things super fast even after a reload (or opening a link in a
new tab). - No worrying about a
Layoutcomponent like with other frameworks and the
benefits that offers me from a data-loading perspective. Again, this will
require a blog post.
I mention that several of these will require a blog post. Not because you have
anything to learn to take advantage of these things, but to explain to you that
you don’t. It’s just the way Remix works. I spend less time thinking about how
to make things work and more time realizing that my app’s capabilities are not
limited by my framework, but by my ✨ imagination ✨.
I can’t tell you how much I’ve learned from building this website. It’s been a
ton of fun and I’m excited to put my learnings into blog posts and workshops to
teach you the specifics of how I did this stuff so you can do it too. In fact,
I’ve already scheduled some workshops for you to attend!
Pick up tickets now. I look forward to seeing you there! Take
care, and keep up the good work.
And don’t forget, if you haven’t already read the
“Introducing the new kentcdodds.com”
post, please do give it a read!