
As web development evolves, interactive, real-time experiences are becoming a more important feature in modern web applications.
With WebSockets, developers have a powerful tool for building fast, efficient, and dynamic real-time applications. This innovative technology enables bi-directional communication between the client and server, breaking away from HTTP’s traditional request-response model.
In this article, we’ll delve into the intricacies of WebSockets, exploring its potential by building a real-time chat app with Vue. Let’s get started!
Jump ahead:
What are WebSockets?
WebSocket is a protocol for bi-directional, real-time communication between the client and the server. Introduced as part of the HTML5 specification, WebSocket has become one of the most popular methods for building real-time web applications.
Unlike traditional HTTP communication, which operates on a request-response model, WebSockets allow for continuous, two-way communication between the client and server, meaning the client can send a request to the server, and the server can send a request to the client too.
The constant flow of data between the client and the server ensures that the user experience is seamless, with updates appearing in real time instead of after refreshing the page. HTTP is also limited for loading static pages and insufficient for time-sensitive communication.
How do WebSockets work?
The WebSockets protocol operates over Transmission Control Protocol (TCP), a low-level communications protocol that provides a reliable, stream-oriented connection between two computers. Before building a WebSocket connection, you’ll have to follow several steps.
During the initial request, the client sends an HTTP request to the server with a specific header reading Upgrade: WebSocket, indicating that it wants to upgrade the connection to a WebSockets connection.
Next, during the handshake process, the server receives the initial request and checks to see if it supports WebSockets. If it does, the server sends a response with the same Upgrade: websocket header and a 101 Switching Protocols HTTP status code, indicating that the connection is being upgraded. The client and the server then exchange WebSockets handshake keys to ensure that the connection is secure.
Once the handshake process is complete and the keys match, the WebSockets connection is established, and the client and server can exchange data in both directions without needing a request-response cycle. The data is sent as packets over the underlying TCP connection. This full-duplex communication enables real-time updates and notifications.
Either the client or the server can close the WebSockets connection at any time. The WebSockets protocol provides a mechanism for gracefully closing the connection, allowing any remaining data to be sent before the connection is closed.
The WebSockets protocol is designed to work over the same ports as HTTP and HTTPS, making it easy to integrate into existing web infrastructure.
Benefits of using WebSockets
In comparison to other traditional HTTP-based communication methods, WebSockets has several benefits, offering a fast and low-latency communication method.
WebSockets eliminates the overhead associated with traditional HTTP request-response cycles, allowing for continuous, bi-directional communication over a single connection. This reduces the amount of data transmitted and the number of round trips required, improving the performance of real-time applications.
WebSockets is a standardized protocol that is supported by many modern browsers, enabling cross-browser compatibility:
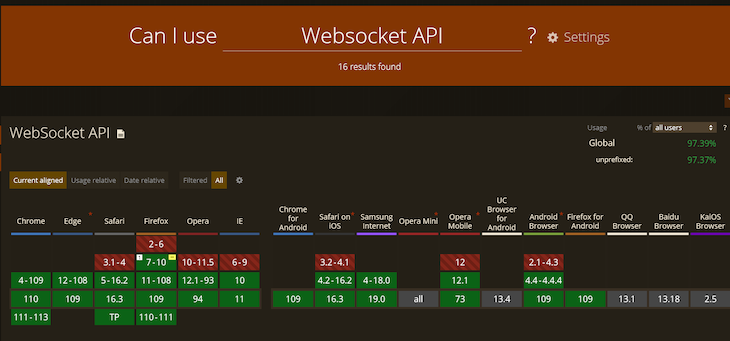
WebSockets also has an advantage over polling, in which the client continues to request new data from the server even if no new data is available. WebSockets allows for more efficient and responsive communication between the client and server, making it an ideal solution for real-time applications.
WebSockets events
To open the WebSocket connection, call the WebSocket object, as shown below:
const socket = new WebSocket(url);
Once the WebSockets connection has been created, you can trigger events in both the client and the server. We use callback functions and event listeners to listen to these events. The four main events are open, message, error, and close.
The open event is triggered when a connection is successfully established. The callback function for this event is called onopen:
socket.onopen => (){
  console.log("WebSocket connection opened:", event);
};
message is triggered when a message is received from the server. The message data can be accessed through the event.value property:
socket.onmessage => (event) {
  console.log("WebSocket message received:", event.value);
};
error is triggered when an error occurs while trying to establish or maintain a connection. The callback to the error event is onerror:
socket.onerror => (error) {
  console.log("WebSocket error:", error);
};
close is triggered when the connection is closed:
socket.onclose => (event)  {
  console.log("WebSocket connection closed:", event.code);
};
The WebSocket protocol provides several methods that you can use to perform actions on a WebSocket connection, including send() and close().
We use the send() method to send data to the server over a WebSocket connection. The data can be a string, a binary array, or a blob:
socket.send("Hello, server!");
We use the close() method to close the WebSocket connection. It takes two optional parameters, code, the status code, and reason, a text string that specifies the reason for closing the connection:
socket.close(1000, "Goodbye");
Building a real-time chat app
Now that we’re familiar with the basics of WebSockets, let’s run through a practical example with Vue. Before we get started, be sure you have the following:
- Basic knowledge of Vue and JavaScript
- Node.js and npm installed on your machine
- Any IDE of your choice
To begin setting up our development environment, we’ll need to create two separate projects, one for the client and one for the server. This separation will allow for easier management of dependencies and enable us to work on each project independently. You can access the full code on GitHub for the client as well as the server.
Creating the WebSocket server
ws is a popular Node.js WebSocket library that is simple to use and thoroughly tested for WebSocket client and server implementation.
ws provides simple and direct methods for creating WebSocket servers, handling incoming connections, and sending messages between the client and the server. It is compatible with a wide range of browsers and platforms, and it provides customization and extension options.
To set up the server-side project, first initialize a new Node.js project by running npm init and following the prompts to create a package.json file. Next, create a new file called server.js in the root of the server project directory.
You’ll need to install the ws library and Express to create the WebSocket and start the server, respectively:
npm install ws, express
We’ll use Express to create a web server instance that will handle HTTP requests and responses. This server is then passed to the WebSocket constructor to create a WebSocket server:
// Import required modules
const express = require("express");
const http = require("http");
const WebSocket = require("ws");
// Create an Express app instance
const app = express();
// Create an HTTP server using the Express app instance
const server = http.createServer(app);
// Create a WebSocket server instance and attach it to the HTTP server
const websocketServer = new WebSocket.Server({ server });
// Start the server listening on port 3000
server.listen(3000, () => {
  console.log("Websocket server started on port 3000");
});
Once we’ve set up the base of the server, we can create the WebSocket events to handle the chat application:
//Listen for WebSocket connections
websocketServer.on('connection', (socket) => {
  // Log a message when a new client connects
  console.log('client connected.');
  // Listen for incoming WebSocket messages
  socket.on('message', (data) => {

   // Broadcast the message to all connected clients
    websocketServer.clients.forEach(function each(client) {
      if (client !== socket && client.readyState === WebSocket.OPEN) {
        client.send(data.toString());
        // console.log("message",data.toString())
      }
    });
  });
  // Listen for WebSocket connection close events
  socket.on('close', () => {
    // Log a message when a client disconnects
    console.log('Client disconnected');
  });
});
The code above sets up a simple WebSocket server that can handle incoming connections, messages, and disconnections. When a client sends a message, the server broadcasts the message to all the connected clients except the sender.
Building the frontend
To set up the client side of the application, we’ll use Vue to develop the user interface and then connect to the WebSocket server using the native WebSocket object.
The WebSocket API provides a set of methods and events that allow us to work with WebSockets on the client. These include the WebSocket() constructor, which creates a new WebSocket object and establishes a connection to the specified URL, the send() method, which sends data to the server, and the onopen, onmessage, onerror, and onclose events, which handle connection status and incoming data:
const socket = new WebSocket('ws://localhost:3000')
The code above initializes the object of the WebSocket, and then passes the URL to where your server is hosted.
For the chat application, we’ll create a simple UI that starts off with a modal to save the user’s name, then displays a page with an input box for the messages that would be sent between the client and the server.
First, create a new project using the Vue CLI by running the following command:
vue create socket-chat
To organize the project, we’ll create a separate chat component, then paste the code below to define the template structure of the page:
<template>
  <div class="chat-container">
    <!-- Name Input window -->
    <div v-if="!connect">
        <div class="modal-background">
          <div class="modal-content">
            <form @submit.prevent="handleSubmit">
              <h3> Enter your name to start chatting </h3>
              <input type="text" v-model="username" placeholder="Enter your name" />
              <br>
              <button type="submit"> Connect </button>
            </form>
          </div>
        </div>
      </div>
    <div v-if="connect" class="chat-window">
      <div class="messages-container">
        <!-- <ul> -->
          <!-- Use a v-for directive to iterate over the messages array and display each message -->
          <div v-for="(val, index) in messages" :key="index" :class="[val.username === username ? 'left-bubble' : 'right-bubble']">
              <!-- Use mustache syntax to interpolate the username and message properties of each message object -->
              <b>{{ val.username }}</b>: <em>{{ val.message }}</em>
          </div>
        <!-- </ul> -->
      </div>
      <div class="chat-input">
          <form @submit.prevent="handleMessageSubmit(username,text)">
          <!-- Use v-model directive to bind the text input to the 'text' variable -->
          <input type="text" v-model="text" placeholder="Write message..." />
          <button type="submit"><i class="bi bi-send "></i> </button>
          </form>
      </div>
    </div>
  </div>
</template>
To add functionality to the app, we’ll use three main functions. For one, the handleConnect function checks if the user has entered a name, then assigns connect to true:
const handleConnect = () => {
  if(username.value.length > 0) {
    connect.value = true
  }
}
SendMessage stores the username and text in an object, then sends the object to the server using the send method. It also converts the object to a string using the JSON.stringify() method:
 const sendMessage = (username,text) => {
        const messageData = { username: username, message: text};
        // Send the message data to the server using WebSockets
        socket.send(JSON.stringify(messageData))
        // Add the message data to the messages array
        messages.value.push(messageData)
      }
To get messages from the server, we‘ll use the onmessage event, then convert the string data back to the JavaScript object using the JSON.parse() method:
      socket.onmessage = (event) => {
        const message = JSON.parse(event.data);
        messages.value.push(message);
      }
And with that, we’ve successfully built a real-time chat application that can send messages between multiple clients:
Conclusion
In this article, we explored WebSockets by building a Vue chat application that provides a seamless and fast user experience, allowing users to communicate with each other in real time. You can also build on this example to add any modifications or new features. If you have any questions, feel free to reach out to me on Twitter or leave a comment below. Happy coding!
Experience your Vue apps exactly how a user does
Debugging Vue.js applications can be difficult, especially when there are dozens, if not hundreds of mutations during a user session. If you’re interested in monitoring and tracking Vue mutations for all of your users in production, try LogRocket.  https://logrocket.com/signup/
LogRocket is like a DVR for web and mobile apps, recording literally everything that happens in your Vue apps including network requests, JavaScript errors, performance problems, and much more. Instead of guessing why problems happen, you can aggregate and report on what state your application was in when an issue occurred.
The LogRocket Vuex plugin logs Vuex mutations to the LogRocket console, giving you context around what led to an error, and what state the application was in when an issue occurred.
Modernize how you debug your Vue apps – Start monitoring for free.