This article explores how to combine the power of TypeScript and the speed of Vite to build a modern, scalable, and efficient web application.
TypeScript is a statically-typed superset of JavaScript that provides optional type annotations, making it easier to write robust, scalable, and maintainable code. Meanwhile, Vite is a fast and lightweight build tool for modern web development, providing a quick development experience focused on speed and simplicity.
In this guide, we’ll walk through setting up a new project, adding TypeScript support, and utilizing Vite’s features to improve the development experience.
Whether you’re a seasoned web developer or just starting out, I think you’ll find this article valuable for learning how to build a TypeScript app with Vite. So, grab a cup of coffee, and let’s get started!
Jump ahead:
Prerequisites
For the hands-on demonstration portion of the article, ensure you have Node.js 18 or later installed.
Unique features of Vite
Vite offers many unique features that set it apart from other build tools and make it an excellent choice for web development. Let’s take a look at some of Vite’s special features:
- Instant reloading: Vite offers instant reloading, meaning that changes made to the code are immediately reflected in the browser without needing a full page reload. This speeds up the development process and makes testing and debugging code easier
- Optimized build times: Vite is optimized for fast build times, focusing on minimal overhead. It uses in-memory caching and fast incremental builds to minimize the time required to compile and build the application. This results in shorter build times and a more efficient development experience
- Efficient code splitting: Vite uses efficient code splitting to ensure that the user only downloads the code required for the current page, resulting in faster load times and a better user experience. This is especially important for large and complex applications, where load times can become bottlenecks
- Fast and lightweight: Vite is designed to be fast and lightweight, making it an excellent choice for small and large applications alike. It requires minimal setup and configuration and is easy to use and understand, even for beginners
- Native ES module support: Vite supports the native ES module (ESM) format, the modern standard for JavaScript modules. This allows for faster and more efficient loading of modules and provides a cleaner and more maintainable codebase
Why combine TypeScript and Vite?
TypeScript and Vite are two powerful tools that have gained widespread popularity in the web development community. While TypeScript provides type safety and a strong foundation for building scalable applications, Vite offers a fast and efficient development experience. So, why combine these two technologies? Let’s take a look.
Improved type safety
TypeScript provides optional type annotations that can catch type-related errors during development. This helps developers to write more robust and maintainable code and reduces the likelihood of bugs and unexpected behavior. With TypeScript and Vite, developers can ensure the code they write is high quality and free from type-related errors.
Faster development experience
Vite was designed with speed and simplicity in mind. It offers instant reloading and optimized build times, making developing web applications more accessible and efficient. By combining TypeScript with Vite, developers can take advantage of TypeScript’s robust type system and Vite’s fast development experience for a more enjoyable and efficient development process.
Scalable and maintainable code
TypeScript is a statically-typed language that supports modern JavaScript features and is widely used in large-scale projects. By combining TypeScript with Vite, developers can write scalable and maintainable code that is easy to understand and modify over time.
Improved performance
Vite is optimized for fast build times and minimal overhead, making it an excellent choice for large and complex applications. This results in improved performance and shorter load times for the end user. By combining TypeScript and Vite, developers can build high-performance web applications that deliver a fast and smooth user experience.
Creating a Vite project
Now that we understand more about the powerful combination of TypeScript and Vite, let’s dive into the demo portion of this tutorial.
Let’s start by creating a Vite project by running the following command in the terminal:
npm create vite@latest
This command will prompt you to choose a name for your project. Feel free to choose any name; then press Enter to continue. For this demonstration, we’ll use the project name “vite-ts-app”.
Next, you’ll be asked to select a framework for your Vite project. Vite provides a variety of frameworks that may be used for an application: React, Vue.js, Lit, Preact, Vanilla JavaScript, and Svelte. For this demo, we’ll select React.
Lastly, you’ll be prompted to choose a variant for your application. For this demo, we’re building a TypeScript app with Vite, so we’ll select TypeScript.
Here are our selections for the Vite project prompts:
Project structure
After processing the project information we just submitted, Vite will generate the project’s folder structure:
 vite-ts-app
┣  public
┃ ┗  vite.svg
┣ src
┃ ┣ assets
┃ ┃ ┗ react.svg
┃ ┣ App.css
┃ ┣ App.tsx
┃ ┣ index.css
┃ ┣ main.tsx
┃ ┗ vite-env.d.ts
┣ .gitignore
┣ index.html
┣ package-lock.json
┣ package.json
┣ tsconfig.json
┣ tsconfig.node.json
┗ vite.config.ts
Here are the key files from the vite-ts-app project folder:
index.html: The main file, typically found in a public directory in a Vite projectmain.tsx: Where the code for producing the browser output is executed; this file is common for Vite projectsvite.config.json: The configuration file for any Vite project
Running the application
We’ve completed the prompts to create a Vite project. Now, let’s cd into the project folder and use the below commands to run the application:
cd vite-ts-app
npm install
npm run dev
To confirm that the application is running, check the terminal — you should see the following:

Press the o key to open the application in your web browser:
Building a blog application
With the Vite app up and running in our web browser, let’s create a blog application using Vite and the React framework that renders some static blog data from a JSON file.
To get started, let’s update the code in the App.tsx file to add a navbar to the application’s UI:
import './App.css'
function App() {

 return (
  <div className="App">
   <div className="navbar">
    <ul>
     <li>Home</li>
     <li>Blog</li>
    </ul>
   </div>
  </div>
 )
}
export default App
Next, let’s update the App.css file to add some new styles to the application:
* {
 padding: 0px;
 margin: 0px;
 box-sizing: border-box;
}
.navbar {
 background-color: rgb(50, 47, 47);
 color: white;
 padding: 10px;
}
.navbar ul {
 display: flex;
 width: 600px;
 margin: 0px auto;
 font-size: 14px;
 list-style: none;
}
.navbar ul li {
 margin: 10px;
}
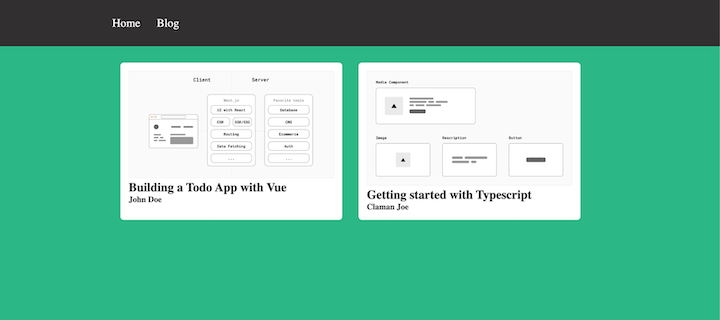
The application’s resulting user interface will look like this:
![]()
Creating the blog data
Next, we’ll need to add data to our blog application. Let’s create a blog.json file in the project’s root directory and add the following data:
[
 {
  "id": 1,
  "title": "Building a Todo App with Vue",
  "cover": "https://nextjs.org/static/images/learn/foundations/next-app.png",
  "author":"John Doe"
 },
 {
  "id": 2,
  "title": "Getting started with TypeScript",
  "cover": "https://nextjs.org/static/images/learn/foundations/components.png",
  "author":"Claman Joe"
 }
]
Here we defined some arrays of blog objects, which we’ll render in our Vite app’s UI.
Creating a blog component
Now, let’s create a components folder in the src directory. Then, we’ll create a Blog.tsx file and add the below snippet:
import blogData from '../../blog.json'
type Blog = {
  id: number,
  title: string,
  cover: string,
  author: string
}
export function Blog() {
  return (
    <div className="container">
      <div className="blog">
        {blogData.map((blog: Blog) =>
          <div className="card" key={blog.id}>
            <img src={blog.cover} alt="" />
            <div className="details">
              <h2>{blog.title}</h2>
              <h4>{blog.author}</h4>
            </div>
          </div>
        )}
      </div>
    </div>
  )
}
This code defines a function that returns a container for blog posts that includes a list of blog cards. Each card displays the title, cover image, and blog post’s author. The code uses a map function to loop through a blogData array and create a card for each item.
Next, let’s update the App.css file to style the Blog component:
.App {
 background: rgb(44, 183, 134);
 height: 100vh;
}
.container {
 width: 600px;
 margin: 0px auto;
}
.container .blog {
 display: flex;
 padding: 10px;
}
.container .card {
 background-color: white;
 margin: 10px;
 padding: 10px;
 border-radius: 4px;
 width: 50%;
 font-size: 10px;
 color: rgb(50, 47, 47);
}
.container .card img {
 width: 100%;
}
Lastly, let’s update the App.tsx component to import and render the Blog component:
import './App.css'
import { Blog} from './components/Blog'

function App() {

 return (
  <div className="App">
   <div className="navbar">
    <ul>
     <li>Home</li>
     <li>Blog</li>
    </ul>
   </div>
    <Blog />
  </div>
 )
}
export default App
We’ve successfully created a blog application using TypeScript and Vite!
Performance comparison: CRA vs. Vite
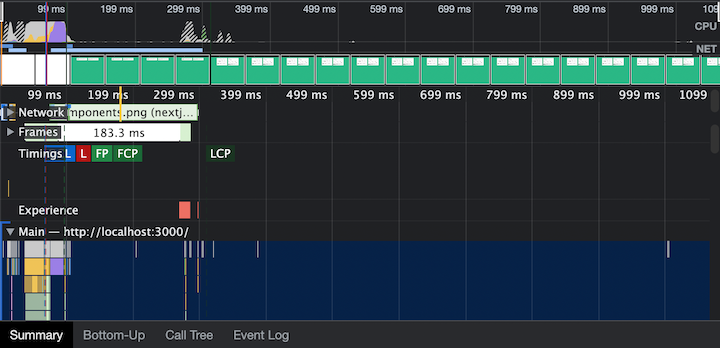
To compare the startup time of a Vite app to an app built with an alternative, like Create React App (CRA), we’d need to build and test both apps under similar conditions. To demonstrate this, I built the same demo application that we just created in this tutorial, except I used CRA. Then, I used the performance inspection feature in Chrome DevTools to test the start time for each version of the app.
Here’s the performance result for the TypeScript app built with CRA; the startup time was 99ms:
And here’s the performance of the TypeScript app built with Vite; the startup time was 42ms:
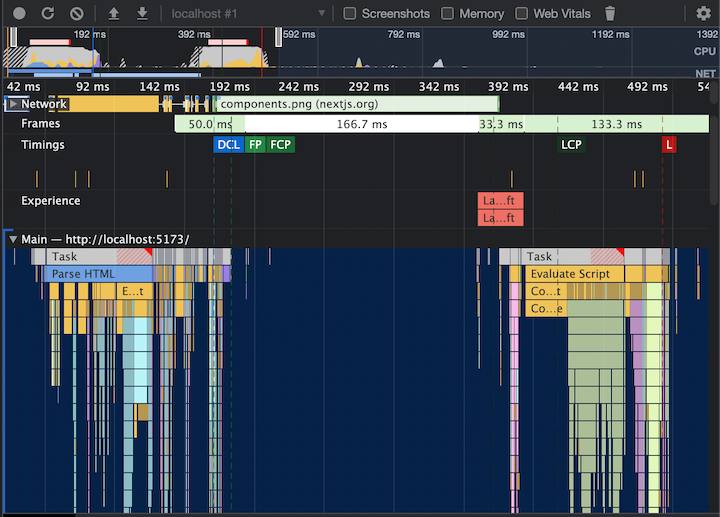
In our test, the TypeScript application built with Vite started 58% faster than the TypeScript application built with CRA.
In this article, we discussed the many benefits of combining TypeScript and Vite, demonstrated how to build a simple TypeScript blog application with Vite, and then compared the performance of our app with that of a TypeScrtipt app built with CRA.
TypeScript and Vite offer several advantages for web development, including improved type safety, faster development experience, scalable and maintainable code, and improved performance. Vite’s focus on speed, efficiency, and simplicity helps deliver high-quality, performant web applications. The combination of TypeScript and Vite affords developers of all levels an excellent choice for building high-quality and performant web applications.
I hope you got value from this tutorial. Happy coding!
The post How to build a TypeScript app with Vite appeared first on LogRocket Blog.
from LogRocket Blog https://ift.tt/qXbfRoH
Gain $200 in a week
via Read more
Source link