NestJS interceptors are class-annotated with injectable decorators and implement the NestInterceptor interface. This interface has two methods: intercept and handleRequest. The intercept method is called before sending the request to a controller, while the handleRequest method is called after the request has been processed by the controller and a response is returned.
In this article, we will look at what NestJS interceptors are, how to use them, and some use cases for them.
Jump ahead:
What are NestJS interceptors?
Interceptors are the most powerful form of the request-response pipeline. They have direct access to the request before hitting the route handler. We can mutate the response after it has passed through the route handler. To get a better understanding of what these interceptors are, let’s take a look at the diagram below:
The diagram above is a typical request-response diagram of how users or clients interact with a server. Let’s say a client makes a request to the Nest API endpoint. That will then process that request and send back a response to the client. An interceptor is what lies between the request and the response. For example, we can create an interceptor so that when a client makes a request to the server, it will be intercepted by the interceptor before the request reaches the server.
In the interceptor, we can do any processes and modify the request before it’s sent to the server. We can also set up the interceptor to intercept the response before being sent back to the client.
Exploring the intercept method, ExecutionContext, and CallHandler
The intercept method is a method that implements a custom interceptor. It takes in two arguments, namely: ExecutionContext and CallHandler. The ExecutionContext is an object that provides methods to access the route handler and class that can be called or invoked. The CallHandler is an interface that provides access to an Observable, which represents the response stream from the route handler.
Creating a custom interceptor
To start, create a project from our terminal with the nest new interceptors command. This will bootstrap our NestJS project:

Inside the app.servive.ts, implement a User interface, as shown below:
export interface User {
 id: number;
 first_name: string;
 last_name: string;
 email: string;
}
Then, rename the getHello method (default) to getUsers. This will return an array of the Users object. Here’s what that looks like:
import { Injectable } from '@nestjs/common';

export interface User {
 id: number;
 first_name: string;
 last_name: string;
 email: string;
}
@Injectable()
export class AppService {
 getUsers(): User[] {
   return [
     {
       id: 1,
       first_name: 'John',
       last_name: 'Doe',
       email: 'John@gmail.com',
     },
     {
       id: 2,
       first_name: 'Bod',
       last_name: 'Madley',
       email: 'todd@gmail.com',
     },
   ];
 }
}
Now, inside the app.controller.ts, we have a getHello method that calls the getUsers function in the app.service.ts by default. We’ll change the name to getUsers as well:
import { Controller, Get} from '@nestjs/common';
import { AppService, User } from './app.service';

@Controller()
export class AppController {
 constructor(private readonly appService: AppService) {}

 @Get()
 getUsers(): User[] {
   return this.appService.getUsers();
 }
}
Let’s call this endpoint in our Postman and see the response we get back:
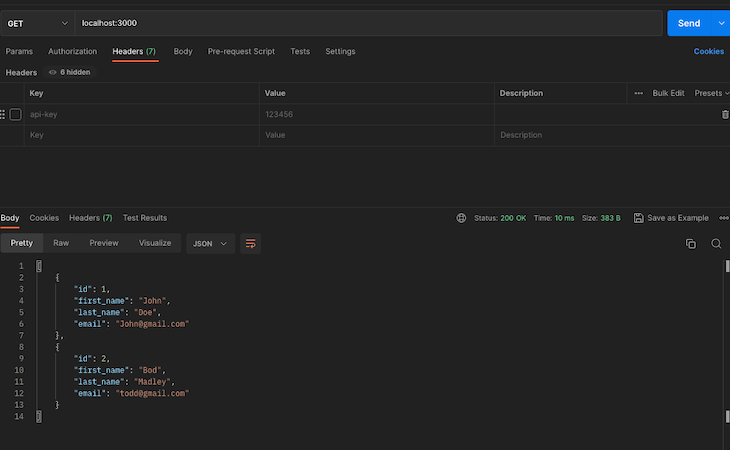
The endpoint returns an array of two objects as specified in the app.service.ts. Now, say we want to modify the response sent to the user from this endpoint by changing the first_name and last_name snake case to CamelCase. We can use a custom interceptor to achieve this.
Let’s build a simple custom interceptor and see how to use it in NestJS applications. Create a file in the src folder called custom.interceptors.ts. The interceptor will be created using a class that will implement a NestInterceptor. Then, the intercept method will be implemented. This method will take the two params mentioned earlier (ExecutionContext and Handler).
Then, create a folder in the src folder named interceptors. After that, create a file called custom.interceptor.ts, where we will create our custom interceptor.
Here’s the code:
import { CallHandler, ExecutionContext, NestInterceptor } from '@nestjs/common';
import { map, Observable } from 'rxjs';
import { User } from 'src/app.service';

export class CustomInterceptors implements NestInterceptor {
 intercept(context: ExecutionContext, handler: CallHandler): Observable<any> {
   console.log('Before...');
   return handler.handle().pipe(
     map((data) =>
       data.map((item: User) => {
         console.log('After....');
         const res = {
           ...item,
           firstName: item.first_name,
           lastName: item.last_name,
         };
         delete res.first_name, delete res.last_name;
         return res;
       }),
     ),
   );
 }
}
Here, we are implementing a custom interceptor that intercepts the response sent back to a client when it makes a request to the endpoint at http://localhost:3000/.
Normally, the response sent back looks like this format:
[

{
   "id": 1,

   "first_name": "John",

   "last_name": "Doe",

   "email": "John@gmail.com"

},

{
   "id": 2,

   "first_name": "Bod",

   "last_name": "Madley",

   "email": "todd@gmail.com"

}

]
However, we do not want to send the data back to the client in this format. We want to modify the response to have a CamelCase name instead of the first_name and last_name. First, as previously explained, we implement the intercept method using the context and handler params.
Logging texts
In the code above, we logged a "Before.." text where the interception occurs when the client makes the request before reaching the API endpoint/server. Then, we called the handler.handle method to trigger the execution of the controller. We also used the Interceptors on the pipe method. This processes any additional modifications before the response is returned to the client. Inside the handler.handle method, we used the map operator to transform the returned data.
We also mapped over the array of data and logged an "After" text. This is where the interceptor occurs when sending back the data to the client. From there, we took the item (each User object) from the map method and stored it in a variable res. This is where we spread the values in the object and add the CamelCase transformation we want to achieve for first_name and last_name.
Then, we used the delete operator to remove the initial first_name and last_name values from the transformed object. Lastly, we needed to bind this custom interceptor to the controller that returns this data for our response to be properly transformed. We do the binding in the app.controller.ts as follows:
@Get()
 @UseInterceptors(CustomInterceptors)
 getUsers(): User[] {
   return this.appService.getUsers();
 }
Now, let’s rerun the request and see the response we get back:
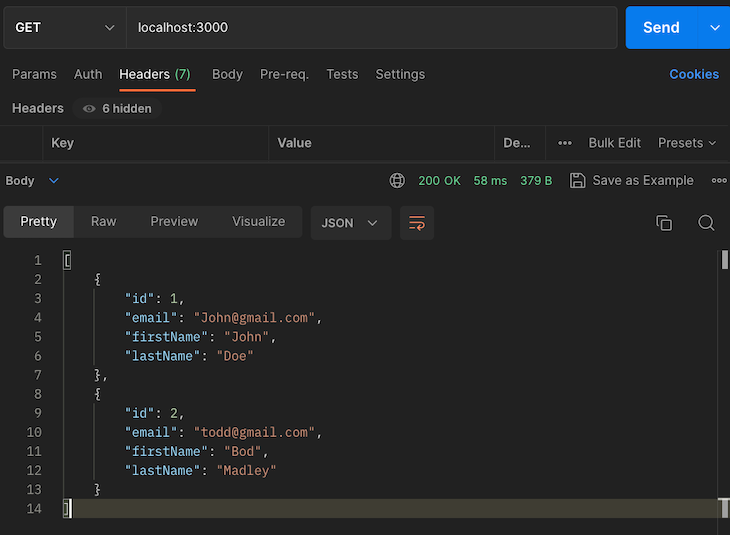
Here, we can see that when we make the request to that endpoint, we get transformed data, the firstName and lastName. This better explains the concept of interceptors. The client makes the request to the endpoint, then before the response is sent back, we intercept it and transform it to return a data type we wanted.
Binding interceptors in NestJS
As we saw in the previous section, to set up our custom interceptor, we used the @UseInterceptors() decorator that applies the interceptor to that specific route (getUsers). So, if we have another route with getReports, the interceptor will not be applied because we only specified it to apply to a particular route. Like NestJS guards and pipes, interceptors can also be global-scoped, controller-scoped, or method-scoped.
To implement the interceptor to apply to each route handler defined in a controller (controller-scoped), we will define it above the controller itself, as follows:
@Controller()
@UseInterceptors(CustomInterceptors)
export class AppController {
 constructor(private readonly appService: AppService) {}

 @Get()
 getUsers(): User[] {
   return this.appService.getUsers();
 }

@Get('/reports')
 getReports(): Reports[] {
   return this.appService.getReports();
 }
}
Now, when we make a request to either the "https://247webdevs.blogspot.com/" route or the "/reports", the interceptor will always transform the response to the specified logic in the interceptor.
To set up a global interceptor, we will use the useGlobalInterceptors method in the main.ts file, as shown below:
import { NestFactory } from '@nestjs/core';
import { AppModule } from './app.module';

async function bootstrap() {
 const app = await NestFactory.create(AppModule);
 // global scoped interceptor
 app.useGlobalInterceptors(new CustomInterceptors());
 await app.listen(3000);
}
bootstrap();
With this, the CustomInterceptor will be applied across the entire application for all the controllers and router handlers. However, if we register our CustomInterceptor globally, we will not be able to inject any dependencies which are defined within a modular scope. To solve this, we can register our interceptor within a scoped module, as shown below:
import { Module } from '@nestjs/common';
import { APP_INTERCEPTOR } from '@nestjs/core';
import { AppController } from './app.controller';
import { AppService } from './app.service';
import { CustomInterceptors } from './interceptors/custom.interceptor';

@Module({
 imports: [],
 controllers: [AppController],
 providers: [
   AppService,
   {
     provide: APP_INTERCEPTOR,
     useClass: CustomInterceptors,
   },
 ],
})
export class AppModule {}
NestJS interceptors use cases
Logging
NestJS interceptors can be used for logging. Developers often need to track their Nest applications’ requests and responses. This is useful for debugging purposes and monitoring the performance of the application. Now, let’s create a logger interceptor to log a client’s request method, the URL.
Here’s the code:
import {
 CallHandler,
 ExecutionContext,
 Logger,
 NestInterceptor,
} from '@nestjs/common';
import { Observable, map } from 'rxjs';

export class LoggerInterceptor implements NestInterceptor {
 intercept(context: ExecutionContext, next: CallHandler): Observable<any> {
   console.log('Before...');

   const req = context.switchToHttp().getRequest();
   const method = req.method;
   const url = req.url;
   console.log(`Method: ${method}, URL: ${url}`);
   const now = Date.now();
   return next.handle().pipe(
     map((data) => {
       Logger.log(
         `${method} ${url} ${Date.now() - now}ms`,
         context.getClass().name,
       ),
         console.log('After...');
       return data;
     }),
   );
 }
}
Then, we use it in our app.module.ts file, as shown below:
 @Get('/logger')
 @UseInterceptors(LoggerInterceptor)
 getUsersLogger() {
   return 'Request Logged';
 }

When we call this logger endpoint and check our terminal, we will see the logs of the request method (GET). We will see the URL that was called (/logger). We will also see the in-built logger method logging the time it takes for the request to be completed (2ms) in the map operator. Having the data on how long it takes the client to make a complete request to an endpoint can be useful for application performance and debugging purposes.
Data validation
Remember we mentioned that we could intercept the client request before it gets to the server and the response is processed? Well, a good use case of this is data validation. Let’s say we have a POST route handler that saves the details of a user into a database. We can use an interceptor to intercept the client request and ensure it meets our predefined criteria. Say we want first_name and last_name to be compulsory for users that call the POST endpoint.
Before the request is processed and saved to the database, we can make the interceptor enforce the client to ensure they enter the first_name and last_name. Only when this criterion is met can the request proceed to be processed. We will create a new data-validation.interceptor.ts file and do the implementation there:
import {
 NestInterceptor,
 ExecutionContext,
 CallHandler,
 BadRequestException,
} from '@nestjs/common';
import { Observable, map } from 'rxjs';

export class DataValidationInterceptor implements NestInterceptor {
 intercept(context: ExecutionContext, handler: CallHandler): Observable<any> {
   const req = context.switchToHttp().getRequest();
   if (!req.body.first_name || !req.body.last_name) {
     throw new BadRequestException(
       'Both First Name and Last Name are required',
     );
   }

   const { first_name, last_name } = req.body;

   return handler
     .handle()
     .pipe(map((data) => ({ data, first_name, last_name })));
 }
}
Here, we get the req object using the context.switchToHttp().getRequest() method. In the request object, we have access to the request body object, where we make our validation check. If there is no first_name or last_name in the request body, then the request should not be processed, and a Bad Request error should be thrown telling the client to enter both first_name and last_name.
Furthermore, if the request body contains both values, the request should be processed without error. Now, let’s bind this interceptor to our Post route in the app.controller.ts file:
@Post('/validation')
 @UseInterceptors(DataValidationInterceptor)
 getUsersValidation() {
   return 'Data Validated';
 }
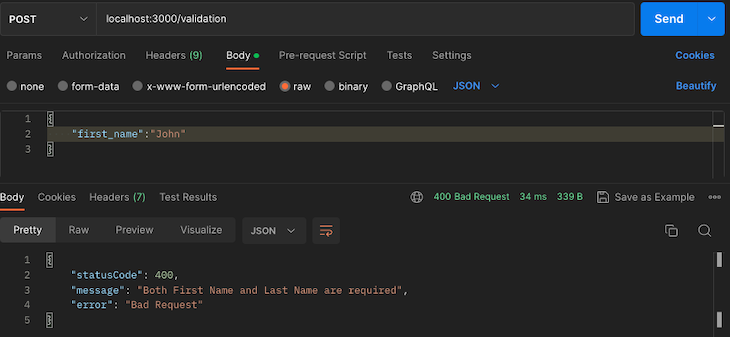
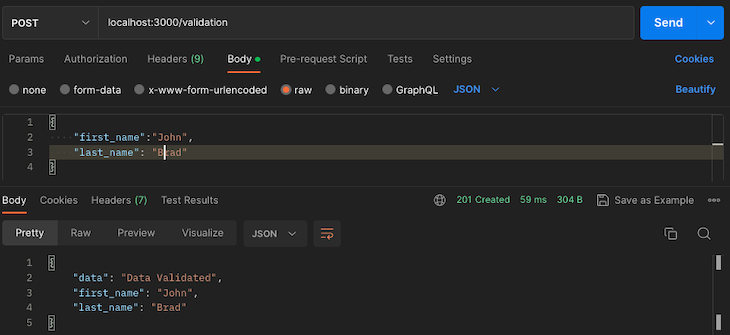
Here, we can see that when we make the request in the first image, a 400 bad request error is thrown. This error message clearly states that we need to pass in the first_name and last_name. When both fields were passed in the second image, the request was processed, and a success response was returned. This is how we can use interceptors for data validation in NestJS applications.
Authentication and authorization
The third use case of interceptors is authorization and authentication. When building backend applications, we often want to protect the routes in our application so that only authorized data can use or call the endpoints. To implement an Auth Interceptor in NestJS, we will create a new file in the interceptors folder called auth.interceptors.ts and implement it as follows:
import {
 CallHandler,
 ExecutionContext,
 NestInterceptor,
 UnauthorizedException,
} from '@nestjs/common';
import { Observable } from 'rxjs';

export class AuthInterceptor implements NestInterceptor {
 intercept(context: ExecutionContext, handler: CallHandler): Observable<any> {
   const req = context.switchToHttp().getRequest();
   const authHeader = req.headers.authorization;
   const token = authHeader && authHeader.split(' ')[1];

   console.log('token', token);
   console.log('auth', authHeader);
   if (!token) {
     throw new UnauthorizedException('No token provided');
   }
   return handler.handle();
 }
}
Like the data validation use case where we can access the body of a request from the request object, we can also access the request header from the request object. First, we get the request from the context method and then store the request header authorization value present in any incoming request in a token variable.
Afterward, we check if there is no token in the authorization header. Then, we throw an UnauthorizedExecption error, which means the user is not authorized. If there is a valid token, then the request is processed.
Let’s bind this interceptor in our controller file and see how it works. Of course, it is an auth interceptor. It will only make sense if we use the controller-scoped method of binding. So, the auth will be applied to any route called within this controller, as shown below:
@Controller()
@UseInterceptors(AuthInterceptor)
export class AppController {
 constructor(private readonly appService: AppService) {}
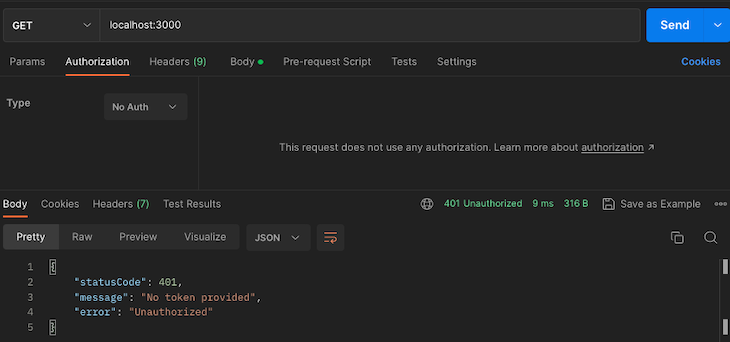
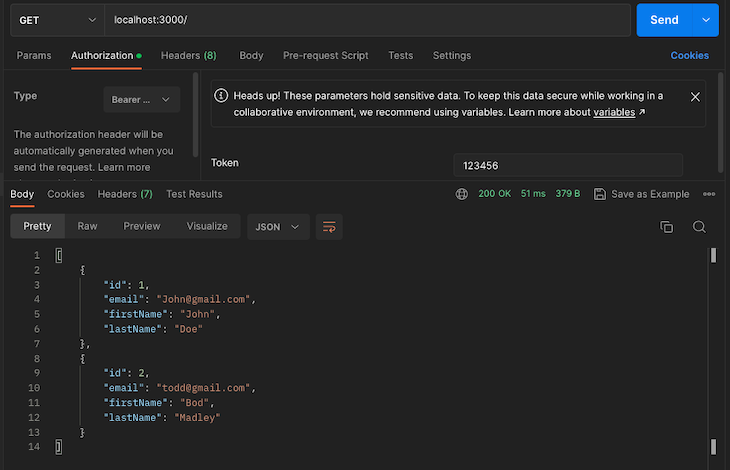
Here, we are making an API call to the getUsers route. When we provided no auth in the first illustration, it threw an unauthorized error. However, after passing in a bearer token in the authorization header, we returned our normal response.
Exception mapping
Another use case of NestJS interceptors is exception mapping. This is basically overriding the predefined exceptions using the RxJS operator called catchError(). Here’s what that looks like:
import {
 BadRequestException,
 CallHandler,
 ExecutionContext,
 NestInterceptor,
} from '@nestjs/common';
import { catchError, throwError } from 'rxjs';

export class ExceptionInterceptor implements NestInterceptor {
 intercept(context: ExecutionContext, handler: CallHandler): any {
   return handler
     .handle()
     .pipe(catchError((err) => throwError(() => new BadRequestException())));
 }
}
Here’s the code for App.module.ts:
 @Get('/exception')
 @UseInterceptors(ExceptionInterceptor)
 getUsersException() {
    throw new UnprocessableEntityException();
 }

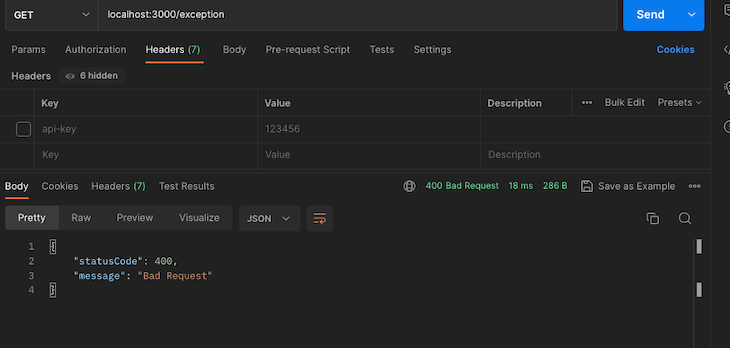
The first illustration shows that the getUsersException method throws an Unprocessable entity error when called. We can override the default exception thrown with exception mapping, as shown in the second illustration.
Conclusion
In this tutorial, we have learned what interceptors are in NestJS, how powerful they are to the request-response cycle, and their use cases when building a NestJS application. With interceptors, you can make your applications more scalable and efficient and ensure that the application data is secured and consistent. You can find the source code used in this article here.
The post NestJS interceptors: Guide and use cases appeared first on LogRocket Blog.
from LogRocket Blog https://ift.tt/yFROT9P
Gain $200 in a week
via Read more
Source link