Using React Context
By Jeff Schuman
Developers new to React have a tendency to over-use property propagation to nested child components. The term for this is prop drilling. Prop drilling is generally frowned upon as it inhibits clean, reusable, and DRY code.
One alternative to prop drilling is using the React Context API. Context allows for the sharing of data in a component hierarchy without passing the data down to each component through properties. This article will give you an overview of the Context API through an example.
A typical use case for Context is application theming. For our example, we’ll give our user the ability to easily enlarge the text for each UI widget. Here’s what our final product looks like:
By selecting the dropdown (currently set to ‘Normal’), the user can increase the size of the elements inside the box. Other options include ‘Enlarged’ and ‘Gigantic.’
Here’s a breakdown of the various React components discussed below:
The first step in using React Context is to create the Context itself. It is generally a good idea to use a separate module to create the context so it can be reused. Here is our simple ThemeContext.js file:
Note that we are using the React API createContext() function and initializing it with a null value. Later, we will ensure that the context has valid data.
In our AppContainer component, we’ll create a state to capture the current theme. This state can be changed by manipulation of the dropdown.
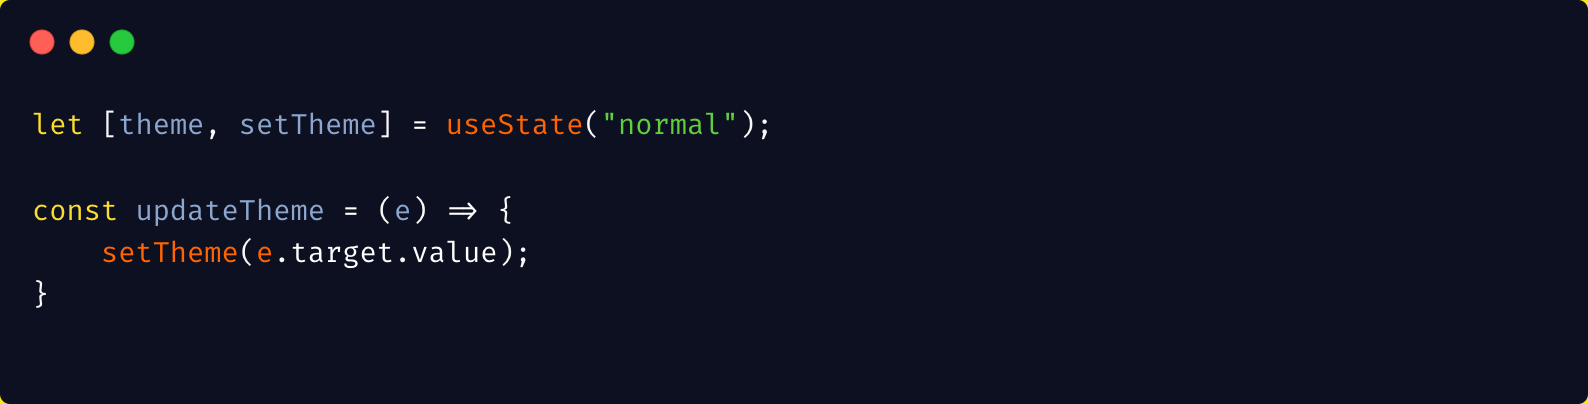
The theme state is defined and updated.
The dropdown updates the theme state value.
Next, we need to provide our context to a set of components. We do this by importing the context and then using its Provider to encapsulate the components that have access to the Context data.
We import the ThemeContext from our context module and then use the ThemeContext.Provider component to wrap the components that have access to the context. NOTE that we set the value of the context to our theme state data by using the value prop of the Provider component.
Let’s take a look at how we can now read the context data in a component within the Provider’s hierarchy.
Our UserList component is fairly simple:
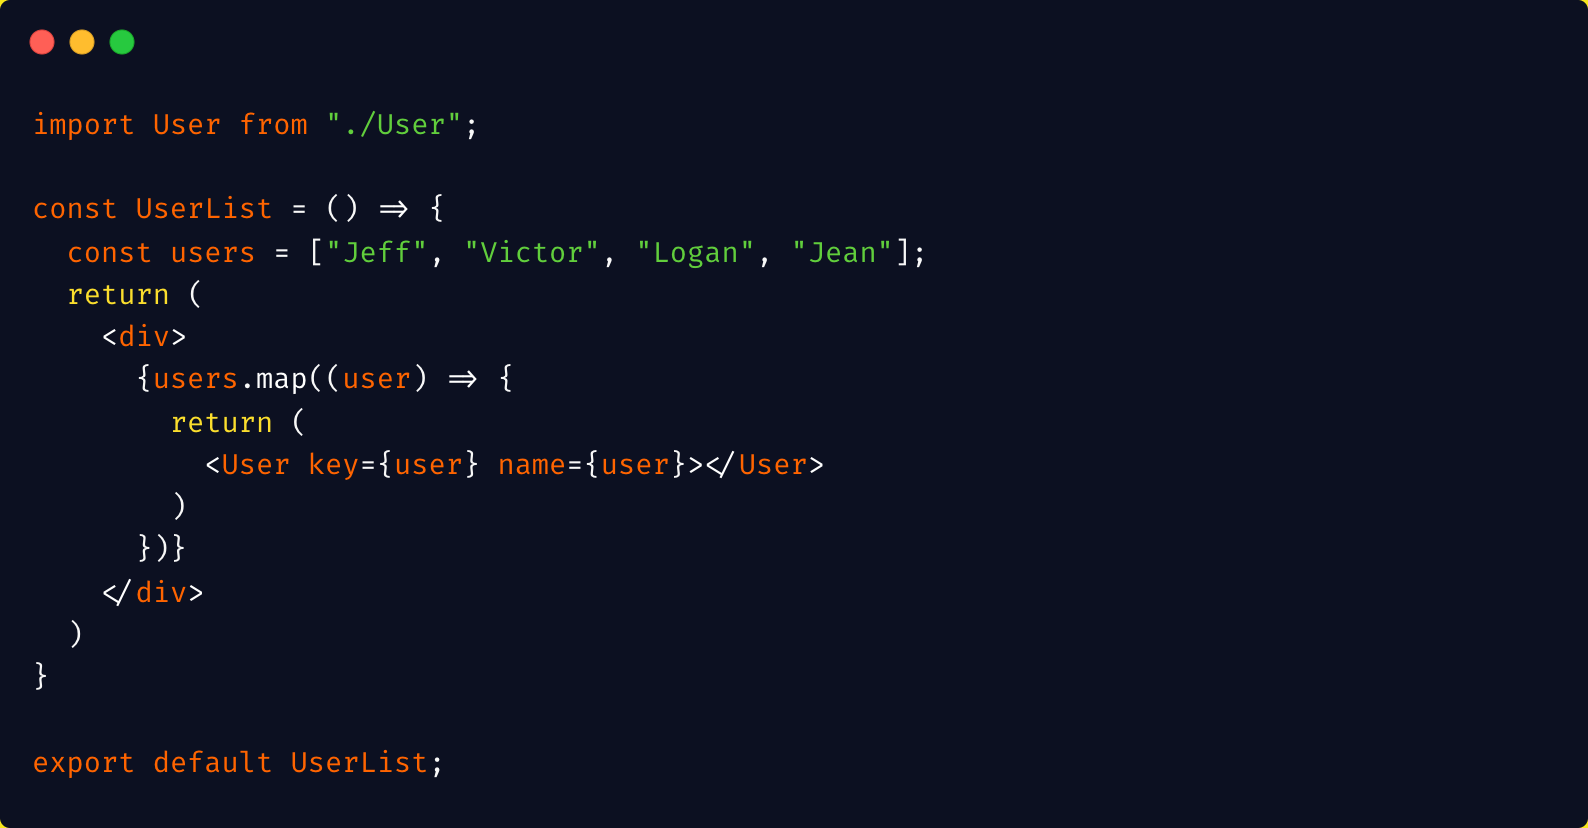
Note that we are not using Context in any way in this component. It simply instantiates a list of User names and then creates a User component for each user.
Here is the User component:
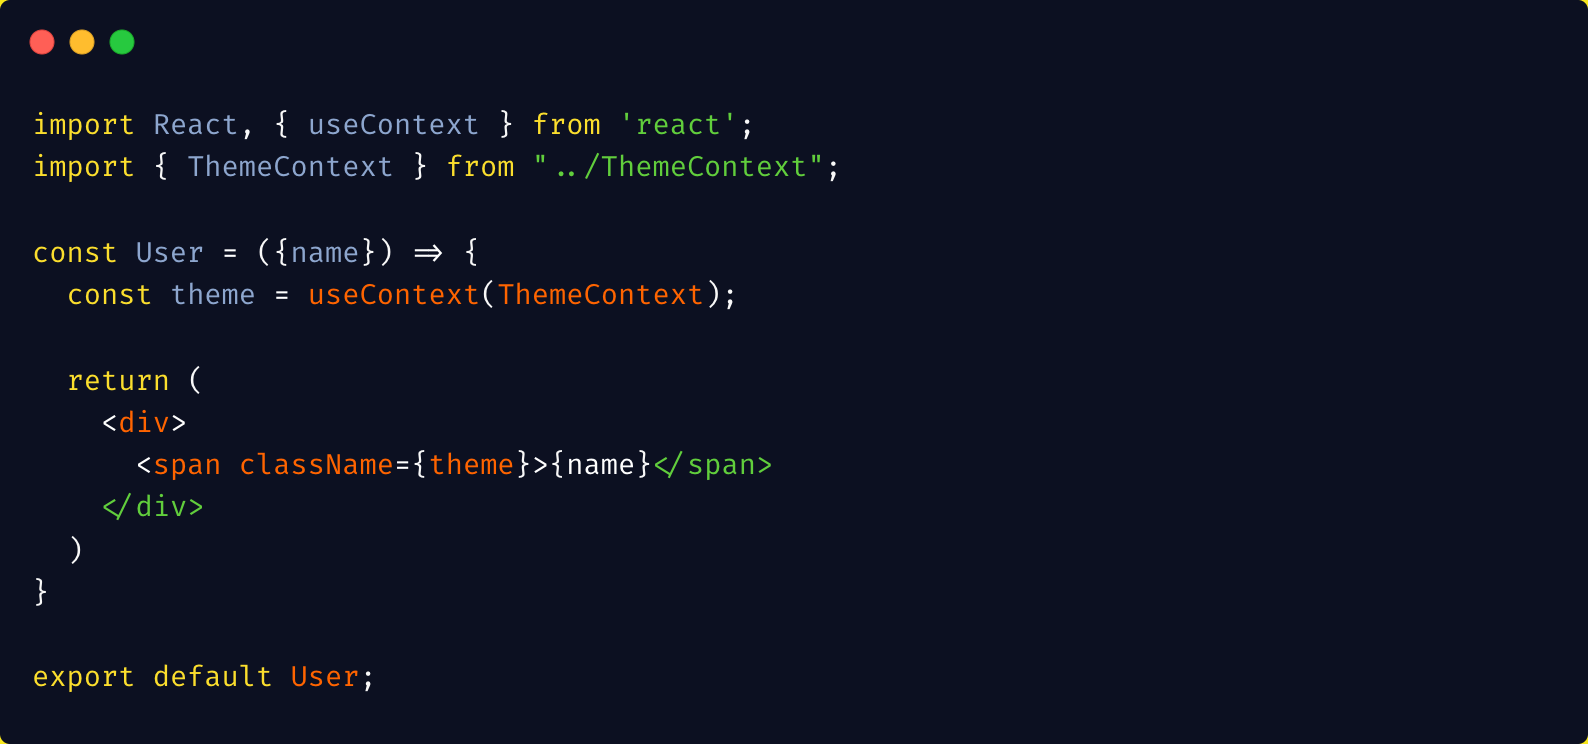
In this component, we can see how to gain access to the Context data. We import the useContext hook AND the ThemeContext module. We invoke the useContext hook, passing in the Context that we created in the module, and the return value is the context data.
In our example, we simply assign the context value as the className to our <span> content.
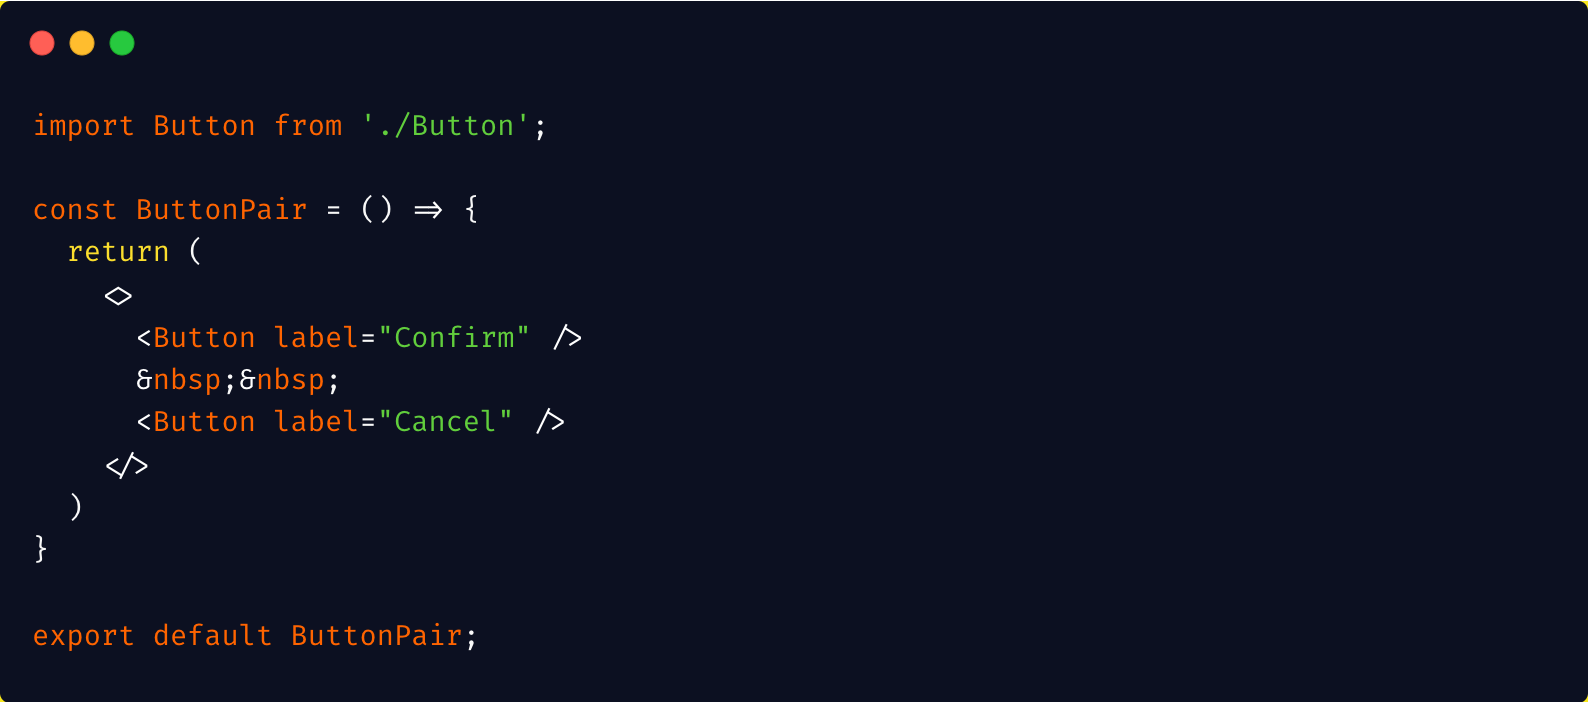
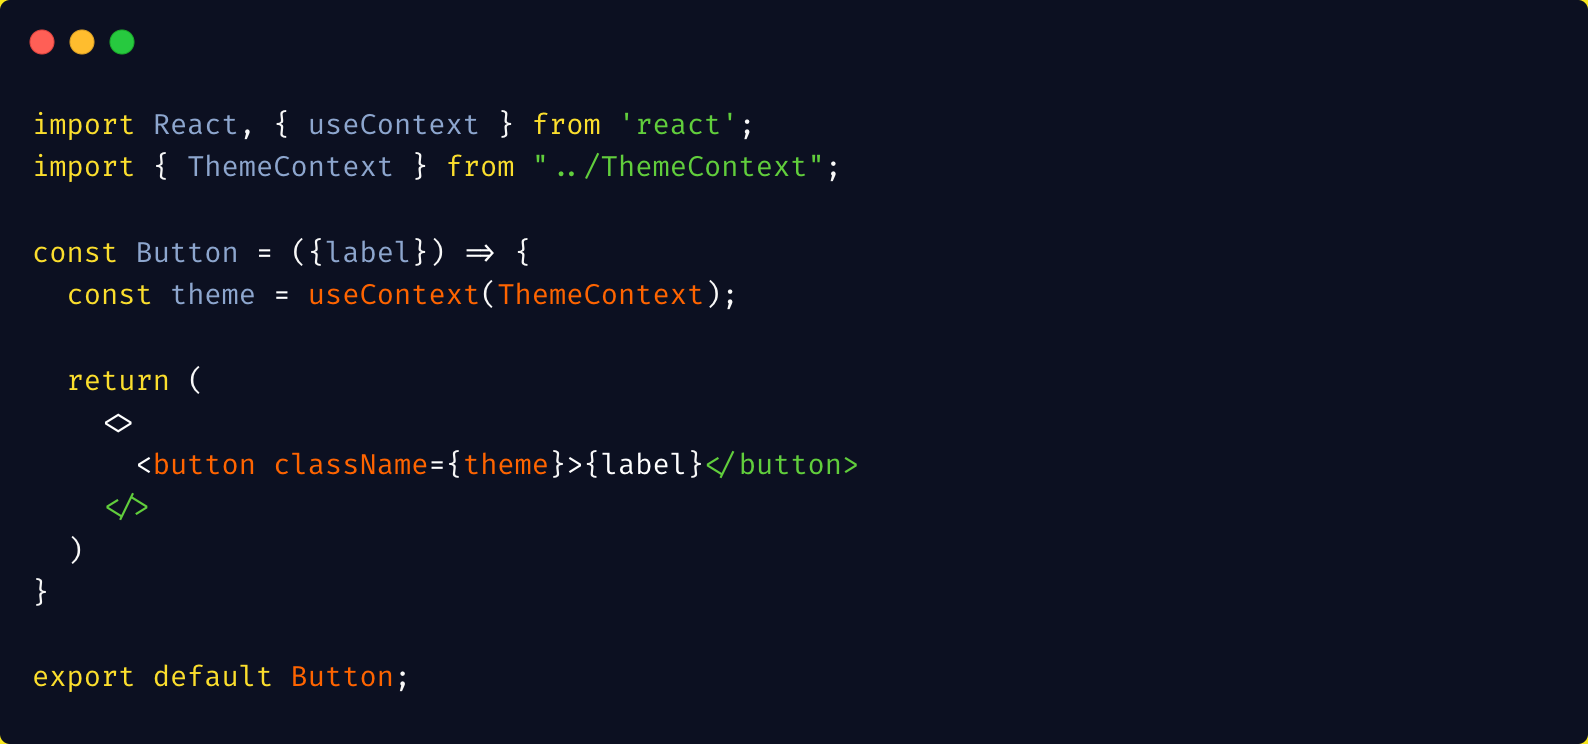
Our ButtonPair and Button components work similarly:
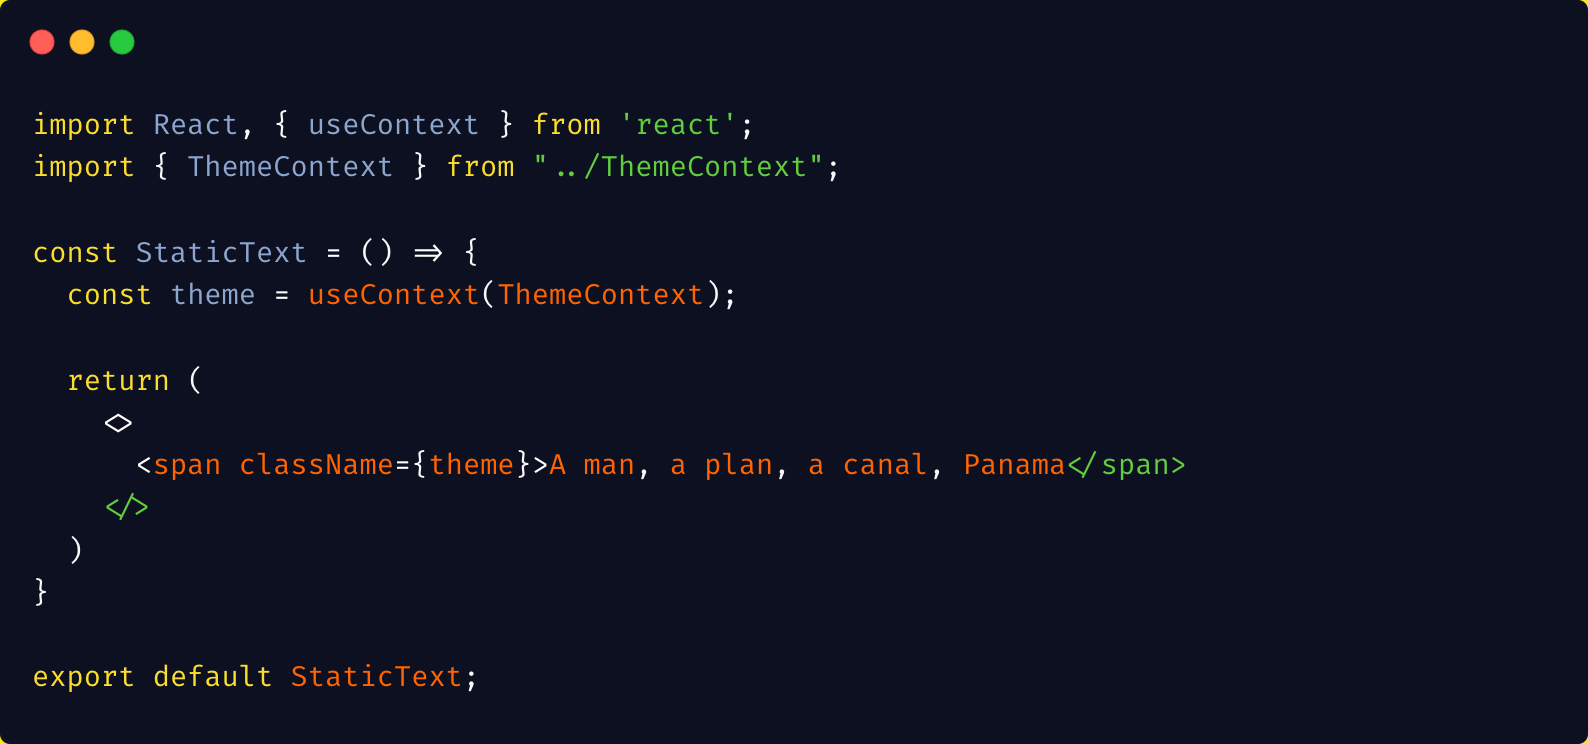
As does the StaticText component:
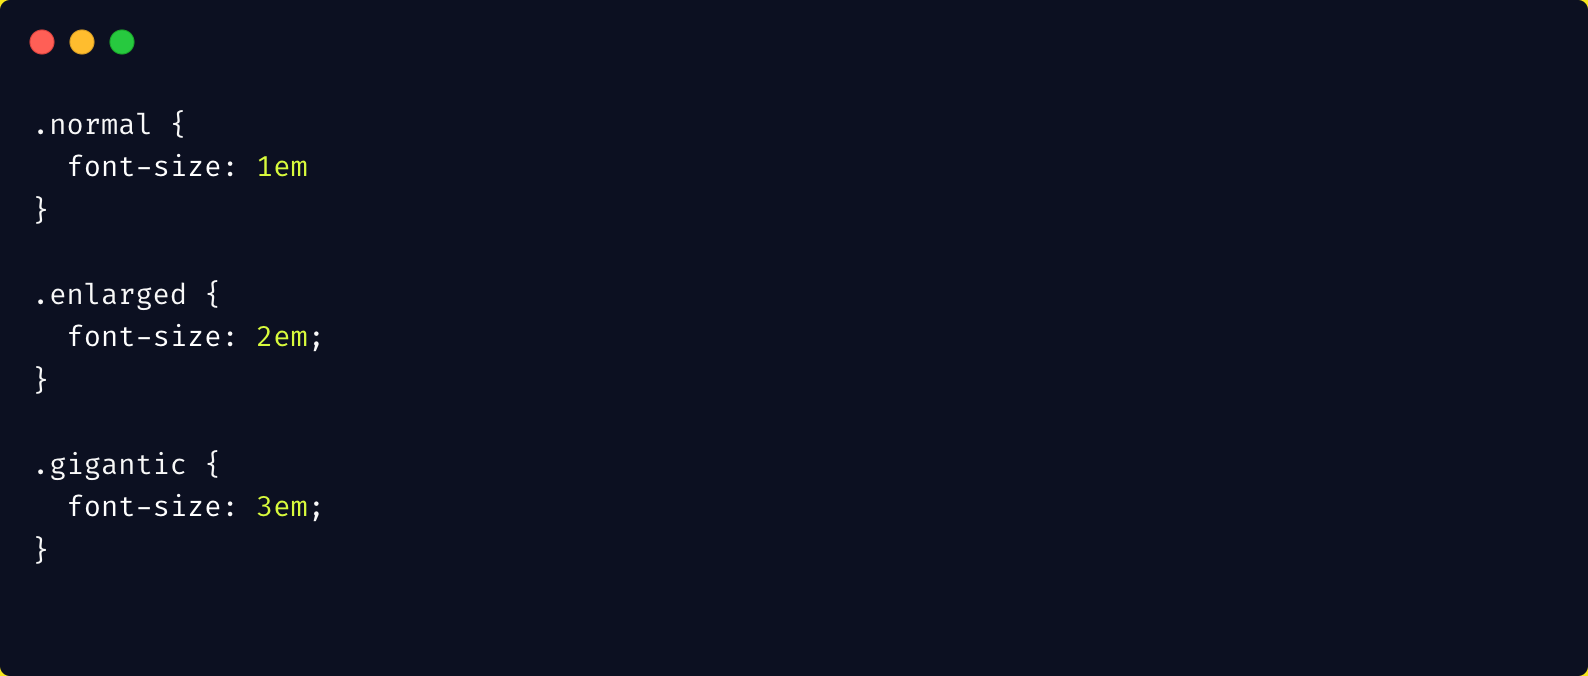
…add in some relatively simple css for each class:
And putting it all together, you have a functioning application where modifying the theme affects all the visual elements within the Context Provider:
In Summary
- The React Context API is one solution to prop drilling in React components.
- Start by creating a context object.
- Import the context object in your component and use its
Providercomponent to establish the container of components (and their descendant components) that will have access to the context data. You’ll also want to set (and provide for modification) of your context data here. - Wherever the context is needed, import the context object and use the
useContexthook to gain access to the context data.
Using the Context API helps keep your components clean and DRY, but there can be drawbacks:
- Component reusability can suffer when using the Context API. We’ve effectively created a dependency on the context data on any component within the hierarchy that uses that context. Attempting to use the component outside the Provider hierarchy is not advisable.
- There can be performance concerns with using the Context API in a complicated and deep hierarchy. As the context changes, this change is broadcast throughout the hierarchy regardless of whether the component is dependent on the change or not.
- An alternative to using Context is Component Composition — a topic for another time!
I hope you have enjoyed this overview of the React Context API and an example of its use. It is a powerful feature that can help you write clean, DRY code and avoid the messiness of passing properties throughout your component hierarchy.
_____________________________________________________________________________________
Controlled Components: The Key To Consistent React Forms
By Jared Mohney
Controlled components are a key concept of React. With their state fully controlled by their parent component, it allows for their data to remain in sync with the rest of our application. Without controlled components, we could find ourselves with multiple sources of truth, and that’s no good!
Let’s quickly look at three simple examples we can run into when building forms:
Input Example
In this example, we have an input element that is fully controlled. Our parent component sets the initial state via useState and handles any updates to it thereafter via handleChange. When submitted, the parent component has access to the value of the input element and can do whatever it needs to with our pizza!
Checkbox
Now this feels familiar. Here we have a clean-cut example of a basic checkbox, reading and updating the state of its parent instead of managing its own internally. Want to learn more about the useCallback being used by handleChange? Check out our article on rendering React reliably!
Select
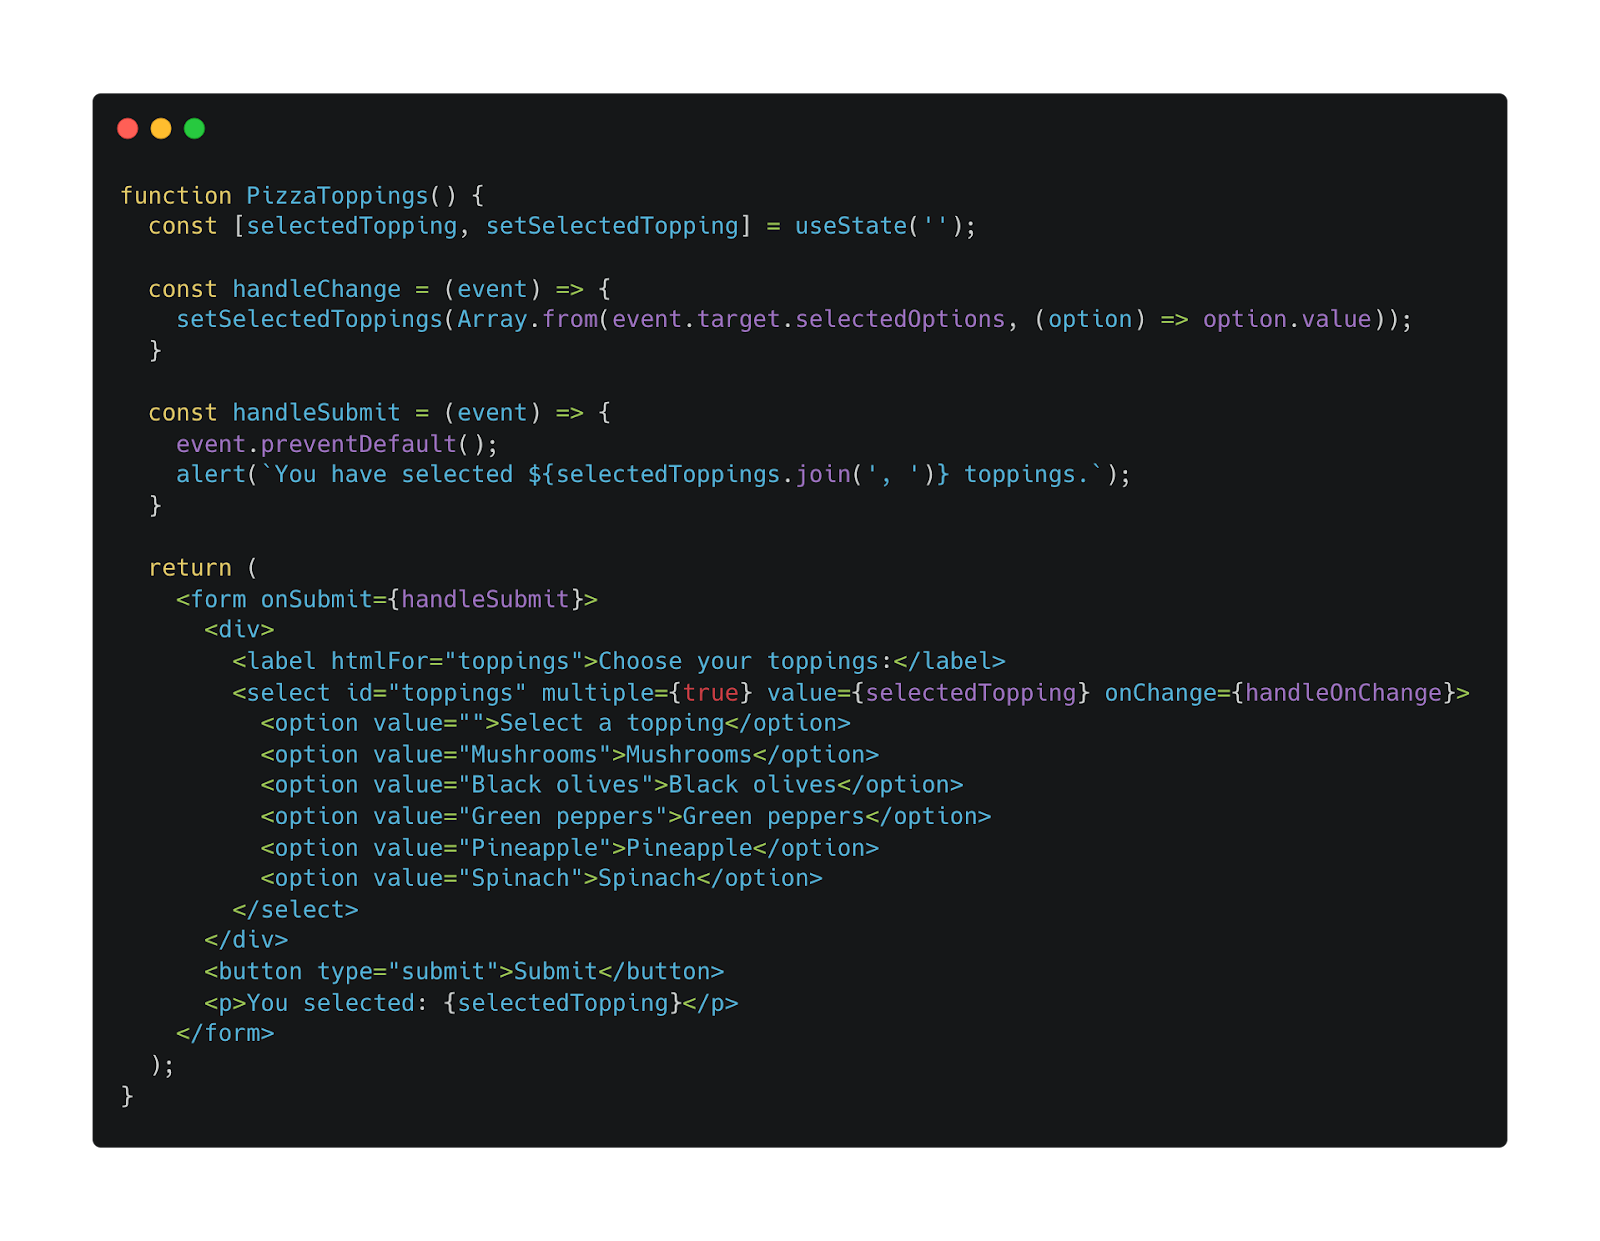
Our final example is a multi-select dropdown, and our approach is identical. We want to hijack the internal state management of these elements so that we can establish reliable data flow within our application.
I hope it’s clear now: State control isn’t scary (or difficult)!
TIP: If you find yourself tackling a larger form, reaching for libraries like Formik and React Hook Form can handle a lot of this boilerplate for you (and more).
In summary, by controlling the state of our form components with React, we can ensure that our data is consistent. This is important in larger applications where there may be multiple components that access the same data. With controlled components, we can avoid inconsistencies and maintain a single source of truth!
_____________________________________________________________________________________
React: Converting Class-Based Components Into Functional Ones. It’s Not So Bad!
By Adam Boudion
Introduction
If you’ve worked with React for any length of time, you’ll likely know that there are two different types of React components: Class and Functional. Class components are the older way and involve extending from the internal React class called Component. Functional components, the newer way, are simple JavaScript functions that return JSX.
Let’s say you find yourself working in a codebase of class-based components, and to keep things closer to the leading edge, you decide you want to update some of these class-based components to functional ones. It can be overwhelming if you’re not familiar with functional components and hooks, but it’s really not as daunting as it first seems. Consider the following class component:
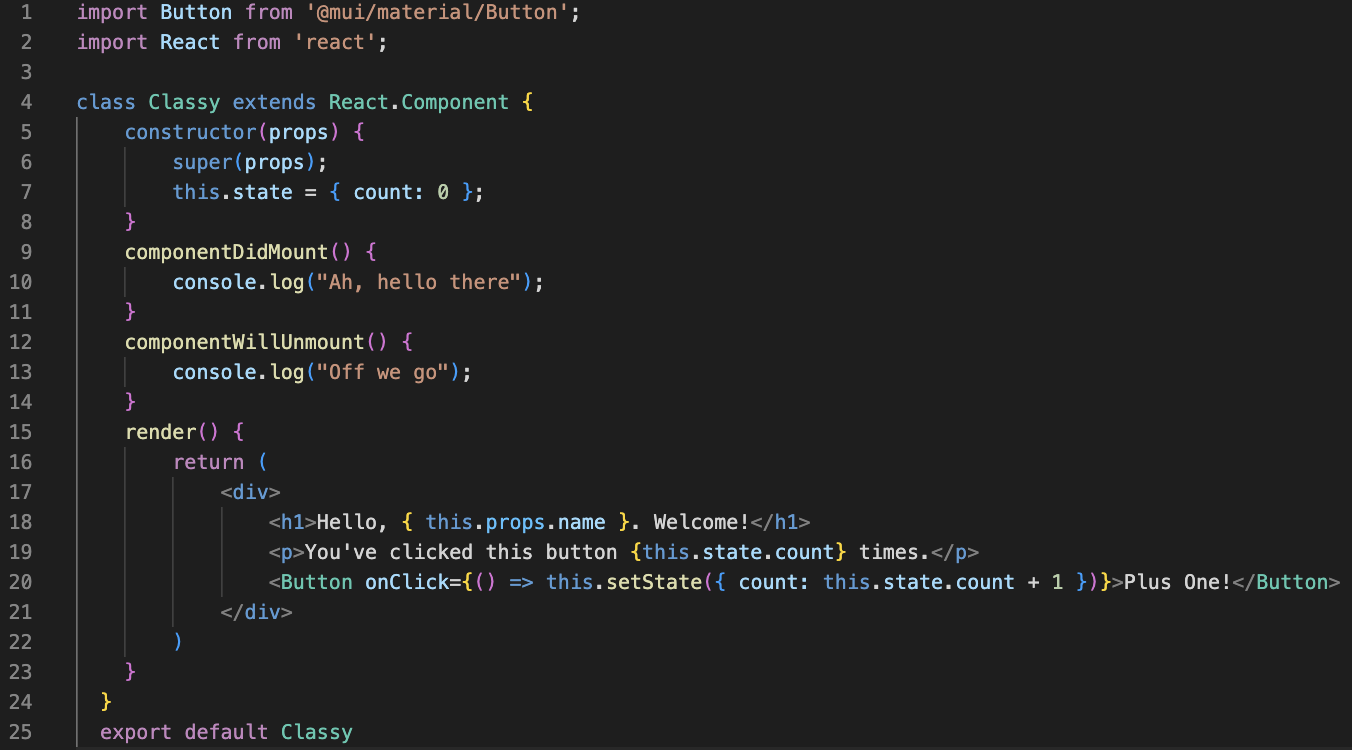
Nothing fancy for the sake of simplicity, but enough to allow us to understand what needs doing in order to make this into a functional component. This component takes in a single prop, name, which will be used to personalize a welcome message. It also contains a button that will use the state to keep track of how many times you click it and display that in the browser. Finally, it will display some messages in the console when the component mounts and unmounts so that we can keep track of its lifecycle.
Converting Props
First, we’ll address the prop. In the class component, the props object is passed into the constructor on lines 4 and 5. The prop is then used within the component by getting its value off of this.props as seen on line 18 in the example above.
Functional components are a bit different. Instead of props being passed in the constructor, they’re simply passed into the component method itself, as you would any other ES6 arrow function.
At that point, you can simply reference the prop directly inside the component:

It’s worth noting that this particular example is destructuring the props. One could easily write the above two lines of code like this, and they would still be functionally equivalent:

Converting State
Next, we need to talk about the differences in state. In the class component example, we can see the state being initialized in the constructor on line 7. A single state variable called count is declared and initialized with a value of zero. That state variable is then printed to the screen as part of line 19. Then, on line 20, the button click handler will increment the state variable by one and trigger a re-render via the setState method.
In functional components, the state is handled using the relatively new useState hook, though the core reactive behavior remains the same. To initialize our count variable in our new functional component, we’ll need a line of code like this:

The useState hook takes in a single argument, an initial value (zero, in this case), and returns two things. The first is a new state variable, called count, in this case. The second, a method called setCount which is used to change the value of this variable. So, instead of using the setState methods as we could in the class-based example, we need to call setCount with the new value we’d like to set it to. So, lines 19 and 20 from above would become something like this:

Rendering
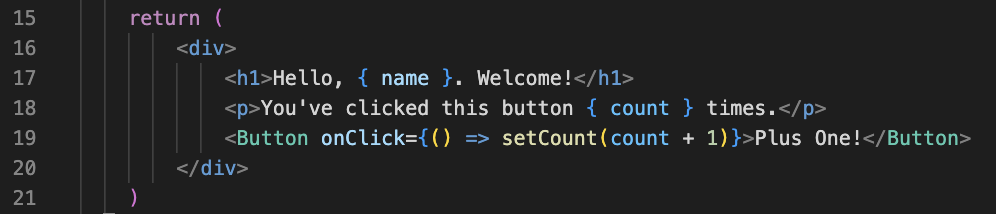
Next, we need to take a look at the different ways HTML is rendered in functional components. In our class example above, we have our familiar render method on line 15, which is responsible for rendering the HTML of our component to the virtual DOM.
In a functional component, there isn’t a render method. Instead, the return statement of the component itself contains the content we’d like to render like this:
Lifecycle Considerations
Finally, we need to look at how to translate our familiar React class lifecycle methods into the world of functional components and hooks. This one is a little tricky, but once you understand the functional equivalent, it will start to make sense.
Typically, in class-based components like the one above, there exists the componentDidMount method, which is used to run code that we’d like to execute when the component is rendered for the very first time. Conversely, there is a componentWillUnmount method, which runs when the component is about to be removed from the virtual DOM. Functional components operate quite a bit differently in this regard, in part because they utilize something called the useEffecthook. Let’s walk through what that would look like.
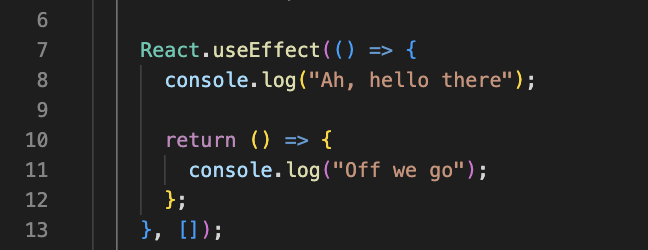
As you can see, this looks markedly different and maybe a little daunting. But it really isn’t! Let’s break it down. The useEffect hook runs every time a component re-renders. But wait a second! We just want this to run once when the component is initialized, not after every render. Well, that’s where this tricky little empty array on line 13 comes into play.
This argument is optional, and when it’s omitted, it ensures that the useEffect hook will run every time the component renders without conditions. If the array is passed but is empty, as in our example, the effect will only run once when the component is first mounted. That’s the behavior we want for our example, but it’s worth talking about what happens when you actually pass something into that array. If we passed in our count variable, for example, then this effect would be skipped on every render except for the ones where the count has changed. This is powerful as it allows the developer to optimize and cut down on excessive re-renders.
Then there’s the return statement where our code that was in componentWillUnmount is now. This is a cleanup method, and it is also optional. This runs whenever the component is unmounted, which is what we want in this case. It’s important to note here that it will also run right before the same useEffect is run again to clean up from the last one. But, since our array of dependencies is empty, it will only run once when first rendered. Therefore, the cleanup method will only run once when dismounted.
Conclusion
So, with all of that said, let’s take a look at the final product.
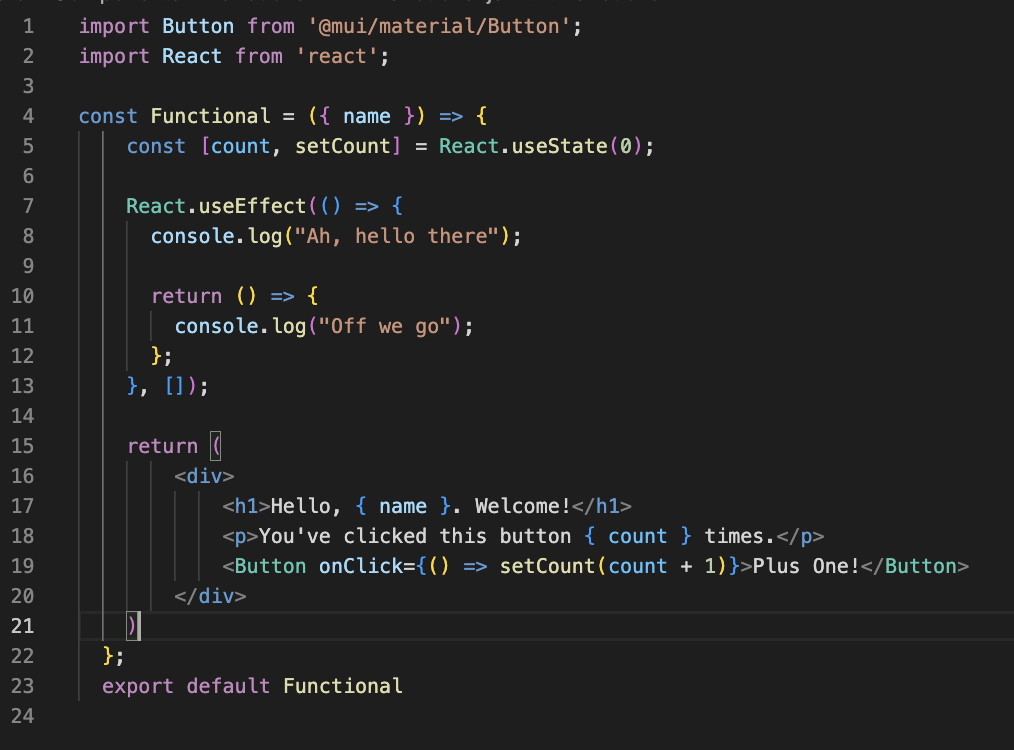
This code is functionally equivalent (no pun intended) to the earlier class example and uses hooks to replace the old lifecycle methods. We all know that real-world class-based component are usually not this simple, but they can be updated to be functional components using the same techniques listed here.
While both methods are viable options for creating components, functional components are widely considered to be the path forward by the overall React community, including the creators of React themselves. For this reason, they have committed themselves to maintain backward compatibility for class components to avoid forcing rewrites of established code but are focusing their attention on improving functional components going forward. Because of this, you may want to consider migrating at some point so you can take advantage of the fancy new features they’re adding now and in the future.
Source link