When it comes to managing large amounts of data in a distributed system, Apache Cassandra and Apache Pulsar are two names that often come up.
Apache Cassandra is a highly scalable NoSQL database that excels at handling high-velocity writes and queries across multiple nodes. It is an ideal solution for use cases such as user profile management, product catalogs, and real-time analytics.
A platform for distributed messaging and streaming, called Apache Pulsar, was created to manage moving data. It can handle standard messaging workloads and more complex streaming use cases including real-time data processing and event-driven architectures.
This article covers the main steps of building a Spring Boot and React-based web application that interacts with Pulsar and Cassandra, displaying stock data live as it is received. This is not a complete tutorial, it only covers the most important steps. You can find the complete source code for the application on GitHub.
You will learn how to:
- Set up Cassandra and Pulsar instances using DataStax Astra DB and Astra Streaming.
- Publish and consume Pulsar messages in a Spring Boot application.
- Store Pulsar messages in Cassandra using a sink.
- Viewing live and stored data in React using the Hilla framework by Vaadin.
Used Technologies and Libraries
- Apache Cassandra (with Astra DB)
- Apache Pulsar (with Astra Streaming)
- Spring Boot
- Spring for Apache Pulsar
- Spring Data for Apache Cassandra
- React
- Hilla
- AlphaVantage API
Requirements
- Java 17 or newer
- Node 18 or newer
- Intermediate Java skills and familiarity with Spring Boot
Storing Sensitive Data in Spring Boot
Much of the setup for Cassandra and Pulsar is configuration-based. While it might be tempting to put the configuration in application.properties, it is not a smart idea as the file is under source control, and you may unintentionally reveal secrets.
Instead, create a local config/local/application.properties configuration file and add it to .gitignore to ensure it does not leave your computer. The settings from the local configuration file will be automatically applied by Spring Boot:
mkdir -p config/local

touch config/local/application.properties

echo "

# Contains secrets that shouldn't go into the repository

config/local/" >> .gitignore
You may provide Spring Boot with the options as environment variables when using it in production.
Setting Up Cassandra and Pulsar Using DataStax Astra
Both Apache technologies used in this article are open-source projects and can be installed locally. However, using cloud services to set up the instances is a simpler option.
In this article, we set up the data infrastructure required for our example web application using DataStax free tier services.
Begin by logging in to your existing account or signing up for a new one on Astra DataStax’s official website, where you will be required to create the database and streaming service separately.
Cassandra Setup
Start by clicking “Create Database” from the official Astra DataStax website. Sinking data from a stream into Astra DB requires that both services are deployed in a region that supports both Astra Streaming and Astra DB:
- Enter the name of your new database instance.
- Select the keyspace name. (A keyspace stores your group of tables, a bit like schema in relational databases).
- Select a cloud Provider and Region.
Note: For the demo application to work, you need to deploy the database service on a region that supports streaming too. -
Select “Create Database.”

Cassandra: Connecting to the Service
Once the initialization of the database service is created, you need to generate a token and download the “Secure Connection Bundle” that encrypts the data transfer between the app and the cloud database (mTLS). Navigate to the DB dashboard “Connect” tab sheet where you will find the button to generate a one-time token (please remember to download it) and the bundle download button:
spring.cassandra.schema-action=CREATE_IF_NOT_EXISTS
spring.cassandra.keyspace-name=<KEYSPACE_NAME>
spring.cassandra.username=<ASTRADB_TOKEN_CLIENT_ID>
spring.cassandra.password=<ASTRADB_TOKEN_SECRET>

# Increase timeouts when connecting to Astra from a dev workstation
spring.cassandra.contact-points=<ASTRADB_DATACENTER_ID>
spring.cassandra.port=9042
spring.cassandra.local-datacenter=<ASTRADB_REGION>

datastax.astra.secure-connect-bundle=<secure-connect-astra-stock-db.zip>
Pulsar parameters for application.properties.
Pulsar Set Up
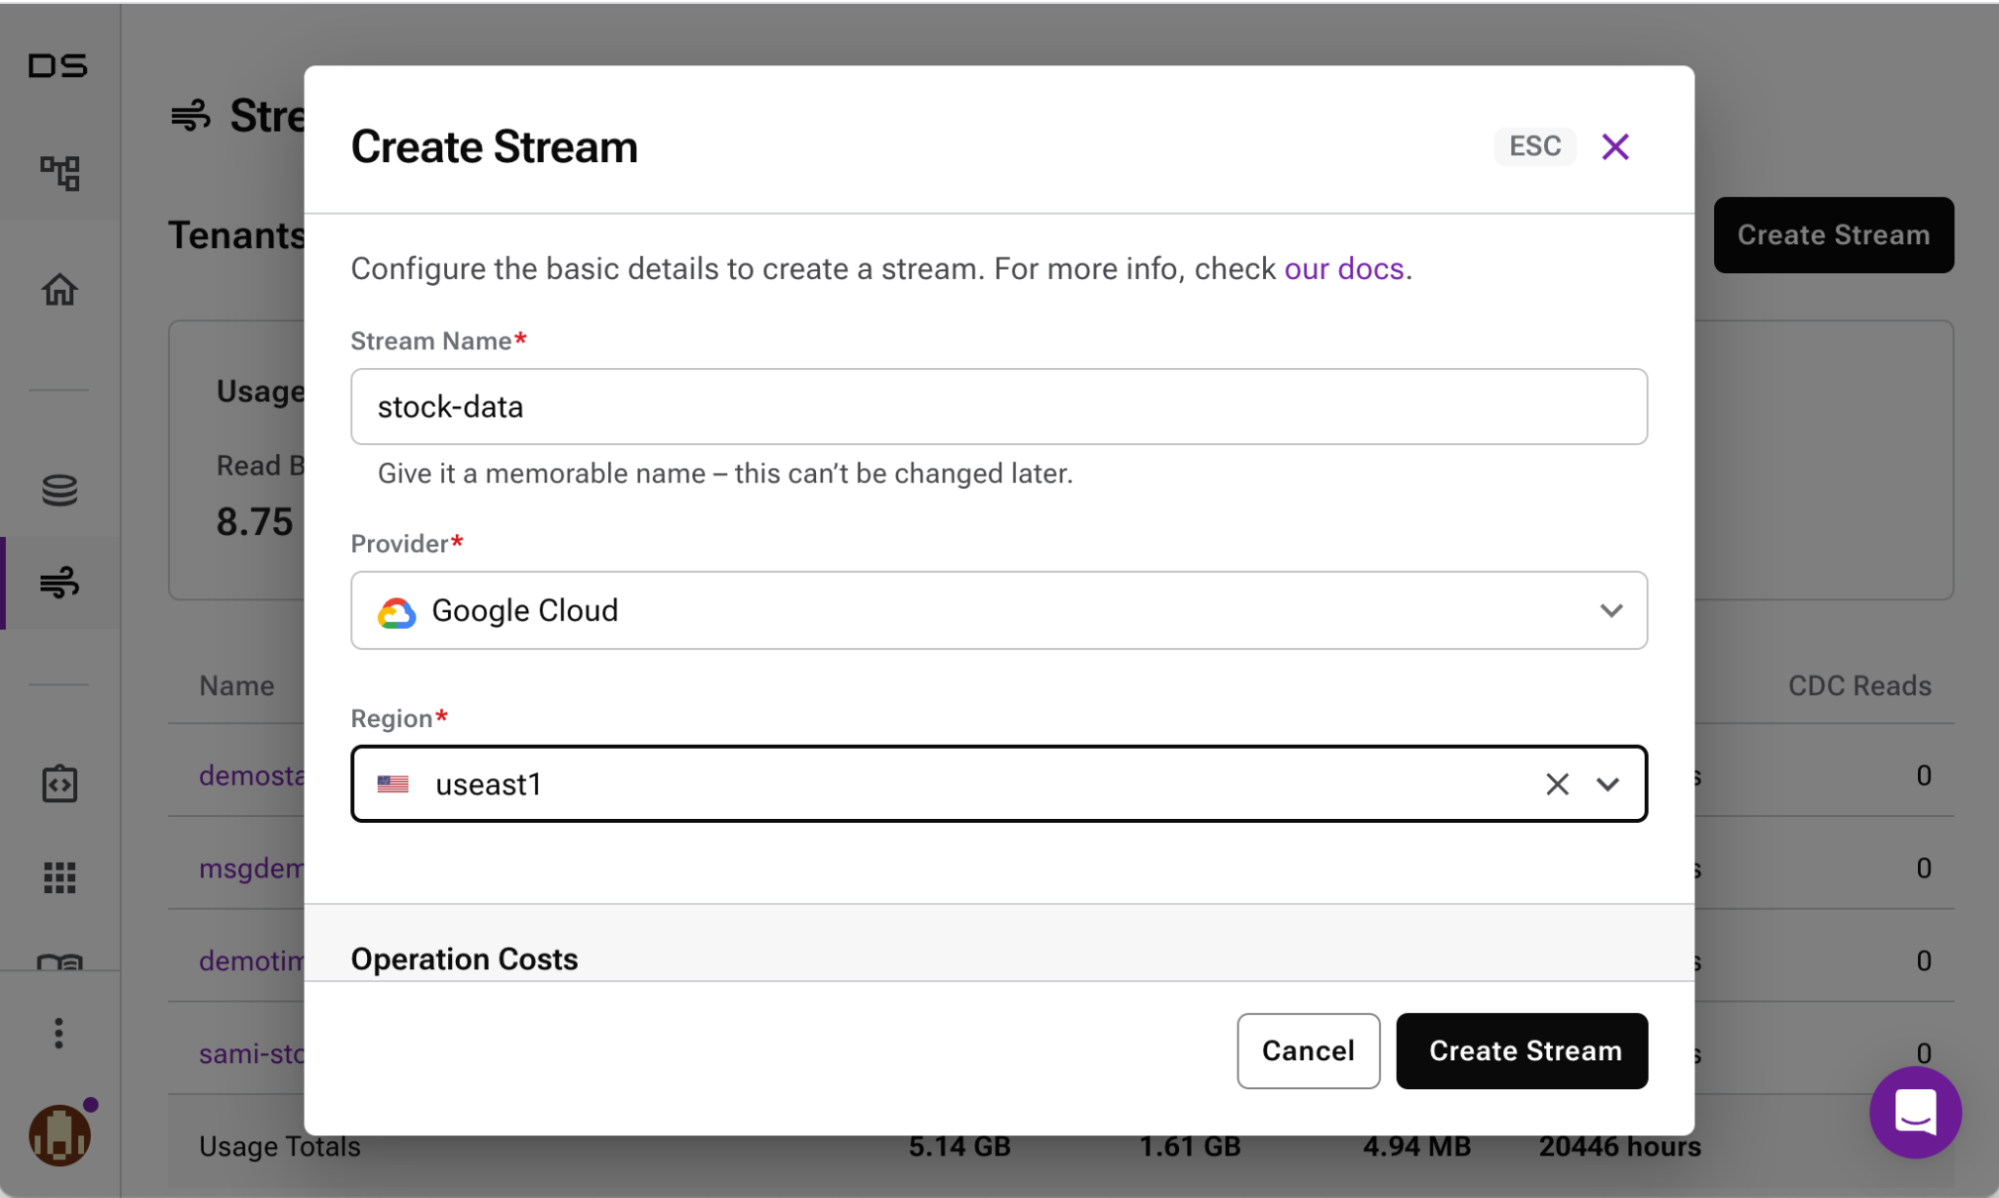
Start by clicking “Create Stream” from the main Astra DataStax page:
- Enter the name for your new streaming instance.
- Select a provider and region.
Note: Remember to use the same provider and region you used to create the database service. - Select “Create Stream.”
Pulsar: Enabling Auto Topic Creation
In addition to getting the streaming service up and running, you will also need to define the topic that is used by the application to consume and produce messages. You can create a topic explicitly using UI, but a more convenient way is to enable “Allow Auto Topic Creation” setting for the created instance:
-
Click on the newly created stream instance and navigate to the “Namespace and Topics” tab sheet, and click “Modify Namespace.”
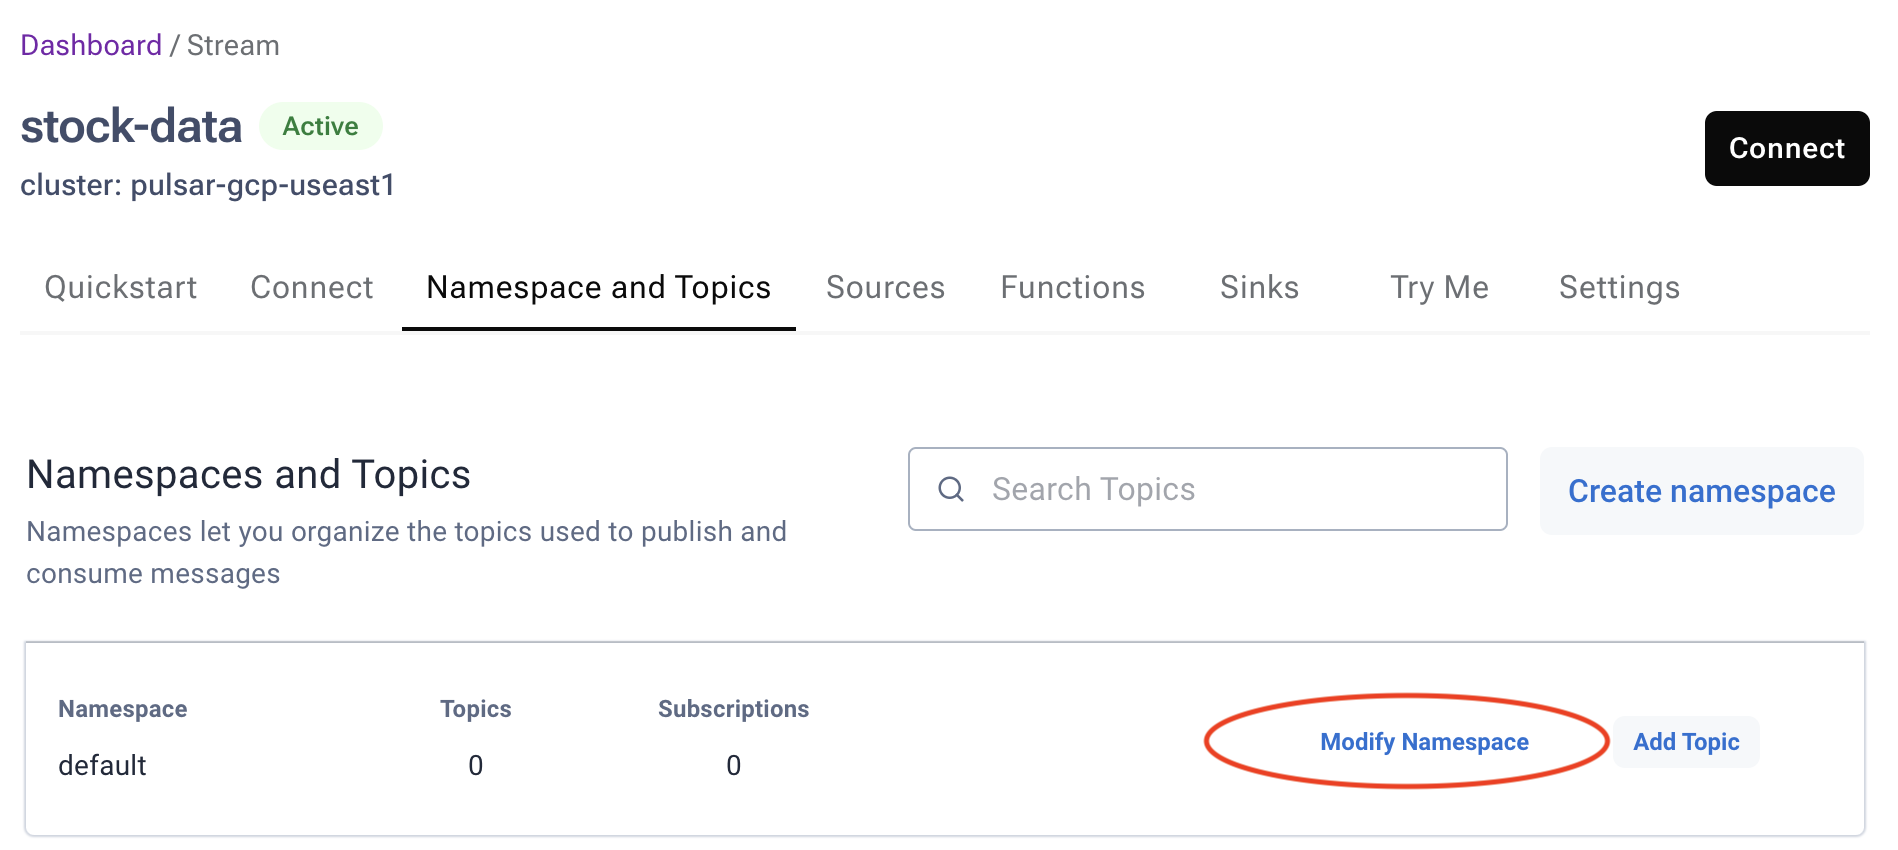
- Navigate to the “Settings” tab located under the default namespace (not the top-level “Settings” tab) and scroll all the way down.
- Change the “Allow Topic Creation” to “Allow Auto Topic Creation.”
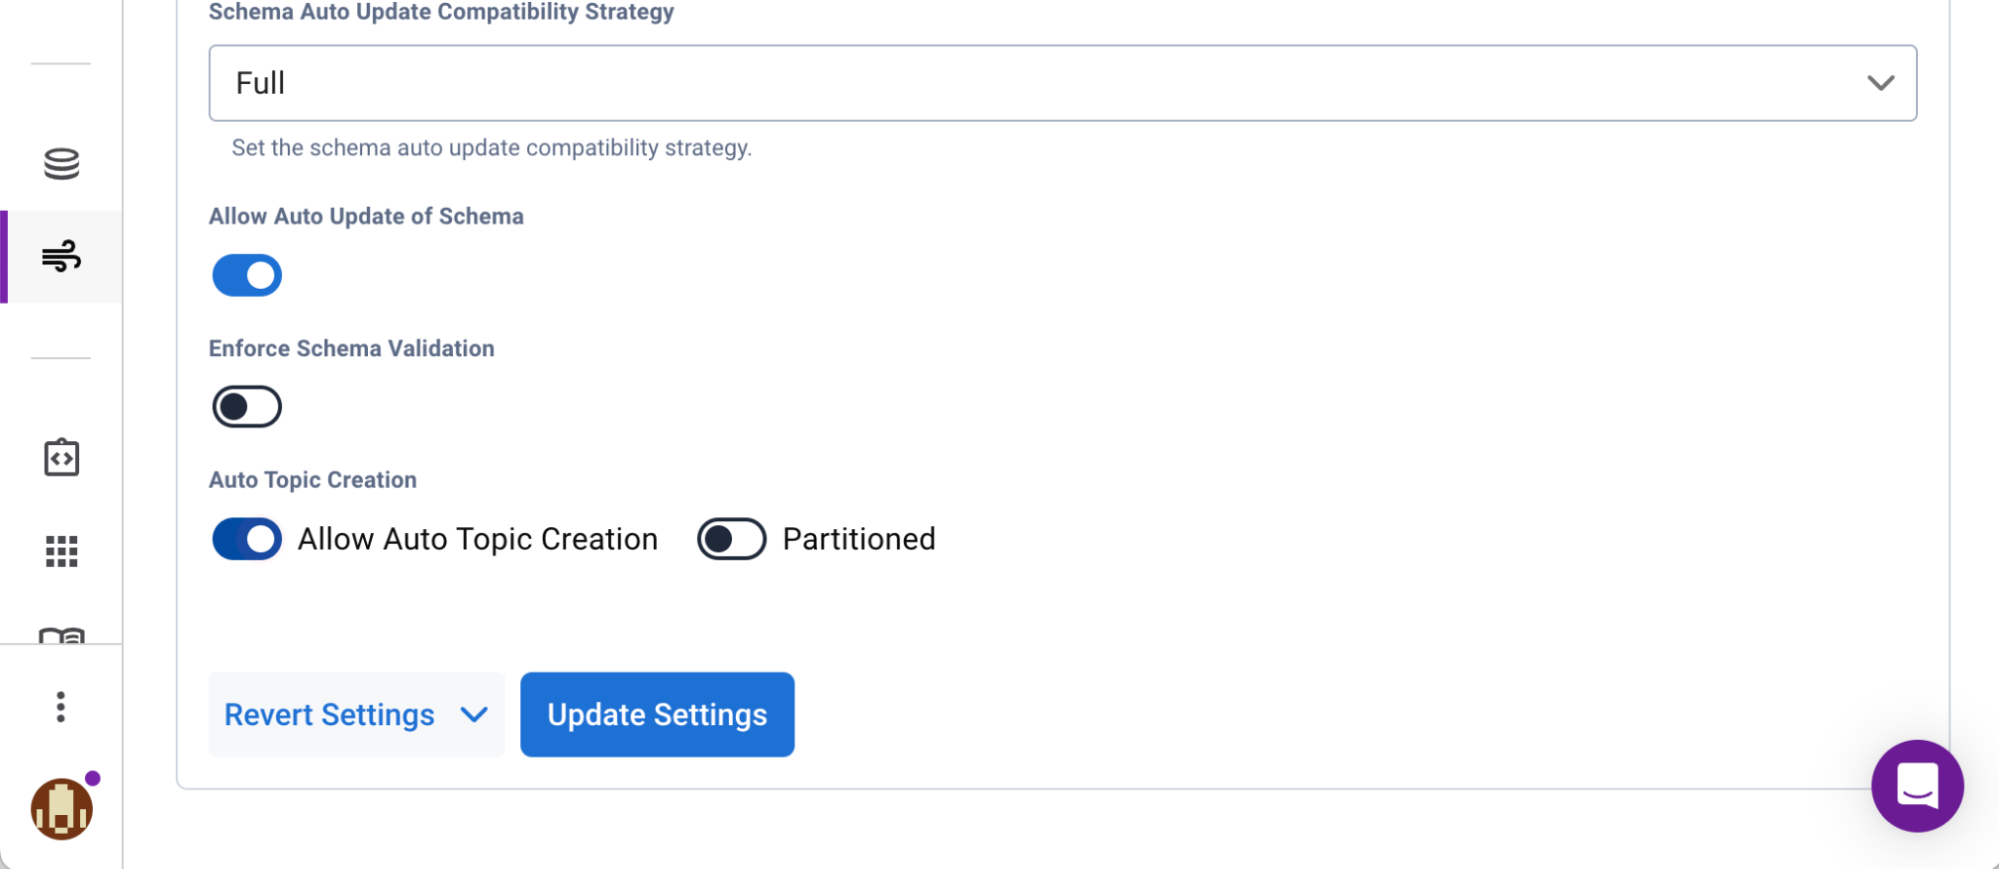
Changing this default setting will allow the application to create new topics automatically without any additional admin effort in Astra. With this, you have successfully established the infrastructure for hosting your active and passive data.
Pulsar: Connecting to the Service
Once the streaming instance has been set up, you need to create a token to access the service from your app. Most of the necessary properties are located on the “Connect” tab sheet of the “Streaming dashboard.” The “topic-name” input is found in the “Namespaces and Topics” tab sheet:
## Client
spring.pulsar.client.service-url=<Broker Service URL>
spring.pulsar.client.auth-plugin-class-name=org.apache.pulsar.client.impl.auth.AuthenticationToken
spring.pulsar.client.authentication.token=<Astra_Streaming_Token>

## Producer
spring.pulsar.producer.topic-name=persistent://<TENANT_NAME>/default/<TOPIC_NAME>
spring.pulsar.producer.producer-name=<name of your choice>

## Consumer
spring.pulsar.consumer.topics=persistent://<TENANT_NAME>/default/<TOPIC_NAME>
spring.pulsar.consumer.subscription-name=<name of your choice>
spring.pulsar.consumer.consumer-name=<name of your choice>
spring.pulsar.consumer.subscription-type=key_shared
Pulsar parameters for application.properties.
Publishing Pulsar Messages From Spring Boot
The Spring for Apache Pulsar library takes care of setting up Pulsar producers and consumers based on the given configuration.
In the application, the StockPriceProducer component handles message publishing. To fetch stock data, it makes use of an external API call before publishing it to a Pulsar stream using a PulsarTemplate.
Autowire the PulsarTemplate into the class and save it to a field:
@Component
public class StockPriceProducer {

    private final PulsarTemplate<StockPrice> pulsarTemplate;

    public StockPriceProducer(PulsarTemplate<StockPrice> pulsarTemplate) {
        this.pulsarTemplate = pulsarTemplate;
    }

	//...

}
Then use it to publish messages:
private void publishStockPrices(Stream<StockPrice> stockPrices) {
    // Publish items to Pulsar with 100ms intervals
    Flux.fromStream(stockPrices)
            // Delay elements for the demo, don't do this in real life
            .delayElements(Duration.ofMillis(100))
            .subscribe(stockPrice -> {
                try {
                    pulsarTemplate.sendAsync(stockPrice);
                } catch (PulsarClientException e) {
                    throw new RuntimeException(e);
                }
            });
}
You need to configure the schema for the custom StockPrice type. In Application.java, define the following bean:
@Bean
public SchemaResolver.SchemaResolverCustomizer<DefaultSchemaResolver> schemaResolverCustomizer() {
    return (schemaResolver) -> schemaResolver.addCustomSchemaMapping(StockPrice.class, Schema.JSON(StockPrice.class));
}
Consuming Pulsar Messages in Spring Boot
The Spring for Apache Pulsar library comes with a @PulsarListener annotation for a convenient way of listening to Pulsar messages. Here, the messages are emitted to a Project Reactor Sink so the UI can consume them as a Flux:
@Service
public class StockPriceConsumer {
    private final Sinks.Many<StockPrice> stockPriceSink = Sinks.many().multicast().directBestEffort();
    private final Flux<StockPrice> stockPrices = stockPriceSink.asFlux();

    @PulsarListener
    private void stockPriceReceived(StockPrice stockPrice) {
        stockPriceSink.tryEmitNext(stockPrice);
    }

    public Flux<StockPrice> getStockPrices() {
        return stockPrices;
    }
}
Creating a Server Endpoint for Accessing Data From React
The project uses Hilla, a full-stack web framework for Spring Boot. It manages websocket connections for reactive data types and allows type-safe server communication.
The client may utilize the matching TypeScript methods created by the StockPriceEndpoint to fetch data:
@Endpoint
@AnonymousAllowed
public class StockPriceEndpoint {
    private final StockPriceProducer producer;
    private final StockPriceConsumer consumer;
    private final StockPriceService service;

    StockPriceEndpoint(StockPriceProducer producer, StockPriceConsumer consumer, StockPriceService service) {
        this.producer = producer;
        this.consumer = consumer;
        this.service = service;
    }

    public List<StockSymbol> getSymbols() {
        return StockSymbol.supportedSymbols();
    }

    public void produceDataForTicker(String ticker) {
        producer.produceStockPriceData(ticker);
    }

    public Flux<StockPrice> getStockPriceStream() {
        return consumer.getStockPrices();
    }

    public List<StockPrice> findAllByTicker(String ticker) {
        return service.findAllByTicker(ticker);
    }
}
Displaying a Live-Updating Chart in React
The DashboardView has an Apex Chart candle stick chart for displaying the stock data. It’s bound to a state of type ApexAxisChartSeries:
const [series, setSeries] = useState<ApexAxisChartSeries>([]);The view uses a React effect hook to call the server endpoint and subscribe to new data. It returns a disposer function to close the websocket when it is no longer needed:
useEffect(() => {
  const subscription = StockPriceEndpoint
    .getStockPriceStream()
    .onNext((stockPrice) => updateSeries(stockPrice));
  return () => subscription.cancel();
}, []);
The series is bound to the template. Because the backend and frontend are reactive, the chart is automatically updated any time a new Pulsar message is received:
<ReactApexChart type="candlestick" options={options} series={series} height={350} ></div>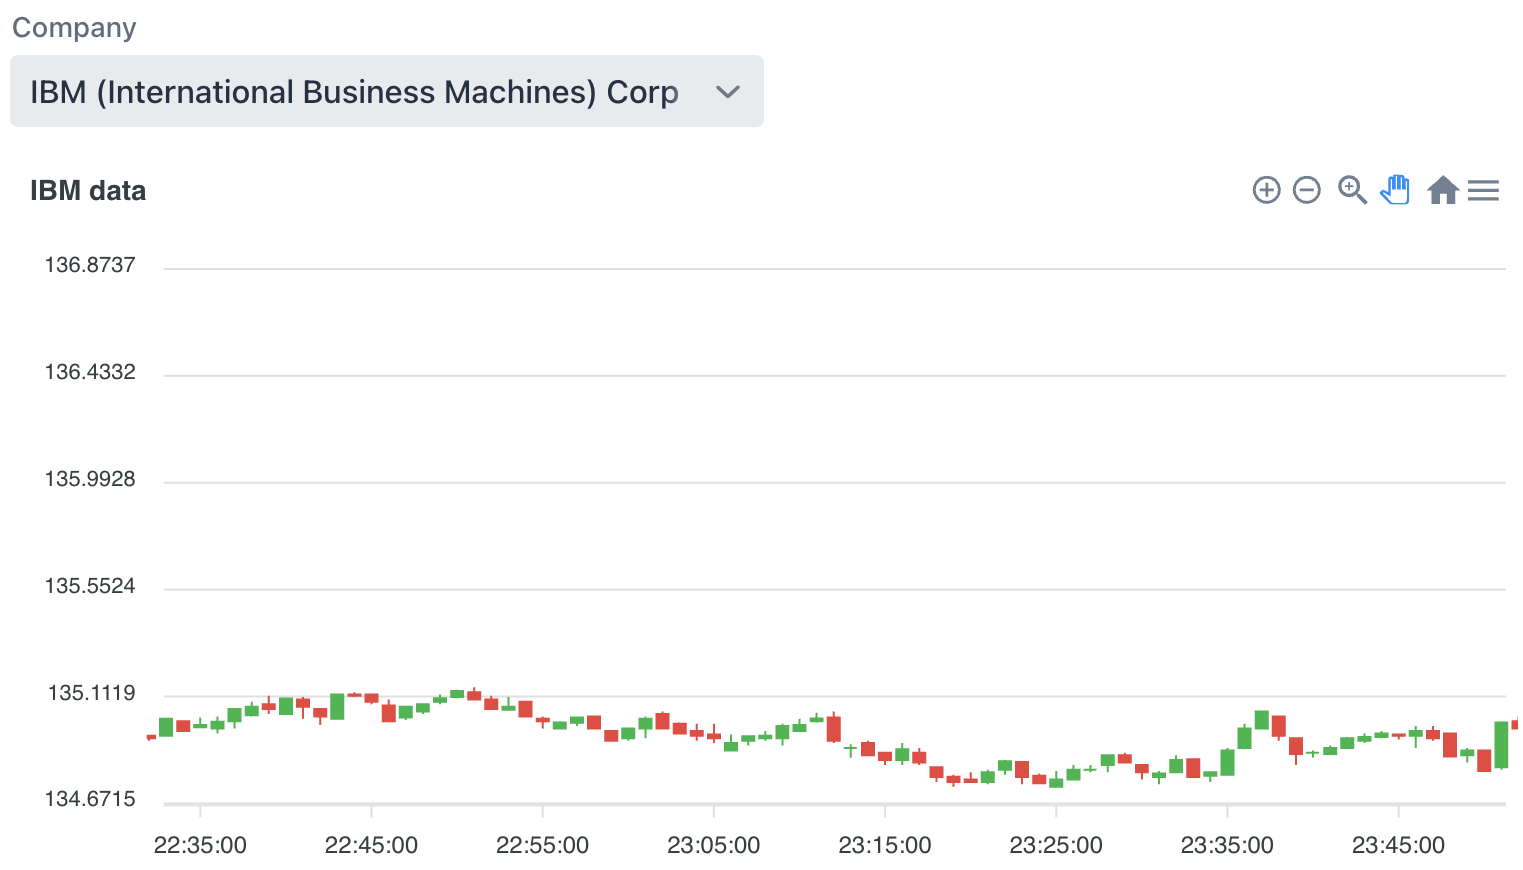
Persisting Pulsar Messages to Cassandra
Sinking Pulsar messages to Astra DB can be useful in scenarios where you need a reliable, scalable, and secure platform to store event data from Pulsar for further analysis, processing, or sharing. Perhaps you need to retain a copy of event data for compliance and auditing purposes, need to store event data from multiple tenants in a shared database, or for some other use case.
Astra Streaming offers numerous fully-managed Apache Pulsar connectors you can use to persist event data to various databases and third party solutions, like Snowflake. In this article, we are persisting the stream data into Astra DB.
Creating a Sink
Start by selecting the “Sink” tab sheet from the Astra streaming dashboard.
- Select the “default” namespace:
- From the list of available “Sink Types,” choose “Astra DB.”
- Give the sink a name of your choice
- Select the “stock-feed” that will be available once you have published messages to that topic from your app.
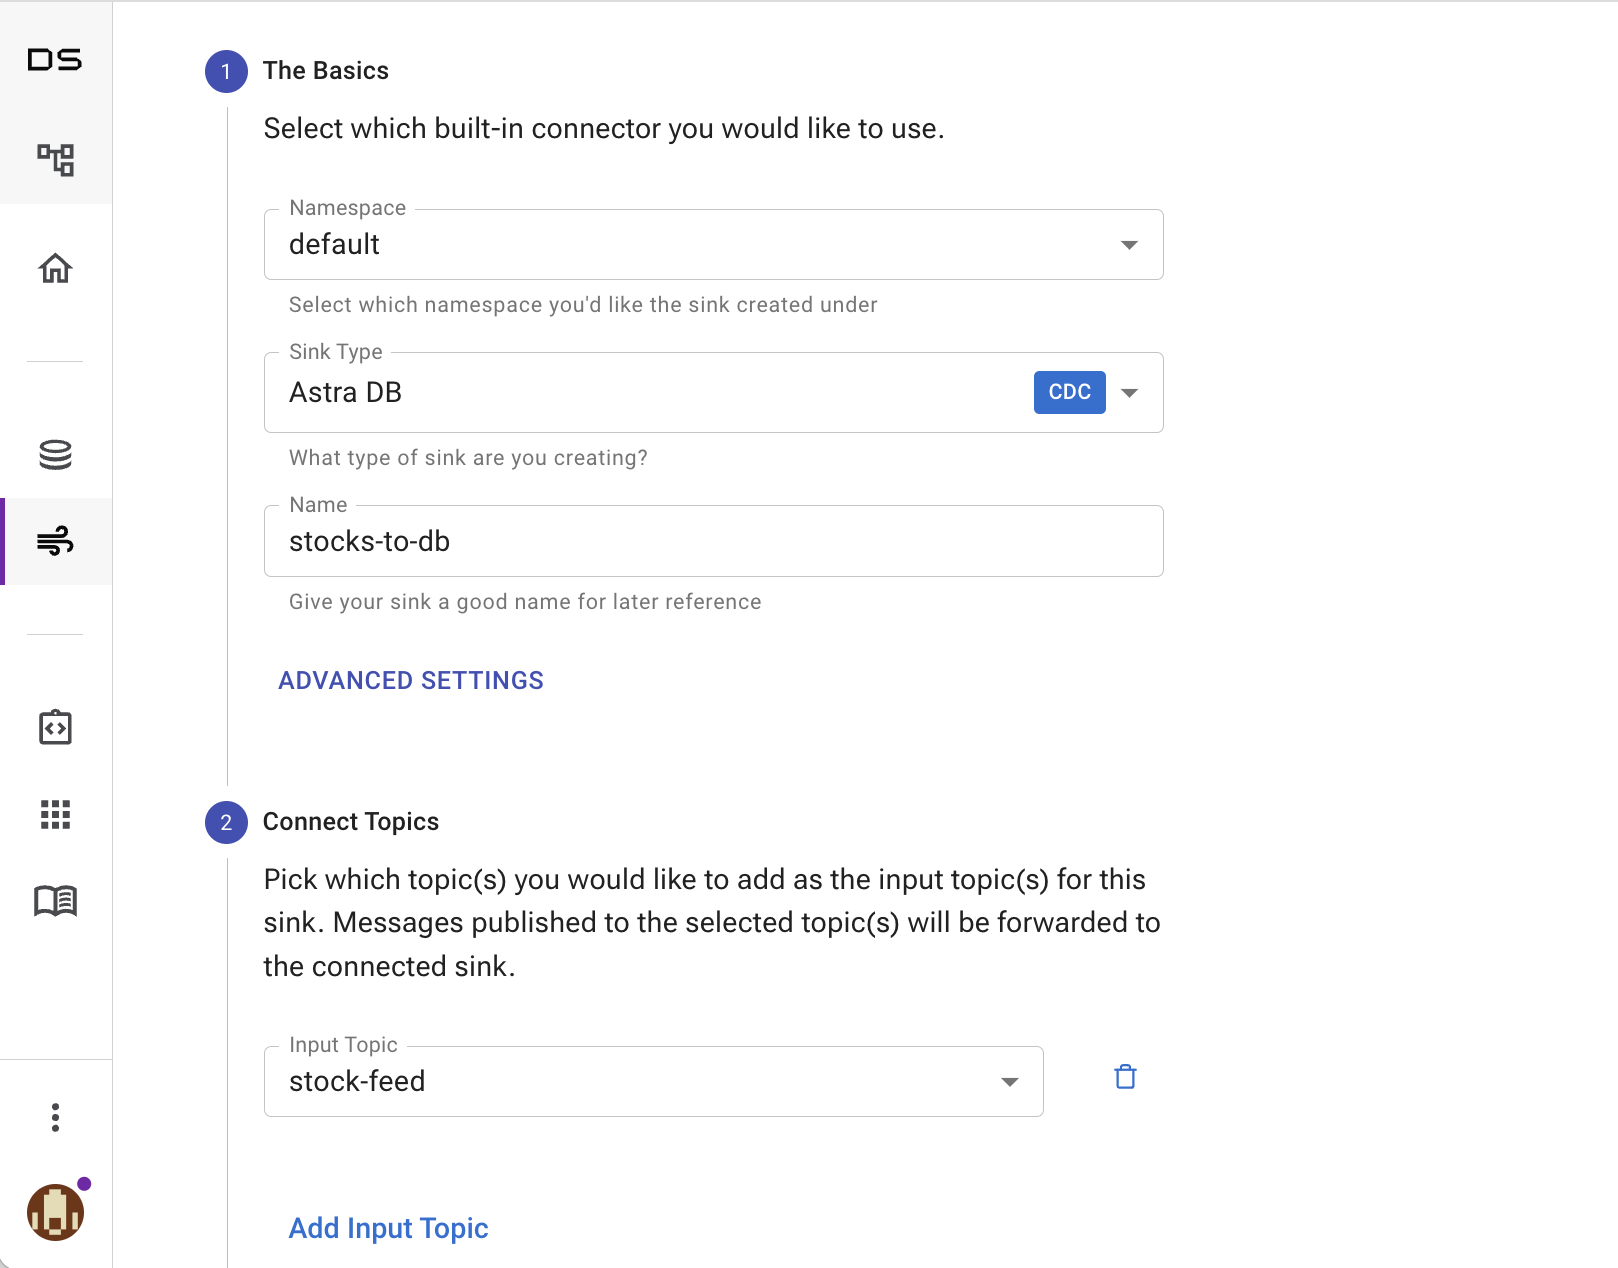
- After selecting data stream input, select the database you want to persist pulsar messages:
- To enable table creation, paste the Astra DB token with valid roles. You’ll notice keyspaces after the entry of a valid token, choose the keyspace name that was used to create the database.
- Then enter the table name.
Note: This needs to match the@Table("stock_price")annotation value you use in StockPrice.java class to read back the data.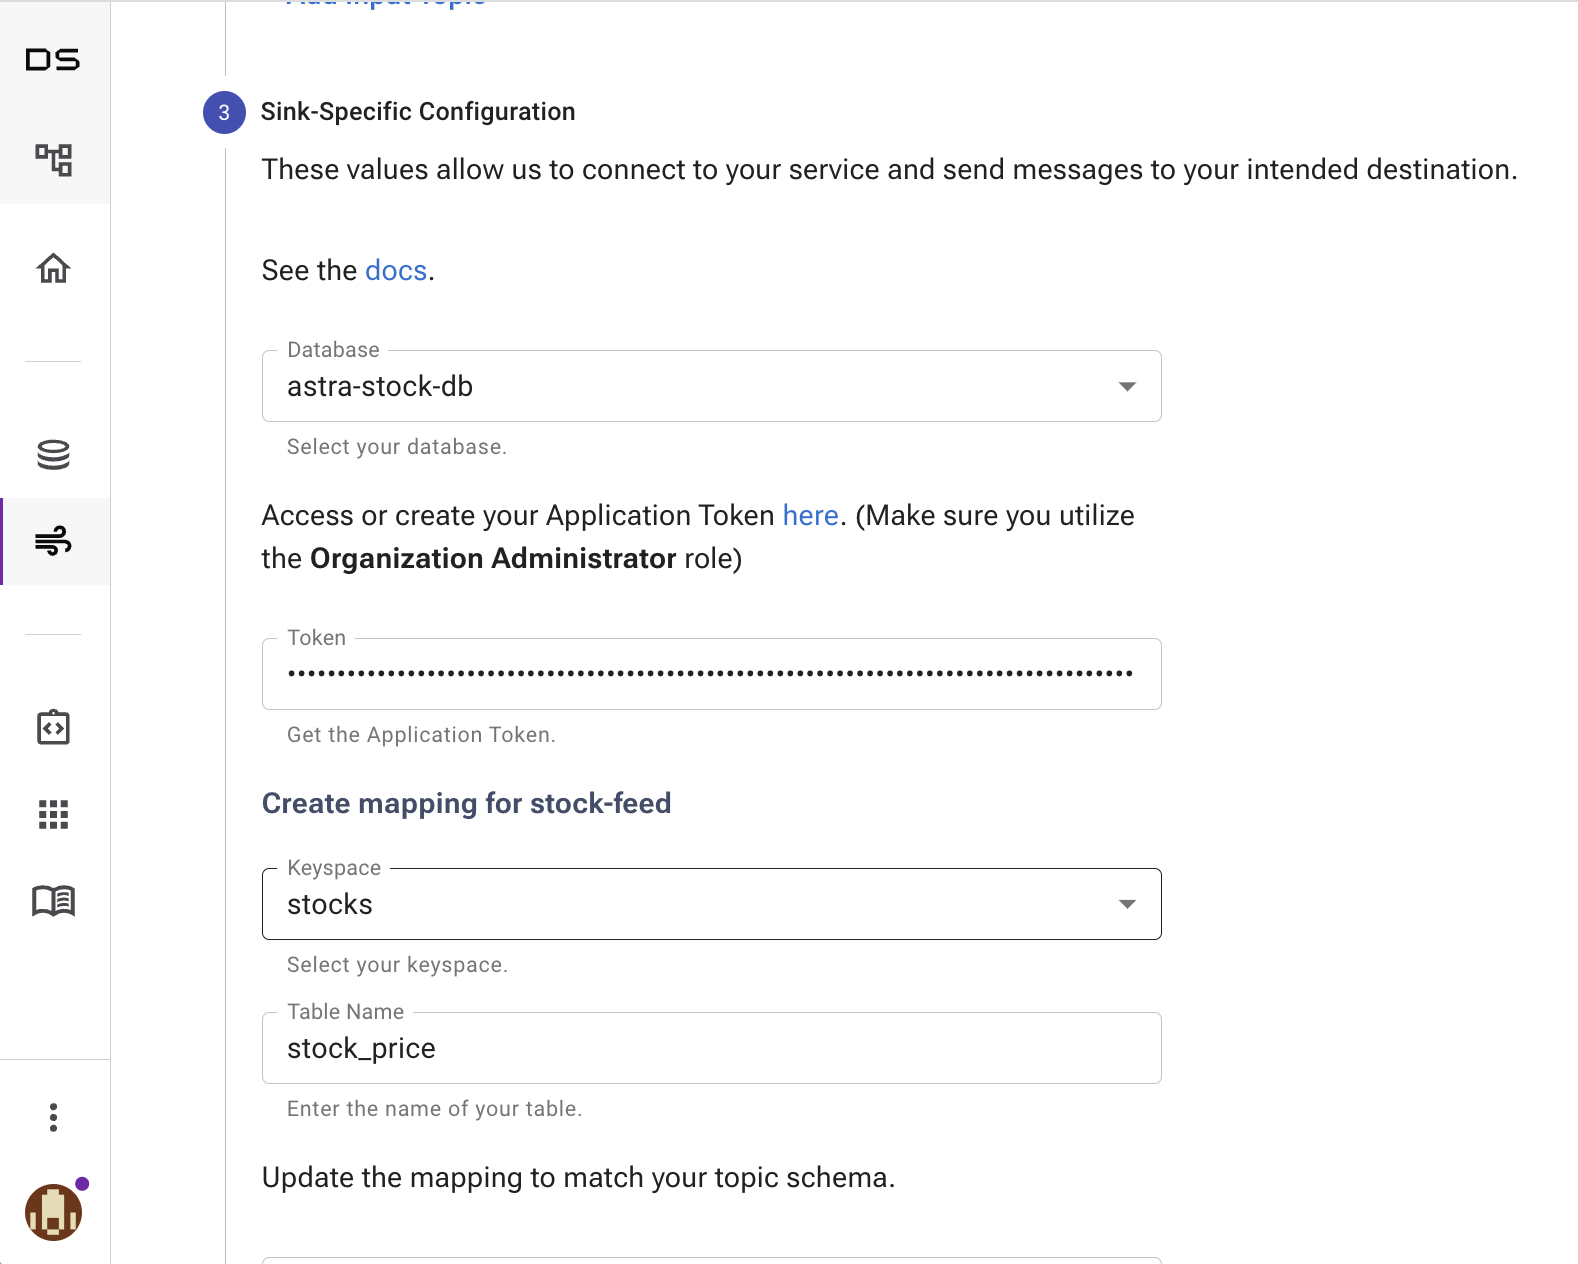
- Next, you need to map the properties from the Pulsar message to the database table column. Property fields are automatically mapped in our demo application, so you can simply click “Create” to proceed. If you were, for instance, persisting a portion of the data to the database, opening the schema definition would enable you to view the property names employed and create a custom mapping between the fields.
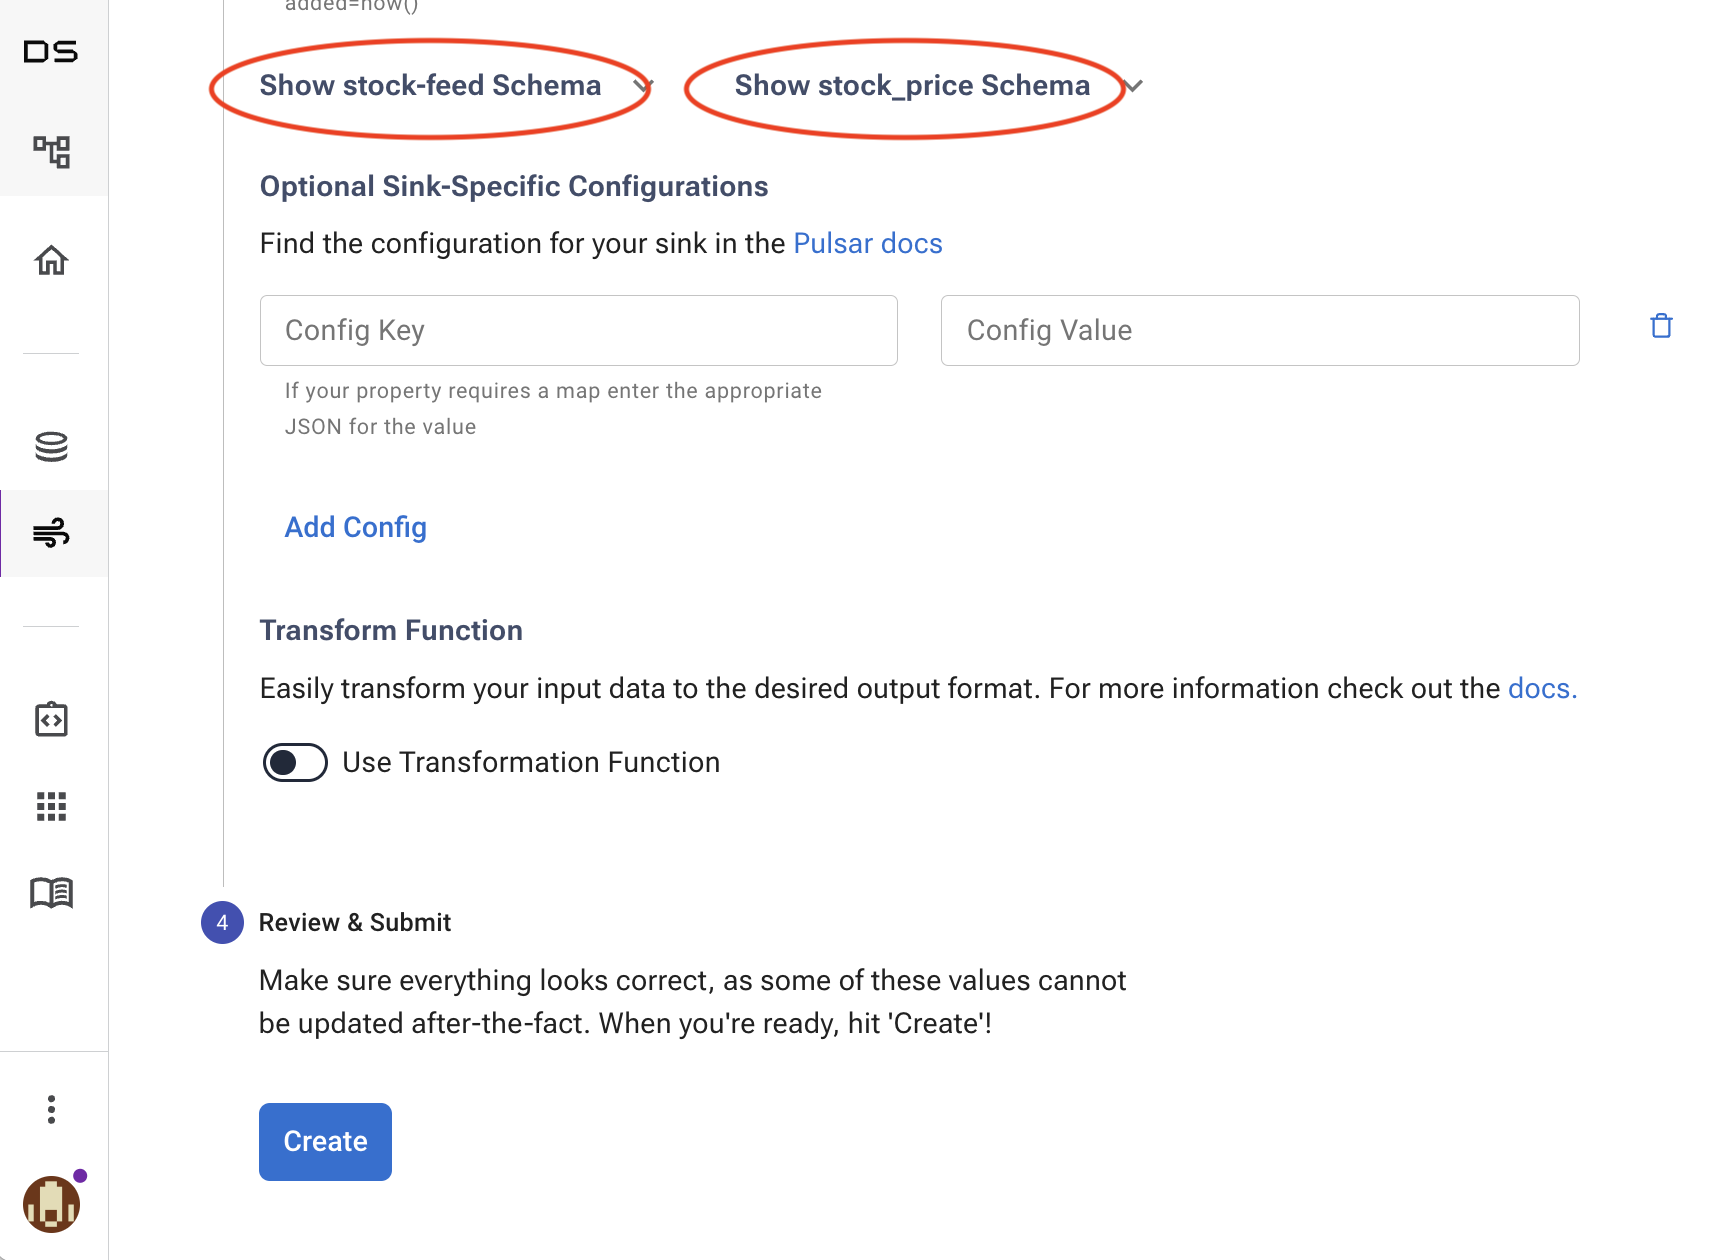
After the sink is created, the initialization process will begin. After which, the status will change to “active.” Then, you’re done with automatically persisting stock data into your database for easy access by application. The sink dashboard provides access to sink log files in the event of an error.
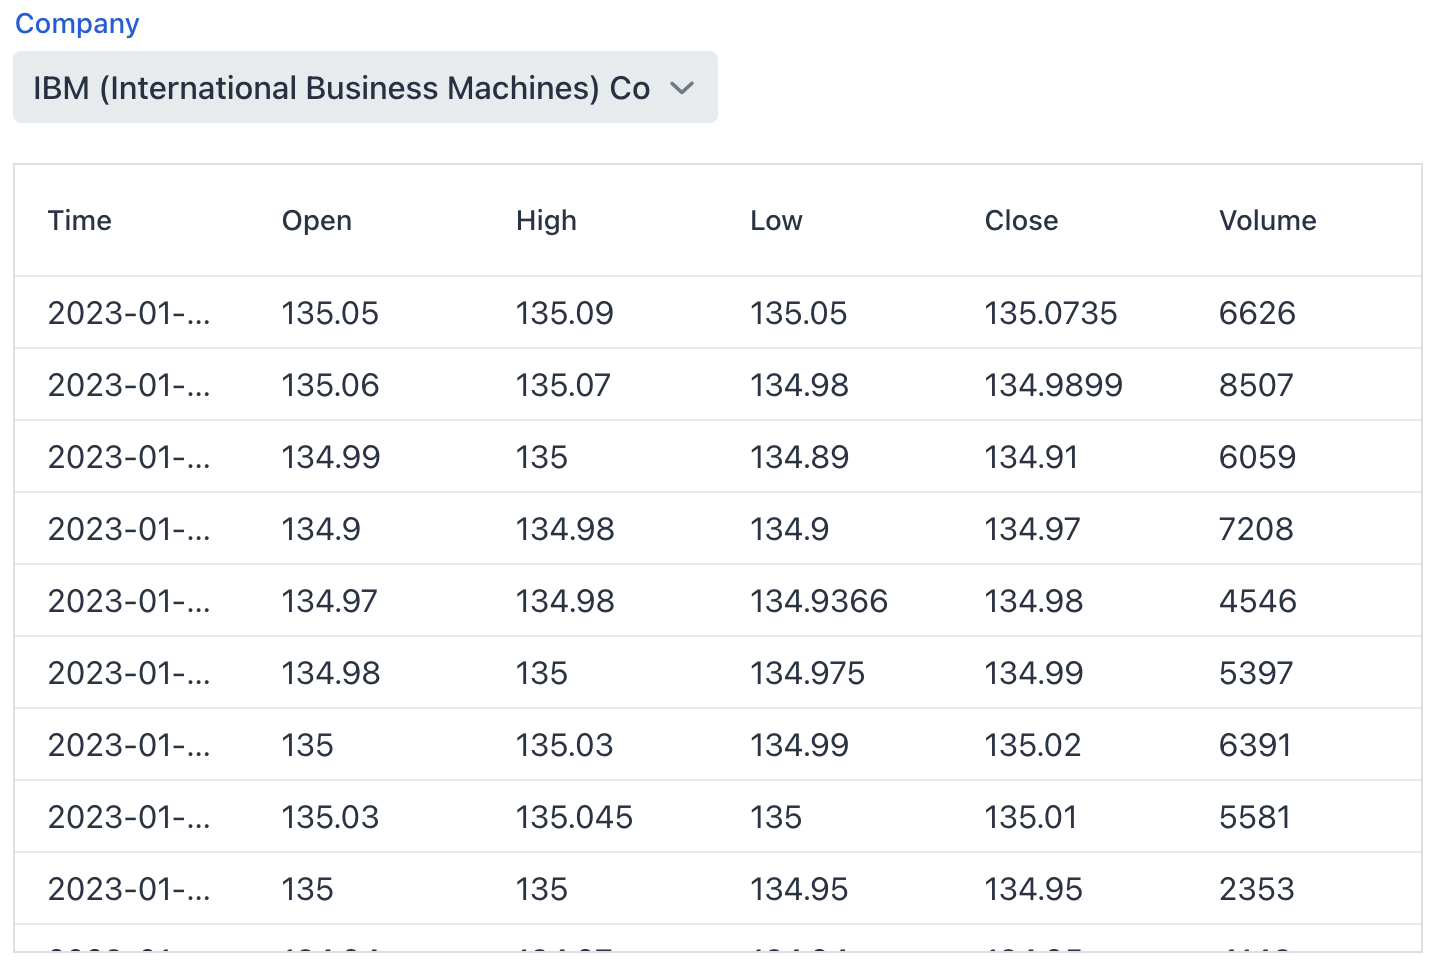
Displaying Cassandra Data in a Table
The historical data that is stored in Cassandra are displayed in a data grid component. The DetailsView contains a Vaadin Grid component that is bound to an array of StockPrice objects which are kept in a state variable:
const [stockData, setStockData] = useState<StockPrice[]>([]);The view has a dropdown selector for selecting the stock you want to view. When the selection is updated, the view fetches the data for that stock from the server endpoint:
async function getDataFor(ticker?: string) {
  if (ticker) setStockData(await StockPriceEndpoint.findAllByTicker(ticker));
}
The StockData array is bound to the grid in the template. GridColumns define the properties that columns should map to:
<Grid items={stockData} className="flex-grow">
  <GridColumn path="time" ></GridColumn>
  <GridColumn path="open" ></GridColumn>
  <GridColumn path="high" ></GridColumn>
  <GridColumn path="low" ></GridColumn>
  <GridColumn path="close" ></GridColumn>
  <GridColumn path="volume" ></GridColumn>
</Grid>
Conclusion
In this article, we showed how you can build a scalable real-time application using an open-source Java stack. You can clone the completed application and use it as a base for your own experiments.
Source link