Contents
-
Introduction to the Document Object Model
-
What is the DOM?
-
How does DOM work?
-
Selectors
Introduction
- In this blog, we are going to dive deep into DOM and try to understand what it is and how it works.
What Is DOM?
- It acts as an interface for HTML and XML documents, which represent the content of the document as a tree-like structure.
- DOM allows JavaScript and other programming languages to interact with and manipulate the content and structure of HTML or XML documents.
- We can use DOM to add or remove elements from the page, change the text of elements, or responds to a mouse click or keyboard inputs.
How Does DOM Work?
- When a web page is loaded, the browser creates a Document Object Model (DOM) of the page.
- DOM works like a tree structure and converts the HTML code into a tree in which each node represents the elements of that particular HTML code.
- The root of this tree is document objects, and each node represents elements like paragraphs, images, headers, links, etc.
<html>
  <head>
    <title> DOM BLOG </title>
  </head>
  <body>
    <button> Click here to read the blog </button>
  </body>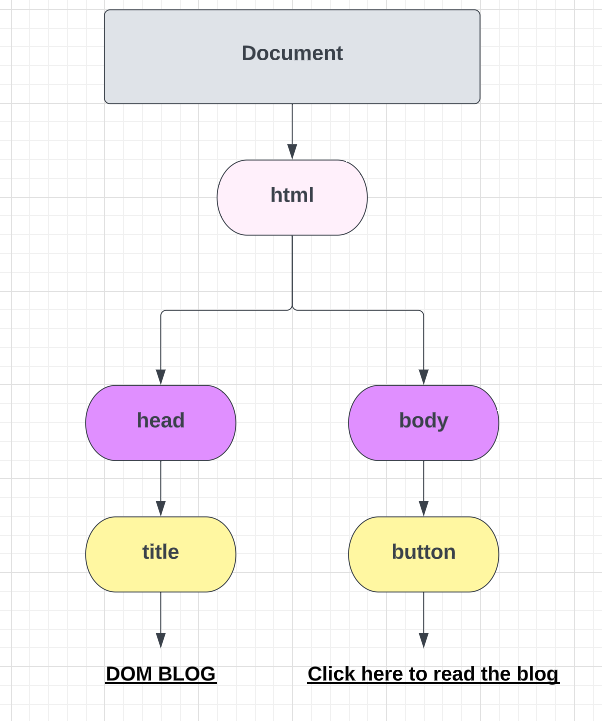
</html>- For example, if the above code is simple HTML code, then what DOM will do is convert this code into a tree-like structure so that the DOM manipulation can be done easily.
- Below is the image of how the above code gets converted into a tree structure by DOM.
- In DOM, properties and methods are two types of members associated with each node or element, or object. Properties and methods, along with some attributes and functions, help in interacting with and manipulating the HTML to get the desired outcome.
- Let’s understand properties and methods with the example:
The Properties
Let’s say you have an HTML document with a heading element like this:
<h1 id="blog-head">It's a blog about DOM</h1>Now, if we want to change this heading without even touching HTML, then what we are going to do is use DOM.
First, we “get” this heading element in JavaScript using a selector called getElementbyID(” ”);
It returns the value as an object.
var heading = document.getElementById('blog-head');Then we access its inner HTML using .innerHTML and change its value/text accordingly.
heading.innerHTML = 'Read, Learn and Leave your Feedback!';By doing all these steps, We change the innerHTML of the heading without even touching HTML.
Don’t worry; we are going to learn selectors in just a few minutes.
The Methods
Let’s say you have a button element in your HTML document like this:
<button id="my-button">Click me to read the blog about DOM</button>Now, same as above, first, we select the button in JavaScript using a selector called .getElementsbyID(” ”).
It returns the value as an object.
Now, we can manipulate and make changes with the button without touching HTML. Let’s say we want an alert of “You clicked the button for reading the blog about DOM!” whenever a user clicks the button.
In order to do that, we need to do two things.
-
Add event listener, which responds to the click
-
A
function()that executes the block of code and returns the alert which says, “You clicked the button for reading the blog about DOM!”.
var button = document.getElementById('my-button'); button.addEventListener('click', function() { alert('You clicked the button for reading the blog about DOM!'); });This .addEventListener() is what we call a method in DOM. We passed two arguments in it.
-
click = then click on button
-
function()= which shows the alert when the click happens.
NOTE: Methods have parenthesis() at the end, and properties do not.
In summary, properties are the value of an element or node, or object, while methods are similar functions() as it has a code that gets executed when that particular method is called.
There are differences b/w methods() and functions(), but it’s not the topic of this blog.
Selectors
There are many ways to select elements inside DOM.
Let’s say we have this HTML code:
<ul id = title> <li class = item> One <li> <li class = item> One <li> <li class = item> One <li> </ul>Now, if we want to select the li we use selectors:
1) get Elements by Tag Name(””);
-
This Selector selects all the elements by their tag names(li, ul, p, h1, h1 etc…)
-
In this case, we are selecting
li -
This selector selects all the
liin the HTML document
document.getElementsbyTagName("li"); // HTMLCollection(3) [li.item, li.item, li.item] => Selects all 3 "li" from above HTML codeNOTE: Elements is plural, so it returns more than one value in form of an array.
Now, Let’s style the li
document.getElementsbyTagName("li"); document.getElementsbyTagName("li")[0].style.color = "Red"; //change color of first li to red document.getElementsbyTagName("li")[1].style.color = "Blue"; //change color of second li to Blue document.getElementsbyTagName("li")[2].style.color = "Green"; //change color of Third li to GreenWe can also change the text size and text style by using different properties in place of style.
You can change the style of all three elements at once using loops.
var items = document.getElementsByTagName("li"); for (let i = 0; i < 3; i++) { items[i].style.backgroundColor = "red"; }2) get Elements by Class Name(””);
- This selector selects all the elements with particular class names given to that element.
<ul id = title> <li class = item> One <li> <li class = item> One <li> <li class = item> One <li> </ul> <button class="btn">Click to read blog</button>document.getElementsbyClassName("btn"); //This selects all the elements with .btn class in it- Similar to the above example, we can also add different properties to get different results, like changing text color, text size, and others.
document.getElementsByClassName("btn"); document.getElementsByClassName("btn")[0].textContent = "you are reading the blog" //This changes the text content inside the button.- This selector also returns the value as an array.
3) get Element by ID(” ”);
- This selector selects the element with the Unique ID given to it.
<ul id = title> <li class = item> One <li> <li class = item> One <li> <li class = item> One <li> </ul> <button class="btn">Click to read blog</button>Now, let’s select the ul element using its ID.
document.getElementbyID("title"); //Selects element with ID Onlydocument.getElementbyID("title").style.color = "red"; //Styles the title element and changes its color to Red.NOTE: ID selector has “Element” without “s,” which means it’s singular, so it returns only a single value.
Also, ID is a unique property, and on every page, there is only one ID of the same name, so that also clears that there’s only one single element with a particular ID.
4) query Selector(””);
-
So, the previous three selectors are used in specific cases(for the tag name, for class, for ID). But, in the query selector, we can target any element with its name only, whether it be h1,h2,h3, or IDs like(#title) or classes like(.btn)
<h1 class = "header" id = "first-head">Follow me for more such informative blogs</h1>- We can style and manipulate the h1 element in three ways here;
document.querySelector("h1").style.color = "red" //Here we select the element with its tag name //This changes color of element to Reddocument.querySelector("#first-head").style.color = "Blue" //Here we select the same element with its ID //This changes color of element to Bluedocument.querySelector(".header").style.color = "Green" //Here we select the same element with its class name //This changes color of element to GreenThis is all for this blog. Read, learn, and leave your important feedback so that I can improve my future blogs. There is going to be one more part of this blog, so stay tuned for that one.
Source link
