Express.js is the most popular web framework for developing web applications in Node.js. It comes with several features to make API development faster and easier.
However, Express falls short when it comes to security, not ensuring an adequate level of protection from common vulnerabilities. Fortunately, it can be easily extended thanks to middleware, a set of functions executed during the processing of HTTP requests.
Helmet.js is middleware-based technology that improves security by safeguarding HTTP headers returned by a Node.js app. Here, you will learn what Helmet is, why you need it, and how to integrate it into Node.js to secure HTTP headers in an Express.js application. We will cover:
Let’s dig into Helmet in Node.js!
What is Helmet?
Helmet.js is an open source JavaScript library that helps you secure your Node.js application by setting several HTTP headers. It acts as a middleware for Express and similar technologies, automatically adding or removing HTTP headers to comply with web security standards.
Although not a silver bullet, Helmet makes it harder for attackers to exploit known vulnerabilities. It helps to protect Node.js Express apps from common security threats such as Cross-Site Scripting (XSS) and click-jacking attacks.
Helmet is particularly useful because Express applications do not come with security HTTP headers out of the box. This explains why the helmet npm package has more than 2,000,000 weekly downloads, while its GitHub repo boasts over 9.4k stars!
Let’s now dig deeper into why adopting Helmet in Node.js is so important.
Why do you need Helmet in a Node.js app?
Without Helmet, default headers returned by Express expose sensitive information and make your Node.js app vulnerable to malicious actors. In contrast, using Helmet in Node.js protects your application from XSS attacks, Content Security Policy vulnerabilities, and other security issues.
Let’s explore this question further through an example. You are going to set up a Node.js Express app and see what level of security its default HTTP headers offer.
Setting up a Node.js Express project
First, make sure you have Node.js and npm installed on your machine. If you aren’t set up yet, start by downloading Node.js and following the installation wizard to set it up.
Now, let’s set up an Express project. Run the command below to create the express-demo project folder:
mkdir express-demo
Then, enter the express-demo folder in your terminal by running the following:
cd express-demo
Launch the following command to initialize a default npm project:
npm init -y
The npm init command will configure a blank npm project for you. Note that the -y flag will automatically answer “yes” to all questions that npm would otherwise ask you during the process.
You need to add Express to your project’s dependencies. Install the Express module with the below:
npm install express
Then, create an index.js file in the express-demo folder and initialize it with these lines:
// index.js

const express = require("express")

// creating an Express instance
const app = express()
const PORT = process.env.PORT || 3000

// initializing a basic API that
// returns the "Hello, World!" message
app.get("https://247webdevs.blogspot.com/", (req, res) => {
    res.json("Hello, World!")
})

// running the server
app.listen(PORT, () => {
    console.log(`Starting Express server on http://localhost:${PORT}`)
})
This is nothing more than a basic Express server setup with a single endpoint.
Start the server with this command:
node index.js
The Express server should now be running at http://localhost:3000. Launch the command below in your terminal to test the / endpoint:
curl http://localhost:3000/
This should print the following output:
"Hello, World!"
Et voilà! You now have a working Express app!
Exploring Express security without Helmet
Let’s now use the demo application we just created to verify the default behavior of Express when it comes to security HTTP headers.
Repeat the curl command above with the --include flag to get also the HTTP response headers:
curl http://localhost:3000/ --include
If you do not have cURL installed on your computer, use an HTTP client such as Postman or Insomnia to inspect the HTTP headers of the response.
In the response header section, you should be seeing the following:
X-Powered-By: Express
Content-Type: application/json; charset=utf-8
Content-Length: 15
ETag: W/"f-pob1Yw/KBE+3vrbZz9GAyq5P2gE"
Date: Fri, 20 Jan 2023 16:29:40 GMT
Connection: keep-alive
Keep-Alive: timeout=5
Note the X-Powered-By header. As with all headers that begin with X-, it is a non-standard header. Specifically, backend technologies generally use X-Powered-By to indicate the name and version number of the framework or library used by the server to generate the HTTP response.
As recommended by OWASP, a nonprofit foundation that works to improve web security, X-Powered-By should be omitted. This is because you should never give attackers details about your tech stack. Otherwise, they could use that info to exploit known vulnerabilities in that framework or library.
Now, let’s check what the Security Headers online project has to say about the security level of your Express app.
Since Security Headers only allows you to test public addresses, you need to make your local Express server publicly available. You can either deploy your Express app to a server or take advantage of ngrok, which allows you to expose a local web server to the Internet.
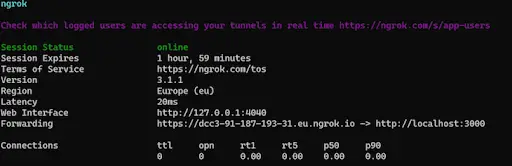
Download ngrok, extract it, and open the folder in the terminal. Then, launch the following command to host your local server with ngrok:
ngrok http 3000
You should get a similar result to the below:
The “Forwarding” field contains the URL to publicly access your local server. Since the endpoint to test is /, copy the URL, add a trailing / character, and paste it in the Security Headers input as shown below:

Click the “Scan” button, and you should get the following result:
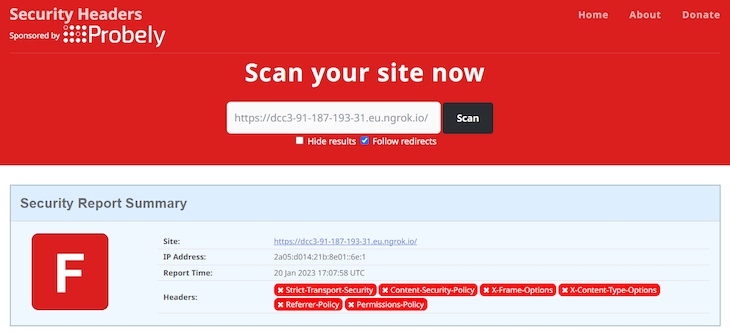
As you can see here, the Security Headers project gives the demo app a worrying “F” grade. The reason is that the API response developed with Express without Helmet is missing all the most relevant HTTP security headers.
This is also why the official Express “Production Best Practices: Security” page mentions adopting Helmet as a best practice for production applications. Let’s now learn how to integrate Helmet in Node.js!
Securing Express with Helmet
Let’s expand the Express demo project implemented earlier to secure it with Helmet. As you are about to learn, this only takes a couple of lines of code.
Installing Helmet in your Express project
First, you need to add Helmet.js to your project’s dependencies. Install the helmet npm package with the following command:
npm i helmet
Your package.json file will now contain helmet in the dependencies fields.
Setting up Helmet in Express
Integrating Helmet into your Node.js Express app is simple. In case of problems, follow the official guide.
In your index.js file, import helmet with the following command:
const helmet = require("helmet")
Now, register helmet in your Express application with the below:
app.use(helmet())
Remember that helmet() is nothing more than an Express middleware. Specifically, the top-level helmet() function is a wrapper of 15 sub-middlewares. So, by registering helmet(), you are adding 15 Express middlewares to your apps.
Note that each middleware takes care of setting one HTTP security header.
Your index.js file will now look as follows:
// index.js

const express = require("express")
const helmet = require("helmet")

const PORT = process.env.PORT || 3000

const app = express()

// enabling the Helmet middleware
app.use(helmet())

// initializing a basic API that
// returns the "Hello, World!" message
app.get("https://247webdevs.blogspot.com/", (req, res) => {
    res.json("Hello, World!")
})

// running the server
app.listen(PORT, () => {
    console.log(`Starting Express server on http://localhost:${PORT}`)
})
That’s it! Adding Helmet to your Node.js app only involve two lines of code!
Exploring Express security with Helmet
Let’s repeat the security test performed earlier. Stop your Node.js local server and relaunch it with this command:
node index.js
Repeat the curl command or use an HTTP client to see the HTTP headers of the new response:
curl http://localhost:3000/ --include
The response HTTP header section will now include the following:
Content-Security-Policy: default-src 'self';base-uri 'self';font-src 'self' https: data:;form-action 'self';frame-ancestors 'self';img-src 'self' data:;object-src 'none';script-src 'self';script-src-attr 'none';style-src 'self' https: 'unsafe-inline';upgrade-insecure-requests
Cross-Origin-Embedder-Policy: require-corp
Cross-Origin-Opener-Policy: same-origin
Cross-Origin-Resource-Policy: same-origin
X-DNS-Prefetch-Control: off
X-Frame-Options: SAMEORIGIN
Strict-Transport-Security: max-age=15552000; includeSubDomains
X-Download-Options: noopen
X-Content-Type-Options: nosniff
Origin-Agent-Cluster: ?1
X-Permitted-Cross-Domain-Policies: none
Referrer-Policy: no-referrer
X-XSS-Protection: 0
Content-Type: application/json; charset=utf-8
Content-Length: 15
ETag: W/"f-pob1Yw/KBE+3vrbZz9GAyq5P2gE"
Date: Fri, 20 Jan 2023 18:15:32 GMT
Connection: keep-alive
Keep-Alive: timeout=5
As you can see, there are many new HTTP headers in the response. Also, X-Powered-By was removed.
If you shut down ngrok, run it again with the following:
ngrok http 3000
Otherwise, visit the Security Headers website right away. Just like before, copy the URL provided by ngrok and click “Scan.” This time, the outcome will be different:
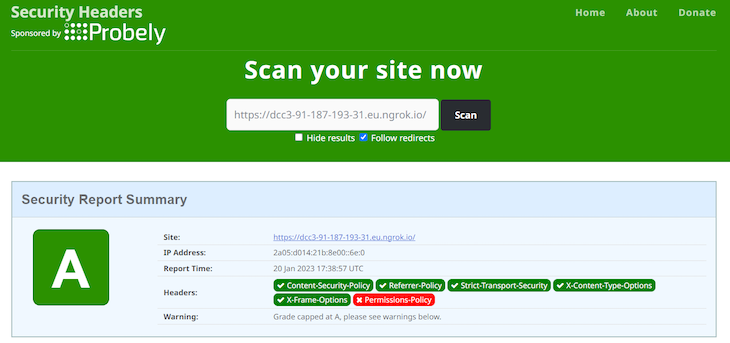
Note that the API response now involves all the major HTTP Security headers, except for Permissions-Policy. This allowed the Express app to go from an “F” grade to an “A” grade. What a huge change with just two lines of code!
Also, as mentioned on GitHub by one of the lead developers of Helmet.js, Helmet does not automatically support Permissions-Policy only because the header specification is still in a draft state. So, this may change soon.
As you just learned, Helmet sets a lot of headers by default. Since security policies change over time, it is critical to always keep helmet up-to-date. This way, the security headers introduced by Helmet will always comply with security standards.
All of those headers have an impact on the security of your application, but some are more relevant than others. Let’s now focus on the most important security headers to understand why they are useful, how Helmet treats them by default, and how you can configure them with Helmet.
Content Security Policy, also known as CSP, is a security measure that helps you mitigate several attacks, such as cross-site scripting (XSS) and data injection attacks.
Specifically, CSP allows you to specify what sources of content a web page is allowed to load and execute. For example, you can use CSP to block a web page from loading images and iframes from other websites.
You can configure CSP through the Content-Security-Policy HTTP header. By default, Helmet gives the Content-Security-Policy header the following value:
Content-Security-Policy: default-src 'self';base-uri 'self';font-src 'self' https: data:;form-action 'self';frame-ancestors 'self';img-src 'self' data:;object-src 'none';script-src 'self';script-src-attr 'none';style-src 'self' https: 'unsafe-inline';upgrade-insecure-requests
With this policy, your web pages cannot load remote fonts or styles. This is because font-src and style-src are set to self, respectively. The CSP policy defined by Helmet by default is very restrictive, but you can change it with contentSecurityPolicy() as follows:
// overriding "font-src" and "style-src" while
// maintaining the other default values
helmet.contentSecurityPolicy({
  useDefaults: true,
  directives: {
    "font-src": ["'self'", "external-website.com"],
    // allowing styles from any website
    "style-src": null,
  },
})
useDefaults applies the default values. Then, the following directives override the defaults. Set useDefaults to false to define a CSP policy from scratch.
The Referrer-Policy HTTP header defines what data should be sent as referrer information in the Referer header. By default, Referer generally contains the current URL from which an HTTP request is performed.
For example, if you click on a link to a third-party website, Referer will contain the address of the current web page. As a result, the third-party website could use the header to track you or understand what you were visiting.
If the current address contains private user information, the third-party site will be able to steal it from the Referer header. Because of this, even though this header is typically used for caching or analytics, it opens up some privacy concerns because it can leak sensitive information.
Helmet sets it to no-referrer by default. This means that the Referer header will always be empty. So, requests performed by web pages served by your Node.js app will not include any referrer information.
If you want to change this restrictive policy, you can do it with refererPolicy as below:
// setting "Referrer-Policy" to "no-referrer"
app.use(
  helmet.referrerPolicy({
    policy: "no-referrer",
  })
)
The Strict-Transport-Security HTTP header, also known as HSTS, specifies that a site or resource should only be accessed via HTTPS. In detail, the maxAge parameter defines the number of seconds browsers should remember to prefer HTTPS over HTTP.
By default, Helmet sets the Strict-Transport-Security header as follows:
max-age=15552000; includeSubDomains
Note that 15552000 seconds corresponds to 180 days, as well as that includeSubDomains extends the HSTS policy to all the site’s subdomains.
You can configure the Strict-Transport-Security header with the hsts Helmet function as follows:
app.use(
  helmet.hsts({
    // 60 days
    maxAge: 86400,
    // removing the "includeSubDomains" option
    includeSubDomains: false,
  })
 )
The X-Content-Type-Options HTTP header defines that the MIME types used in the Content-Type header must be followed. This mitigates MIME type sniffing, which can lead to XSS attacks and cause other vulnerabilities.
For example, attackers could hide HTML code in a .png file. The browser might perform MIME type sniffing to determine the content type of the resource.
Since the file contains HTML code, the browser will determine that it is an HTML file rather than a JPG image. Thus, the browser will execute the attacker’s code accordingly when rendering the page.
By default, Helmet sets X-Content-Type-Options to nosniff. This disables and prevents MIME type sniffing.
Note that the noSniff() Helmet function contained in helmet() does not accept parameters. If you want to disable this behavior and go against recommended security policies, you can prevent Helmet from importing nosniff() with the following:
app.use(
  // not loading the noSniff() middleware
  helmet({
    noSniff: false,
  })
)
The X-Frame-Options HTTP response header specifies whether or not a browser should be allowed to render a page in the <frame>, <iframe>, <embed> and <object> HTML elements.
By preventing the content of your site from being embedded in other sites, you can avoid click-jacking attacks. A click-jacking attack involves tricking users into clicking on something different from what they perceive or expect.
By default, Helmet sets X-Frame-Options to SAMEORIGIN. This allows a web page to be embedded in a frame on pages with the same origin as the page itself. You can set this header in Helmet with frameguard() as follows:
// setting "X-Frame-Options" to "DENY"
app.use(
  helmet.frameguard({
    action: "deny",
  })
);
If you want to omit the X-Frame-Options header entirely, you can disable the frameguard() middleware with the following:
app.use(
  // not including the frameguard() middleware
  helmet({
    frameguard: false,
  })
)
Note that this is not recommended for security reasons.
Conclusion
In this article, you learned what Helmet.js is and why it plays such an important role when it comes to securing a Node.js app.
As you saw here, APIs developed in Express do not involve security HTTP headers. So, default Express apps come with some security concerns.
With Helmet, you can add a security layer to Node.js with just a single line of code, safeguarding your application from the most common attacks and vulnerabilities.
The post Using Helmet in Node.js to secure your application appeared first on LogRocket Blog.
from LogRocket Blog https://ift.tt/oQpjVzf
Gain $200 in a week
via Read more
Source link