
If you’re using Rust in your application, you’re most likely working in an environment where code reliability and efficiency are focal points in your development process. Although Rust provides a compiler with rich, memory-safe features, when it comes to business processes and application logic, you still need to test your code to ensure that it performs as intended, especially in environments where change is a constant factor.
There are a lot of testing strategies for Rust, ranging from unit to integration testing. In this article, we’ll explore snapshot testing using Insta, learning how it can supplement your development efforts. To follow along, you can find the full boilerplate project on GitHub. Let’s get started!
Jump ahead:
What is snapshot testing?
Snapshot testing is a method of verifying the correctness of your code by comparing the output to a set of defined, expected values. For example, if you’ve written integration tests before, part of your tests could be considered a snapshot since you’re comparing expected results against actual outputs.
By default, Rust already has this feature using the assert_eq! function, but it only lets you compare against primitive Rust types. Snapshot testing requires you to make a comparison of more complex data structures.
Usually, snapshot testing is done on the frontend rather than the backend because frontend applications return HTML instead of a regular string. Instead of parsing the HTML and checking each specific element, it’s more time-efficient to compare the outputs.
You can utilize snapshot testing to its fullest potential when testing the entire program’s output, thereby testing more elements within a webpage without worrying about whether all the results are consistent.
What is Insta?
Insta is a snapshot testing library for Rust applications that offers a simple and intuitive interface for you to run and update tests:
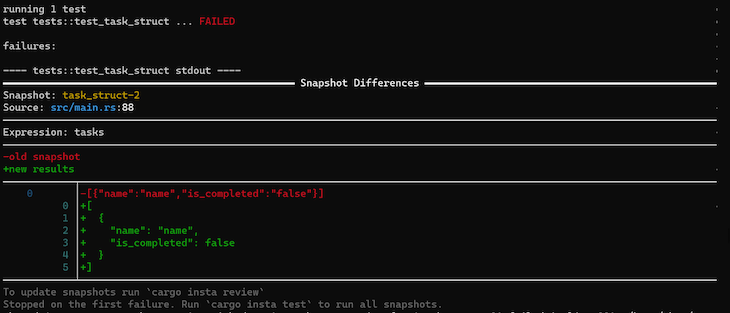
As you can see in the screenshot above, it’s very easy to debug tests in Insta, and with the help of the Insta CLI, you can easily update all the failing test outputs with the newer ones. Remember that you shouldn’t update the results every time there’s a failure. You should implement the updates only once you change the code output of a certain test, minimizing the number of errors caused by code updates.
Insta only supports CSV, JSON, TOML, YAML, and RON files via Serde, a data serialization library that makes it possible to encode various types of data structures into a more compact format, and vice versa.
How Insta works
Insta has many different flavors of support. As mentioned, you can use Insta to snapshot test JSON files, CSV files, and even YAML files. But, what’s interesting about this is how the Insta macros run under the hood.
Insta provides multiple file support using Serde. Still, instead of separating them into smaller packages, Insta relies on Cargo’s features to seamlessly ship all the packages as one, so the client can download only what they need via features:
// Cargo.toml
[features]
csv = ["dep_csv", "serde"]
json = ["serde"]
ron = ["dep_ron", "serde"]
toml = ["dep_toml", "serde"]
yaml = ["serde"]
The main Insta snapshot assertion library only compares two strings. So, in the end, as long as you pass the SerializationFormat, the assert_snapshot! macro will compile and work just fine.
The chart below demonstrates the assertion library flow:
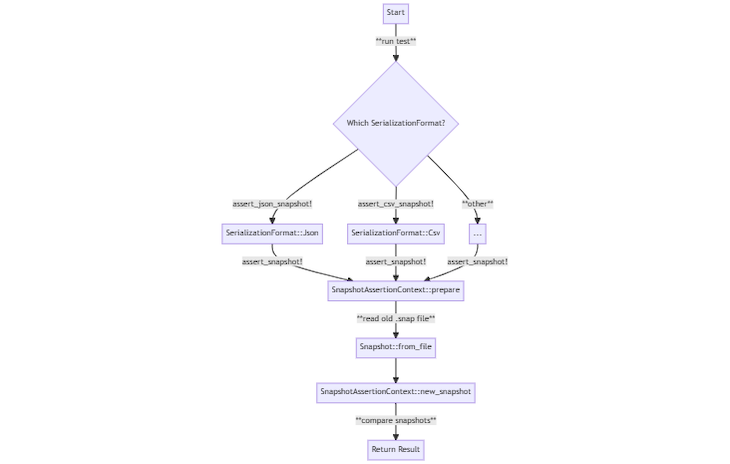
The main runtime consists of only assert_snapshot!, while the other macros function as wrappers. The process within the assert_snapshot! macro is pretty straightforward. Insta reads the old snapshot via the .snap file, creates a new snapshot with SnapshotAssertionContext::new_snapshot, runs a basic comparison, then returns an Ok(()) if the values are equal.
The macro wrappers exist in the macros.rs file, which will call the _assert_serialized_snapshot function that will pipe them all together into assert_snapshot. Each macro wrapper has a SerializedFormat hard-coded into it. All the serializations are located in the serialization.rs file and the content directory.
Insta vs. assert_eq
Under the hood, both Insta and assert_eq do things other than serialization. The biggest difference between the two assertion solutions is that Insta supports serialization natively. At the same time, you have to do manual serializations using Serde to achieve the same result as Insta when using assert_eq!.
Even inside the assert_snapshot function, Insta makes a simple string-to-string comparison. Using assert_eq will achieve similar results. The comparison process for assert_eq is much more lightweight than Insta’s, and comparing Insta with assert_eq is not ideal compared to using Insta directly since it requires a lot of boilerplate code and extra effort.
Getting started with Insta
Installing Insta is simple. Like any other Cargo package, open your Cargo.toml and add your dependencies. In this case, you’ll add both Insta and Serde:
// Cargo.toml // ...
[features]
json = ["serde"]

[dependencies]
serde = { version = "1.0.117", optional = true }

[dev-dependencies]
insta = { version = "1.26.0", features = ["json", "csv"] }
serde = { version = "1.0.117", features = ["derive"] }
In this example, we’ll use the json and csv features to make a simple program that you can test. We’ll create a simple to-do list CLI app to track tasks over time.
First, create a basic boilerplate inside the src/main.rs file:
// main.rs
use std::env;
use std::io::{self, BufRead};
use std::path::Path;

struct Task {
    name: String,
    is_completed: bool,
}

fn readline() -> String {
    let mut strr: String = "".to_string();
    let stdin = io::stdin();
    for line in stdin.lock().lines() {
        strr = line.unwrap().to_string();
        break;
    }
    strr
}

fn main() -> io::Result<()> {
    let mut tasks: Vec<Task> = vec![];
    while true {
        println!("{}", readline());
        break;
    }
    Ok(())
}
fn add_task(tasks: &Vec<Task>) -> io::Result<()> {
    // TODO: Add logic
    Ok(())
}
fn list_tasks(tasks: &Vec<Task>) -> io::Result<()> {
    // TODO: List logic
    Ok(())
}
fn complete_task(tasks: &Vec<Task>) -> io::Result<()> {
    // TODO: Complete logic
    Ok(())
}
This simple CLI will allow users to create or update new tasks. The structure of the code might give you a clue about what we’ll use Insta for. But, let’s not get ahead of ourselves.
Next, we’ll define each function to add more structure, focusing on the main function:
fn main() -> io::Result<()> {
    let mut tasks: Vec<Task> = vec![];
    loop {
        list_tasks(&tasks);

        let option = readline();
        _ = match option.as_str() {
            "1" => {
                println!("Enter new task name: ");
                let name = readline();
                add_task(&mut tasks, name);
            },
            "2" => {
                println!("Enter task to complete: ");
                let level: i32 = readline().parse::<i32>().unwrap();
                complete_task(&mut tasks, level);
            },
            _ => break,
        };
    }
    Ok(())
}
The main function will redirect your commands to the other functions of the application, either to list tasks, create new ones, or complete them. To simplify things, for now, we won’t have a task removal function. But, you can implement one later on if needed.
CRUD is an acronym for create, read, update, and delete. Don’t mind the delete part for now. We’ll start with the create function add_task.
Since a mutable tasks vector is passed from the main to the add_task function, you can add a new item to the vector using the .push modifier:
fn add_task(tasks: &mut Vec<Task>, name: String) -> io::Result<()> {
    tasks.push(Task {
        name: name,
        is_completed: false,
    });
    Ok(())
}
Read
You’ll want to list the task list every time you open the CLI. list_tasks is already declared at the beginning of the loop in main; all you need to do is to define it. To make things simpler, pass the tasks vector to the list_tasks function. Then, iterate over them and print their names and states:
fn list_tasks(tasks: &Vec<Task>) {
    for _ in 0..50 {
        println!("n");
    }
    println!("Tasks List: ");
    for task in tasks {
        println!("Name: {}", task.name);
        println!("Is Completed: {}", task.is_completed);
    }
    println!("Choose the following options:
1. Add tasks
2. Complete tasks
3. Exit");
}
Rust doesn’t have a clear screen option for CLIs; you can get around that by printing white lines fifty times.
Finally, to update the tasks, you only update their state. You can access the vector item directly and modify the is_completed property:
fn complete_task(tasks: &mut Vec<Task>, level: i32) -> io::Result<()> {
    tasks[level as usize].is_completed = true;
    Ok(())
}
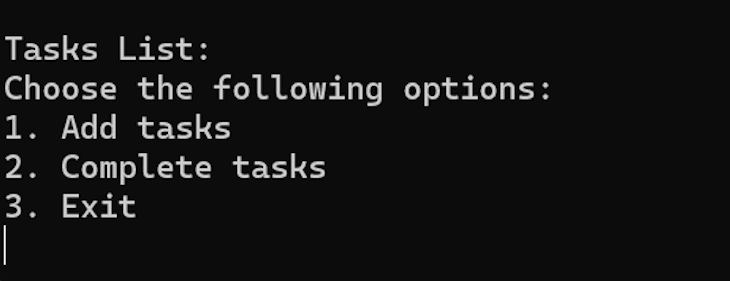
Now, try running the application. You should be able to create and complete new tasks. Go to your terminal and type cargo run, and you should see something like the following:
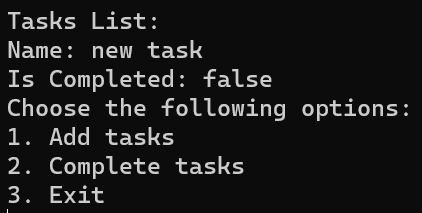
It’s not the most sophisticated app, but for our tutorial, it works. Type in 1 and press enter. Rename the task new task, and you‘ll receive the following:
If it was difficult for you to follow along, you can see what we did up to this point in the GitHub branch. Now that you’ve verified that everything is running, you can proceed to the snapshot tests.
Serde is an optional dependency and Insta is a dev-dependency, so you can’t include them in the main application context. You must prefix them with a #[cfg(test)] macro. Duplicate the Task struct as follows:
#[cfg(test)]
#[derive(serde::Serialize, Clone)]
struct Task {
    pub name: String,
    pub is_completed: bool,
}

#[cfg(not(test))]
#[derive(Clone)]
struct Task {
    pub name: String,
    pub is_completed: bool,
}
The Task used in the test will be serializable and cloneable, so we can store multiple copies of the same object without corrupting it. We’ll use the struct with the #[cfg(test)] during testing and the #[cfg(not(test))] when running the project with cargo run. We’ll separate the structs for different contexts; although this is not the best practice, it will save you time to focus on the more important Insta tests.
To make add_task and complete_task testable, they must return a Task struct every time they run:
fn add_task(tasks: &mut Vec<Task>, name: String) -> io::Result<Task> {
    let task = Task {
        name: name,
        is_completed: false,
    };
    tasks.push(task.clone());
    Ok(task)
}

// fn list_tasks....

fn complete_task(tasks: &mut Vec<Task>, level: i32) -> io::Result<Task> {
    tasks[level as usize].is_completed = true;
    Ok(tasks[level as usize].clone())
}
The previously added Clone derivation will be used in the add_task function. To write a unit test for this function using Insta, at the bottom of the file, add the following code:
#[cfg(test)]
extern crate insta;
Then, test the add_task function like so:
#[cfg(test)]
mod tests {
    use super::*;
    use insta::{assert_json_snapshot, assert_compact_json_snapshot, assert_csv_snapshot};

    #[test]
    fn test_json_add_task_struct_vec() {
        let mut tasks: Vec<Task> = vec![];

        let task: Task = add_task(&mut tasks, "name".to_string()).unwrap();
        assert_json_snapshot!(task, @r###"{
  "name": "name",
  "is_completed": false
}"###);
        assert_compact_json_snapshot!(task, @r###"{"name": "name", "is_completed": false}"###);
        assert_json_snapshot!(tasks, @r###"[
  {
    "name": "name",
    "is_completed": false
  }
]"###);
        assert_compact_json_snapshot!(tasks, @r###"[{"name": "name", "is_completed": false}]"###);
    }
}
Run the tests by executing the cargo test command in your terminal or the command prompt. All the tests should pass successfully, and you’re done! You can still add more tests, and if you want to see the end project, visit the GitHub branch.
If you have any questions regarding the code in this project or the tests for these functions, feel free to create an Issue at the GitHub repository.
Conclusion
When developers write applications, they face the challenge of testing. In an ideal world, we’d be able to run our code and ensure that it works as expected before deploying it to production. However, real-world software development is far from ideal, so testing is an essential part of our development workflow. This is especially true when developing mission-critical systems or applications where failure is not an option.
Aside from using C/C++, languages like Rust, which provide strict type-systems, are increasingly becoming an option for mission-critical applications, especially if you’re accounting for speed and memory safety.
Snapshot testing helps you to verify the correctness of your code by validating the outputs. It’s very helpful if you’re managing an ever-changing codebase, so you’ll find out if something is breaking when you make updates or changes.
Insta makes wrappers around common assertion macros available for you to use in your program. By having them tested and ready for deployment with your project’s requirements in mind, Insta handles most of the boilerplate code you might otherwise have to do yourself.
There are many features of Insta that are beyond the scope of this article, but you can read more on the official documentation page and watch the official video explanation of Insta.
LogRocket: Full visibility into web frontends for Rust apps
Debugging Rust applications can be difficult, especially when users experience issues that are difficult to reproduce. If you’re interested in monitoring and tracking performance of your Rust apps, automatically surfacing errors, and tracking slow network requests and load time, try LogRocket. 
LogRocket is like a DVR for web and mobile apps, recording literally everything that happens on your Rust app. Instead of guessing why problems happen, you can aggregate and report on what state your application was in when an issue occurred. LogRocket also monitors your app’s performance, reporting metrics like client CPU load, client memory usage, and more.
Modernize how you debug your Rust apps — start monitoring for free.
Source link
