
User authentication is an essential part of any web application, and setting it up can be a daunting task for many developers. However, with the help of Appwrite, this process can become much easier and more streamlined.
This tutorial will cover how to use Appwrite Web SDK to interact with Appwrite’s new Graphql API to set up user authentication in a React application. We will discuss how to implement signup functionality, handle user login and logout, and implement an email verification feature.
Jump ahead:
To follow along with this tutorial, you should have a basic understanding of React and its concepts. This tutorial also requires a basic understanding of GraphQL, including how to write queries and mutations.
So, let’s get started!
Setting up Appwrite
In this blog, we will be discussing how to use Appwrite to implement user authentication in your React application easily. But before diving into the details, let’s briefly discuss what Appwrite is.
Appwrite is an open source, self-hosted, backend-as-a-service platform. It provides all the core APIs that allow developers to easily manage and interact with various services, such as user authentication, database management, and file storage.
By using Appwrite, developers can focus on building their core application logic while leaving the backend infrastructure to Appwrite.
The first step in setting up Appwrite is to install it using Docker. To do so, you need to have the Docker CLI installed on your host machine. Then, you can run one of the following commands according to your OS to install Appwrite.
Before running the command, make sure Docker is running on your machine.
To install Appwrite on a Mac or Linux device, use the following command:
docker run -it --rm
    --volume /var/run/docker.sock:/var/run/docker.sock
    --volume "$(pwd)"/appwrite:/usr/src/code/appwrite:rw
    --entrypoint="install"
    appwrite/appwrite:1.2.0
To install Appwrite on a Windows device, run the following command using Command Prompt:
docker run -it --rm ^
    --volume //var/run/docker.sock:/var/run/docker.sock ^
    --volume "%cd%"/appwrite:/usr/src/code/appwrite:rw ^
    --entrypoint="install" ^
    appwrite/appwrite:1.2.0
After running the command, you will be prompted with a series of configuration questions. These questions will ask for information such as the HTTP port, hostname, and other settings. You can choose the default options by pressing the enter key or modify the options if you prefer.
For more detailed instructions on installing Appwrite, you can refer to the official installation documentation on the Appwrite website.
Creating a project on the Appwrite console
Now that you have Appwrite installed and running on your machine, you can access the Appwrite console by navigating to http://localhost.
You will be prompted to create a new account. This account will be used to access the Appwrite console and manage your projects and services.
To create a project, click the “Create Project” button on the Appwrite dashboard, enter the project name, and click “Create.”
Once you have created a project, you will need to add a web platform to your project to init the Appwrite SDK and interact with the Appwrite APIs. You can do this by clicking the “Web App” button on the Appwrite console.
You will be prompted to enter a project name and hostname. For development purposes, you can use localhost as your hostname. Once you have added the web platform, you will be able to use the Appwrite SDK to interact with the Appwrite services.
Cloning the starter code for our React and Appwrite project
To get started quickly, I have created a starter code repository that contains all the necessary code. To clone the starter code, open up a terminal and run the following command:
git clone https://github.com/rishipurwar1/appwrite-graphql-authentication.git
Once you have cloned the starter code repository, you will find all the components inside the src/components folder. These components include:
Navbar.js— responsible for displaying the navbar at the top of the application- Contains links to the different pages of the application
Home.js— the main landing page of the sample applicationLogin.js— contains the code for the login formSignup.js— contains the code for the signup formProfile.js— contains the code for the profile page- Displays the user’s profile information (display name, email address, etc.)
In addition to the components mentioned earlier, the starter code repository also includes the routing setup for React Router in the src/App.js file. For example, the / URL is mapped to the Home component, the /login URL is mapped to the Login component, and so on.
You will also find the CSS code in the src/App.css file for all the components, which is imported into the App.js file.
After cloning the starter code repository, you must install all the dependencies before running the application. To do this, you need to navigate to the appwrite-graphql-authentication directory and run the following command:
npm install
Once the dependencies are installed, you can run the application by using the command:
npm start
This command will start the application, which you can access by navigating to http://localhost:3000 in your web browser.
Setting up the Appwrite Web SDK
Now that our sample application is up and running, we can proceed to install the appwrite package in order to interact with Appwrite services using the Appwrite Web SDK easily. To do this, install the appwrite package by running the following command:
npm install appwrite
Once the package is installed, create an appwrite folder inside the src folder, and inside it, create a config.js file. This file will be used to import and initialize the Appwrite SDK.
In the config.js file, you can import the Appwrite modules and initialize the Appwrite SDK by adding the following code to the file:
import { Client, Graphql } from "appwrite";

// initialize SDK
const client = new Client();
client
  .setEndpoint("YOUR_API_ENDPOINT") // Replace this
  .setProject("YOUR_PROJECT_ID"); // Replace this

export const graphql = new Graphql(client);
Make sure to replace “YOUR_API_ENDPOINT” and “YOUR_PROJECT_ID” with your project’s API endpoint and project ID. You can find this information on your Appwrite project settings page:
In the last line of the code, we created and exported the graphql instance we will use it in other components to interact with the Appwrite Graphql API.
Implementing signup functionality in our React app
In this section, we will implement the signup functionality for our React application. To do this, we will create a custom Hook, which will contain functions for login, signup, and logout actions. This Hook will also have one state variable to keep track of the logged-in user.
By creating a custom Hook, we can easily manage the state and functionality related to user authentication in one place. This will make it easy to reuse the code across different components and keep the application organized.
Now, let’s create a hooks folder inside the src folder, then create a useAuth.js file. At the top of this file, import graphql from the config.js. You will then need to create a useAuth function by adding the following code:
import { graphql } from "../appwrite/config";

const useAuth = () => {
  // useAuth hook code goes here
};

export default useAuth;
Let’s create a signup function inside the useAuth. We can do that by adding the following code:
import { graphql } from "../appwrite/config";

const useAuth = () => {
  // sign up functionality
  const signup = async (email, password, username) => {
    const response = await graphql.mutation({
      query: `mutation (
                $email: String!,
                $password: String!,
                $name: String
            ) {
                accountCreate(
                    userId: "unique()",
                    email: $email,
                    password: $password,
                    name: $name
                ) {
                  _id
                }
            }`,
      variables: {
        email: email,
        password: password,
        name: username,
      },
    });

    if (response.errors) {
      throw response.errors[0].message;
    }
  };

  return {
    signup,
  };
};

export default useAuth;
The signup function we created in the code above takes in three parameters — email, password, and username. Inside the function, there is a method called graphql.mutation that is used to make changes to the data. In this case, the method creates a new account with the provided email, password, and username.
The mutation method takes in an object that contains two properties — the query property and the variables object.
The query property uses the accountCreate mutation to create a new user account with the provided email, password, and username.
The variables object is used to pass the values of the email, password, and username to the accountCreate mutation dynamically. If the mutation is successful, it will return the _id of the created account.
The if block is added to check for any errors while creating the account.
Finally, the Hook returns an object that contains the signup function, which can be used in other components.
Using the signup function in our Appwrite project
Now that we have created the signup function inside our useAuth hook, we can use it in our Signup component to create a new account. Before we do that, let me explain the Signup component code.
In this component, we have two functions — handleChange and handleSubmit.
The handleChange function is used to update the user state variable with the values entered by the user in the form input fields.
The handleSubmit function is used to handle the form submission event, and prevent the default form submission behaviour. In this example, this function only logs the user object to the console, but later on, we will use the signup function to create a new account.
The form has three input fields for email, username, and password. Each input field has the onChange event that calls the handleChange function to update the user state variable with the values entered by the user.
The form element also has an onSubmit event that calls the handleSubmit function when a user clicks the submit button.
Let’s use the signup function to create a new user account when a user signs up using the Signup form.
To do this, first, we need to import the useAuth hook in the Signup component, then call the useAuth hook and destructure the signup function from it. Then, call the signup function inside the handleSubmit function with the values of the email, password, and username entered by the user.
Your code should look like this:
import { useState } from "react";
import { Link } from "react-router-dom";
import { useAuth } from "../hooks/useAuth"; // import useAuth

const Signup = () => {
  const [user, setUser] = useState({});
  const { signup } = useAuth();

  const handleChange = (e) => {
    setUser({ ...user, [e.target.name]: e.target.value });
  };

  const handleSubmit = async (e) => {
    e.preventDefault();
    try {
      await signup(user.email, user.password, user.username);
      alert("Account created successfully!");
    } catch (error) {
      console.log(error);
    }
  };

  // rest of the code
}
To test the signup feature, open the signup page of your application. Fill in the form with your email, username, and password. Remember that the password should be at least eight characters long.
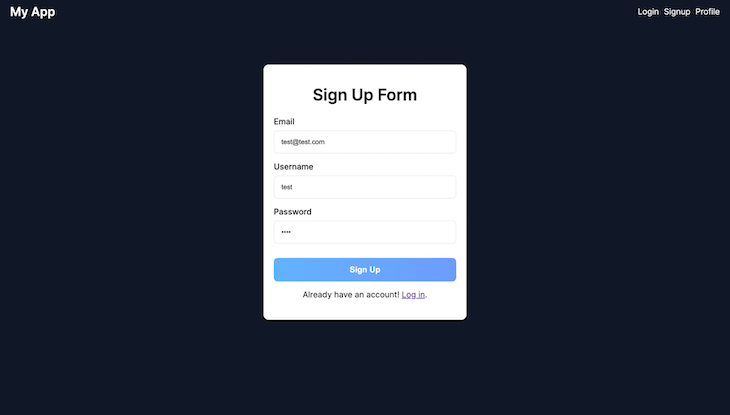
Once you have filled in the form, click the “Sign Up” button to submit the form. If the account creation is successful, you should see an alert message. If the account creation fails, an error message will be printed on the console.
You can also verify that the user has been created by checking your Appwrite project dashboard. Log in to your Appwrite account, navigate to the project dashboard, and select the “Auth” tab on the sidebar. Here, you will be able to see the new user account that you just created:
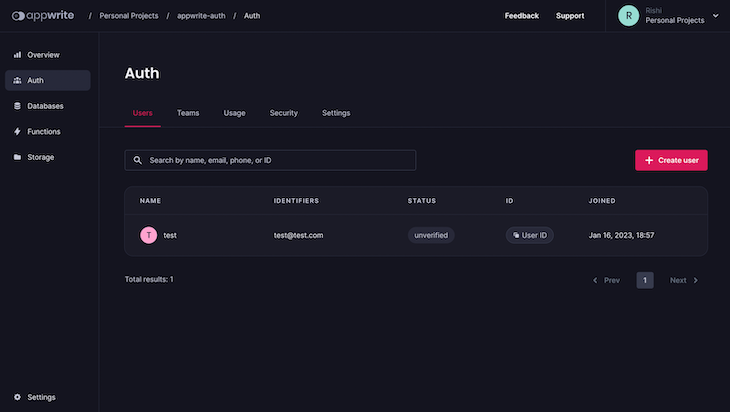
Congratulations!  You have successfully implemented signup functionality in your React application using Appwrite.
Implementing login functionality in our React app
To implement login functionality in our React app with Appwrite, we will follow a similar approach as we did for the signup functionality. First, create a login function inside the useAuth hook by adding the following code:
import { graphql } from "../appwrite/config";

const useAuth = () => {
  const signup = async (email, password, username) => {
   // signup function code
  };

  const login = async (email, password) => {
    const response = await graphql.mutation({
      query: `mutation (
          $email: String!,
          $password: String!,
      ) {
        accountCreateEmailSession(
          email: $email,
          password: $password,
      ) {
          _id
        }
      }`,
      variables: {
        email: email,
        password: password,
      },
    });

    if (response.errors) {
      throw response.errors[0].message;
    }
  };

  return {
    signup,
    login, // return it
  };
};

export default useAuth;
The above query property uses the accountCreateEmailSession mutation to allow users to log in to their accounts by providing a valid email and password. This will create a new session for the user.
Using the login function in our Appwrite project
Let’s import the useAuth hook in the Login.js file and call it inside the Login component. Then, destructure the login function from the useAuth hook. Finally, call the login function inside the handleSubmit function, passing in the values of the email and password entered by the user.
The code should look similar to this:
import { useState } from "react";
import { Link, useNavigate } from "react-router-dom";
import useAuth from "../hooks/useAuth";

const Login = () => {
  const [user, setUser] = useState({});
  const navigate = useNavigate();
  const { login } = useAuth();

  const handleChange = (e) => {
    setUser({ ...user, [e.target.name]: e.target.value });
  };

  const handleSubmit = async (e) => {
    e.preventDefault();
    try {
      await login(user.email, user.password);
      navigate("/profile");
    } catch (error) {
      console.log(error);
    }
  };

  // rest of the code
};

export default Login;
To test the login feature, open the login page of your application. Fill in the form with your email and password. Once you have filled in the form, click the “Log In” button to submit the form.
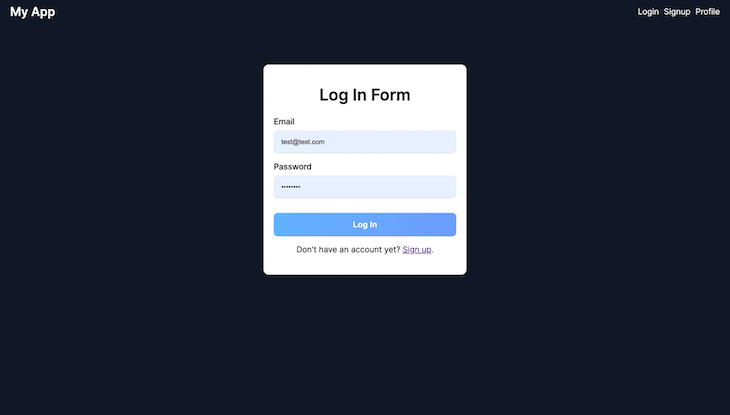
If the login is successful, the user will be navigated to the /profile page. If the login fails, an error message will be printed on the console.
Currently, the information displayed on the profile page is hardcoded, but we will make it dynamic by fetching the logged-in user’s data using the Appwrite API in the next section.
Fetching logged-in user data with the Appwrite API
In this section, I will show you how to fetch a logged-in user’s data and display it on the Profile component. First, let’s create a user state using the useState Hook in the useAuth hook and set it to null:
import { useState } from "react"; // import useState

const useAuth = () => {
  const [user, setUser] = useState(null); // create a user state

  // rest of the code
}
Next, we will create the getCurrentUser function inside the useAuth Hook. The getCurrentUser function uses the accountGet query provided by the Appwrite GraphQL API to fetch the currently logged-in user’s data.
Below is the code for the getCurrentUser function:
const getCurrentUser = async () => {
  const response = await graphql.query({
    query: `query {
          accountGet {
              _id
              name
              emailVerification
              email
          }
      }`,
  });
  return response.data.accountGet;
};
As you can see, this query returns an object that contains the user’s ID, name, email address, and email verification status.
Next, we will use the useEffect Hook to call the getCurrentUser function and update the user state with the returned data.
Finally, we will return the user state from the useAuth hook so it can be accessed in other components.
Your useAuth code should look like this:
import { useEffect, useState } from "react"; // import useEffect
import { graphql } from "../appwrite/config";

const useAuth = () => {
  const [user, setUser] = useState(null);

  const signup = async (email, password, username) => {
    // signup code
  };

  const login = async (email, password) => {
    // login code
  };

  const getCurrentUser = async () => {
    // getCurrentUser code
  };

  // fetching the logged user data
  useEffect(() => {
    const fetchUser = async () => {
      const userDetails = await getCurrentUser();
      setUser(userDetails);
    };
    fetchUser();
  }, []);

  return {
    signup,
    login,
    user, // return it
  };
};

export default useAuth;
Using the user state in the Profile component
In the Profile component, you can import the useAuth hook and destructure the user state. Then, you can use the user data to display the user’s name, email, and other information on the profile page.
Below is the updated code for the Profile component:
import useAuth from "../hooks/useAuth"; // import useAuth

const Profile = () => {
  const { user } = useAuth(); // destructure user

  return (
    <div className="profile">
      <h1 className="name">Welcome, {user?.name}</h1>
      <h2 className="email">Email: {user?.email}</h2>
    </div>
  );
};

export default Profile;
Once you have updated the code, you should see the currently logged-in user’s name and email displayed on the /profile page:

Implementing logout functionality in our React app
To implement logout functionality in our React app with Appwrite, first create a logout function inside the useAuth Hook by adding the following code:
const logout = async () => {
  const response = await graphql.mutation({
    query: `mutation {
          accountDeleteSession(
              sessionId: "current"
          ) {
              status
          }
      }`,
  });

  if (response.errors) {
    throw response.errors[0].message;
  }
};
As you can see, the accountDeleteSession mutation takes in the “current” as the session ID, which logs out the currently logged-in user from the current device session.
Finally, we will return the logout function from the useAuth hook so it can be accessed in other components.
Your useAuth code should look like this:
import { useEffect, useState } from "react";
import { graphql } from "../appwrite/config";

const useAuth = () => {
  const [user, setUser] = useState(null);

  const signup = async (email, password, username) => {
    // signup code
  };

  const login = async (email, password) => {
    // login code
  };

  const getCurrentUser = async () => {
    // getCurrentUser code
  };

  // logout function
  const logout = async () => {
    // logout code
  };

  useEffect(() => {
    // code
  }, []);

  return {
    signup,
    login,
    logout, // return logout
    user
  };
};

export default useAuth;
Using the logout function in our Appwrite project
Let’s import the useAuth hook in the Profile.js file and call it inside the Profile component. Then, destructure the logout function from the useAuth hook.
Next, create a handleLogout function inside the Profile component by adding the following code:
const handleLogout = async () => {
  try {
    await logout();
    navigate("/login");
  } catch (error) {
    console.log(error);
  }
};
Finally, add an onClick event listener to the “Log Out” button. Your Profile component code should look like this:
import { useNavigate } from "react-router-dom"; // import useNavigate
import useAuth from "../hooks/useAuth";

const Profile = () => {
  const { logout, user } = useAuth();
  const navigate = useNavigate();

  const handleLogout = async () => {
    try {
      await logout();
      navigate("/login");
    } catch (error) {
      console.log(error);
    }
  };

  return (
    <div className="profile">
      <h1 className="name">Welcome, {user?.name}</h1>
      <h2 className="email">Email: {user?.email}</h2>
      <button className="logOut-btn" onClick={handleLogout}>
        Log Out
      </button>
    </div>
  );
};
export default Profile;
To test the logout feature, open the profile page and click the “Log Out” button. If the logout action is successful, the user will be redirected to the /login page. If the logout action fails, an error message will be printed on the console.
Adding email verification functionality with Appwrite’s GraphQL API
In this section, we will learn how to implement email verification functionality in our application using Appwrite’s GraphQL API. To verify the user’s email address, we need to accomplish two steps:
- Send a verification link to the user’s email address
- Confirm the email address once the user clicks on the verification link
But before we begin, it is important to note that in order to send verification emails, we will need to set up a third-party SMTP provider such as SendGrid or MailGun. For this tutorial, we will be using MailGun.
To set up MailGun, first go to the MailGun website and sign up for a free account. After signing up, you will be taken to the dashboard, where you need to verify your email address by following MailGun’s instructions.
After that, select the “SMTP” option on the “Overview” page. Here, you’ll find your SMTP credentials such as hostname, port, username, and password:

Configuring the .env file with your SMTP credentials
Now, open the appwrite folder that was created when you installed Appwrite, not the one that we created inside the project folder. Inside this folder, you will find a file named .env that needs to be updated with your SMTP credentials.
Open the .env file and update the following fields with the respective information for your project:
_APP_SMTP_HOST— your SMTP hostname_APP_SMTP_PORT— your SMTP port_APP_SMTP_SECURE— SMTP secure connection protocol (you can set it to ‘tls’ if running on a secure connection)_APP_SMTP_USERNAME— your SMTP username_APP_SMTP_PASSWORD— your SMTP password_APP_SYSTEM_EMAIL_ADDRESS— your SMTP email address
Once you have updated the .env file, save it and restart your Appwrite server by running the following command:
docker compose up -d
Now that we have set up the SMTP configuration, we can move on to implementing the email verification feature.
Sending verification emails to newly signed-up users
Create a sendVerificationEmail function inside the useAuth Hook by using the following code:
const useAuth = () => {
  // other functions and state

const sendVerificationEmail = async () => {
    const response = await graphql.mutation({
      query: `mutation {
        accountCreateVerification(
            url: "http://localhost:3000/profile"
        ) {
            _id
            _createdAt
            userId
            secret
            expire
        }
    }`,
    });

    if (response.errors) {
      throw response.errors[0].message;
    }
  };

  return {
    signup,
    login,
    logout,
    user,
    sendVerificationEmail // return this
  };
};
This function will be responsible for sending verification emails. Note that the accountCreateVerification mutation in this function takes in a url property, which is the URL that the user will be redirected to after they click on the verification link sent to their email address.
Before we use this function, it is important to note that you can only send verification emails after creating a login session for the user. To do that, you need to call the login function right after calling the signup function in the handleSubmit function of the Signup component, like this:
const Signup = () => {
  const [user, setUser] = useState({});
  const { signup, login } = useAuth(); // add login function

  const handleChange = (e) => {
    setUser({ ...user, [e.target.name]: e.target.value });
  };

  const handleSubmit = async (e) => {
    e.preventDefault();
    try {
      await signup(user.email, user.password, user.username);
      await login(user.email, user.password); // call login function
      alert("Account created successfully!");
    } catch (error) {
      console.log(error);
    }
  };

  // rest of the code
};
Let’s call the sendVerificationEmail function after the login function call to send verification emails:
const Signup = () => {
  const [user, setUser] = useState({});
  const { signup, login, sendVerificationEmail } = useAuth(); // add sendVerificationEmail function

  const handleChange = (e) => {
    setUser({ ...user, [e.target.name]: e.target.value });
  };

  const handleSubmit = async (e) => {
    e.preventDefault();
    try {
      await signup(user.email, user.password, user.username);
      await login(user.email, user.password);
      await sendVerificationEmail(); // call sendVerificationEmail function
      alert("Account created and verification email sent successfully!");
    } catch (error) {
      console.log(error);
    }
  };

  // rest of the code
};
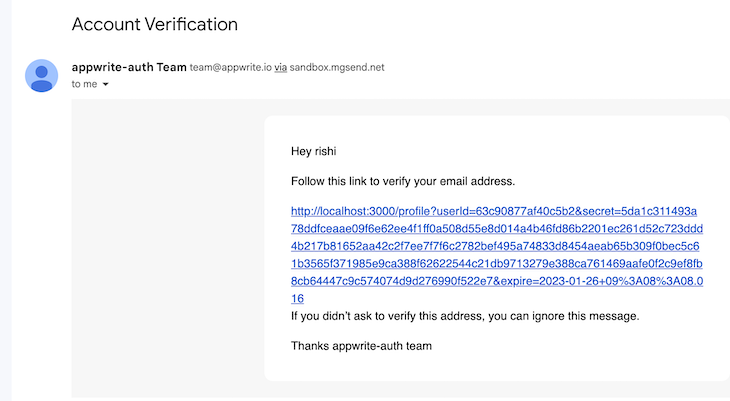
To test this feature, go ahead and sign up for an account in your app using the email that you verified on MailGun. You should receive a verification link in your email. Be sure to check your spam folder as well:
Verifying the user’s email
In the verification link you receive, you’ll see userId and secret parameters attached. We’ll use these parameters to make another API request to verify the user’s email address. Let’s create a function for that in the useAuth hook by using the following code:
const useAuth = () => {
  // other functions and state

  const confirmEmailVerification = async (userId, secret) => {
    const response = await graphql.mutation({
      query: `mutation (
          $userId: String!,
          $secret: String!,
      ) {
          accountUpdateVerification(
              userId: $userId,
              secret: $secret
          ) {
              _id
          }
      }`,
      variables: {
        userId: userId,
        secret: secret,
      },
    });

    if (response.errors) {
      throw response.errors[0].message;
    }
  };

  return {
    // rest of the functions and state
    confirmEmailVerification
  };
};
In the Profile component, we need to extract the parameters from the redirected URL and pass them to the confirmEmailVerification function as parameters when the user is on the profile page after redirection. This can be done by using the following code:
import { useNavigate } from "react-router-dom";
import useAuth from "../hooks/useAuth";
const Profile = () => {
  const { logout, user, confirmEmailVerification } = useAuth(); // add confirmEmailVerification

  // rest of the code

  const handleLogout = async () => {
    // code
  };

  const urlParams = new URLSearchParams(window.location.search);
  const userId = urlParams.get("userId"); // extract userId
  const secret = urlParams.get("secret"); // extract secret

  const handleConfirmEmailVerification = async () => {
    try {
      await confirmEmailVerification(userId, secret);
      alert("Email verified successfully!");
      navigate("/profile");
    } catch (err) {
      console.log(err);
    }
  };

  if (!user?.emailVerification && userId && secret) {
    handleConfirmEmailVerification();
  }

  // rest of the code
};
export default Profile;
You should be able to verify the user’s email address. And with that, this tutorial is finished!
Conclusion
This concludes our tutorial on setting up user authentication in React using Appwrite and the GraphQL API. We covered installing and setting up Appwrite, creating a project, implementing signup and login functionality, fetching the logged-in user’s information, and setting up email verification functionality.
I hope you enjoyed this article! Thanks for taking the time to read it. If you have any issues while following the article or have further questions, let me know in the comments section.
If you like what I’m doing here and want to help me keep doing it, don’t forget to hit that share button. Happy coding!
The post Using React with Appwrite to set up user authentication appeared first on LogRocket Blog.
from LogRocket Blog https://ift.tt/6aQUnZC
Gain $200 in a week
via Read more
Source link
