A five-second test is a rapid usability testing method used by UX researchers to gather users’ first impressions of a design. It’s predominantly used by UX teams to see if a brand’s messaging is fully understood by audiences in the first few moments that they are exposed to it.
As a testing method, it’s not only low-fi, it’s extremely efficient and can be implemented at multiple stages in the UX design process to ensure the team stays user-centric and that all issues are ironed out well before development.
In this article, we’re going to be running you through the details of what a five-second test is and exactly how to conduct one. We’ll be providing you with a step-by-step guide, enabling you to jump right in and get started.
Here’s what we’ll be covering in this guide:
Ready to get started? Then read on!
What is 5-second testing?
Five-second testing is a handy user research method for assessing your users’ immediate impressions of a product, feature, website, or design. A five-second test is the process of showing your users an image — for example, a screen grab of a landing page — for just five seconds before asking them specific questions about what they have seen, their understanding of the messaging, and their experience of the design.
Sometimes called a Quick Exposure Memory Test, a five-second test is a very quick, practical, and low-fi way of gaining an understanding of what users take away from a site in their first few moments of landing on the page. It’s generally a quantitative testing method that can be used to test various elements of a site, from messaging to images to the overall design of the page.
Typically, UX researchers use five-second testing to establish if the primary message they want to get across is effectively communicated to its target users.
How to conduct 5-second testing
Conducting a five-second test is not dissimilar from other types of usability testing. You’ll need to define your goals, decide which part of the site or design you’d like to test, create a stimulus and task, and find and recruit participants. Let’s get testing!
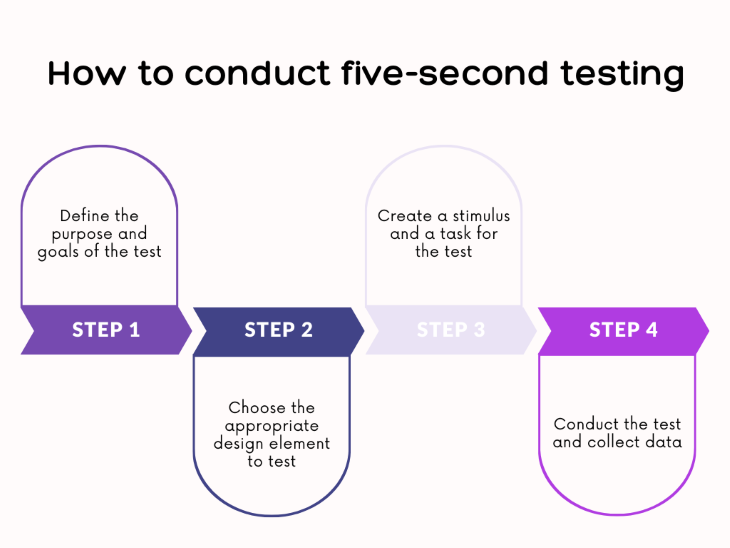
Step 1: Define the purpose and goals of the test
When deciding on the goals of your test, you need to start by thinking about what information you’d like to know from your users. It might concern readability, accessibility, or messaging, or it might be as simple as wanting to know how much your users like the look of a particular page of your website.
The goal of your test can cover whatever you need it to. Do you want to know proportionally how many users understand the title text on the landing page? Or do you want to know if the main image prompts visitors to your site to find out more about the product?
You might want to know if it’s immediately clear from a single glance what the product or service is that’s being promoted on a sponsored social media post. For SaaS products, a five-second test can be used to test the UI of the design too.
Put simply, what you choose to test here is entirely up to you. Bear in mind that this test works best when used to provide quantitative data about a momentary interaction or impression, and that, as a great gauge of users’ first impressions, the test is perfect for testing first user touchpoints.
Common goals of a five-second test include trying to understand a user’s first impressions regarding:
- The clarity of the messaging
- The visual design
- What the product is
- The overall message being communicated
Step 2: Choose the appropriate design element to test
As the name suggests, a five-second test is a pretty quick method for garnering the views of users on your product, service, or website. You’ll want to be showing users a pretty complete version of the design, such as a page screenshot or high-fidelity mockup of that page, and you should avoid any sort of file that includes unnecessary design details that won’t be in the final version.
Your goal should be to make it as straightforward as possible for participants to look closely at the page and examine it within the given timeframe. Depending on whether you’re conducting the test remotely or in person, it can be a good idea to send the chosen design element directly to the participant’s own devices. If conducted this way, the test also gives users the opportunity to view the design element within the context of a regular website visit, which is likely to lead to results which are more true to life than if they view the design element in an unfamiliar environment.
There are a number of handy tools available that have been designed specifically for assisting five-second tests. These can be particularly useful for uploading and distributing your design to multiple participants, as well as running the test itself. Here are some of the best ones available:
Step 3: Create a stimulus and a task for the test
The task that the user has to complete during the test can be as simple as answering the question: “What message is this image conveying to you?” Or it could be that they have to complete an assigned activity, such as identifying where certain navigation elements are, or explaining what they think will happen when they click on a certain button.
In most instances, UX researchers use the five-second test to get user feedback on how they feel when they see or interact with a page for this very short period of time, and to ensure that the message they want to communicate is clearly coming across.
Here are some common themes which might help you design the questions you put to your users:
- Do you understand the offering?
- Can you identify a clear benefit?
- What is the company or product name?
- What do you remember most about the image?
Recruit and screen participants
The next step in preparing for your five-second test is to find, screen, and recruit your participants. You have a few options open to you when it comes to user recruitment. You can:
- Reach out to your current user base via an email newsletter
- Directly email individuals who fit into the desired demographic
- Post an engaging social media announcement about your search for participants
- Post in relevant social media groups
- Use a usability testing tool that helps with participant recruitment
- Ask friends and family
Before you get started recruiting your participants, be sure that the whole UX team is aligned on:
- Exactly which design element you want to study and why
- A defined methodology for testing
- How you will describe the test and its objectives to participants
If you are considering using a UX tool or service to find and recruit your participants, we’d recommend the following:
The advantage of using a testing tool is that you are guaranteed the right number of participants to meet your needs and they can be selected from demographics you are specifically trying to target.
Step 4: Conduct the test and collect data
Now that the prep work is done, you’re ready to conduct the test!
Conducting the test manually
If you’re conducting the test in-house and without the use of a digital tool, you’ll need to set aside a separate space in your office or work area where you’ll show the user the image on a tablet, phone, or laptop. Make sure the area is free of distractions and you have a timer on hand.
Here’s what you’ll need to do:
- Step 1: Run through exactly what will happen with the user in simple terms. Explain how long the test will last and that you’ll be asking them some simple questions afterwards. Be clear about what is expected of them.
- Step 2: Set the timer to five seconds (or for the agreed upon duration — this can range to up to twenty seconds in some cases) and show the user the image on the chosen device.
- Step 3: When the time is up, remove the image/device.
- Step 4: Ask the user the questions you and your team have come up with. We would recommend you record each individual’s answers as they speak and make notes.
Conducting the test using a digital tool
If you choose to use one of the many digital tools available to conduct your five-second test, then your actions at this point will depend on which one you have chosen to run with.
Using the tool you have chosen, create your test and upload the image you want to test before inputting how long you want to run the test for. When you’re good to go, the digital tool will send out the image to your selected participants, usually via a link. When the participants have looked at the image they will be asked to answer the questions you have come up with and submit their answers for your review.
Methods for analyzing and interpreting data
Thanks to the rapid nature of the five-second test, there’s a lot less waiting around for results than with other types of usability tests; if you conducted it in person, you’ll have the results the moment the test is complete, and if you used a tool, the results will be sent to you as soon as the user sends them off or uploads them — typically, within minutes. Either way, from end-to-end, it’s a smart and efficient methodology for getting a feel for how users understand and respond to your messaging, product, or website.
Of course, how you interpret the results of your five-second test will depend on the questions you asked your users. If your main concern was if the user “got” the main messaging on a page, you can quickly categorize answers into ‘yes’ and ‘no’ piles. This type of result is known as a quantitative analysis; the result is numerical and measurable.
For example, if eight users understood the messaging, and two did not, you have a result that suggests the majority of users understood what you were trying to say and the design is generally a success.
If these numbers were reversed, you would need to look at some design and language changes to ensure the message is better communicated. In this case, you would also need to conduct the test again once the changes had been made.
If the questions you asked your users required more detailed answers about the experience itself, the results you’ll get will fall under a qualitative analysis. For example, if you asked a user how they felt when they saw the image, their answer wouldn’t be measurable or easily categorized.
However, one way of organizing these kinds of answers is to look for similar expressions and words used by users, and to tag the overall answer as either positive or negative.This can help you find patterns in the results and to get a general feel for how users feel about the image they were shown. It might be helpful to create a word cloud from these qualitative answers in order to identify key themes.
Some UX teams choose to combine both quantitative and qualitative questions in their five-second tests. They might ask some questions that require a yes or no answer and combine these questions with more open questions, such as “What emotional response did you have to the image?” or “Explain how you might use the product in the image.”
This enables the UX researcher to get both a clear indication of what’s working and what’s not for the majority of users, while also gaining valuable feedback about the overall user experience.
N.B., although five-second testing is a great way to collect users’ first impression of an image, design, or webpage, it’s less suitable for understanding participants’ comprehension of more complex pieces of information.
Five-second testing in the UX design process
This rapid usability testing method is perfect for gathering users’ first impressions of a design. It’s typically used to evaluate the effectiveness of the design’s communication and if the user’s attention has been successfully captured.
Within the UX design process, the five-second test should be conducted during the testing phase/ However, it can be used as many times as the design team deems necessary throughout a project to gain valuable user feedback on each iteration of a design.
As such a lo-fi, fast method of gathering feedback, there’s no reason not to test each new design or version with users before sending the design to the development team.
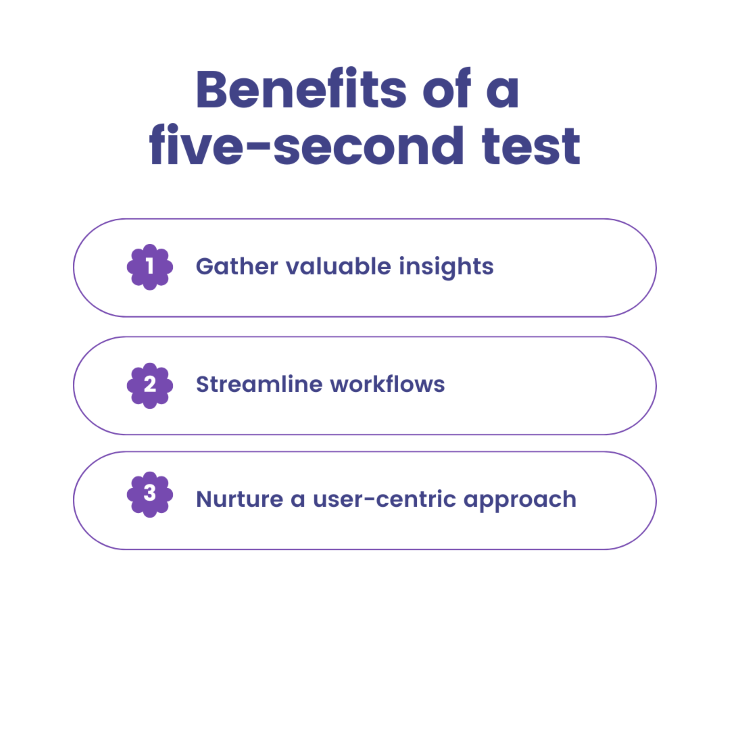
Within the UX design process, five-second testing provides numerous benefits:
Gather valuable insights
It enables the team to gather valuable insights about how a design impacts users, even when the design is still in its early stages. This, in turn, enables the team to make better design decisions going forward and ensures that the user’s experience stays central to the whole design process.
This testing method can also give the design team the confidence to go forward with a design, as it’s a fast way of getting confirmation that users understand and like what they see.
Streamline workflows
Five-second testing can help to streamline a team’s overall workflow as potential hurdles or user challenges can be identified at a much earlier stage in the UX design process. This saves teams time, money, and resources as it prevents large changes being needed later on.
In addition, for teams on a limited budget or working to strict timelines, this method is a cost-effective and fast way to reliably and regularly assess the design’s success with users.
Nurture a user-centric approach
Finally, five-second testing is a great way of nurturing a user-centric approach within a company or team. Team members are encouraged to think about the user’s perspective and experience with the product on a regular basis which ensures designs truly capture the imaginations of target audiences and that the company really speaks the same language as the user group in its messaging.
Conclusion
We hope you’ve enjoyed this guide to running a five-second test! If you follow our step-by-step instructions, you’ll be well-placed to conduct a successful five-second test and gain valuable insights from your users about your product or design.
Remember, five-second testing is perfect for helping you understand a user’s first impressions of a brand, and is therefore ideal for reviewing a user’s first touchpoints with that organization, such as a landing page or a sponsored social media post.
Using these insights, a UX team can make design changes that enhance the overall user experience and boost user engagement.
Header image source: IconScout
LogRocket: Analytics that give you UX insights without the need for interviews

LogRocket lets you replay users’ product experiences to visualize struggle, see issues affecting adoption, and combine qualitative and quantitative data so you can create amazing digital experiences.
See how design choices, interactions, and issues affect your users — try LogRocket today.
Source link