Cypress is a popular end-to-end testing framework used for web applications. It is an open-source JavaScript testing tool designed to make testing web applications fast, easy, and reliable. Cypress allows developers to write automated tests that simulate user interactions and verify the behavior of the applications.
We can use Cypress with JavaScript or TypeScript for development, but JavaScript is the primary language used with Cypress. Cypress is built on top of JavaScript and uses many of the same concepts of modern web development, such as using a browser-based environment to run tests and interacting with web elements using CSS Selectors.
When writing tests in Cypress, you can use JavaScript to create test cases that simulate user interactions and validate the behavior of your application. Cypress also provides a powerful set of built-in commands and assertions to help you write tests quickly and easily.
However, before explaining Cypress JavaScript in detail, we’ll see why we use JavaScript for Cypress test case automation.
Why Cypress With JavaScript?
There are several reasons why Cypress and JavaScript work well together:
Cypress Is Written in JavaScript
Cypress is written in JavaScript, so developers who are already familiar with JavaScript will find it easier to work with Cypress.
Cypress Has Extensive Support for JS Frameworks
Cypress has good support for popular JavaScript frameworks like React, Vue, and Angular. This means that developers building applications using these frameworks can easily write tests for their applications using Cypress.
Cypress Has a Rich API for Interacting With Web Applications
Cypress provides a rich API for interacting with web applications, which includes methods for interacting with the DOM, making HTTP requests, and handling events. This API is designed to be easy to use and well-documented, making it easy to write tests using JavaScript.
Debugging Support
Cypress provides a comprehensive debugging experience, including built-in debugging tools and the ability to step through tests.
Community Support
There is a vast community of JavaScript developers, which means that plenty of resources are available online to help developers with any issues they encounter while using Cypress.
Cypress uses a unique architecture that enables it to run tests in the same context as the application being tested. This means that Cypress has access to the application’s DOM, network traffic, and even its backend server. This architecture allows for faster and more reliable tests and a more intuitive and powerful testing experience.
Trends of Cypress on GitHub
The data below is gathered from the official site of Cypress GitHub repository:
- Stars: 43.1k
- Forks: 2.8k
- Used By: 769k
- Releases: 302
- Contributors: 435
Benefits of Using Cypress JavaScript for Automation
Cypress JavaScript provides several features that make it easy to write and run tests, debug issues, and ensure the quality of web applications. We’ll explore some of the key features of the Cypress automation tool in detail.
Easy Setup
Cypress JavaScript is very easy to set up and use. It can be easily installed with npm and requires minimal setup. Cypress also comes with a user-friendly graphical interface, which makes it easy for developers to navigate and use.
Comprehensive APIs
Cypress JavaScript provides a rich set of APIs for interacting with the DOM, making HTTP requests, and more. This makes it easy to write tests that simulate user interactions with your web application.
Real-Time Reloads
Cypress JavaScript provides real-time reloads, which means that any changes made to the code or tests are instantly reflected in the browser. This saves developers time and makes it easy to see the impact of changes in real-time.
Automatic Waiting
Cypress JavaScript automatically waits for assertions to pass and for elements to appear before executing the next command. This makes tests more stable and reduces the likelihood of false negatives.
Debugging
Cypress JavaScript comes with built-in debugging tools, making it easy to troubleshoot and fix failing tests. Developers can use these tools to inspect the DOM, debug JavaScript code, and more.
Time Travel
Cypress JavaScript provides a unique feature called “time travel” that allows you to go back and forth in time, inspecting and debugging your application at any point in the test. This feature can save developers a lot of time and effort when trying to debug complex test scenarios.
Cross-Browser Testing
Cypress JavaScript supports cross-browser testing and can run tests on different browsers. This makes it easy to ensure that your application works as expected across different browsers.
Automatic Screenshots and Video
Cypress JavaScript can automatically take screenshots and record videos of your tests, making it easy to see what happened during a test run. This can be helpful when trying to identify issues or bugs in your application.
Custom Commands
Cypress JavaScript allows developers to create custom commands that can be reused across different tests. This makes it easy to create a library of common test commands and reduces the amount of code duplication.
Continuous Integration
Cypress JavaScript can be easily integrated with popular continuous integration (CI) tools like Jenkins, CircleCI, and Travis CI. This makes it easy to run tests automatically as part of your CI/CD pipeline.
How To Install and Set up Cypress
Cypress end-to-end testing framework is easy to set up and use. Here are the steps to install and set up Cypress.
1. Install Node.js
Cypress requires Node.js to be installed on your system. You can download and install the latest version of Node.js from the official website https://nodejs.org.
2. Create a New Project
Create a new directory for your Cypress project and navigate into it using the command line. Run npm init to create a package.json file.
3. Install Cypress
Install Cypress by running the following command in the command line.
|
npm install cypress –save-dev Here –save-dev is a command-line option used with Node Package Manager (npm) to install and save development dependencies for a project. OR yarn add cypress –dev Here, we can see version 12.6.0 installed. Save it as a development dependency in your package.json file. |
Open Cypress
Once installed, you can open Cypress by running the following command in the command line.
yarn run cypress open
The default folder structure of Cypress is shown below. You can create test cases under the folder “e2e”.
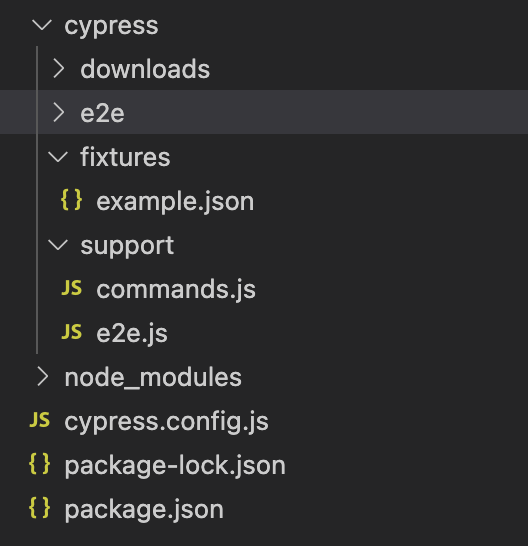
Project Structure of Cypress
From the screenshots, you can see that Cypress has created a default folder hierarchy when it opens for the first time. Below are the details for each of these folders/files created by Cypress.
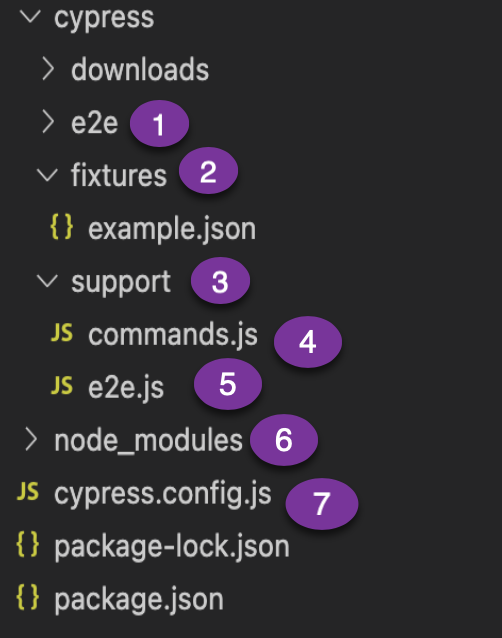
There are two files inside the support folder: commands.js and index.js.
- command.js: This is the file where you add your commonly used functions and custom commands. It includes the common functions that you may call to use in different tests. Cypress created some functions for you, and you can override them here if you want.
- e2e.js: This file runs before every single spec file. In this file, we keep all global configurations and can modify them as per the requirement. By default, it imports only commands.js, but you can import or require other files to keep things organized.
- node_modules: All the node packages will be installed in the node_modules directory and available in all the test files. So, in a nutshell, this is the folder where NPM installs all the project dependencies.
- cypress.config.js: This is a configuration file used by the Cyprestesting framework to customize the behavior of the framework and tests. This file can be used to configure various settings for your tests, such as the base URL for your application, viewport size, test timeout values, and other options.
The cypress.config.js file is located in the root of the Cypress project, alongside the cypress folder. When Cypress runs, it will automatically load this file and use the configuration values specified in it.
Apart from the above folders, we have some more folders like Screenshots, Downloads, and Videos to store different related files.
Basic Constructs of Cypress
Cypress uses the same syntax as Mocha for writing test cases. The following are some of the key constructs frequently used in Cypress test development.
describe():This method is used to group related test cases. It takes two arguments: a string that describes the group of test cases and a callback function that contains the individual test cases.it():This method is used to define a test case. It takes two arguments: a string that describes the test case and a callback function that contains the actual test codebefore(): This method is used to run a setup function before any test case in a particularly described block. It can be used to set up the test environment, initialize variables, and perform other setup tasks.after():This method is used to run a cleanup function after all the test cases in a particularly described block have finished running. It can be used to clean up the test environment, close open connections, and perform other cleanup tasks.beforeEach():This method is used to run a setup function before each test case in a particularly described block. It can be used to reset the state of the test environment and perform other setup tasks.afterEach():This method is used to run a cleanup function after each test case in a particularly described block has finished running. It can be used to reset the state of the test environment and perform other cleanup tasks..skip():When dealing with a large codebase and wanting to concentrate on specific tests or subsets of tests, the .skip() function provides a handy means to temporarily prevent certain tests from being executed.
Types of Testing Performed Using Cypress JavaScript
Cypress is a JavaScript-based testing framework that provides a comprehensive set of features for testing different aspects of web applications, including UI, API, mobile responsiveness, and accessibility.
Here’s how Cypress JavaScript can be used for each of these types of testing:
User Interface (UI) Testing
Cypress allows easy and comprehensive UI testing. Cypress provides APIs that allow developers and testers to interact with the web application’s UI elements and simulate user interactions while performing Cypress UI automation. The Cypress APIs are capable of validating the application’s functionality by allowing users to click on buttons, enter data into forms, and navigate between different pages.
It also provides an automatic waiting mechanism that waits for the UI to finish rendering, ensuring that the tests are accurate, reliable, and less flaky. Cypress JavaScript offers significant benefits in dealing with flakiness due to its ability to automatically retry failed tests and provide reloading in real-time.
Application Programming Interface (API) Testing
Cypress can also be used to test the web application’s APIs. Testers can use Cypress to send HTTP requests and validate the responses. It provides a built-in command called cy.request() that enables testers to send HTTP requests and make assertions based on the received responses while performing Cypress API testing.
Additionally, Cypress JavaScript supports response interception, mocking, and stubbing, allowing testers to simulate different server responses.
Accessibility Testing
Cypress can be used to test the accessibility of the web application. Cypress JavaScript provides an integrated accessibility testing library called cypress-axe, which uses the Axe engine to detect accessibility issues and generate accessibility violation reports. With Cypress accessibility testing, it’s possible to test the web application’s accessibility features and ensure that it’s usable by everyone, regardless of any disabilities.
Component Testing
Cypress is also suitable for component testing, which is useful when working with a modular application that utilizes several components. Cypress JavaScript offers an isolated test environment, making it easy to test individual components and ensure that they work as expected. This testing approach helps to identify and resolve issues early in the development process, reducing the chances of the web application crashing.
Mobile Responsiveness Testing
Cypress can be used for web application responsive testing across different viewports. Cypress provides a viewport resizing feature, allowing testers to simulate mobile devices’ different screen sizes, making it easy to test the web application’s responsiveness.
Additionally, Cypress JavaScript can integrate with third-party mobile testing platforms like LambdaTest, which offers access to a vast range of mobile devices and operating systems.
UI Testing With Cypress JavaScript
Cypress provides easy access to the application’s DOM, making it easy to manipulate and assert the state of individual elements on the page. It also supports plugins, which can be used to extend its functionality and integrate with other tools and services. These are the reasons Cypress JavaScript is preferred for UI testing.
UI Test Case: Example 1
Let’s create a new folder under the e2e folder named “LambdaTest” to perform Cypress UI testing.
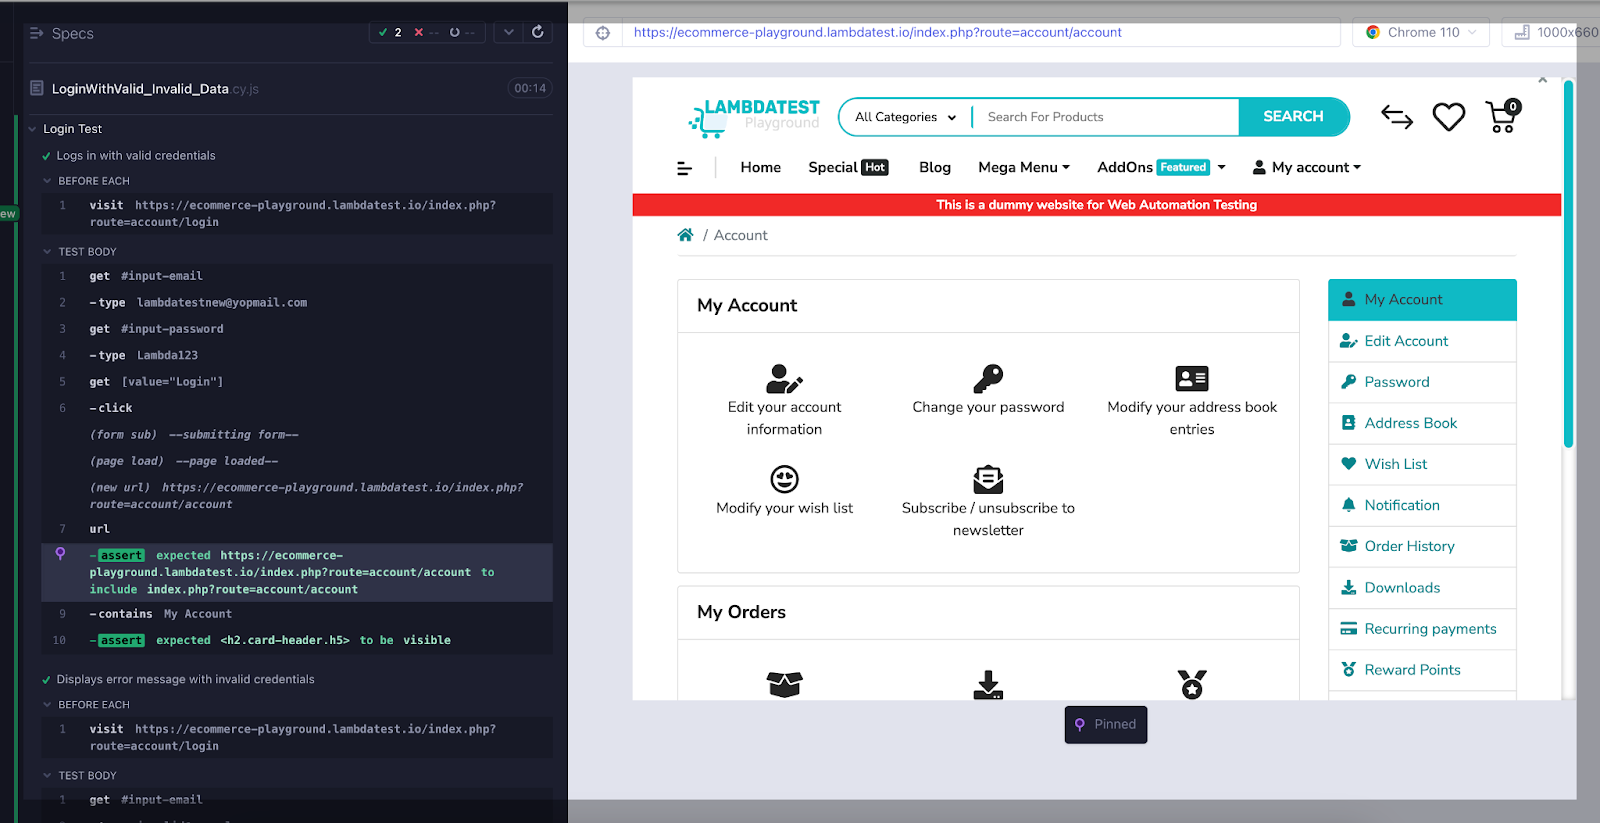
Create the first spec with the name LoginWithValid_Invalid_Data.cy.js under the folder LambdaTest.
In the below test case, we are covering login into LambdaTest with Valid/Invalid data.
For demo purposes, we are using the LambdaTest eCommerce Playground site.
Use Case
Login into the application and update the newsletter subscription
describe('Login and Subscribe', () => {

 it('Logs in and subscribes to newsletter', () => {

   // Visit the site

   cy.visit('https://ecommerce-playground.lambdatest.io/index.php?route=account/login')


// Click the login button

 cy.get('[value="Login"]').click()

// Enter valid email and password

cy.get('#input-email').type('lambdatestnew@yopmail.com')

cy.get('#input-password').type('Lambda123')


// Click the login button

cy.get('[value="Login"]').click()


// Verify successful login

cy.url().should('include', 'index.php?route=account/account')

cy.contains('My Account').should('be.visible')


// Subscribe to newsletter

 cy.contains('Newsletter').click()

 cy.get('#input-newsletter-yes').click({force:true})

 cy.get('[value="Continue"]').click()


 // Wait for subscription success message

   cy.get('.alert-success').should('contain', 'Success: Your newsletter subscription has been successfully updated!')

 })

})
Output
Below is the output of the above-executed test case.
UI Test Case: Example 2
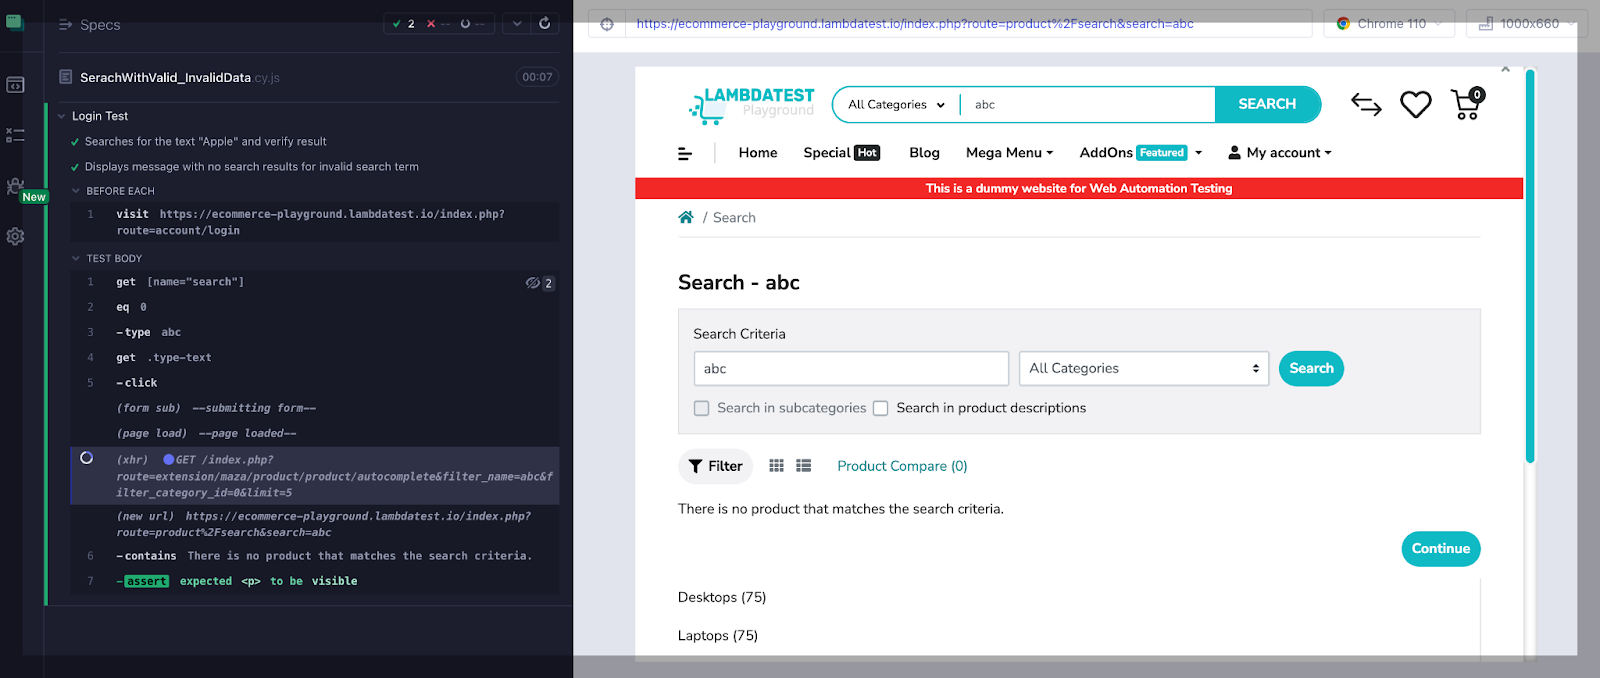
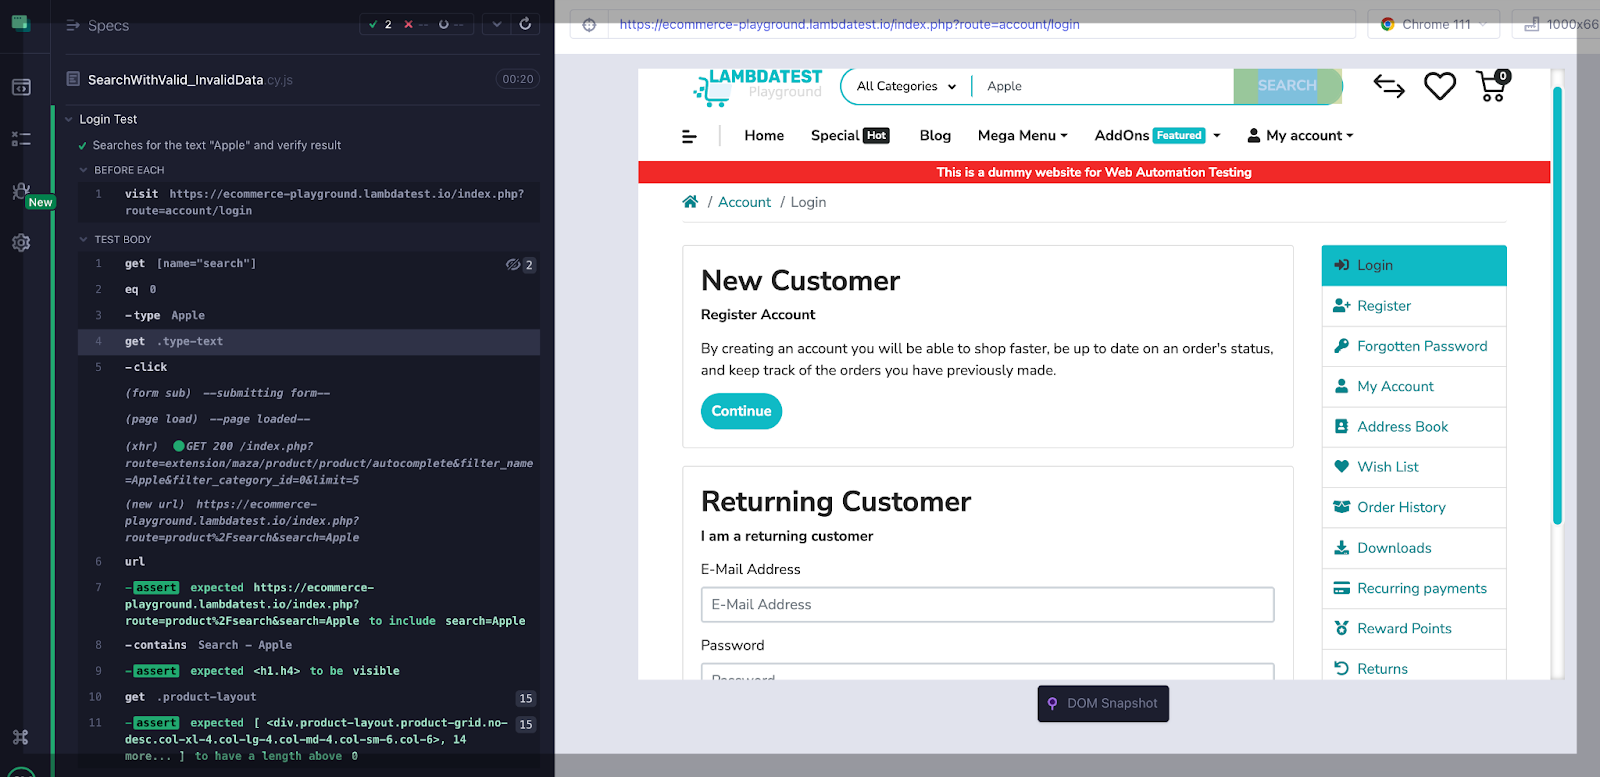
Create the second spec with the name SerachWithValid_InvalidData.cy.js under the folder LambdaTest.
In the below test case, we are covering the search with valid and invalid data and verifying the search result.
describe('Search  with Valid/ Invalid data' , () => {

 beforeEach(() => {

 cy.visit('https://ecommerce-playground.lambdatest.io/index.php?route=account/login')

 })

 it('Searches for the text "Apple" and displays results', () => {

  // Enter search data and submit form

   cy.get('[name="search"]').eq(0).type('Apple')

   cy.get('.type-text').click()

   // Verify search results

   cy.url().should('include', 'search=Apple')

   cy.contains('Search - Apple').should('be.visible')

   cy.get('.product-layout').should('have.length.gt', 0)

 })

 it('Displays message with no search results for invalid search term', () => {

   // Enter search term that returns no results and submit form

   cy.get('[name="search"]').eq(0).type('abc')

   cy.get('.type-text').click()

   // Verify message for no search results

   cy.contains('There is no product that matches the search criteria.').should('be.visible')

 })

})
Output
Below is the output of the above-executed test case.
API Testing with Cypress JavaScript
Developers and testers using Cypress can create tests that send HTTP requests to their application’s API and validate the corresponding responses.
We can use Cypress API to write automated tests that simulate user interactions with the application’s API endpoints.
This type of testing is especially useful for testing API responses, validating data input and output, and verifying the application’s behavior. It also provides several built-in assertions that can be used to verify the response status code, headers, and body.
Here are some key features of using Cypress JavaScript for API testing:
HTTP Requests
Cypress provides simple and intuitive APIs for making HTTP requests, allowing developers to test different API endpoints and parameters easily. It supports all common HTTP methods, such as GET, POST, PUT, DELETE, etc.
Mocking and Stubbing
Cypress lets you mock and stub API responses, which is useful when testing API endpoints that rely on third-party services or data sources that may not be available during development/testing.
Request and Response Objects
Cypress provides request and response objects that allow developers to inspect and manipulate the data being sent and received by APIs. This can help test complex APIs with nested data structures.
Authentication and Authorization
Cypress supports testing APIs that require authentication or authorization. Testers can use the built-in cy.request method to send authentication tokens or cookies, or they can use plugins to integrate with external services such as OAuth providers.
Built-In Support for GraphQL
Cypress provides built-in support for testing GraphQL APIs, including a GraphQL-request method that simplifies making GraphQL queries.
API Automation Examples
For API testing demo purposes, we are taking the example of the site.
In the below API testing example, we are covering CRUD operation using the REST API.
API Test Case: Example 1
GET Request
The GET method is used to retrieve specific data and pass parameters on reading code from the API response. In the example below, we are getting specific user data using the GET method and userId.
 it('GET API Automation Using GoRest API', () => {

     cy.request({

       method: 'GET',

       url: 'https://gorest.co.in/public/v1'+`/users/${userId}`,

       headers: {

         Authorization: 'Bearer 84bb7773414ee1a1247f6830428a2ab051d763d7cb24c97583f10ca96a59ddde',

       },

     }).then((response) => {

       expect(response.status).to.equal(200);

       expect(response.body.data.name).to.equal('John Doe');

       expect(response.body.data.gender).to.equal('male');

     });

   });
Output
Below is an example of a POST request along with a bearer token for authorization. In POST requests, we retrieve userId for further use by passing data in the body.
POST Request
 describe('API Automation Using GoRest API', () => {

   let randomNumber =Math.floor(Math.random() * 1000);

   let userId;

   it('POST API Automation Using GoRest API', () => {

     const user = {

       name: 'John Doe',

       email: "johndoe123"+randomNumber+"@example.com",

       gender: 'male',

       status: 'active',

     };

     cy.request({

       method: 'POST',

       url: 'https://gorest.co.in/public/v1/users',

       headers: {

         Authorization: 'Bearer 84bb7773414ee1a1247f6830428a2ab051d763d7cb24c97583f10ca96a59ddde',

       },

       body: user,

     }).then((response) => {

       userId=response.body.data.id

       expect(response.status).to.equal(201);

       expect(response.body.data.name).to.equal(user.name);

       expect(response.body.data.email).to.equal(user.email);

     });

   })

 });
Output
PUT Request
Below is an example of a PUT request and a bearer token for authorization. In PUT requests, we update the existing data by passing the userId for which we want to update the data.
it('PUT API Automation Using GoRest API', () => {

     const user = {

       name: 'Time Cook',

       email: "TimCook123"+randomNumber+"@example.com",

       gender: 'male',

       status: 'active',

     };

     cy.request({

       method: 'PUT',

       url: 'https://gorest.co.in/public/v1'+`/users/${userId}`,

       headers: {

         Authorization: 'Bearer 84bb7773414ee1a1247f6830428a2ab051d763d7cb24c97583f10ca96a59ddde',

       },

       body: user,

     }).then((response) => {

       expect(response.status).to.equal(200);

       expect(response.body.data.name).to.equal(user.name);

       expect(response.body.data.email).to.equal(user.email);

     });

   });
Output
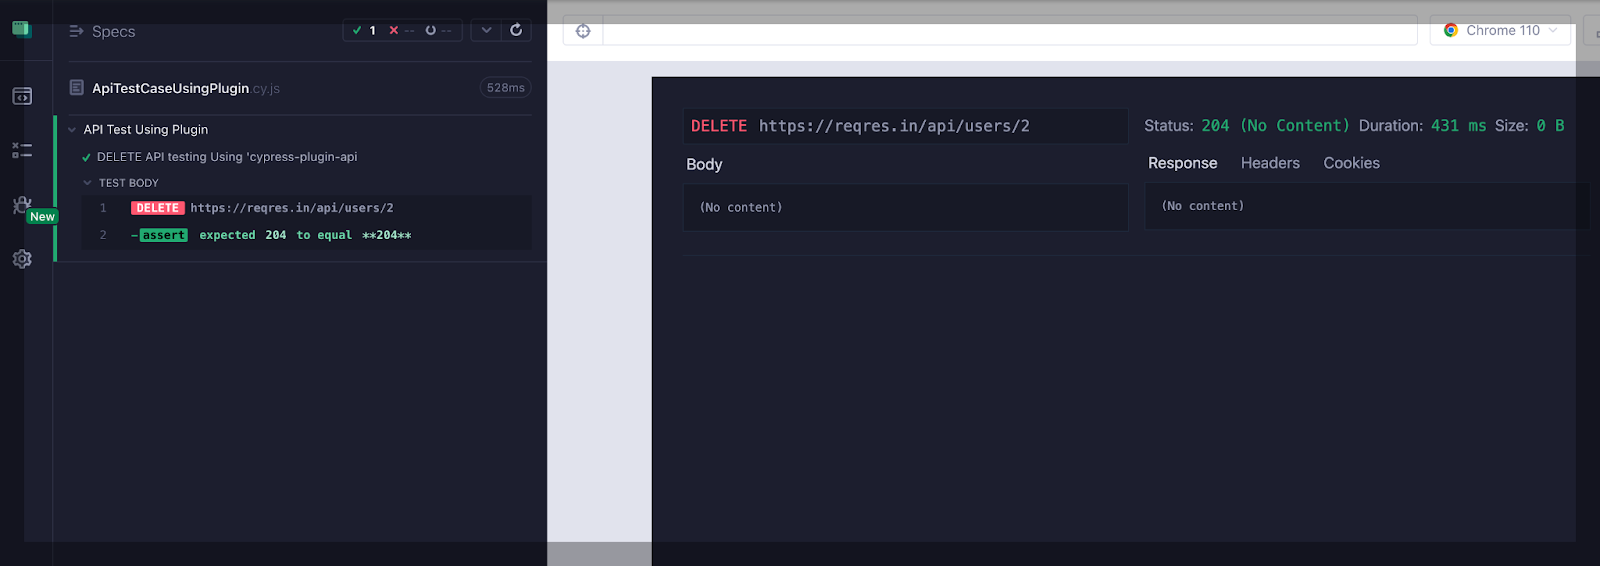
DELETE Request
The created record can be deleted using the delete method. We can pass the userId and an authorization token in the header.
 it('DELETE API Automation Using GoRest API', () => {

     cy.request({

       method: 'DELETE',

       url: 'https://gorest.co.in/public/v1'+`/users/${userId}`,

       headers: {

         Authorization: 'Bearer 84bb7773414ee1a1247f6830428a2ab051d763d7cb24c97583f10ca96a59ddde',

       },

     }).then((response) => {

       expect(response.status).to.equal(204);


     });

   });
Output
API Automation Using ‘Cypress-Plugin-Api’ Plugin
The ‘cypress-plugin-api’ is a useful plugin for Cypress that provides a simplified and streamlined API for making HTTP requests and performing API testing in your Cypress tests.
There are several benefits of using this plugin, some of which are listed below.
cy.api()command informs about the API call, such as URL, headers, response, and more to the UI frame, and this info can be viewed in time-travel snapshots.- Simple table for viewing cookies.
- JSON data object and array folding.
- Color coding of methods in UI view and in the timeline.
Let’s set up cypress-plugin-api.
Steps 1
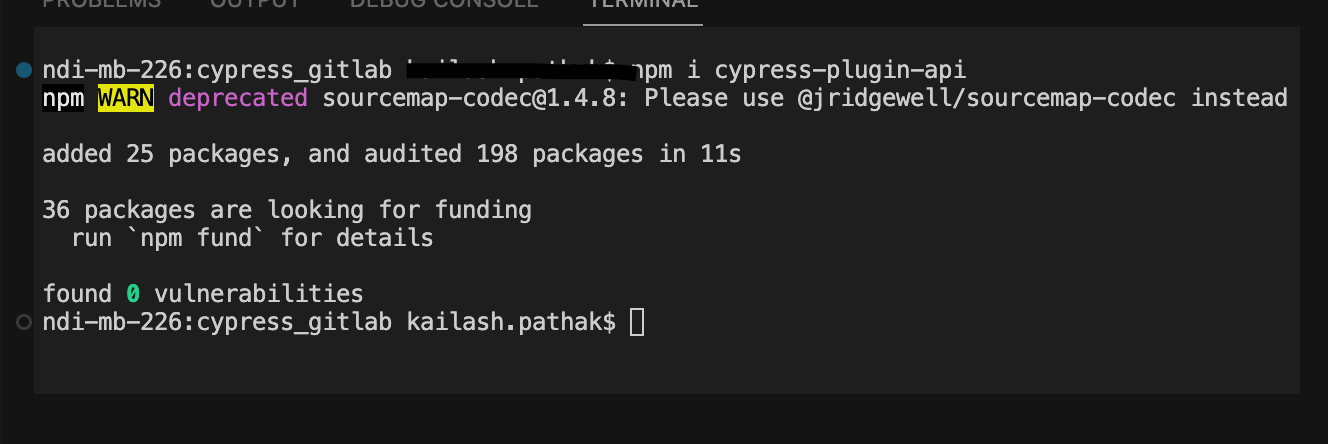
Install the plugin ‘cypress-plugin-api‘ using the below commands.
npm i cypress-plugin-api
Or
yarn add cypress-plugin-api
Steps 2
Import the plugin under the path cypress/support/e2e.js file.
import ‘cypress-plugin-api‘
or
require(‘cypress-plugin-api‘)
package.json looks like below:
{

 "name": "cypress_javascript",

 "version": "1.0.0",

 "description": "",

 "main": "index.js",

 "scripts": {

   "test": "echo "Error: no test specified" && exit 1"

 },

 "author": "Kailash Pathak",

 "license": "ISC",

 "devDependencies": {

   "cypress": "^12.6.0"

 },

 "dependencies": {

   "cypress-plugin-api": "^2.10.3"

}

}
Add the below commands under the Cypress/e2e.js file are below:
import './commands'

import 'cypress-plugin-api'
Let’s take some examples to automate using the plugin cypress-plugin-api. Create ApiTestCaseUsingPlugin.cy.js with Methods (GET, POST, PUT, DELETE)
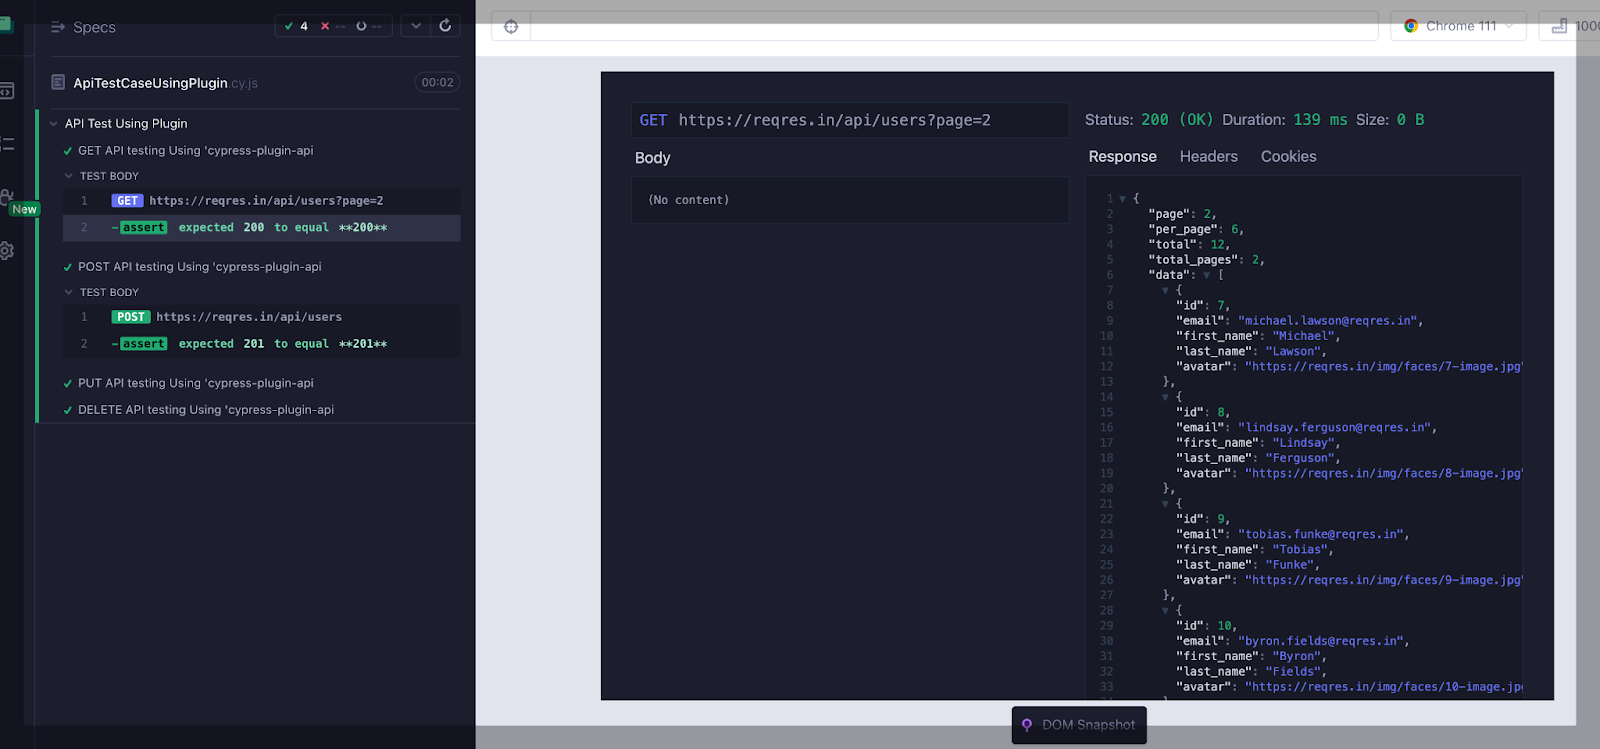
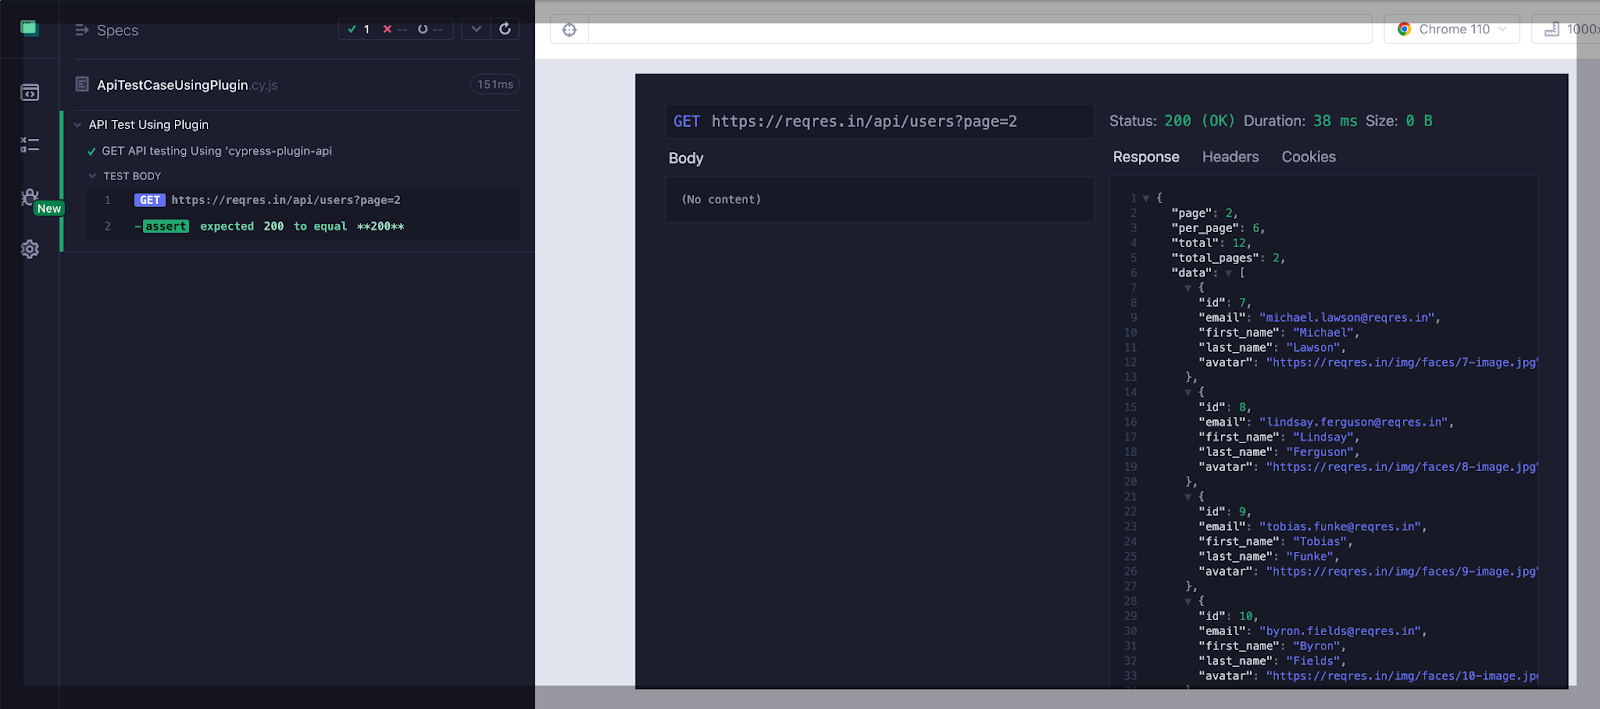
Below is an example of Methods (GET, POST, PUT, DELETE) with their output of the execution of Test Cases. The data for Body, Response, Headers, and Cookies may be seen in the Cypress App UI in the screenshot below.
The cy.api() works similarly to the cy.request() command. The benefit of using cy.api() is it provides the response, headers, and cookies are all visible, and also prints details about the call in your Cypress runner, as shown below.
GET Request
 it('GET API Automation Using GoRest API', () => {

     cy.api({

       method: 'GET',

       url: 'https://gorest.co.in/public/v1'+`/users/${userId}`,

       headers: {

         Authorization: 'Bearer 84bb7773414ee1a1247f6830428a2ab051d763d7cb24c97583f10ca96a59ddde',

       },

     }).then((response) => {

       expect(response.status).to.equal(200);

       expect(response.body.data.name).to.equal('John Doe');

       expect(response.body.data.gender).to.equal('male');

     });

   });
Output
GET Request
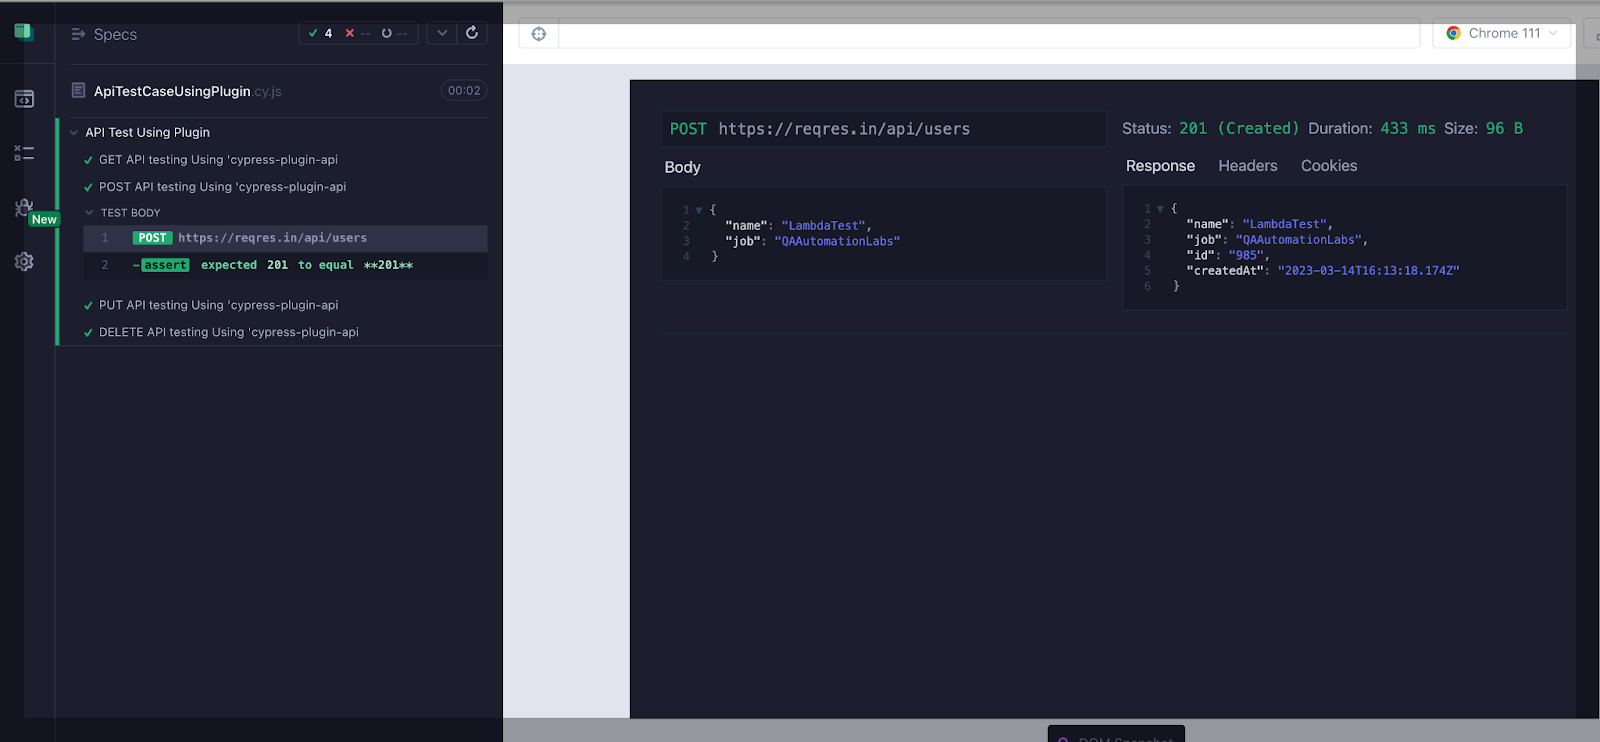
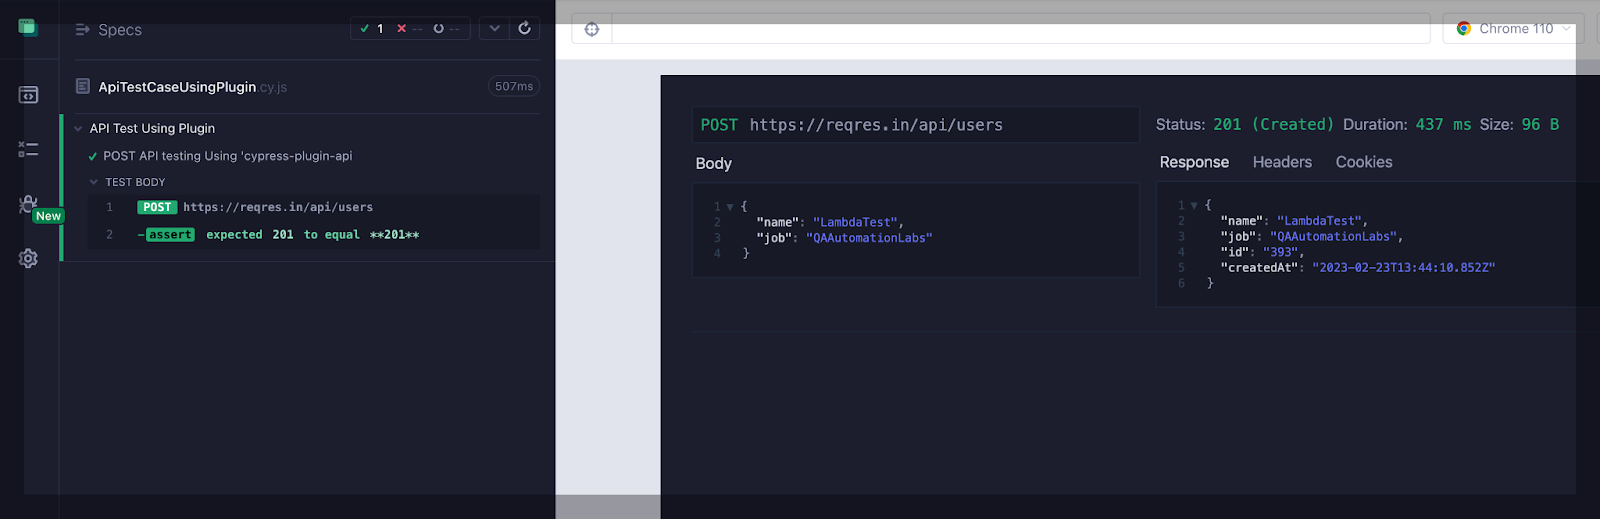
POST Request
it('POST API Automation Using GoRest API', () => {

     const user = {

       name: 'John Doe',

       email: "johndoe123"+randomNumber+"@example.com",

       gender: 'male',

       status: 'active',

     };

     cy.request({

       method: 'POST',

       url: 'https://gorest.co.in/public/v1/users',

       headers: {

         Authorization: 'Bearer 84bb7773414ee1a1247f6830428a2ab051d763d7cb24c97583f10ca96a59ddde',

       },

       body: user,

     }).then((response) => {

       userId=response.body.data.id

       expect(response.status).to.equal(201);

       expect(response.body.data.name).to.equal(user.name);

       expect(response.body.data.email).to.equal(user.email);

     });

   });
Output
POST Request
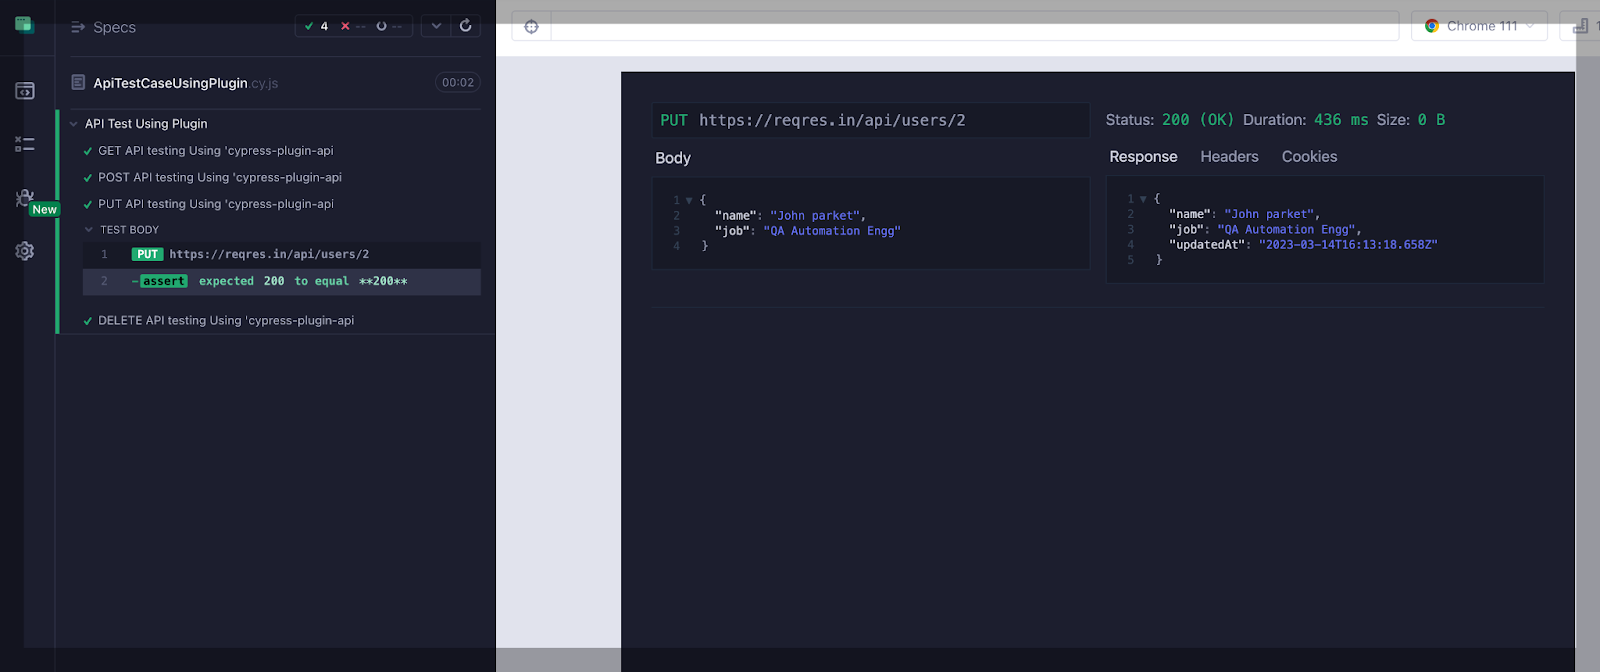
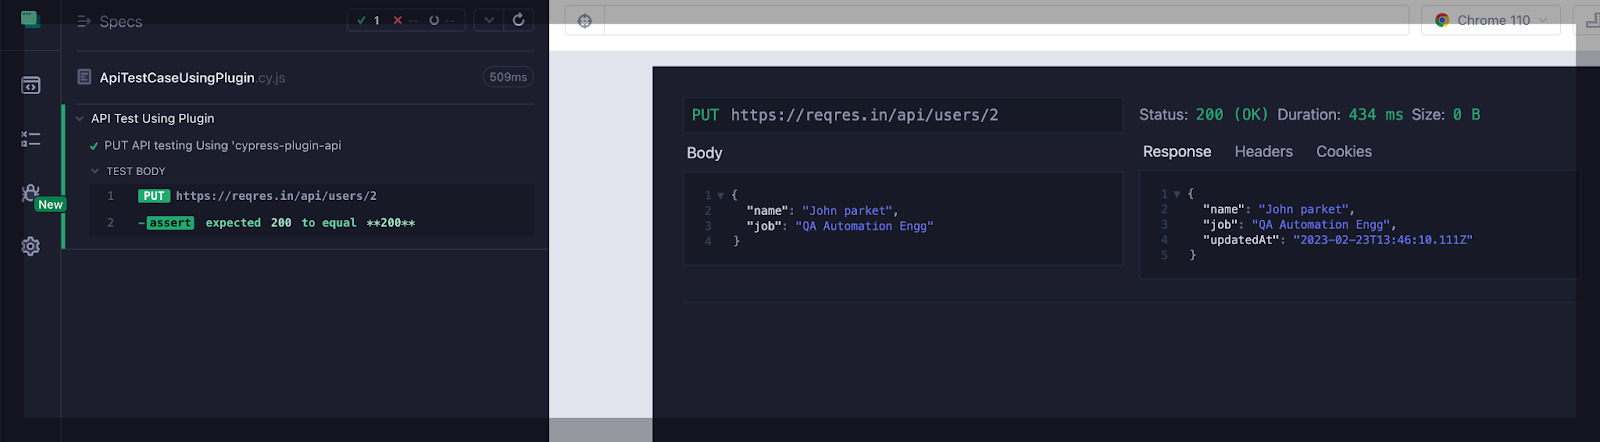
PUT Request
 it('PUT API Automation Using GoRest API', () => {

     const user = {

       name: 'Time Cook',

       email: "TimCook123"+randomNumber+"@example.com",

       gender: 'male',

       status: 'active',

     };

     cy.request({

       method: 'PUT',

       url: 'https://gorest.co.in/public/v1'+`/users/${userId}`,

       headers: {

         Authorization: 'Bearer 84bb7773414ee1a1247f6830428a2ab051d763d7cb24c97583f10ca96a59ddde',

       },

       body: user,

     }).then((response) => {

       expect(response.status).to.equal(200);

       expect(response.body.data.name).to.equal(user.name);

       expect(response.body.data.email).to.equal(user.email);

     });

   });
Output
PUT Request
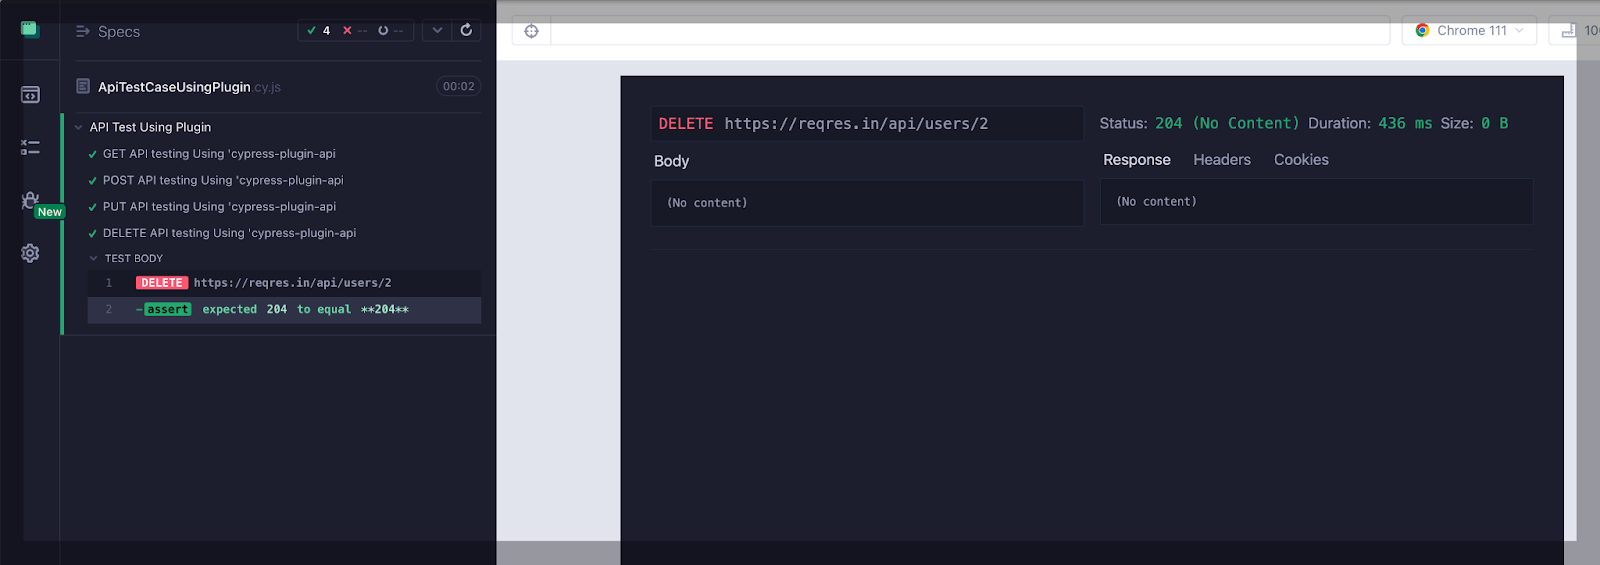
DELETE Request
 it('DELETE API Automation Using GoRest API', () => {

     cy.request({

       method: 'DELETE',

       url: 'https://gorest.co.in/public/v1'+`/users/${userId}`,

       headers: {

         Authorization: 'Bearer 84bb7773414ee1a1247f6830428a2ab051d763d7cb24c97583f10ca96a59ddde',

       },

     }).then((response) => {

       expect(response.status).to.equal(204);


     });

   });
Output
DELETE Request
Accessibility Testing With Cypress JavaScript
Accessibility testing is the process of evaluating a website or application to ensure that it can be used by people with disabilities. Cypress JavaScript provides an accessibility plugin called cypress-axe that can be used to check for accessibility issues on a website. The plugin employs the axe-core open-source library to conduct accessibility assessments, which detect accessibility infractions under the Web Content Accessibility Guidelines (WCAG).
To use the cypress-axe plugin, you first need to install it using npm. Once installed, you can import the plugin into your Cypress test file and use the cy.checkA11y() method to check for accessibility violations. Executing this command triggers the axe-core library to scan the present page and disclose any accessibility problems it detects.
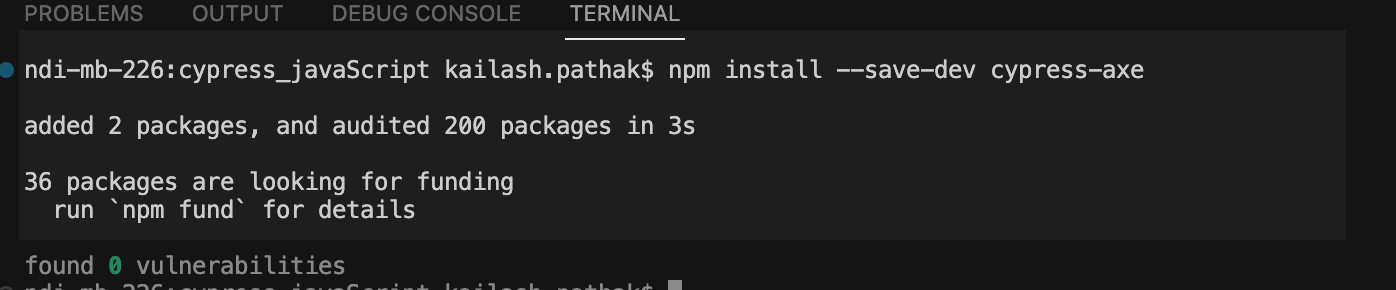
Install the Cypress accessibility plugin by running the following command in your project directory:
npm install --save-dev cypress-axe
Once the installation is complete, you can import the plugin in your Cypress test file by adding the following line at the top:
import ‘cypress-axe‘;
Now, you can write your accessibility tests using the cy.injectAxe() and cy.checkA11y() commands provided by the plugin.
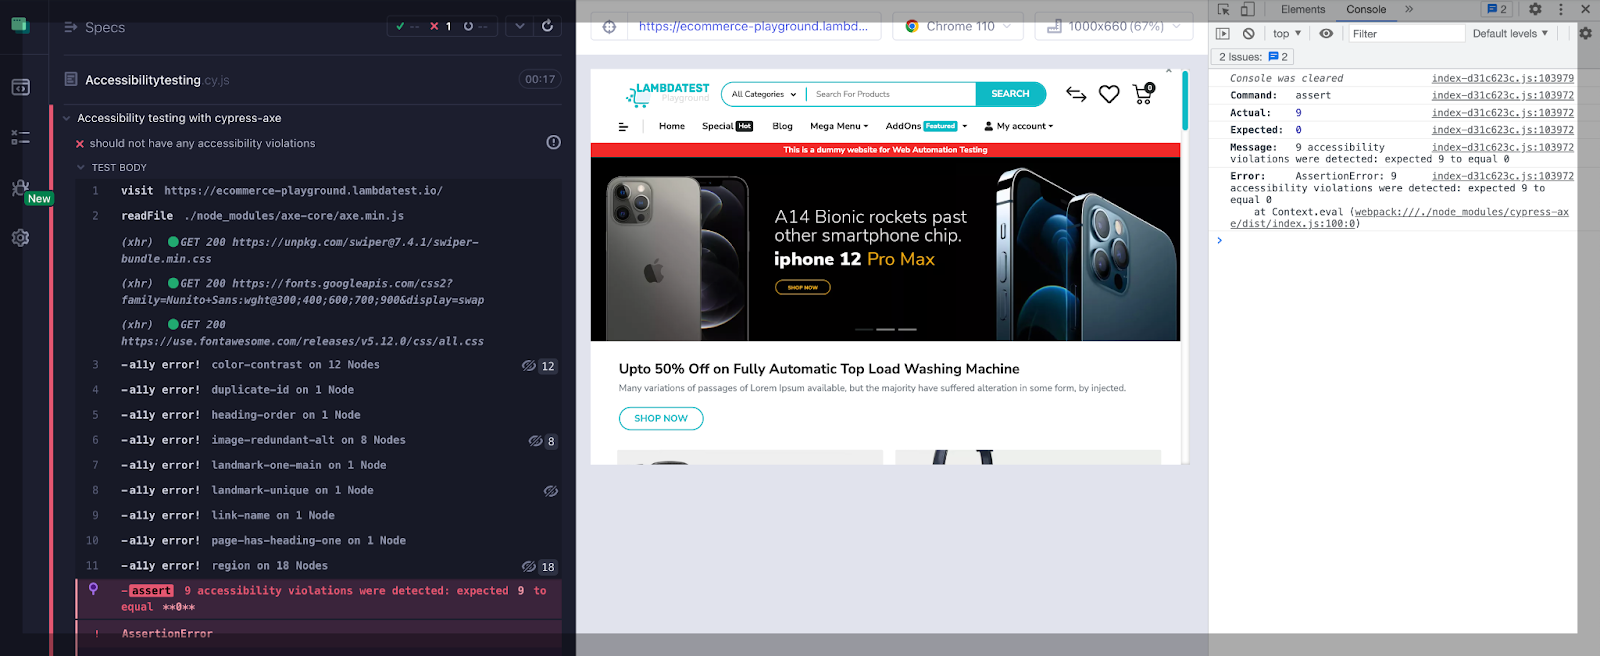
describe('Accessibility testing with cypress-axe', () => {

   it('should not have any accessibility violations', () => {

     cy.visit('https://ecommerce-playground.lambdatest.io/');

     cy.injectAxe();

     cy.checkA11y();

   });

 });
This test uses the cy.visit() command to open the website, and the cy.injectAxe() command to inject the accessibility plugin. The cy.checkA11y() command then checks the page for accessibility violations.
Output
In the screenshot, you can see nine accessibility violations.
Component Testing With Cypress JavaScript
Component testing is a type of software testing in which individual components of a software system are tested in isolation from the rest of the system.
What Is Component Testing?
The purpose of component testing is to validate the functionality and behavior of individual software modules, such as functions, classes, or methods, to ensure that they work as expected and meet the requirements specified in the design.
Component testing primarily aims to uncover flaws or glitches in the software modules before their integration into the broader system, thereby minimizing the likelihood of downstream breakdowns and simplifying the process of isolating and remedying issues.
By testing each component in isolation, developers can gain confidence that each module is working correctly, which can improve overall system quality and reduce the time and cost of testing and debugging.
Cypress for Component Testing
With Cypress, you can use its built-in testing API to create tests that target specific components of your application. Cypress JavaScript provides a <mount> command that can be used to mount a React component within a Cypress test runner, making it possible to test the component’s behavior and interactions with other components.
Advantages of Component Testing With Cypress JavaScript
Early Detection of Defects
Component testing helps detect defects or issues in the software code early in the development process. By identifying and fixing issues early, it becomes easier and cheaper to fix them than when they are detected later in the software development life cycle.
Improved Reusability
Component testing promotes code reusability since individual components can be reused in other applications.
Faster Development
Component testing helps to speed up the development process. By catching defects early, developers can fix them quickly, which leads to faster development cycles and quicker delivery of software.
Better Maintainability
Component testing helps to improve the maintainability of the software code. By ensuring that each component of the software is functioning correctly, it becomes easier to maintain the software in the long run.
Isolation
Since each component is tested in isolation, defects can be easily isolated and identified, making it easier to fix them.
Example of Component Testing
Before taking the example, let’s do some prerequisite steps for creating component testing.
Prerequisite
Testing React components with Cypress involves setting up a testing environment and writing test cases to ensure that the components behave as expected. Here are the steps to get started:
Let’s set up a React component.
Step 1: Run the below command in the terminal.
npx create-react-app my-new-sample-app
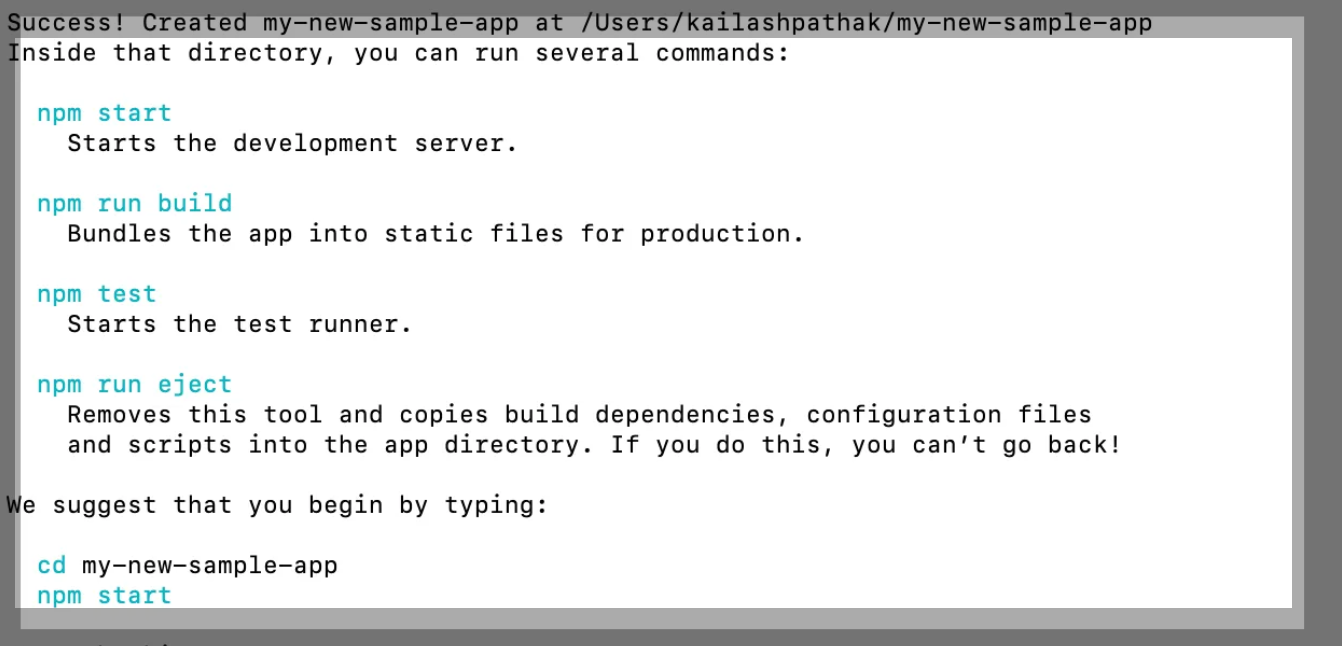
Step 2: In the root directory and run the below command to launch React app and install Cypress (if not installed previously).
cd my-new-sample-app
npm start
npm install cypress -D

Step 3: Run the command to open Cypress runner.
npx cypress open
or
yarn cypress open
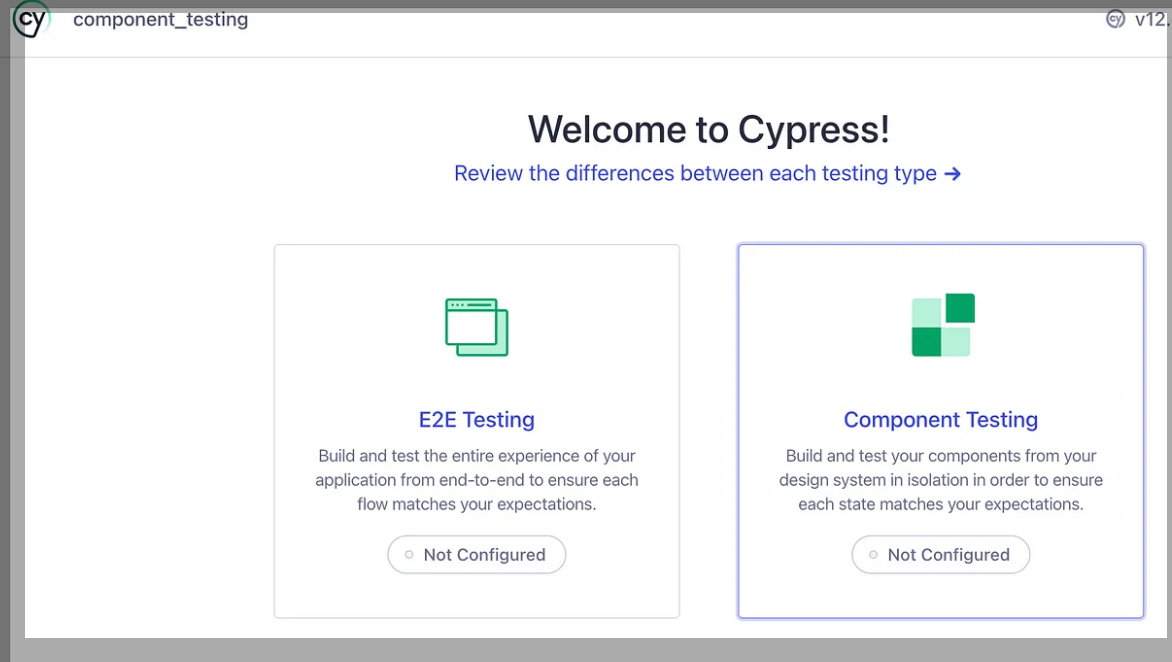
Step 4: From the below screenshot select ‘Component Testing”.
Step 5: After selecting ‘Component Testing’ from the above, the below-attached screen gets opened.
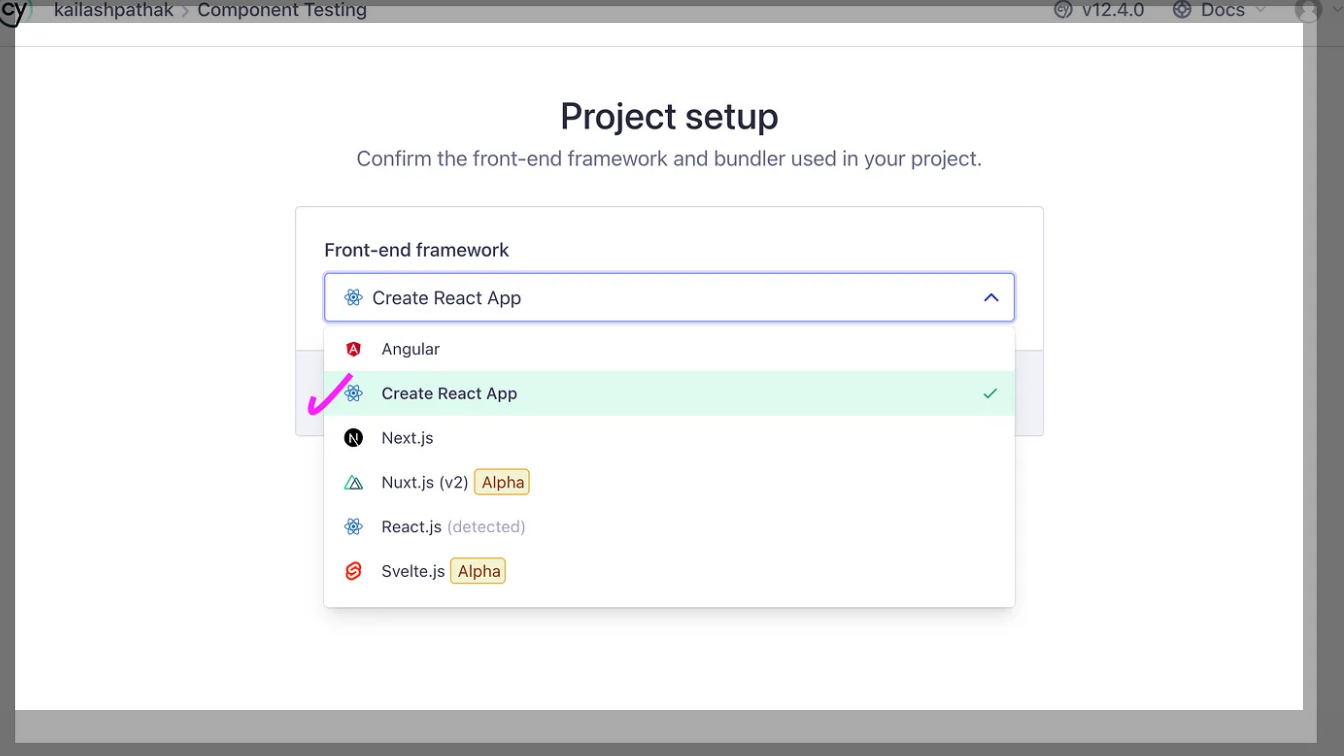
Select the option ‘Create React App’ from the above screen.
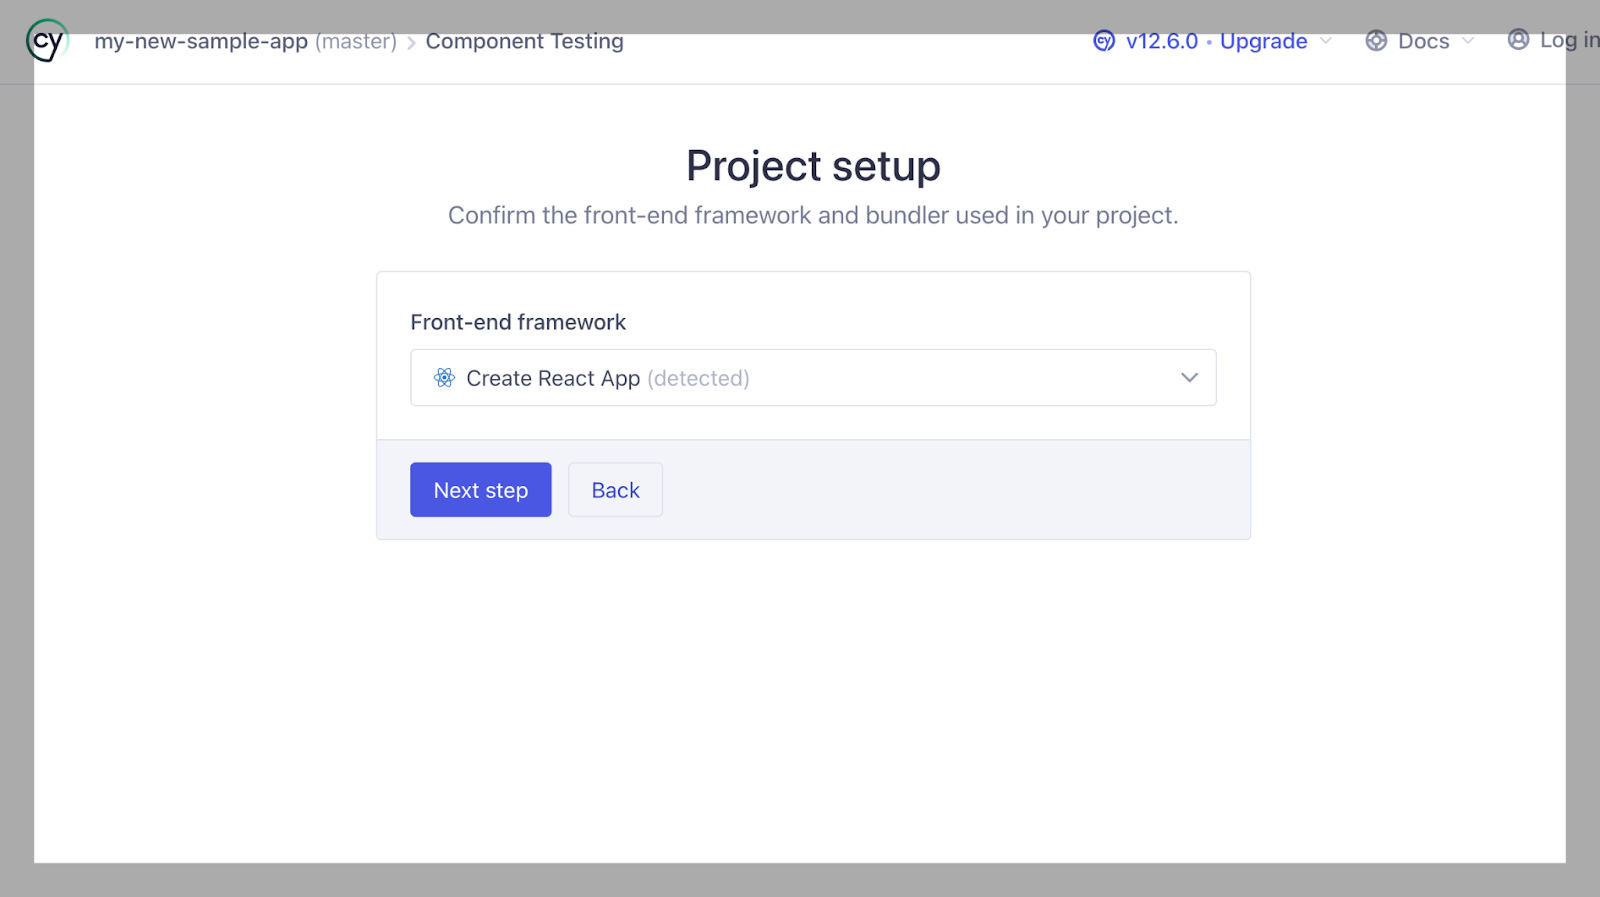
Step 6: Click on Next step from the above screen and wait for all dependencies to install.
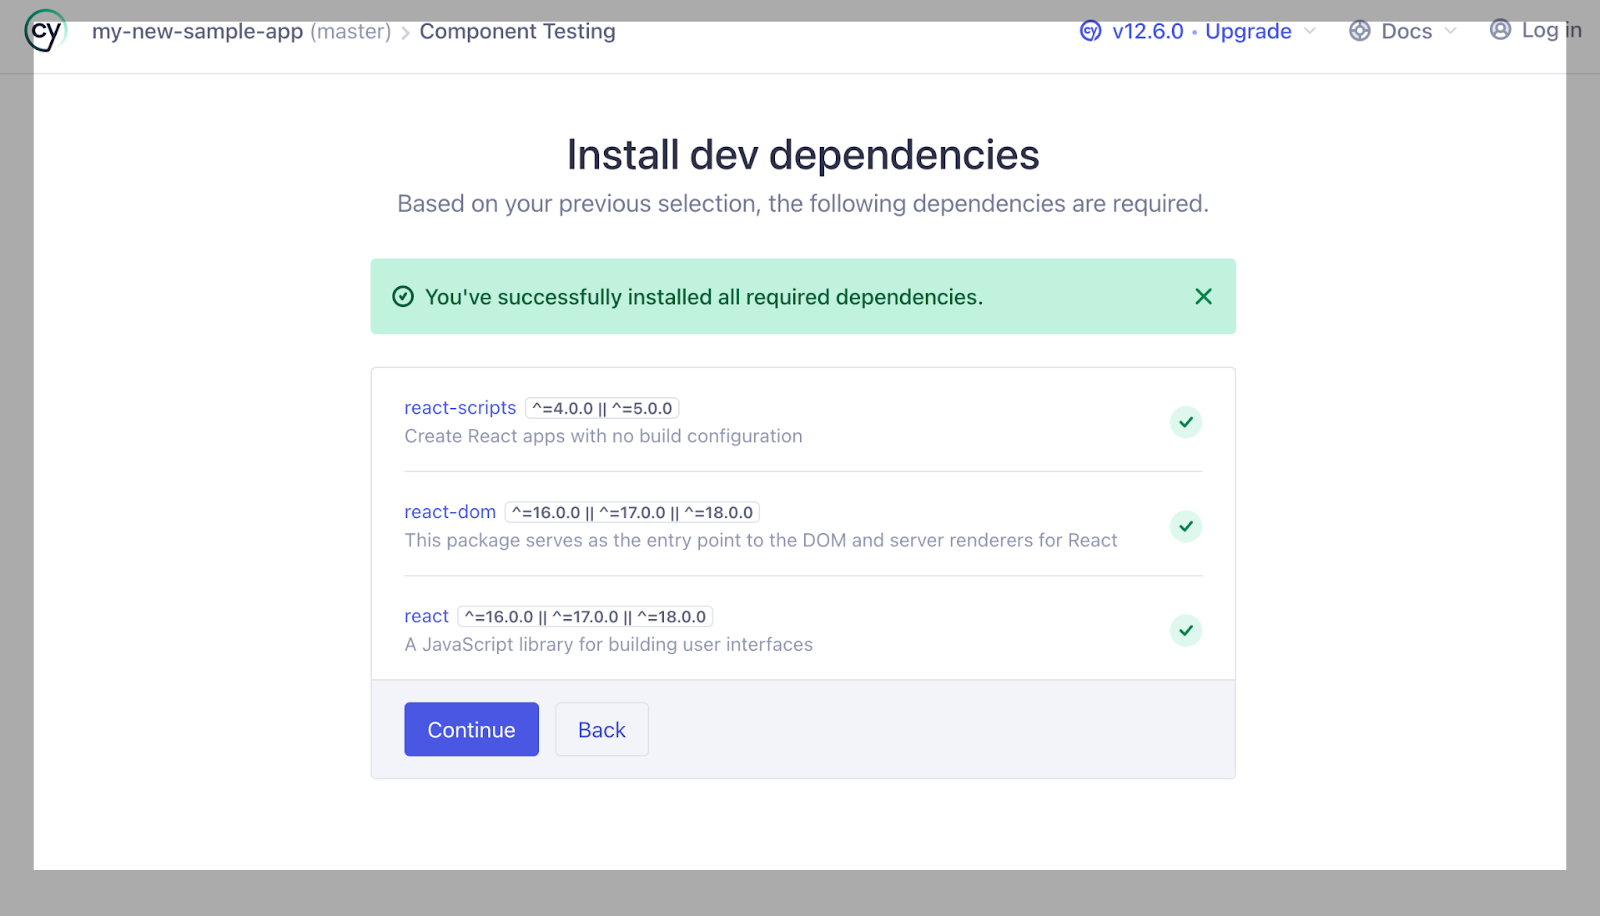
Step 7: Click on Continue button from the above screen.
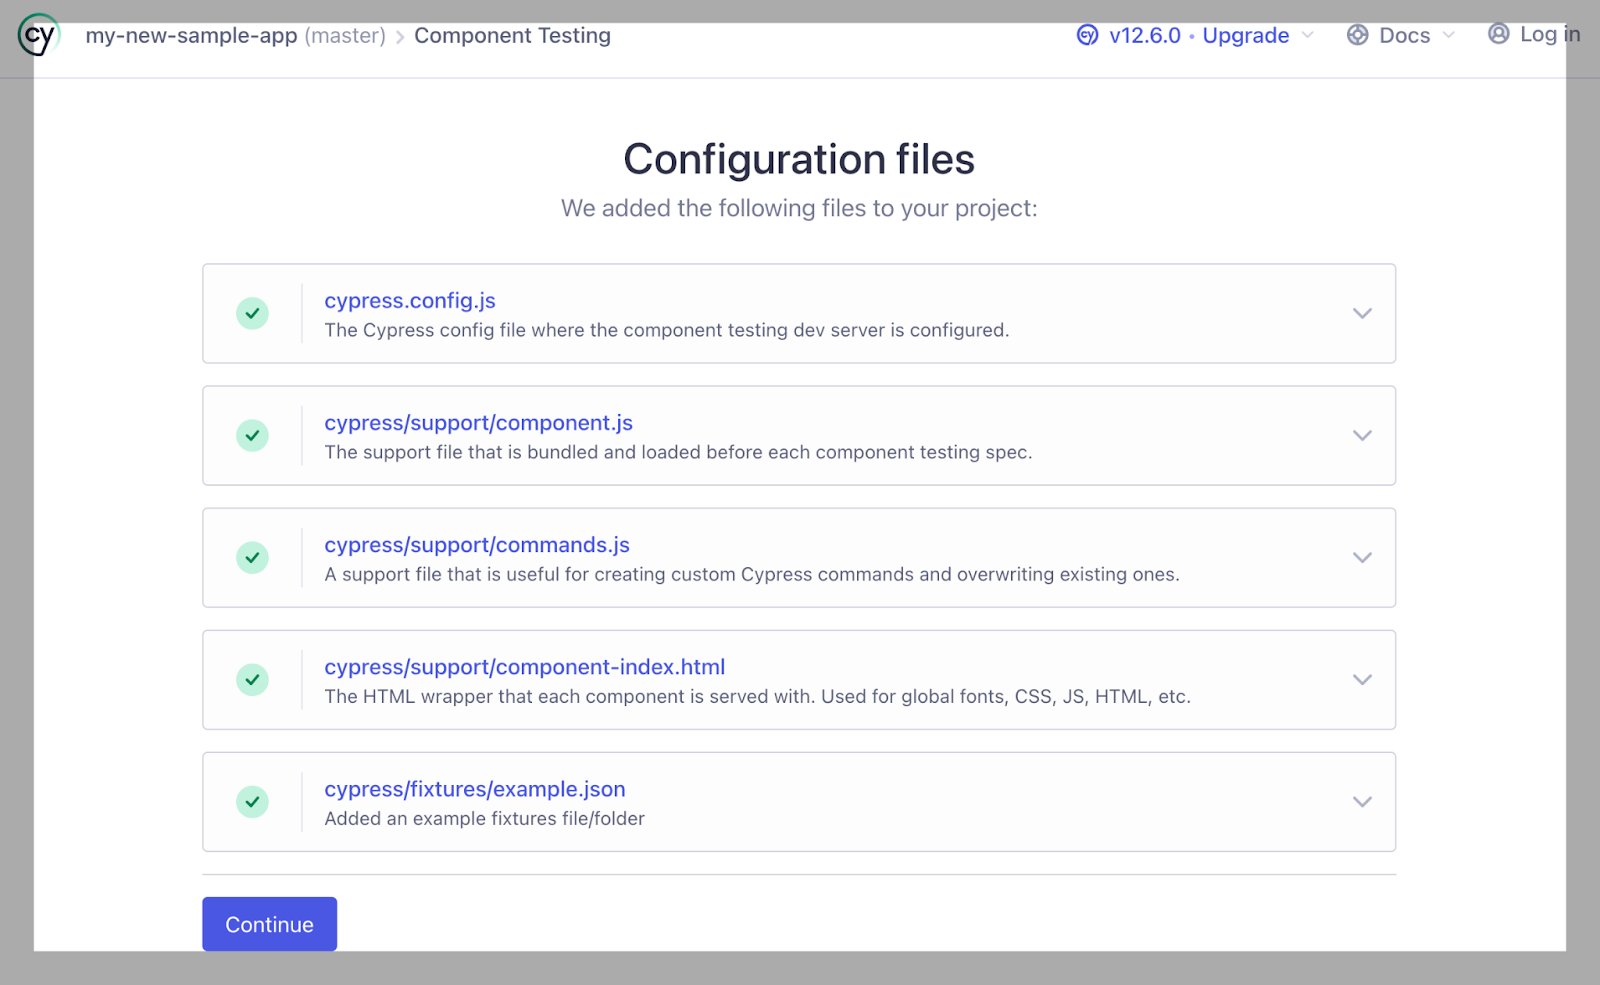
Step 8: Click on Continue button from the above screen.
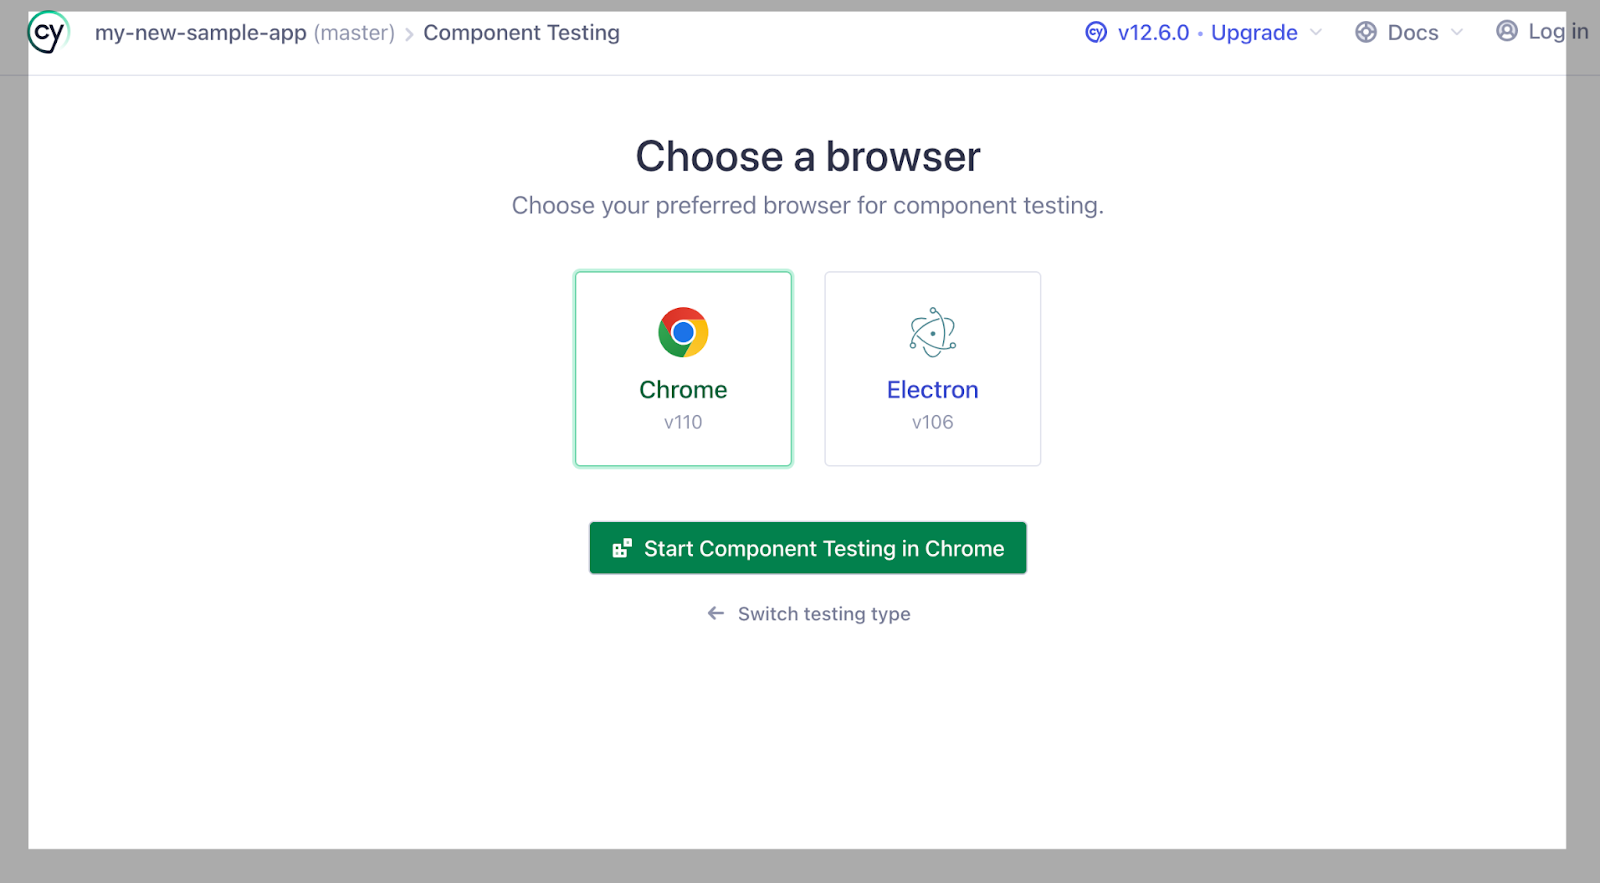
Select the browser, e.g., Chrome, and click ‘Start Component Testing in Chrome.’
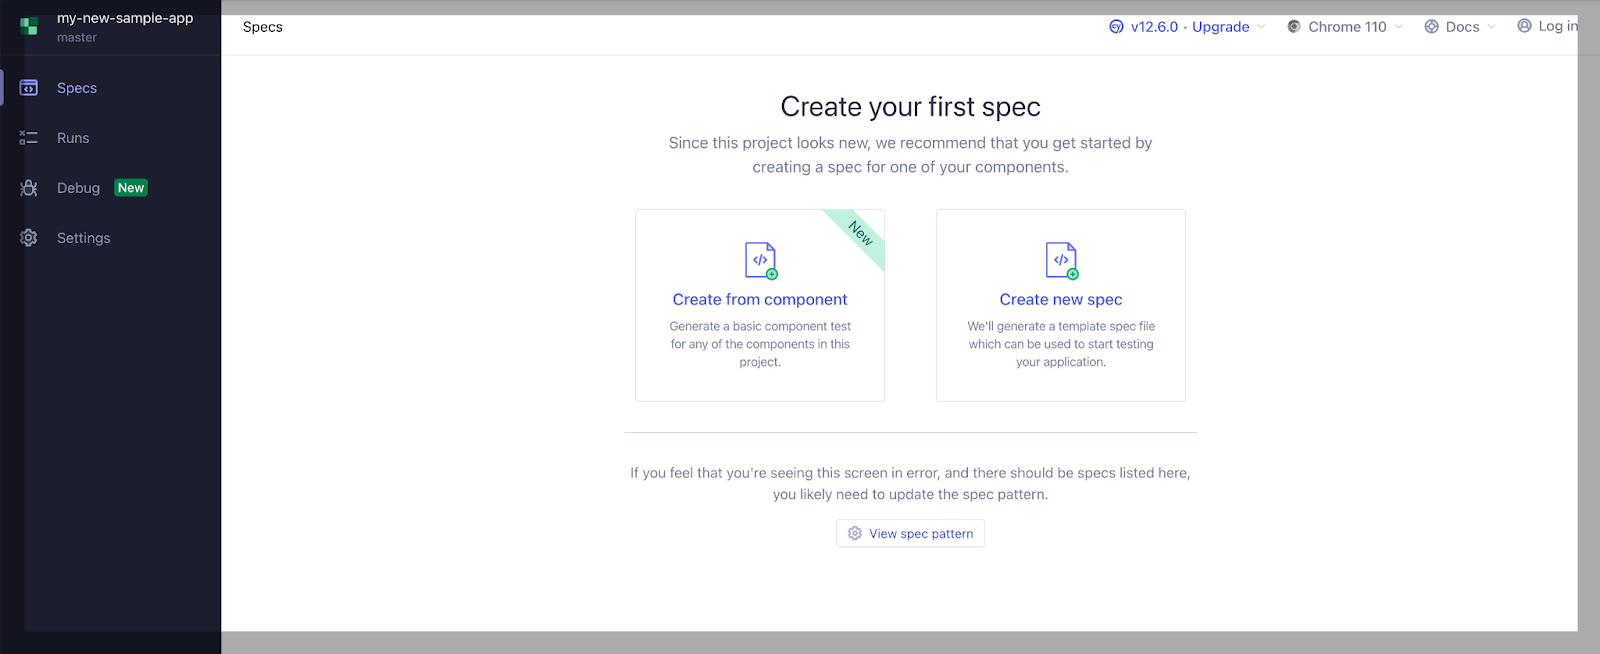
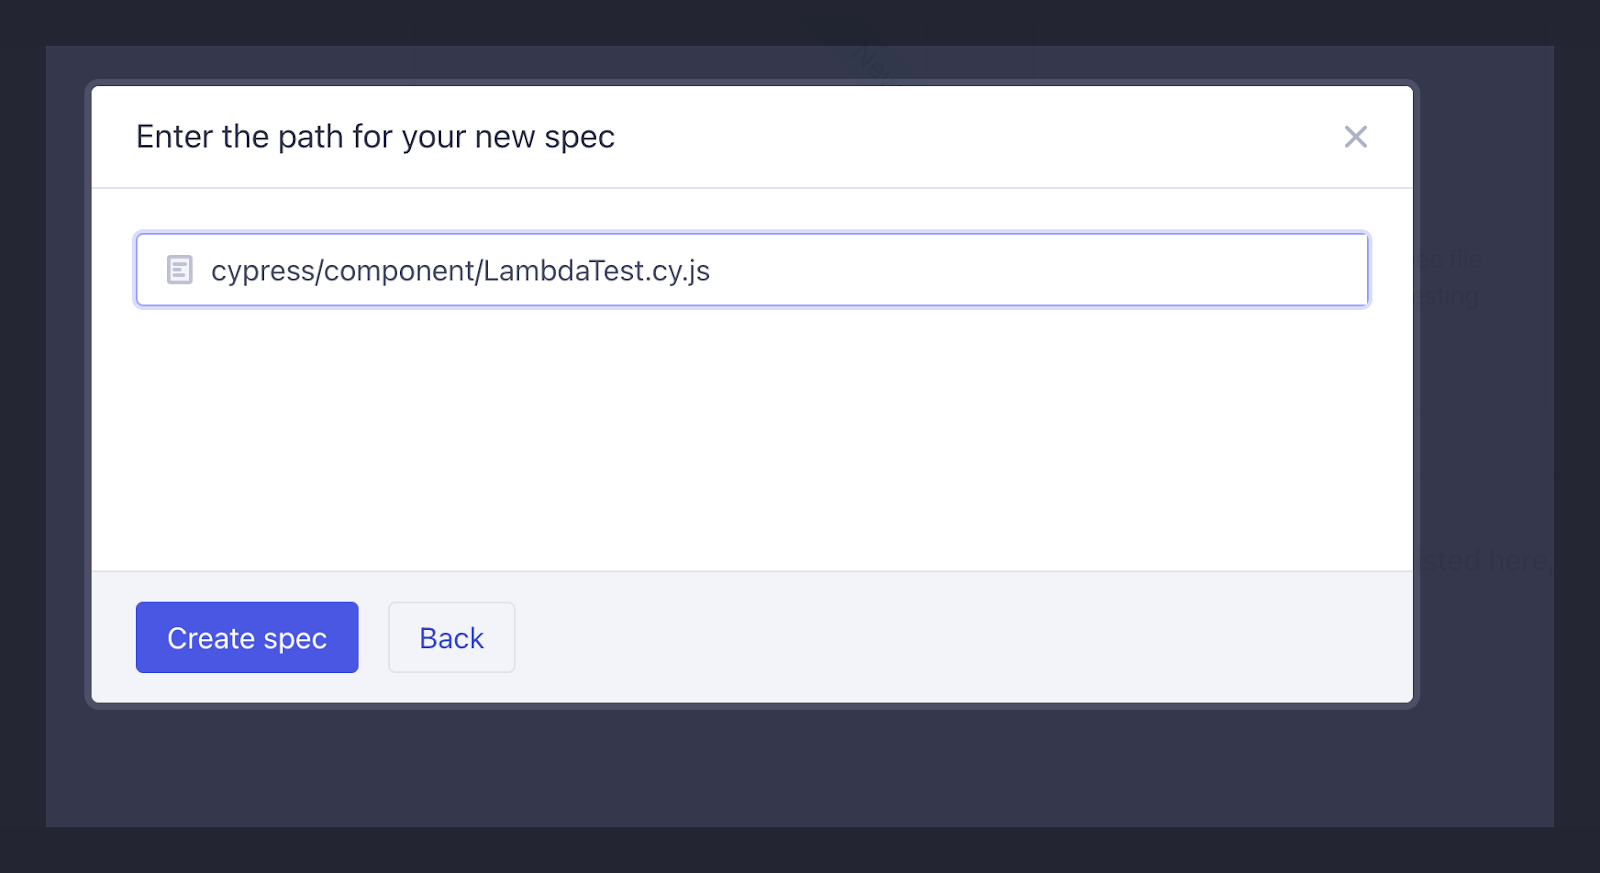
Step 9: Select ‘Create new spec’ and enter the path of the new spec and click ‘Create spec.’
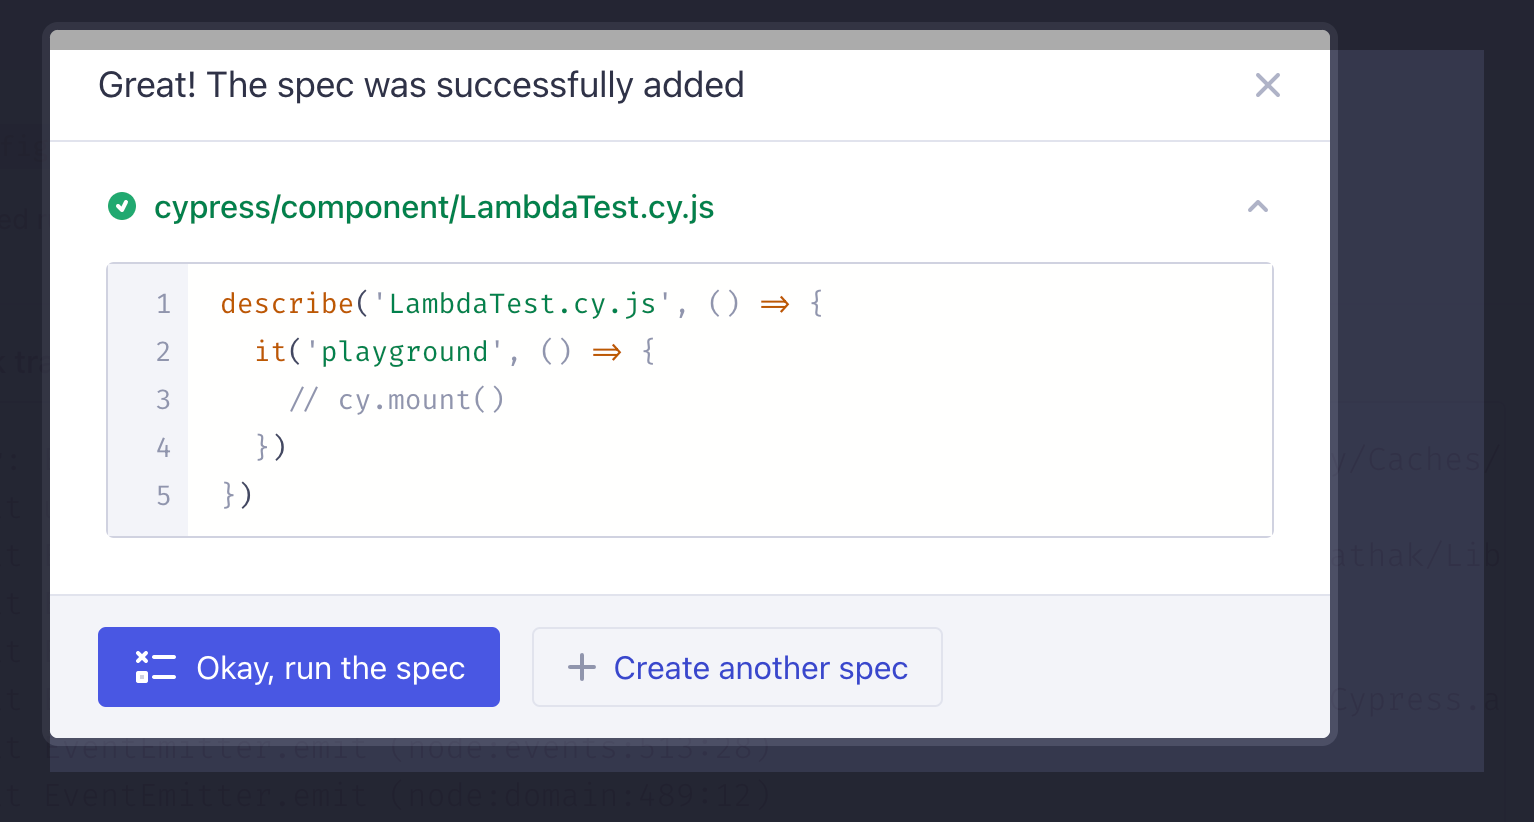
Step 10: Click on Okay, run the spec button.
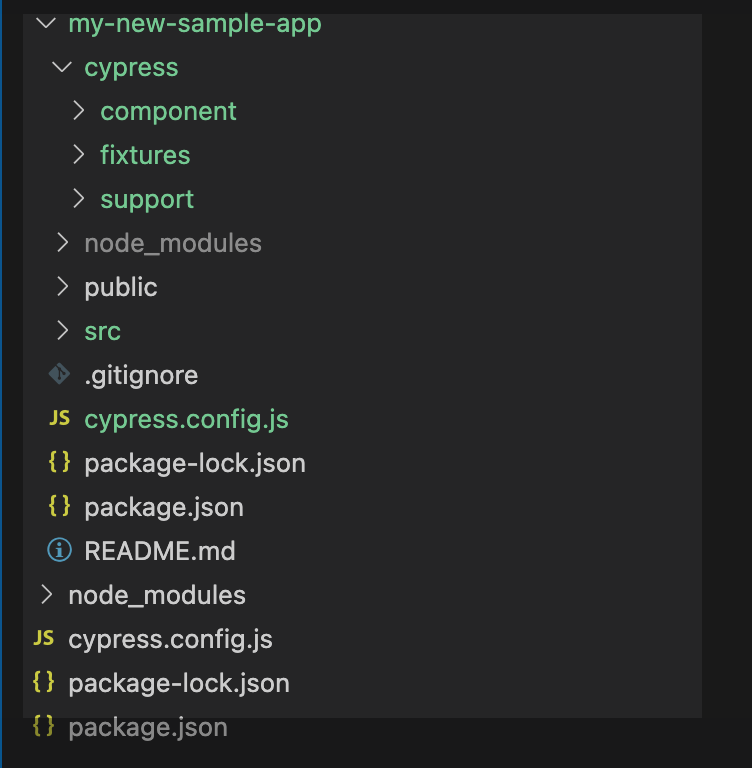
Below is the folder structure after installing the React app.
In this structure, the src folder contains all the source code for the project, while the components subfolder is where the component files are stored, and it is from these files that the test files in the components folder at the top level of the project will import the components to be tested.
Each component has its folder, which includes the component file itself (component1.js, component2.js, etc.) and its corresponding test file, e.g. (component 1.test.js, component 2.test.js, etc.).
Let’s create a component test case.
Create a ‘counter component’ inside the src folder and give its name lambadaTest.jsx.
import { useState } from 'react'

export default function Counter({ initial = 0 }) {

   const [count, setCount] = useState(initial)

   return (

       <div style={{

           padding: 30

       }}>

           <button style={{ color: "black", backgroundColor: "green", margin: 10 }} aria-label="decrement" onClick={() => setCount(count - 1)}>

               -

           </button>

           <span data-cy="counter">{count}</span>

           <button style={{ color: "black", backgroundColor: "green", margin: 10 }} aria-label="increment" onClick={() => setCount(count + 1)}>

               +

           </button>

       </div>

   )

}
Let’s run the created component test cases by running the below command.
npx cypress open --component
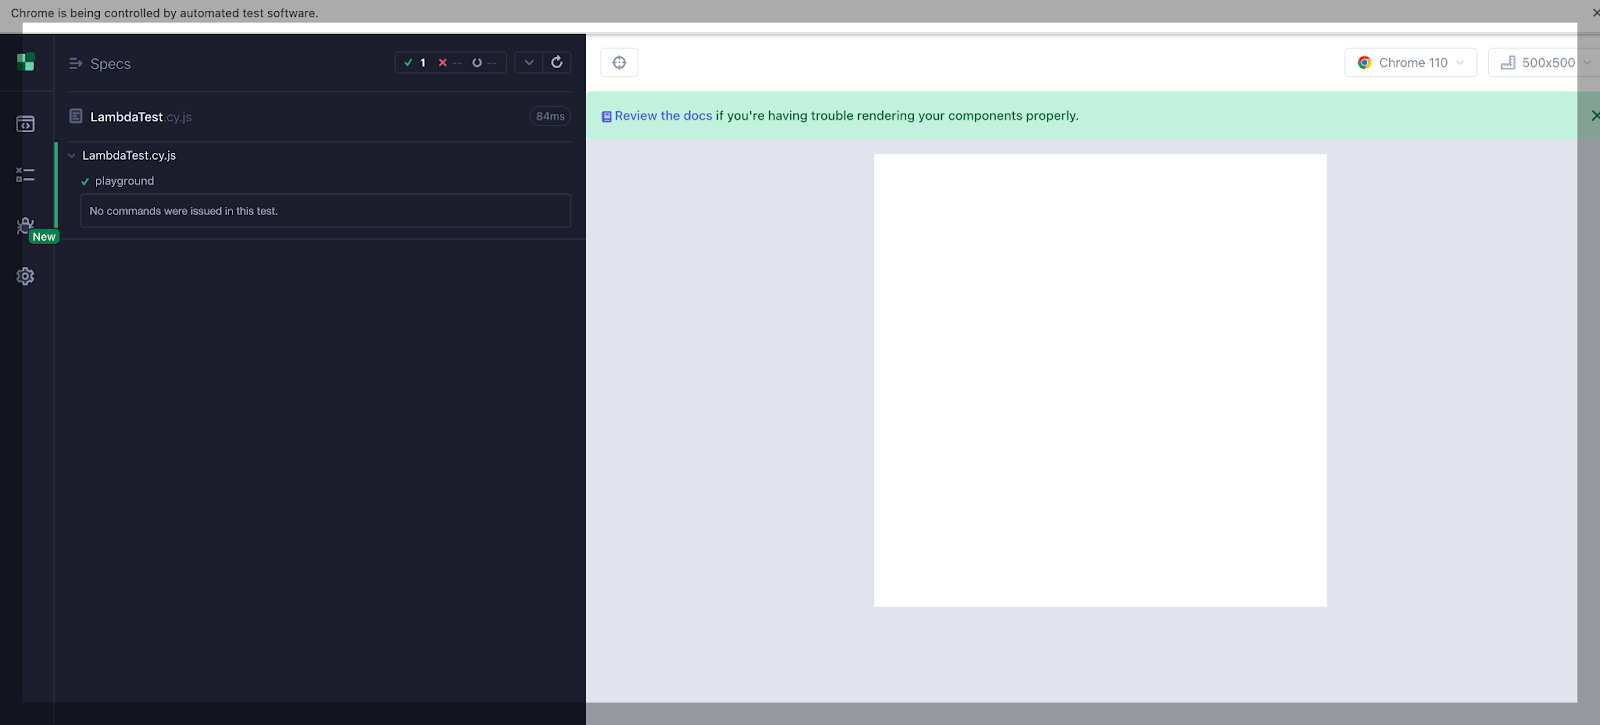
In the below screenshot, we can see that component tests are executed.
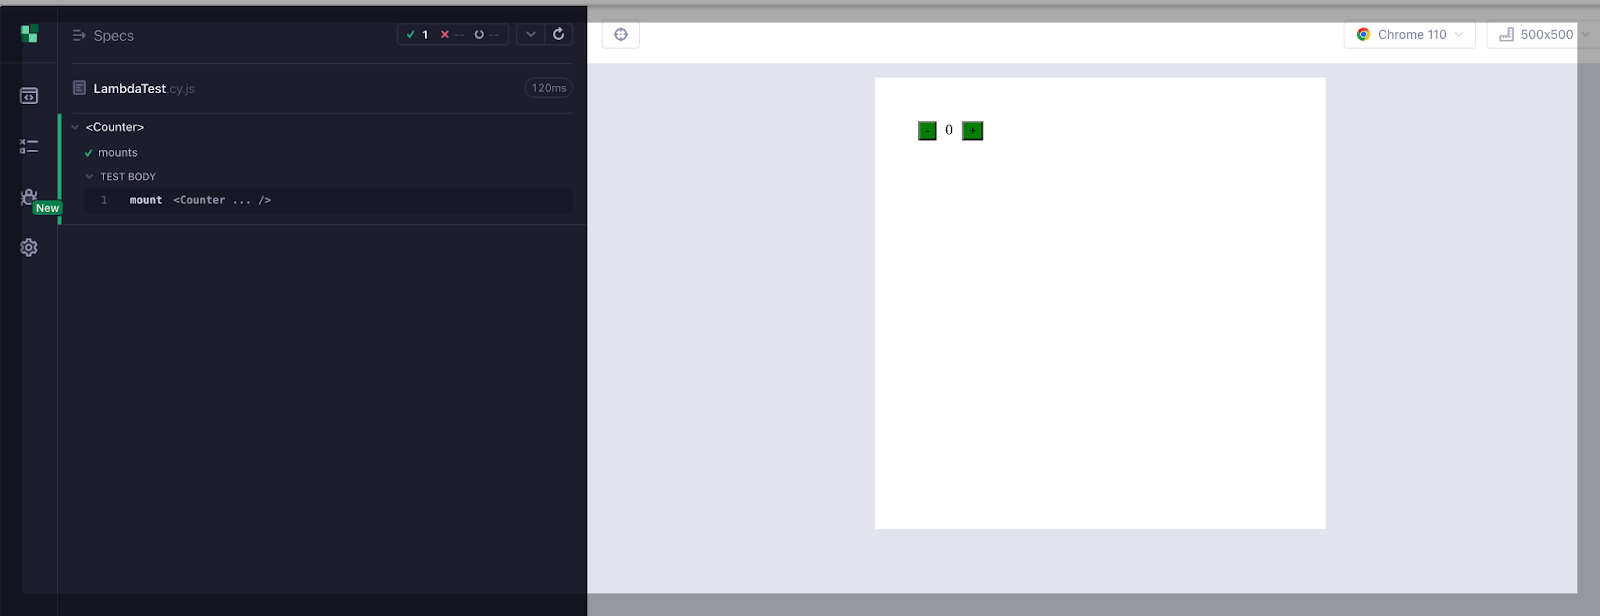
Let’s cover some more scenarios using this Counter React component.
Test Scenario
|
cy.mount(
//Do two time Increment the Count
cy.get(incrementSelector).click();
cy.get(incrementSelector).click();
// Put Assert
cy.get(counterSelector).should(“contain.text”, 2);
//Do the decrement now
cy.get(decrementSelector).click();
// Put Assert
cy.get(counterSelector).should(“have.text”, “1”);
// Put Assert color
cy.get(decrementSelector)
.should(“have.css”, “color”)
.and(“eq”, “rgb(0, 0, 0)”);
// Assert background color
cy.get(decrementSelector)
.should(“have.css”, “background-color”)
.and(“eq”, “rgb(0, 128, 0)”);
});
it(“Do two time decrement then one time increment the count “, () => {
cy.mount(
//Two time decrement the count
cy.get(decrementSelector).click();
cy.get(decrementSelector).click();
// Assert
cy.get(counterSelector).should(“have.text”, “-2”);
//Then increment the count
cy.get(incrementSelector).click();
cy.get(counterSelector).should(“have.text”, “-1”);
// Put Assert color
cy.get(decrementSelector)
.should(“have.css”, “color”)
.and(“eq”, “rgb(0, 0, 0)”);
// Put Assert background color
cy.get(decrementSelector)
.should(“have.css”, “background-color”)
.and(“eq”, “rgb(0, 128, 0)”);
});
});” data-lang=”text/javascript”>
import Counter from '../../src/lambadaTest'

describe("<Counter>", () => {

 const counterSelector="[data-cy="counter"]";

 const incrementSelector = "[aria-label=increment]";

 const decrementSelector = "[aria-label=decrement]";

 it("Do two time increment then one time decrement the count ", () => {

   cy.mount(<Counter />);

   //Do two time Increment the Count

   cy.get(incrementSelector).click();

   cy.get(incrementSelector).click();

   // Put Assert

   cy.get(counterSelector).should("contain.text", 2);

   //Do the decrement now

   cy.get(decrementSelector).click();

   // Put Assert

   cy.get(counterSelector).should("have.text", "1");

   // Put Assert color

   cy.get(decrementSelector)

     .should("have.css", "color")

     .and("eq", "rgb(0, 0, 0)");

   // Assert background color

   cy.get(decrementSelector)

     .should("have.css", "background-color")

     .and("eq", "rgb(0, 128, 0)");

 });

 it("Do two time decrement then one time increment the count ", () => {

   cy.mount(<Counter />);


   //Two time decrement the count

   cy.get(decrementSelector).click();

   cy.get(decrementSelector).click();

   // Assert

   cy.get(counterSelector).should("have.text", "-2");


   //Then increment the count

   cy.get(incrementSelector).click();


   cy.get(counterSelector).should("have.text", "-1");

   // Put Assert color

   cy.get(decrementSelector)

     .should("have.css", "color")

     .and("eq", "rgb(0, 0, 0)");

   // Put Assert background color

   cy.get(decrementSelector)

     .should("have.css", "background-color")

     .and("eq", "rgb(0, 128, 0)");

 });

});
Output
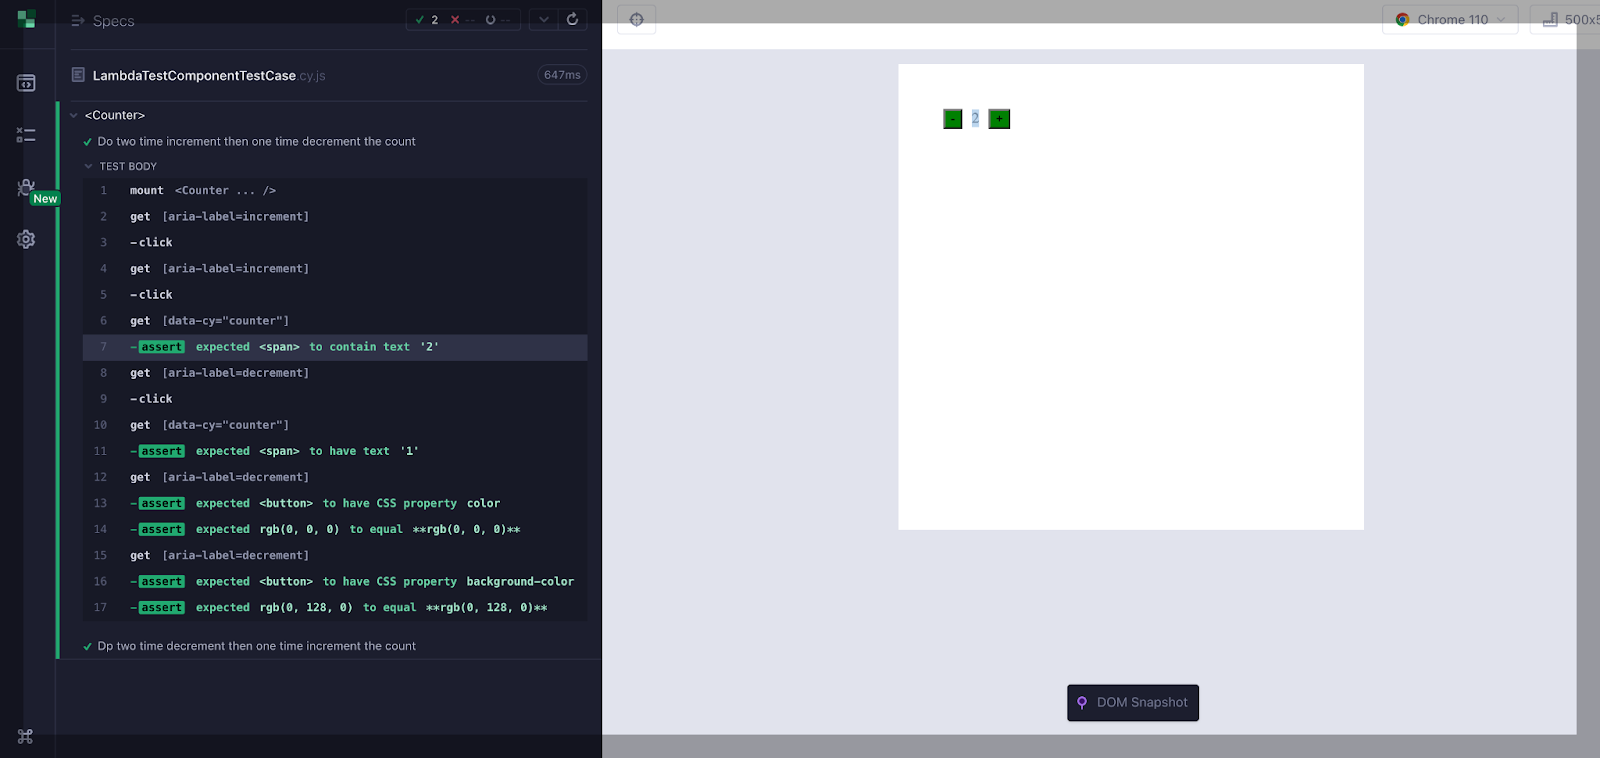
Scenario 1
In the log, first, we increment the count two times and then decrement the count once.
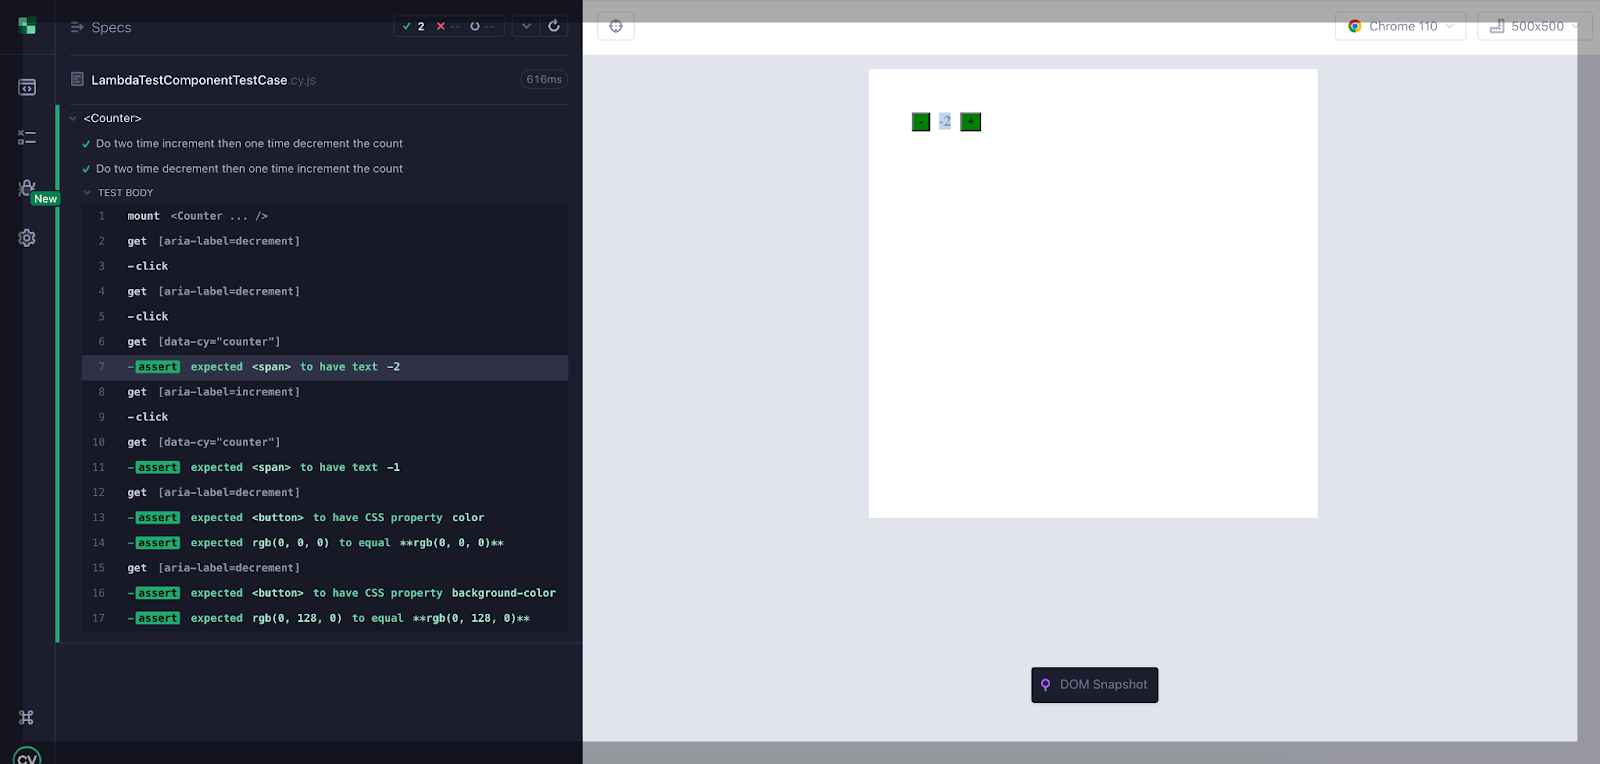
Scenario 2
In the log, first, we decrement the count two times and then increment the count once.
Mobile Responsiveness Testing With Cypress JavaScript
Cypress mobile responsiveness testing is a type of testing that focuses on evaluating the responsiveness and compatibility of a website. It involves using Cypress, an end-to-end testing framework, to automate the process of simulating mobile device interactions and testing the behavior of a website or application across different screen sizes and resolutions.
In Cypress JavaScript, the cy.viewport() method is used to set the dimensions of the browser’s viewport. Here are some of the different methods that can be used with cy.viewport() to modify the viewport.
As mentioned earlier, the cy.viewport() method takes two arguments, width and height, to set the viewport dimensions. For example:
cy.viewport(1280, 720) // set viewport to 1280 x 720 pixels
Cypress provides several predefined device sizes that can be used with cy.viewport() to simulate different devices. For example:
cy.viewport(‘iphone-6’) // set viewport to iPhone 6 size (375 x 667 pixels)
cy.viewport(‘ipad-mini’) // set viewport to iPad Mini size (768 x 1024 pixels)
Developers can also define custom device sizes using the cy.viewport() method. For example:
cy.viewport(550, 750) // set viewport to custom size (550 x 750 pixels)
To simulate landscape orientation, a third argument can be added to cy.viewport(). For example:
cy.viewport(1024, 768, ‘landscape’) // set viewport to 1024 x 768 pixels in landscape orientation
Cypress also provides the ability to dynamically set the viewport size based on the screen size of the device running the test. For example:
cy.viewport(‘macbook-15’) // set viewport to MacBook Pro 15-inch size on a desktop computer
Mobile Responsiveness Test Case Example
In the below example, we are using the LambdaTest eCommerce Playground for mobile responsiveness testing.
Mobile Responsiveness: Example 1
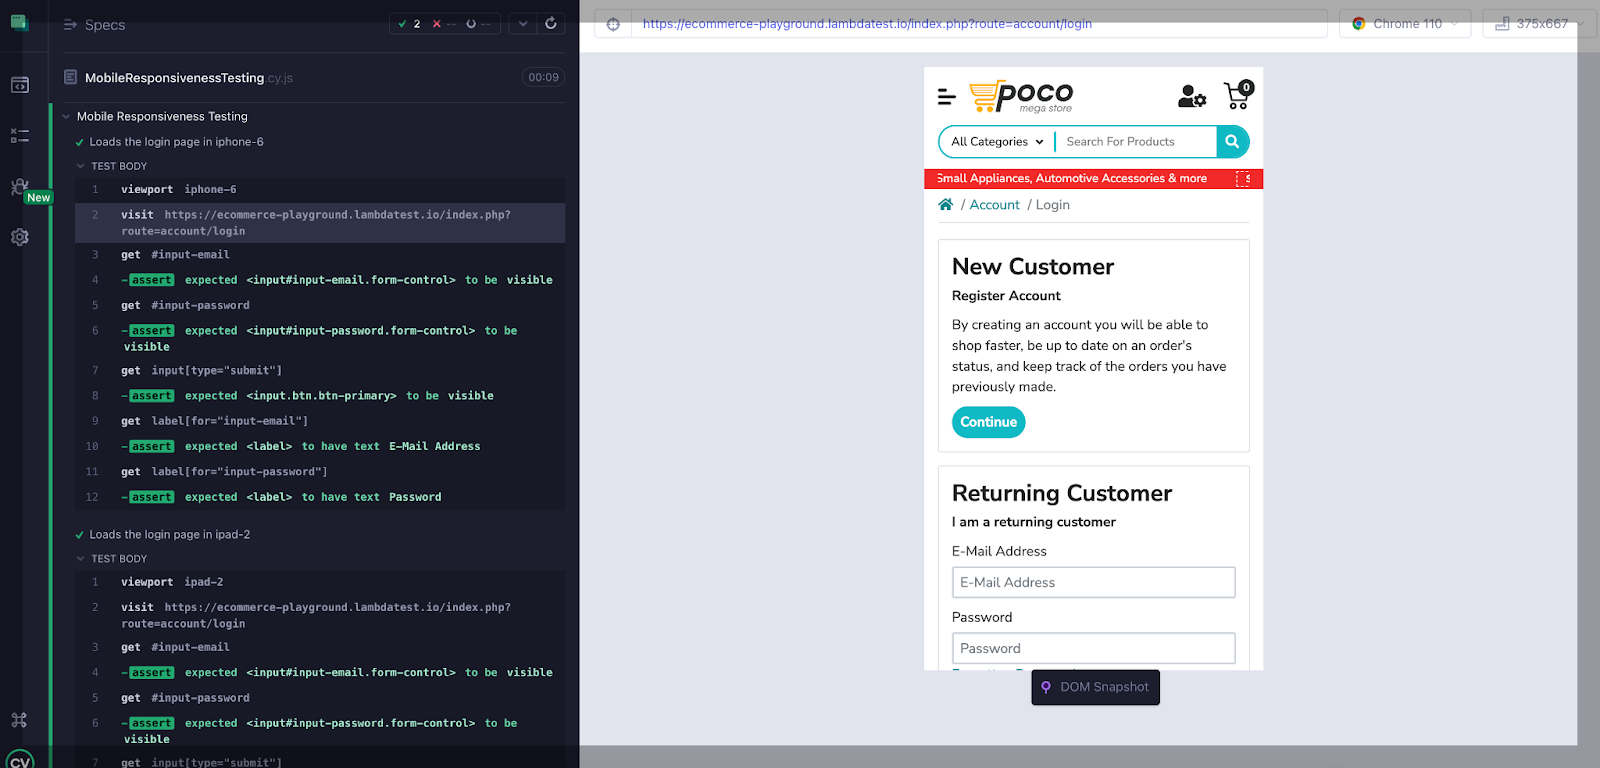
In this example, we verify that the email and password fields are visible and the label of the email and password fields.
describe('Mobile Responsiveness Testing', () => {

 it('Loads the login page in iphone-6', () => {

   cy.viewport('iphone-6') // set viewport to iPhone 6 size

   cy.visit('https://ecommerce-playground.lambdatest.io/index.php?route=account/login')

   cy.get('#input-email').should('be.visible') // check that email input is still visible

   cy.get('#input-password').should('be.visible') // check that password input is still visible

   cy.get('input[type="submit"]').should('be.visible') // check that login button is still visible

   cy.get('label[for="input-email"]').should('have.text', 'E-Mail Address') // check that label for email input is visible and has correct text

   cy.get('label[for="input-password"]').should('have.text', 'Password') // check that label for password input is visible and has correct text

 })

})
Code Walkthrough
This code uses the viewport command to set the size of the browser window to different mobile device sizes. Then it uses the Cypress get command to check that certain elements on the page are visible and have the correct text. You can check additional tests to check other aspects of the page’s responsiveness, such as how images or text scale at different screen sizes.
Presented here is an instance of mobile responsiveness testing carried out on an iPhone 6. Similarly, responsiveness testing can be performed on other viewports by modifying the device name in the cy.viewport() method.
Output
Below is the output of the above-executed test case.
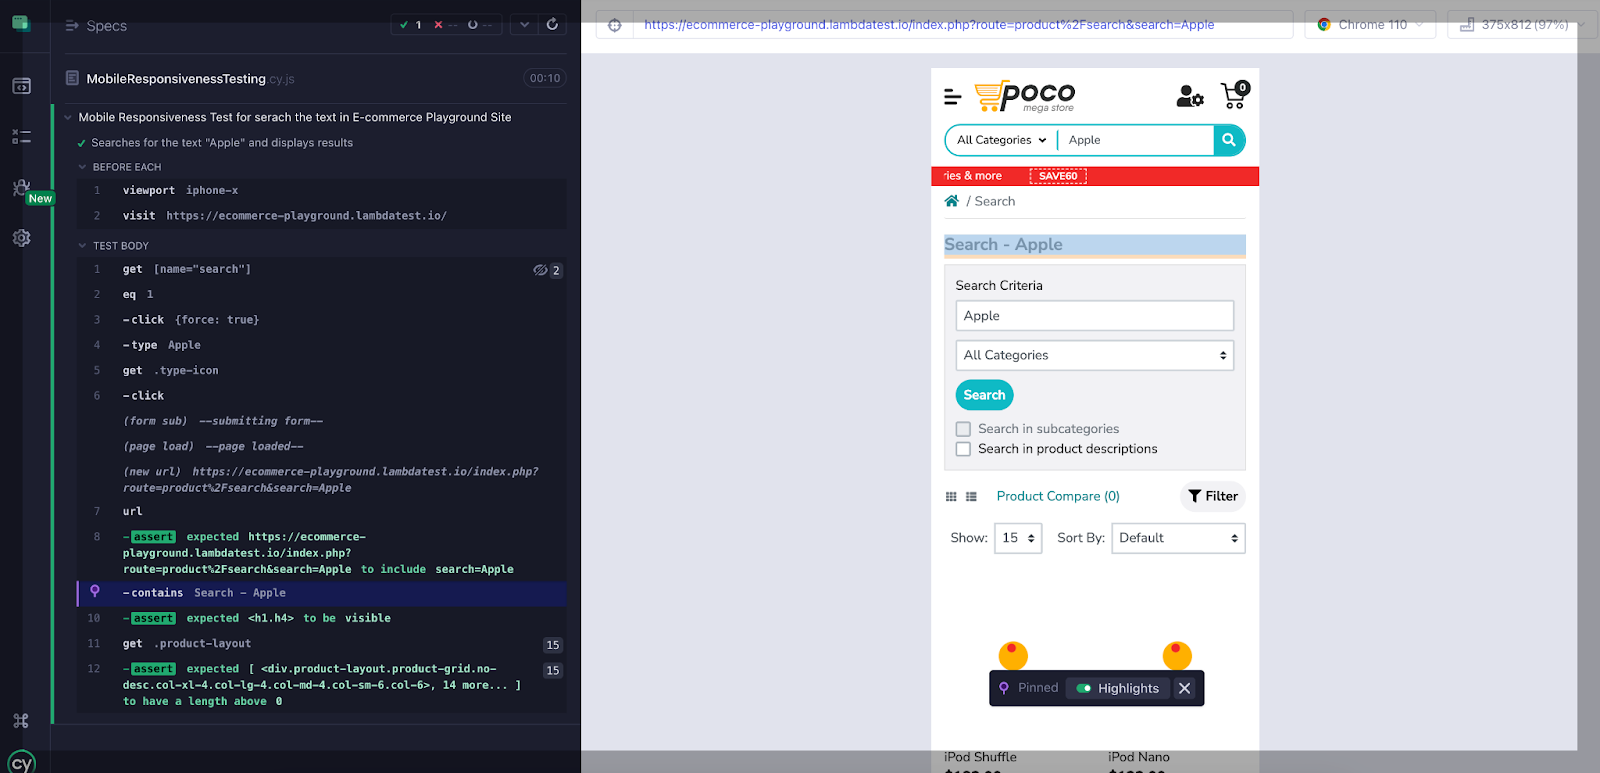
Mobile Responsiveness: Example 2
Below is an example for searching the text in the LambdaTest eCommerce Playground for mobile responsiveness testing.
Code Walkthrough
This code uses the viewport (iphone-x) in beforeEach() hook. In the test case, we are searching the text ‘Apple’ and verify the text after searching.
beforeEach() is a hook that runs a block of code before each test case within a test suite.
describe.only('Mobile Responsiveness Test for search the text in E-commerce Playground Site', () => {

 beforeEach(() => {

   cy.viewport('iphone-x')

   cy.visit('https://ecommerce-playground.lambdatest.io/')

 })

 it('Searches for the text "Apple" and displays results', () => {

   // Enter search data and submit form

   cy.get('[name="search"]').eq(1).click({force: true}).type('Apple')

   cy.get('.type-icon').click()

   // Verify search results

   cy.url().should('include', 'search=Apple')

   cy.contains('Search - Apple').should('be.visible')

   cy.get('.product-layout').should('have.length.gt', 0)

 })

})
Output
Below is the output of the above-executed test case.
Running Cypress Test Cases Locally
You can run the test case from the command line or use Cypress runner. Let’s run test cases using Cypress runner. To open the Cypress test runner, run the following command.
yarn run cypress open
The above command will open the Cypress test runner with the existing test cases. You can select the browser on which you want to run the test case.
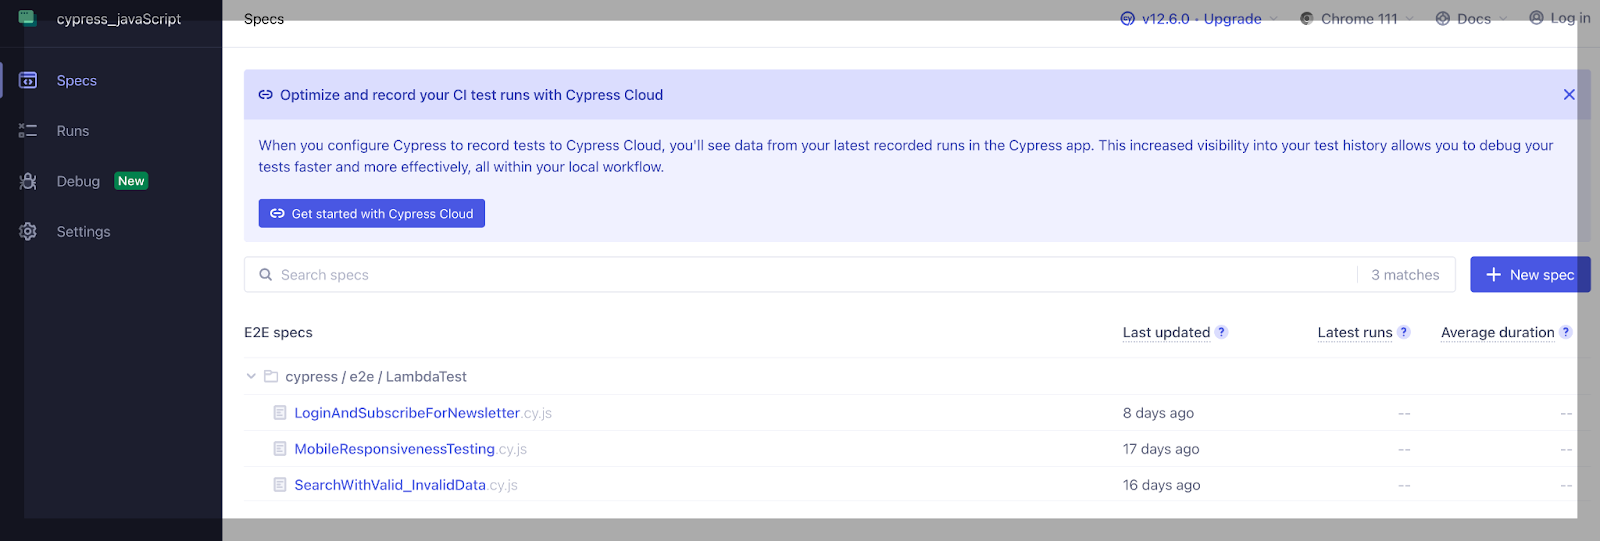
Let’s execute three test cases in the local environment.
- LoginAndSubscribeForNewsletter.cy.js,
- MobileResponsivenessTesting.cy.js, and
- SearchWithValid_InvalidData.cy.js
File Name: LoginAndSubscribeForNewsletter.cy.js
describe('Login and Subscribe', () => {

 it('Logs in and subscribes to newsletter', () => {

   // Visit the site

   cy.visit('https://ecommerce-playground.lambdatest.io/index.php?route=account/login')

// Click the login button

 cy.get('[value="Login"]').click()

// Enter valid email and password

cy.get('#input-email').type('lambdatestnew@yopmail.com')

cy.get('#input-password').type('Lambda123')


// Click the login button

cy.get('[value="Login"]').click()


// Verify successful login

cy.url().should('include', 'index.php?route=account/account')

cy.contains('My Account').should('be.visible')


// Subscribe to newsletter

 cy.contains('Newsletter').click()

 cy.get('#input-newsletter-yes').click({force:true})

 cy.get('[value="Continue"]').click()


 // Wait for subscription success message

   cy.get('.alert-success').should('contain', 'Success: Your newsletter subscription has been successfully updated!')

 })

})
File Name: MobileResponsivenessTesting.cy.js
describe('Mobile Responsiveness Testing', () => {

 it('Loads the login page in iphone-6', () => {

  cy.viewport('iphone-6') // set viewport to iPhone 6 size

   cy.visit('https://ecommerce-playground.lambdatest.io/index.php?route=account/login')

   cy.get('#input-email').should('be.visible') // check that email input is still visible

   cy.get('#input-password').should('be.visible') // check that password input is still visible

   cy.get('input[type="submit"]').should('be.visible') // check that login button is still visible

   cy.get('label[for="input-email"]').should('have.text', 'E-Mail Address') // check that label for email input is visible and has correct text

   cy.get('label[for="input-password"]').should('have.text', 'Password') // check that label for password input is visible and has correct text

 })
File Name: SearchWithValid_InvalidData.cy.js
describe('Login Test', () => {

 beforeEach(() => {

   cy.visit('https://ecommerce-playground.lambdatest.io/index.php?route=account/login')

 })

 it('Searches for the text "Apple" and verify result', () => {

   // Enter search data and submit form

   cy.get('[name="search"]').eq(0).type('Apple')

   cy.get('.type-text').click()


   // Verify search results

   cy.url().should('include', 'search=Apple')

   cy.contains('Search - Apple').should('be.visible')

   cy.get('.product-layout').should('have.length.gt', 0)

 })

 it('Displays message with no search results for invalid search term', () => {

   // Enter search term that returns no results and submit form

   cy.get('[name="search"]').eq(0).type('abc')

   cy.get('.type-text').click()


   // Verify message for no search results

   cy.contains('There is no product that matches the search criteria.').should('be.visible')

 })

})
Let’s execute the above test cases.
When we run the command yarn run cypress open, the below screen is opened.
Test Execution
LoginAndSubscribeForNewsletter.cy.js
MobileResponsivenessTesting.cy.js

SearchWithValid_InvalidData.cy.js
Wrapping Up
In conclusion, Cypress test automation using JavaScript can significantly improve the speed and efficiency of software testing. As JavaScript supports many testing frameworks, developers can leverage it. Also, JavaScript is very easy to learn. Developers can learn JavaScript very fast and start development.
Source link