If you work on a team of developers who frequently interact with each other’s code, then you know just how important it is to write code that is clean and idiomatic.
Sometimes, developers pick up a new programming language by only learning the syntax. They then use it to build really awesome systems, but pay no mind to how programs in that language should be written idiomatically. Linting code is one of the best ways to check for idiomatic code, so let’s see how to do that in Rust.
This article introduces linting as a useful practice in writing idiomatic code. We’ll discuss the importance and results of code linting in Rust specifically, investigating how linting is done in Rust codebases. Then, we’ll install Clippy and demonstrate how to use it to lint Rust code.
Jump ahead:
What is code linting?
Linting is the process of checking through code to detect potential errors, bugs, and styles that do not follow the standard convention of the programming language.
Linting is more popular among dynamic languages like Python and JavaScript because statically typed languages have compilers that perform most of the linting operations. A tool that lints code is called a linter, and it performs the following operations:
- Checks for potential bugs
- Checks for errors
- Checks for code complexity
- Checks for code smells
- Checks that the program follows an idiomatic and clean style
- Checks for mismatched naming conventions
- Provides security warnings
- Checks for memory leaks, indexing overflows, and null pointer dereference
- Checks for illegal data type combinations
It’s important to introduce linting early in your project, because it can be difficult (or even impossible) to lint old, legacy codebases. We’ll discuss linting with regard to the Rust compiler in the next section.
How does linting improve Rust code?
The Rust compiler was built with static code analysis in mind; it has its own inbuilt collection of lint checks that evaluate code during compilation.
To see the list of these inbuilt lints, referred to as allowed-by-default lints, run the following command:
rustc -W help
These lints are categorized into the following groups, called lint levels:
allow: Tells the linter to ignore violations of the lintwarn: Tells the linter to produce a warning if the lint is violatedforce-warn: Same aswarn, but it cannot be overwrittendeny: Tells the linter to produce an error if the lint is violatedforbid: Same asdeny, but it cannot be overwritten
To run a check on your Rust program using the Rust compiler’s inbuilt linting feature, use the following command:
cargo check
Rust code that throws an error during compilation or during a check provides the lint category in the warning: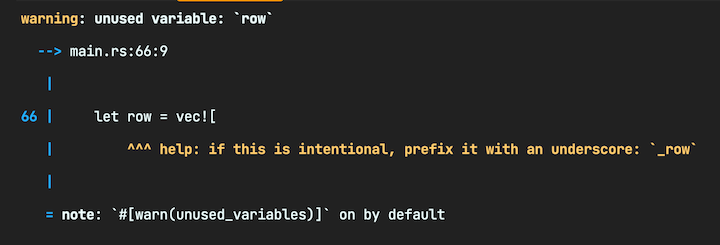
Here, the warning shows the warn category. We can prevent the lint from throwing a warning by adding lint level attributes to the top of the code like this:
#![allow(unused_variables)]
This allows the Rust compiler to override all code in the crate with the (unused_variables) warning. If we run the check or try to compile again, this particular warning will be absent.
Overriding lints can be useful in situations where you are testing or prototyping an application and do not need to follow idiomatic standards. This is particularly useful when you want to run a block of code that would normally throw a linting error at compile time.
Now that we have a better understanding of Rust’s inbuilt compiler, let’s learn more about Clippy.
What is Clippy?
Clippy is a crate that contains a list of lints that are not available in the inbuilt Rust compiler lint list. Clippy offers more than 550 lints to include in your program, all grouped into 10 lint level categories:
cargo: Lints that help you improve yourCargo.tomlmanifest filecomplexity: For complex code that can be simplifiedcorrectness: Lints for checking correct code, and mustn’t include#![allow]deprecated: For deprecated code or librariesnursery: New lints still being developedpedantic: Strict lintsperf: Lints that give suggestions on how to improve the speed and performance of your coderestriction: Useful lints for specific casesstyle: Lints that enforce idiomatic stylesuspicious: Lints for suspicious code that should be fixed but can be left if it was intentional
Now, let’s see how to install and run Clippy.
Installing and running Clippy
New versions of the Rust toolchain come with Clippy preinstalled. If you want to install Clippy manually, you can use the rustup toolchain installer:
rustup update
rustup component add clippy
Clippy can be run as a cargo subcommand inside a project folder:
cargo clippy
Clippy checks and compiles dependencies and code in the project folder like this: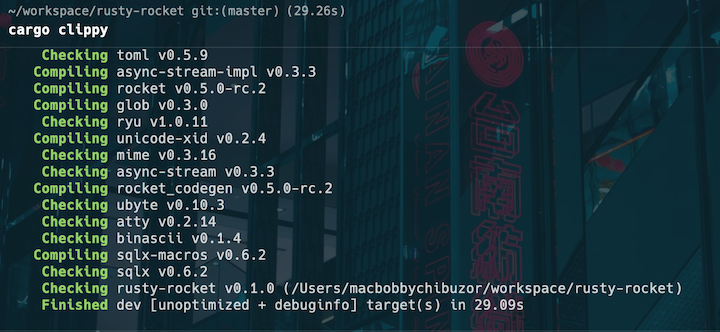
We can also use Clippy without cargo, by using the clippy-driver. To use Clippy in a normal workspace, run the following cargo subcommand:
cargo clippy -p <workspace_name>
Using Clippy for code analysis
Some Rust code can compile without faults or compile errors, but that does not mean that the code is clean. Clippy catches suboptimal practices in your code that you or the Rust compiler cannot detect. For example, the code below would compile normally, but it actually has an issue:
fn add(x: i32, y: i32) -> i32 {
    return x + y
}

fn main() {
    println!("Summation result is: {}", add(3, 7));
}
// Returns: 10
Quickly confirm that this code compiles by clicking Play. Then, check the code and try to determine what could be wrong.
Now, let’s use Clippy to check for and spot the issue:
cargo clippy
The result of the check returns the following error: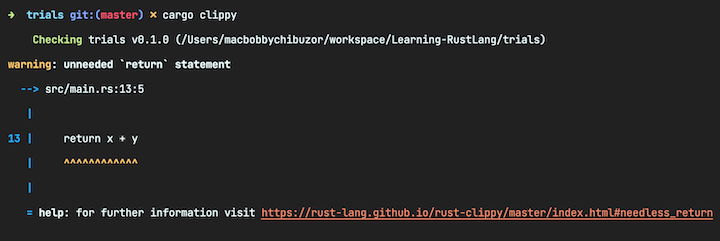
You can proceed to remove the return statement from the code, leaving just x + y. If you check again, no issues will be identified.
Although this is a very trivial example, Clippy is powerful and capable of catching really serious errors. Clippy should always be used in Rust projects.
Configuring Clippy lints
You do not need to accept every lint provided by Clippy. In fact, you are free to add several #![allow(...)] lint attributes to your code when you disagree with a lint. You can also customize Clippy to have certain behaviors that you prefer using specific subcommands.
For example, you can use the -D option to enable or disable specific lints, or the -W option to control the level of warnings that Clippy generates. Additionally, you can use the -A option to run Clippy on all of the dependencies in your project, rather than just your own code.
To allow a specific lint to run, use the -A option like this:
cargo clippy -- -A clippy::lint_name
If you want a warning on a particular lint, use the -W option like this:
cargo clippy -- -W clippy::lint_name
You can also try these attributes with lint categories. For example, you can run Clippy with warnings for all lints enabled:
cargo clippy --W clippy::correctness
Linting to Continuous Integration
On production, it is recommended to run Clippy on your Continuous Integration (CI) provider. If you use GitHub Actions, then append this code to your config script:
on: push
name: Clippy check

# Make sure CI fails on all warnings, including Clippy lints
env:
  RUSTFLAGS: "-Dwarnings"

jobs:
  clippy_check:
    runs-on: ubuntu-latest
    steps:
      - uses: actions/[email protected]
      - name: Run Clippy
        run: cargo clippy --all-targets --all-features
The -Dwarnings flag prevents the CI from processing. The environment variable RUSTFLAGS is set to -Dwarnings to make all cargo commands subject to Clippy warnings.
If your CI provider is Travis CI, you can add this instead:
language: rust
rust:
  - stable
  - beta
before_script:
  - rustup component add clippy
script:
  - cargo clippy
  # if you want the build job to fail when encountering warnings, use
  - cargo clippy -- -D warnings
  # in order to also check tests and non-default crate features, use
  - cargo clippy --all-targets --all-features -- -D warnings
  - cargo test
  # etc.
Further recommendations
In this article, we investigated linting, linting levels, and categories, and we’ve discussed how linting improves Rust code. We demonstrated how to install Clippy and use it to check whether code is idiomatic and correct. We also demonstrated how to include Clippy in Continuous Integration.
There are two things you should keep in mind when using Clippy. First, you are allowed to disagree with Clippy suggestions every now and then. Second, Clippy does not in any way render the inbuilt compiler’s safety and error checking tool replaceable or useless. Instead, Clippy provides an extensive collection of additional lints that can be used to make Rust code more performant.
LogRocket: Full visibility into web frontends for Rust apps
Debugging Rust applications can be difficult, especially when users experience issues that are difficult to reproduce. If you’re interested in monitoring and tracking performance of your Rust apps, automatically surfacing errors, and tracking slow network requests and load time, try LogRocket. 
LogRocket is like a DVR for web and mobile apps, recording literally everything that happens on your Rust app. Instead of guessing why problems happen, you can aggregate and report on what state your application was in when an issue occurred. LogRocket also monitors your app’s performance, reporting metrics like client CPU load, client memory usage, and more.
Modernize how you debug your Rust apps — start monitoring for free.
Source link