Astro 2.0 has brought a game-changing feature to the world of web development: hybrid rendering. With hybrid rendering, developers can prerender certain pages while retaining their deployed server, giving them the best of both worlds. By building pages ahead of time, prerendering enables these pages to load instantly, improving the user experience and overall performance of your web application.
In this article, we’ll take a hands-on approach and explore how to implement hybrid rendering in Astro by building a demo project. We’ll cover the tips, tricks, and best practices for mastering this powerful feature, as well as delve into the benefits of prerendering pages for improved scalability and SEO optimization. So, if you’re ready to level up your web development skills with Astro’s hybrid rendering, let’s get started!
Jump ahead:
Why do we need hybrid rendering?
In the year since its 1.0 release, Astro has become a popular choice among web developers looking for a fast, simple, and flexible way to build websites. With its ability to generate static pages using static site generation (SSG) and server-side rendering (SSR), Astro has quickly become a go-to tool for developers who want the best of both worlds.
Static websites offer incredible performance, thanks to pre-generated HTML and assets that are served to users directly from a CDN. This makes them fast, scalable, and easy to deploy.
However, they lack the ability to generate HTML on-demand for each request. This means that they can’t handle dynamic content such as user authentication, shopping carts, and real-time updates without relying on client-side JavaScript.
On the other hand, server-side rendering (SSR) enables web applications to generate HTML on-demand for each request, making it possible to serve dynamic content and handle complex user interactions. However, SSR can be slow and resource-intensive, especially for high-traffic applications.
To address this challenge, Astro introduced hybrid rendering in version 2.0, enabling developers to choose between SSG and SSR build output depending on the needs of their web application. This provides flexibility to generate pre-rendered HTML for static pages while still allowing for dynamic content using client-side JavaScript.
What does the build process look like in Astro?
Astro’s build process happens in multiple stages, beginning with a server-side JavaScript bundle generated by Vite. The output of this bundle includes:
- Server-side JavaScript used to render HTML
- A client manifest that uses static analysis to collect the components needed for client-side interactivity
- CSS and other assets for the client
From here, there are three possible branches, depending on the output configuration set in the Astro config file.
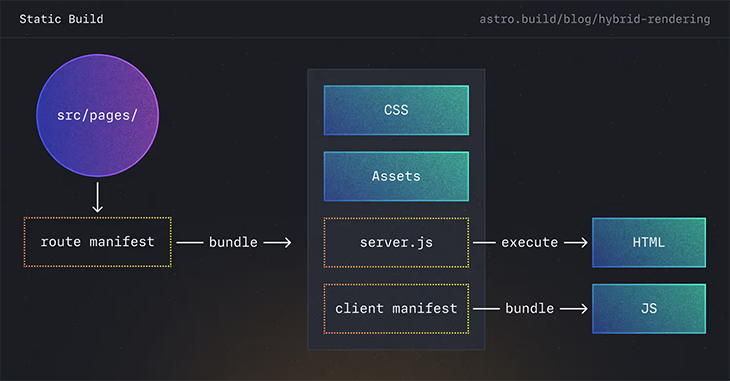
Branch option 1: Static output
If the output is configured to be static, Astro will execute the server-side JavaScript and write the output to .html files. The server-side JavaScript is then discarded.
This creates a set of pre-rendered HTML files that can be served directly to the user from a CDN or web server. This approach offers incredible performance, but lacks the ability to generate HTML on-demand for each request.
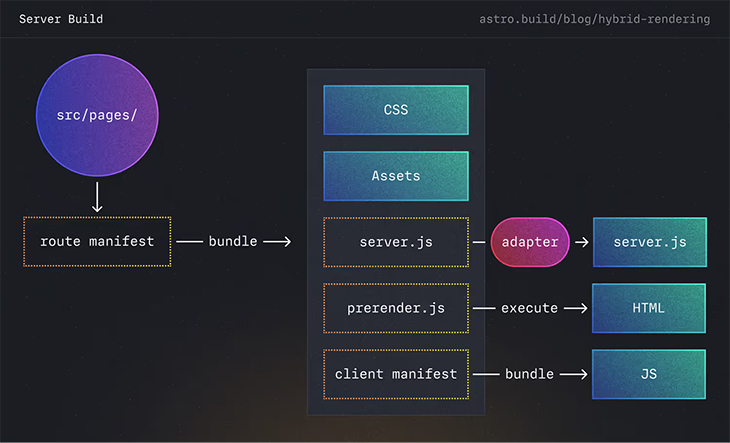
Branch option 2: Server output
If the output is configured to be server, Astro passes the server-side JavaScript to an adapter for further processing. Adapters ensure that your server-side JavaScript is compatible with a particular hosting provider’s JavaScript runtime.
The final output in this case is not a set of .html files, but the JavaScript code necessary to render HTML on the server-side.
Branch option 3: Server output (hybrid rendering)
The build process for hybrid rendering is a combination of the static and server output. During the initial bundling process, a new static analysis step determines which pages should be prerendered, which allows routes to be split into separate chunks based on when they should be rendered.
Much like the original static process, the prerendered chunk is executed and the output is written to .html files, which are then served statically. Meanwhile, the server chunk is passed to an adapter for further processing and is ultimately deployed as a Serverless or Edge Function, depending on your adapter.
Benefits of hybrid rendering
Hybrid rendering is a game-changer for web developers, as it unlocks a host of new possibilities for building fast, scalable, and dynamic web applications. By mixing static and dynamic content together, developers can take advantage of the best of both worlds, improving the render and build performance of their web applications, and adding new functionality such as APIs to existing static sites.
Here are some of the benefits of using hybrid rendering in Astro:
Improved render performance of popular pages
With hybrid rendering, developers can choose to prerender the most popular pages of their website, ensuring that they load instantly for users. This is especially important for websites with high traffic or large numbers of visitors. By prerendering these pages ahead of time, developers can reduce server load and improve the user experience for their visitors.
The most used approach is to prerender landing pages, which usually receive most of the visits. This will give the fastest experience to any visitor “landing” on your website for the first time.
Adding an API to existing static sites
One of the biggest limitations of static websites is the lack of server-side processing, which can make it challenging to add dynamic functionality such as APIs. However, with hybrid rendering in Astro, developers can add an API to their existing static sites, enabling them to add complex functionality such as user authentication, shopping carts, and real-time updates.
Improved build performance of large sites
For large websites with many pages, building and deploying can become a time-consuming and resource-intensive task. With hybrid rendering, developers can choose to prerender only the pages that need it and leave the rest as static pages. This can significantly reduce build times and make it easier to manage and deploy large websites.
Following the example from above, sometimes we don’t want (or need) to prerender all our routes because this process is very time consuming, and therefore not so scalable in big projects. With hybrid rendering, we can still prerender only the pages that we want while the rest and any new pages would render as server routes, keeping the build time short while maintaining a great user experience.
More great articles from LogRocket:
In summary, hybrid rendering is a powerful feature that offers a range of benefits for web developers. By mixing static and dynamic content together, developers can build fast, scalable, and dynamic web applications that are optimized for both SEO and user experience.
How to implement hybrid rendering in Astro
To get started with hybrid rendering in Astro, we must first enable SSR (server-side rendering) features in development mode by setting the output configuration option to 'server' in the astro.config.mjs file:
import { defineConfig } from 'astro/config';

export default defineConfig({
  output: 'server'
});
Once SSR is enabled, any page or server endpoint that supports exporting variables can opt in to prerendering. These files will be statically rendered at build time, similar to the default static output mode.
To opt in to prerendering for a specific file, add the following line of code to the top of the file:
export const prerender = true;
Repeat this process for any additional pages or server endpoints that you want to enable for prerendering.
Finally, build your Astro project as you normally would:
> astro build
This will generate a mix of static and dynamic content in your project output, which can be served by your server. By taking advantage of hybrid rendering, you can improve the render and build performance of your web applications, and add new functionality such as APIs to your existing static sites.
Why we chose an ecommerce website example
Building an ecommerce website serves as a great example to test the feature of hybrid rendering. Let me explain why:
- The product, category, and search results pages usually require server-side rendering (SSR) because they need dynamic content from the server, such as product details, prices, and availability
- Pages such as the home, about, and contact pages can be pre-rendered using static site generation (SSG) because they typically contain static content that doesn’t frequently change
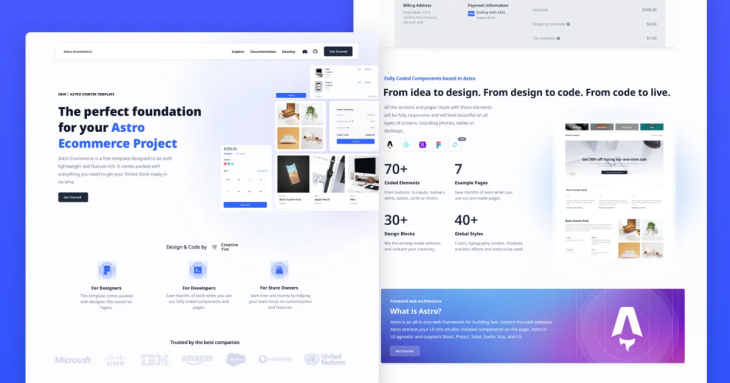
To speed things along, we are going to use the free, open source Astro Ecommerce demo site made by Creative Tim.
Inside the repository astro-ecommerce, we can find the following description for the project:
Introducing Astro Ecommerce, the ultimate starter template for your e-commerce web project. Built on Astro’s next-gen island architecture, Astro Ecommerce offers a sleek and modern design with a wide range of components and features to help you create a stunning online store.
To keep this demo short, I intentionally decided to leave the components of the starter as they are so that we can focus more on the process of hybrid rendering.
Project description
The project is going to consist of four pages:
- Landing page (hybrid): The first page visitors see, which captures attention and encourages exploration
- About Page (SSG): Provides information about your company, mission, and values. Builds trust with your audience
- Shop Page (SSR): Where visitors browse products and make purchases. Makes the shopping experience seamless and enjoyable
- Product Page (SSR): Provides detailed information about a specific product and persuades the visitor to make a purchase
To simulate a “real” ecommerce site, I used DummyJSON to get a list of products and categories. To get the list of products, we can directly call https://dummyjson.com/products API.
The output looks like this:
{
  "products": [
    {
      "id": 1,
      "title": "iPhone 9",
      "description": "An apple mobile which is nothing like apple",
      "price": 549,
      "discountPercentage": 12.96,
      "rating": 4.69,
      "stock": 94,
      "brand": "Apple",
      "category": "smartphones",
      "thumbnail": "...",
      "images": ["...", "...", "..."]
    },
    {...},
    {...},
    {...}
    // 30 items
  ],
  "total": 100,
  "skip": 0,
  "limit": 30
}
Here is the list of all the APIs that we’ll use in the project:
export interface ProductList {
  products: Product[];
  total: number;
  skip: number;
  limit: number;
}

export interface Product {
  id: number;
  title: string;
  description: string;
  price: number;
  discountPercentage: number;
  rating: number;
  stock: number;
  brand: string;
  category: string;
  thumbnail: string;
  images: string[];
}

const toJson = (res: Response) => {
  if (res.status === 404) {
    return undefined;
  }

  return res.json();
};

export const fetchProducts = (category?: string): Promise<ProductList> => {
  const categoryPath = category ? `/category/${category}` : '';
  return fetch(`https://dummyjson.com/products${categoryPath}`).then(toJson);
};

export const fetchSalesProducts = async (): Promise<Product[]> => {
  const allProducts = await fetchProducts();
  return allProducts.products.filter(
    ({ discountPercentage }) => discountPercentage > 10,
  );
};

export const fetchCategories = (): Promise<string[]> =>
  fetch('https://dummyjson.com/products/categories').then(toJson);

export const fetchProduct = (id: string): Promise<Product> =>
  fetch(`https://dummyjson.com/products/${id}`).then(toJson);

export const fetchCategoryImage = async (category: string) => {
  const { products } = await fetchProducts(category);
  return products[0].thumbnail;
};

// DummyJSON doesn't provide any testimonials or reviews API, this one is going to be locally mocked.
export const fetchTestimonials = () =>
  Promise.resolve([
    {
      text: "I recently purchased a dress from this online store and was blown away by the quality and fit. It was even better than I expected and I received so many compliments when I wore it. I'll definitely be back for more!",
      source: 'Sarah D.',
    },
    {
      text: 'I was hesitant to order a piece of furniture online, but the team at this online store made the process so easy and hassle-free. The item arrived on time and in perfect condition, and it looks amazing in my home. I highly recommend this store for their excellent customer service and high-quality products.',
      source: 'John P.',
    },

    {
      text: "I'm always on the lookout for the latest tech gadgets, and this online store has an amazing selection. I ordered a new smartwatch and it arrived quickly and was exactly what I was looking for. The prices are also very competitive, so I know I'm getting a great deal. I'm already browsing their site for my next purchase!",
      source: 'Emily R.',
    },
  ]);
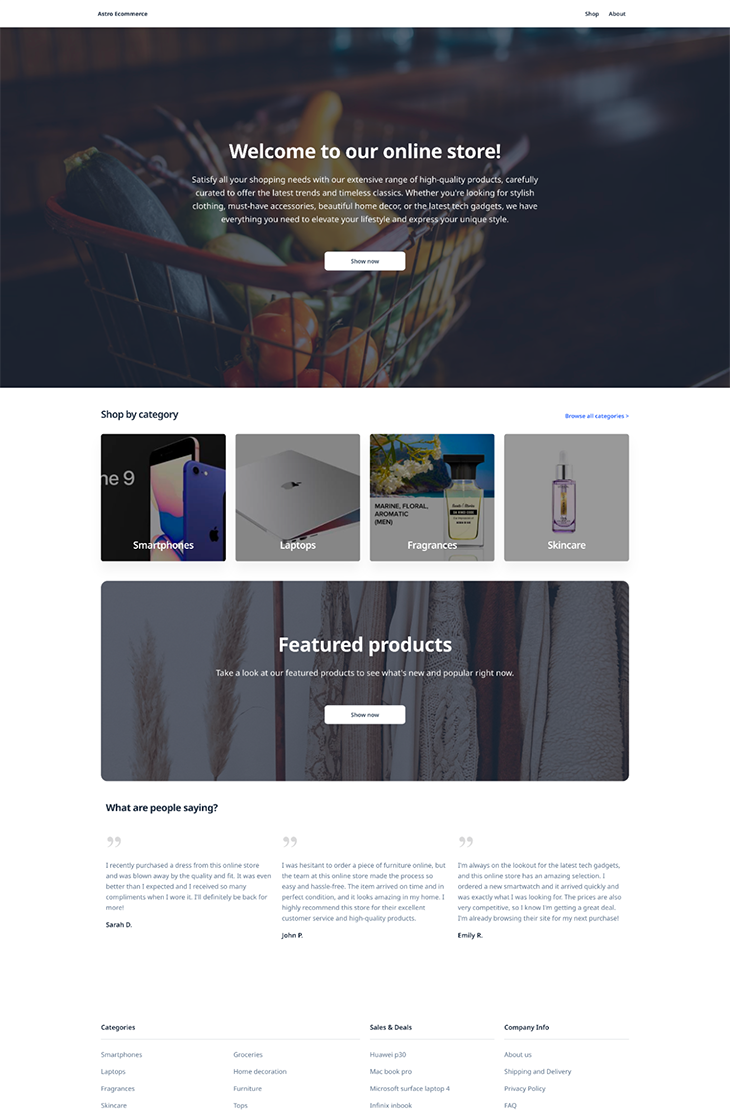
Rendering the Landing page
Let’s go page by page, starting with the Landing page, which we defined at /pages/index.astro. It displays general information about the store, the main shopping categories, and a list of customer reviews.
All of the page information comes from the API module defined above. This page uses hybrid rendering because the content won’t change frequently.
---
import humanize from 'humanize-string';

import Layout from '../layouts/Layout.astro';

// Components from the starter
import Testimonials from '../components/Testimonials.astro';
import CardCategory from '../components/products/cardCategory';
import PromoSectionLarge from '../components/promo/promoSectionLarge';

// Data coming from DummyJSON
import {
  fetchCategories,
  fetchCategoryImage,
  fetchTestimonials,
} from '../api/products';

// Setting SSG for this page!
export const prerender = true;

const categories = (await fetchCategories()).slice(0, 4);
const images = await Promise.all(categories.map(fetchCategoryImage));
const testimonials = await fetchTestimonials();
---

<Layout title="Landing Page">
  <main>
    <PromoSectionLarge
      title="Welcome to our online store!"
      full_description="Satisfy all your shopping needs with our extensive range of high-quality products, carefully curated to offer the latest trends and timeless classics. Whether you're looking for stylish clothing, must-have accessories, beautiful home decor, or the latest tech gadgets, we have everything you need to elevate your lifestyle and express your unique style."
      pageHeaderBgImg="https://images.unsplash.com/photo-1441123285228-1448e608f3d5?ixlib=rb-4.0.3&ixid=MnwxMjA3fDB8MHxwaG90by1wYWdlfHx8fGVufDB8fHx8&auto=format&fit=crop&w=2670&q=80"
      pageHeaderMinVh="90vh"
    />

    <div class="container my-5">
      <div class="d-flex justify-content-between align-items-center mb-4">
        <h4>Shop by category</h4>
        <a class="text-primary text-sm font-weight-bold" href="http://blog.logrocket.com/shop"
          >Browse all categories {'>'}</a
        >
      </div>
      <div class="row mb-5">
        {
          categories.map((category, i) => (
            <div class="col-md-6 col-lg-3">
              <a href={`/shop?category=${category}`}>
                <CardCategory
                  thumb_src={images[i]}
                  title={humanize(category)}
                />
              </a>
            </div>
          ))
        }
      </div>

      <PromoSectionLarge
        title="Featured products"
        full_description="Take a look at our featured products to see what's new and popular right now."
        pageHeaderBgImg="https://images.unsplash.com/photo-1558769132-cb1aea458c5e?ixlib=rb-4.0.3&ixid=MnwxMjA3fDB8MHxwaG90by1wYWdlfHx8fGVufDB8fHx8&auto=format&fit=crop&w=2274&q=80"
        pageHeaderMinVh="50vh"
        pageHeaderRadius="1rem"
      />

      <div class="mt-5 mb-10">
        <Testimonials testimonials={testimonials} />
      </div>
    </div>
  </main>
</Layout>
Rendering the About page
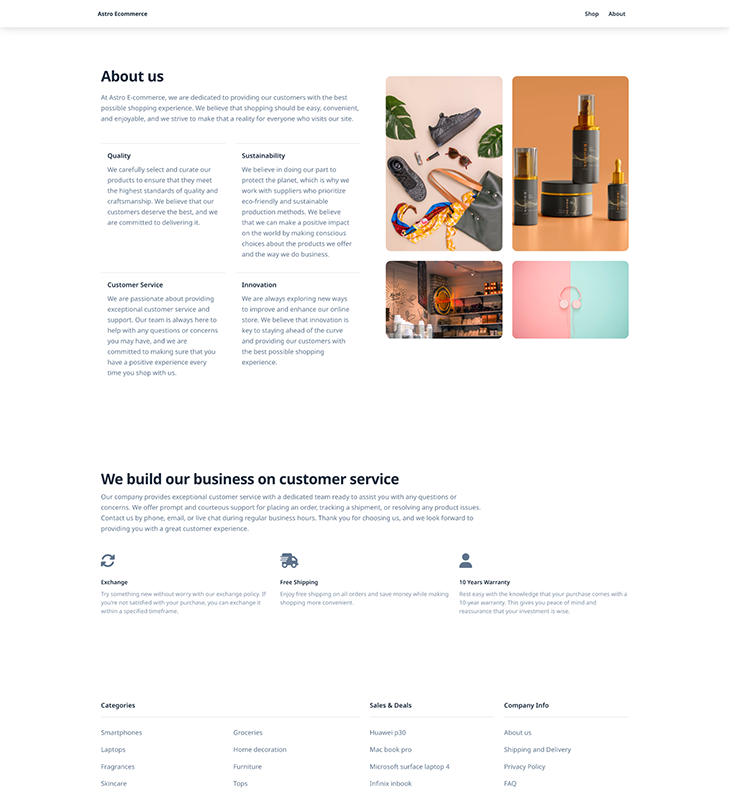
Let’s move on to the About page, defined at /pages/about.astro. It’s quite similar to the Landing page but even simpler, given that no information is required from external services. All of this page’s content is provided within the same page (and this can be improved by adding a CMS layer to the project).
Without hybrid rendering, the server must compute this page on every visit, when that is clearly not needed. By setting hybrid rendering for this page, we can process it at build time and serve the static site to our users, improving the speed drastically.
---
import Layout from '../layouts/Layout.astro';

// Components from the starter
import IncentiveLarge from '../components/incentives/IncentiveLarge.astro';
import ProductFeature from '../components/products/productFeature';

export const prerender = true;

const features = {
  Quality: `We carefully select and curate our products to ensure that they meet the
    highest standards of quality and craftsmanship. We believe that our customers
    deserve the best, and we are committed to delivering it.`,
  Sustainability: `We believe in doing our part to protect the planet, which is why
    we work with suppliers who prioritize eco-friendly and sustainable production methods.
    We believe that we can make a positive impact on the world by making conscious choices
    about the products we offer and the way we do business.`,
  ['Customer Service']: `We are passionate about providing exceptional customer service and support.
    Our team is always here to help with any questions or concerns you may have, and we are committed
    to making sure that you have a positive experience every time you shop with us.`,
  Innovation: `We are always exploring new ways to improve and enhance our online store. We believe
    that innovation is key to staying ahead of the curve and providing our customers with the best
    possible shopping experience.`,
};
---

<Layout title="Landing Page">
  <main>
    <div class="container my-5">
      <ProductFeature
        title="About us"
        full_description={`
          At Astro E-commerce, we are dedicated to providing our customers with the best possible
          shopping experience. We believe that shopping should be easy, convenient, and enjoyable,
          and we strive to make that a reality for everyone who visits our site.
        `}
        images={[
          {
            src: 'https://images.unsplash.com/photo-1511556820780-d912e42b4980?ixlib=rb-4.0.3&ixid=MnwxMjA3fDB8MHxwaG90by1wYWdlfHx8fGVufDB8fHx8&auto=format&fit=crop&w=1287&q=80',
            alt: 'photo of bag, sneakers, and sunglasses on beige surface',
          },
          {
            src: 'https://images.unsplash.com/photo-1627384113743-6bd5a479fffd?ixlib=rb-4.0.3&ixid=MnwxMjA3fDB8MHxwaG90by1wYWdlfHx8fGVufDB8fHx8&auto=format&fit=crop&w=1000&q=80',
            alt: 'black and gold calvin klein perfume bottle',
          },
          {
            src: 'https://images.unsplash.com/photo-1522682078546-47888fe04e81?ixlib=rb-4.0.3&ixid=MnwxMjA3fDB8MHxwaG90by1wYWdlfHx8fGVufDB8fHx8&auto=format&fit=crop&w=1000&q=80',
            alt: 'red and yellow Biscuits neon light signage hanged on gray brick wall',
          },
          {
            src: 'https://images.unsplash.com/photo-1524678606370-a47ad25cb82a?ixlib=rb-4.0.3&ixid=MnwxMjA3fDB8MHxwaG90by1wYWdlfHx8fGVufDB8fHx8&auto=format&fit=crop&w=1000&q=80',
            alt: 'white corded headphones',
          },
        ]}
        featuresDetails={features}
      />

      <div class="my-10">
        <IncentiveLarge
          title="We build our business on customer service"
          description={`
            Our company provides exceptional customer service with a dedicated team ready to assist
            you with any questions or concerns. We offer prompt and courteous support for placing
            an order, tracking a shipment, or resolving any product issues. Contact us by phone,
            email, or live chat during regular business hours. Thank you for choosing us, and we
            look forward to providing you with a great customer experience.
          `}
          items={[
            {
              icon: 'fa-sync-alt',
              title: 'Exchange',
              description: `Try something new without worry with our exchange policy. If you're not satisfied with your
                purchase, you can exchange it within a specified timeframe. `,
            },
            {
              icon: 'fa-shipping-fast',
              title: 'Free Shipping',
              description:
                'Enjoy free shipping on all orders and save money while making shopping more convenient.',
            },
            {
              icon: 'fa-user',
              title: '10 Years Warranty',
              description: `Rest easy with the knowledge that your purchase comes with a 10-year warranty.
                This gives you peace of mind and reassurance that your investment is wise.`,
            },
          ]}
        />
      </div>
    </div>
  </main>
</Layout>
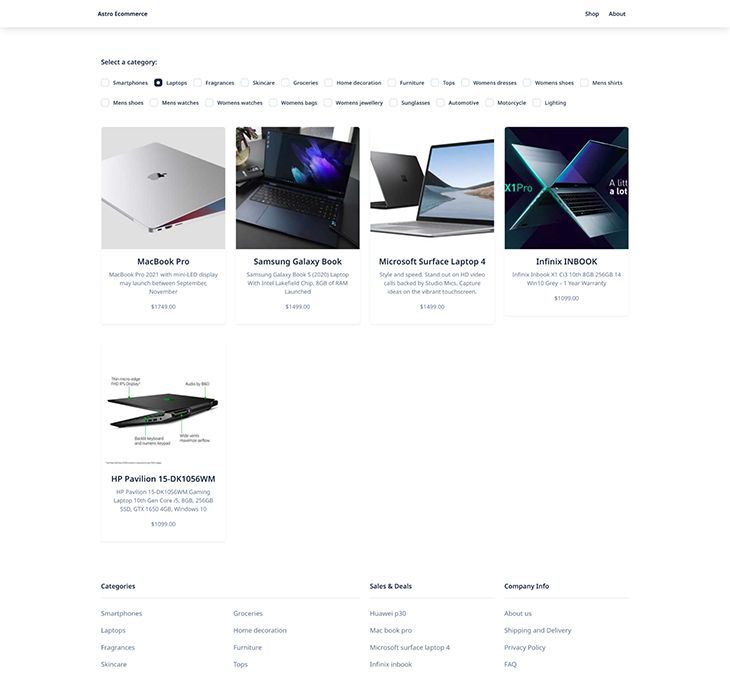
Rendering the Shop page
It can’t be an ecommerce without a Shop page, which we defined at /pages/shop.astro. Here, the user can query all the products available and filter by category.
This page can’t be treated as a static page, otherwise we’ll be forced to generate every possible result of a search with every combination of our different filters in advance. That’s a lot of unnecessary work! Plus, it doesn’t account for the chance that any time a product changes any attribute (price, quantity, category, etc.) we’d have to regenerate the results again.
---
import humanize from 'humanize-string';
import Layout from '../layouts/Layout.astro';

// Components from the starter
import CardProduct from '../components/products/cardProduct';

import { fetchProducts, fetchCategories } from '../api/products';

// Get selected category from query params
const currentCategory = Astro.url.searchParams.get('category') || '';

const categories = await fetchCategories();
const { products } = await fetchProducts(currentCategory);
---

<Layout title="Shop">
  <div class="container mt-5">
    <div class="row">
      <div class="mt-4 d-flex justify-content-between align-items-center">
        <h6 class="mb-0">Select a category:</h6>
      </div>
      <div class="d-flex flex-wrap text-center my-4">
        {
          categories.map((category, i) => {
            const checked = currentCategory === category;
            const route = checked ? '' : `category=${category}`;
            return (
              <div class="mb-3 me-3">
                <div class="form-check">
                  <input
                    class="form-check-input rounded-2"
                    type="radio"
                    name="flexRadioDefault"
                    checked={checked}
                    id={`check-` + category}
                    onclick={`window.location.assign('?${route}')`}
                  />
                  <label class="cursor-pointer" for={`check-` + category}>
                    {humanize(category)}
                  </label>
                </div>
              </div>
            );
          })
        }
      </div>
    </div>
    <div class="row">
      {
        products.map((product) => (
          <div class="col-md-6 col-lg-3">
            <CardProduct
              thumb_src={product.thumbnail}
              thumb_alt={product.title}
              title={product.title}
              description={product.description}
              price={product.price}
              position="center"
              href={`/product/${product.id}`}
            />
          </div>
        ))
      }
    </div>
  </div>
</Layout>
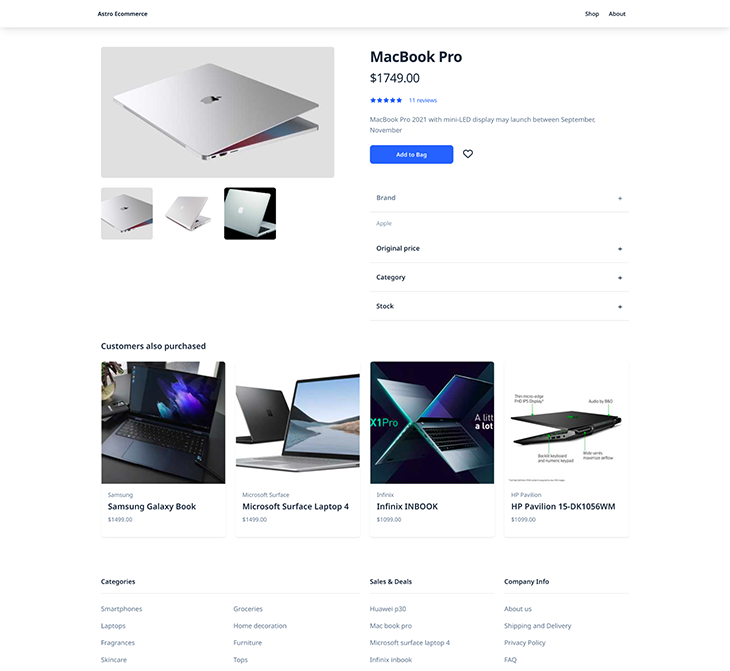
Rendering the Product page
Lastly, we have the Product page, located at /pages/product/[id].astro. This page is defined as a Dynamic route, where we can read the value for id defined in the URL. Once we obtain the id, we can fetch product details and other products that belong to the same category, to be displayed in a Related products section.
If we want to generate this page statically, we have to generate one page for each product in our ecommerce site, increasing the build time in a linear progression against the amount of available products — again, a lot of unnecessary work.
Therefore, because we want to build a project that scales over time, we should render this website on every request of the user with SSR.
---
import humanize from 'humanize-string';
import Layout from '../../layouts/Layout.astro';

// Componens from the starter
import ProductOverviewGallery from '../../components/products/productOverviewGallery';
import CardProduct from '../../components/products/cardProduct';

import { fetchProduct, fetchProducts } from '../../api/products';

// reading id from the url
const { id } = Astro.params;

if (!id) {
  return Astro.redirect('/404');
}

const product = await fetchProduct(id);
if (!product) {
  return Astro.redirect('/404');
}

const { products: categoryProducts } = await fetchProducts(product.category);
const relatedProducts = categoryProducts.filter(
  (related) => related.id !== product.id,
);

const data = {
  Brand: product.brand,
  'Original price': `Discount applied: ${product.discountPercentage}%.
  The original price was: $
  ${Math.floor(product.price / (1 - product.discountPercentage / 100))}`,
  Category: humanize(product.category),
  Stock: `${product.stock} available`,
};
---

<Layout title="Shop">
  <div class="container mt-5">
    <div class="my-5">
      <ProductOverviewGallery
        colors={[]}
        images={product.images.map((src) => ({ src, alt: product.title }))}
        title={product.title}
        full_description={product.description}
        price={product.price}
        rating={product.rating}
        reviews={Math.floor(product.discountPercentage)}
        data={data}
      />
    </div>

    <div class="row">
      <h5 class="mb-4">Customers also purchased</h5>
      {
        relatedProducts.map((related) => (
          <div class="col-md-6 col-lg-3">
            <CardProduct
              thumb_src={related.thumbnail}
              thumb_alt={related.title}
              color={related.brand}
              title={related.title}
              price={related.price}
              position="left"
              href={`/product/${related.id}`}
            />
          </div>
        ))
      }
    </div>
  </div>
</Layout>
Deploying our Astro site
In order to deploy an SSR website in Astro, we need to install a plugin for the deployment service that we want to use. For this case, I opted for Vercel, and we need to install the integration of @astrojs/vercel.
When building the website, we can see how Astro shows a special step when prerendering the Landing and About pages:
➜  astro-ecommerce-hybrid-rendering git:(main) ✗ yarn build
yarn run v1.22.19
$ astro check && tsc --noEmit && astro build
astro check
07:30:02 PM [content] No content directory found. Skipping type generation.
✔  Getting diagnostics for Astro files in /Users/emanuel.suriano/Git/astro-ecommerce-hybrid-rendering/…
Result (10 files):
- 0 errors
- 0 warnings
- 0 hints

07:30:09 PM [content] No content directory found. Skipping type generation.
07:30:09 PM [build] output target: server
07:30:09 PM [build] deploy adapter: @astrojs/vercel/serverless
07:30:09 PM [build] Collecting build info...
07:30:09 PM [build] Completed in 194ms.
07:30:09 PM [build] Building server entrypoints...
07:30:17 PM [build] Completed in 7.82s.

 building client
Completed in 0.93s.

 prerendering static routes
▶ src/pages/index.astro
  └─ /index.html (+2.02s)
▶ src/pages/about.astro
  └─ /about/index.html (+0.89s)
Completed in 2.96s.

 finalizing server assets

07:30:21 PM [build] Rearranging server assets...
07:30:22 PM [build] Server built in 12.91s
07:30:22 PM [build] Complete!
✨  Done in 21.87s.
Something interesting to take a look at is how the output folder looks after the build finishes. Vercel requires a structure where all the static content is included inside a folder called static, while the server routes are defined inside the functions folder. For the case of our demo application, the file structure looks this:
➜  output git:(main) ✗ tree -l 10 --ignore 'node_modules'

▁ /astro-ecommerce-hybrid-rendering/.vercel/output
├── config.json
├── functions
|  └── render.func
|     ├── dist
|     ├── package.json
|     └── src
|        └── pages
|           ├── product
|           |  └── [id].astro
|           └── shop.astro
└── static
   ├── _astro
   ├── about
   |  └── index.html
   ├── data.json
   ├── favicon.svg
   ├── header-blue-purple.jpg
   └── index.html

directory: 53 file: 144

ignored: directory (1)
Feel free to check out the application running in Vercel. You can find all the source code in GitHub, under the repository astro-ecommerce-hybrid-rendering.
Last words
Hybrid rendering in Astro offers developers the best of both worlds when it comes to building fast, scalable, and dynamic web applications. By combining the benefits of static site generation (SSG) and server-side rendering (SSR), developers can improve performance, reduce server load, and provide a better user experience.
With the ability to prerender popular pages, improve build performance, and add APIs to existing static sites, hybrid rendering is one of the best features in the latest Astro release.
I hope this article has been helped you gain a better understanding of Astro 2.0 and its hybrid rendering capabilities. Whether you’re a seasoned web developer or just starting out, Astro 2.0 is something to keep in mind. Its intuitive syntax, fast rendering speeds, and versatile toolset make it a valuable asset for any web project.
Are you adding new JS libraries to improve performance or build new features? What if they’re doing the opposite?
There’s no doubt that frontends are getting more complex. As you add new JavaScript libraries and other dependencies to your app, you’ll need more visibility to ensure your users don’t run into unknown issues.
LogRocket is a frontend application monitoring solution that lets you replay JavaScript errors as if they happened in your own browser so you can react to bugs more effectively.

LogRocket works perfectly with any app, regardless of framework, and has plugins to log additional context from Redux, Vuex, and @ngrx/store. Instead of guessing why problems happen, you can aggregate and report on what state your application was in when an issue occurred. LogRocket also monitors your app’s performance, reporting metrics like client CPU load, client memory usage, and more.
Build confidently — Start monitoring for free.
Source link